Dick Axtell
|
| posted on 18/1/05 at 05:16 PM |

|
|
Welding Jig
....for LOWER wishbones.
Yes, I know it's a long shot, just hoping someone's done some prep already.
TIA
Work-in-Progress: Changed to Zetec + T9. Still trying!!
|
|
|
|
|
nige
|
| posted on 18/1/05 at 05:36 PM |
|
|
wish bone jig
is this for fitting or fabbing up
either way we made ours out of 1" ply
when you start this journey
you think it will be done in " no " time but then " no " turns into a " bloody " long time
|
|
|
Dick Axtell
|
| posted on 18/1/05 at 08:48 PM |
|
|
quote:
Originally posted by nige
is this for fitting or fabbing up
either way we made ours out of 1" ply
For fabricating/welding.
How did you limit welding heat effects on the ply?
And have you any pics or drawings, of ur jig?
[Edited on 18/1/05 by Dick Axtell]
Work-in-Progress: Changed to Zetec + T9. Still trying!!
|
|
|
nige
|
| posted on 18/1/05 at 09:52 PM |
|
|
jig
didnt burn much
will dig it out and take some piccys
when you start this journey
you think it will be done in " no " time but then " no " turns into a " bloody " long time
|
|
|
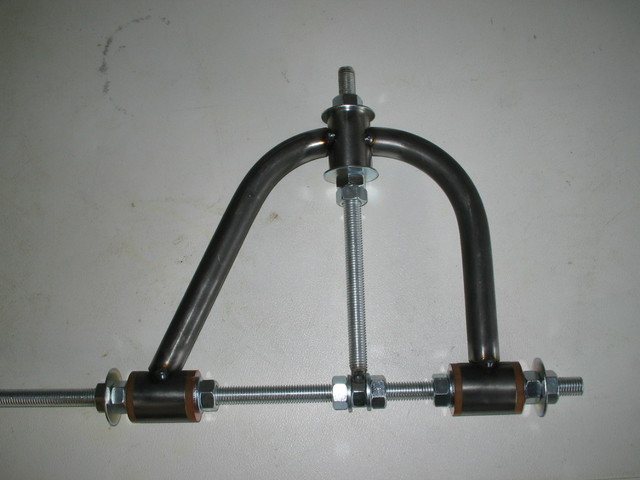
Mix
|
| posted on 19/1/05 at 09:59 AM |
|
|
I turned up two sets of dummy bushes from tufnol and using these and 12mm threaded rod set the width of the bone. A piece of 25x25 drilled at right
angle was threaded onto the rod between the buses and secured in the correct position by nuts and then the ball joint plate was clamped to this for
welding. Worked fine, made the upper bones in a similar fasion but used a second threaded rod welded to a nut and running at 90 degrees to the first
and a couple of dummy bushes to set the ball joint tube.
Hope this makes sense
Mick
|
|
|
nige
|
| posted on 19/1/05 at 08:33 PM |
|
|
jig
cant find bottom jig
but its much like top
laid bush tube,s in and pack arms up to centreline with welding rod
tacked up checked... turned over tacked put back in jig checked ... welded up
and rechecked ......... "job,s a good un"
p.s check my archive dick .... see your old nosecone
 
Rescued attachment jig3.JPG
when you start this journey
you think it will be done in " no " time but then " no " turns into a " bloody " long time
|
|
|
Dick Axtell
|
| posted on 20/1/05 at 11:09 AM |
|
|
Mix & Nige,
Thanks for the tips, and the pic. Now I need some 1" ply (or some old kitchen worktop??).
Reckon there will have to be some 90 deg brkts, for the centring rod, for mounting the bushing sleeves.
Cheers, guys!
Work-in-Progress: Changed to Zetec + T9. Still trying!!
|
|
|
Mix
|
| posted on 20/1/05 at 11:21 AM |
|
|
Dick
My method for the upper bones
Mick
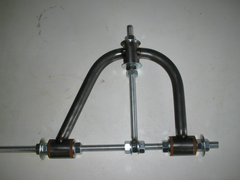 
Rescued attachment Locost pics 002.jpg
|
|
|