(been welding lots of these pipe clips together cause they're about 1.6mm thick
Rescued attachment 100_0734.JPG

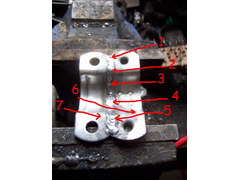
this look like a good weld to anyone else?
(been welding lots of these pipe clips together cause they're about 1.6mm thick
Rescued attachment 100_0734.JPG
Your weld technique need a bit of practice, the main problem is the brackets.
1, The initial start has been contaminated by the zinc coating, causing the crater in the weld, the power is a bit low causing the high weld pass
2, The zinc has been burnt away, the weld here is OK
3, The down hand section, the weld pass has built up due to insufficient power.
4, The zinc contamination has built up through the downhand section and 'exploded' out, you probably heard a pop
5, The weld pool is contaminated, and causing the weld pool to fire out causing the laps in the pass
6, This is the extent of the heat affected area
7, This HAZ area is much smaller showing that the torch angle was incorrect, and pointing to the right.
The brackets area zinc coated, and is causing you problems, try using 1/8" angle iron to practice on and turn the welder on full power until you
start blowing holes, adjust you technique to smooth out the welds and only turn down the power as a last resort.


Rescued attachment Binraker.jpg
Your welds show promise, keep practicing, ditch the zinc!!
My alternator bracket is made from 1/8" angle and I used 140A with 0.6mm wire.


Rescued attachment Alt Bracket3.jpg
im a bit limited as i am using a 100A fixed output arc welder (no mig, yet) and i have to do the weld in little stages or you end up with one blob of
slag on the floor. i just punch holes through the metal otherwise. ans i need to find/scroung or maybee at a push buy som metal to practice on.
but its a start
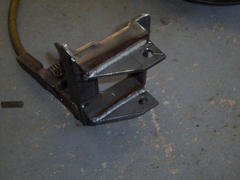
this is what i have to work with
Rescued attachment 100_0736.JPG
I arc welded some sections of my chassis for ease of access (you can bend rutile rods to anticipate the correct angle and you pass along the weld
path).
Keep the arc as tight to the weld as you can without causing it to stick, and make sure the rods are nice and dry before you start. Are you using 2mm
rods, if so going up to 2.5mm may pass more heat into the rod and make life a little easier
i have 1.6 and 2.5mm rods. the 2.5mm rods are very hard to strike
Mark,
I'd hate you to look at my welding! 
The words "Bird Shite" spring to mind when you see mine! Luckily for me (and everyone else) I bought my chassis! 

quote:
Originally posted by Northy
Mark,
I'd hate you to look at my welding!
 good comments though mark.
it's dead easy to criticise welds, I did it when I was teaching evening classes at the local tech, but unless you know the reason why you have a problem, you are not going to get over it. 99% of all weld problems are lack of amps, if you blow through when using the correct amps, its tecnique that it at fault. With a MIG just before you blow through, you will see the edges of the weld pool blur out into the parent metal, just trigger off for a split second and restart, you will reduce the temperature just enough to continue, as the pool is still moulten, there will be no sign that you paused. The same applies to arc, but it is more difficult, flick the rod away, and place it back QUICKLY, if you hesitate, the increased arc length will increase the heat and blow a bigger hole. If you find 2.5mm rods are sticking on startup, preheat them by attaching a piece of scrap onto your earth clamp and strike up on that first, then immediately transfer to the work - instant arc! but keep it CLOSE, the shorter the arc the better, and always try to arc weld uphill, the slag will run backwards and will peel away without the need of a slag hammer.
the slag will run backwards and will peel away without the need of a slag hammer. and land neatly in your boot melting holes in your sock  . In my
experience anyway. If you are not to a few inches of rod, cut the bigger ones in two till you get the hang of arcing up. We used to keep them in a box
with a lit 40w bulb to keep them dry.
[Edited on 13/9/04 by Peteff]
Mark, I take it by the lack of spatter on your bracket you use Argoshield and not straight CO2?
CO2 is for pumping beer only, Argoshield it was!
quote:
Originally posted by Peteff
the slag will run backwards and will peel away without the need of a slag hammer. and land neatly in your boot melting holes in your sock. In my experience anyway. If you are not to a few inches of rod, cut the bigger ones in two till you get the hang of arcing up. We used to keep them in a box with a lit 40w bulb to keep them dry.
If you have it just right, the slag will be a perfect female mould of the weld you have just produced, and will curl up about 2" behind the weld pool
[Edited on 13/9/04 by Peteff]
Ok Mark, think my nice cheap £12 a bottle CO2 refills are just going to go out of the window then, although I'll still keep a bottle by me for
welding up thin rusty road cars, I always find it better on the really thin stuff, but that clean finish you have in the photo just reminded me what
the welds I used to do looked like when I got paid for them in the past!!!!! (well, mine were nearly as nice anyway, but not quite )
)
Just one observation - you're making life hard for yourself trying to stick-weld such a strange shape.
Get yourself some offcuts of 3mm and 1.6mm mild steel plate, and some 25mm sq x 1.6 erw tube, and practice with that first.
Once you've made good-looking weld, beat the metal with a big hammer and try to break it (you'll be surprised...), then hacksaw across your
welds and look critically for slag inclusions, holes, and indications that the weld is going right through the thickness of the metal, without a great
big blob hanging on the other side from the weld.
My biggest hint though is to find a friendly skilled welder - first, watch how he does it (I found it very useful to see the speed at which he moved
the stick across the work - i.e. slow) and then let him watch you. You'll learn more in 1/2 hour than you'll ever learn playing around by
yourself.
Oh... one more thing... make sure your welding rods are REALLY dry. The difference between a bone-dry rod and one at 'garage humidity' is
remarkable. When you're not welding, keep your rods in the airing cupboard - my local college has a special box with a lightbulb in the bottom
to keep theirs dry.
Happy welding!
David
[Edited on 14/9/04 by David Jenkins]
.......is also recomended.
I weld on rare ocasions, and have found that baking the rods in a 250-300f oven for an hour or two prior to using makes a huge difference.
quote:
Originally posted by The Shootist
.......is also recomended.
I weld on rare ocasions, and have found that baking the rods in a 250-300f oven for an hour or two prior to using makes a huge difference.
just cooked some 1.6mm rods and they work much better and tryed prestriking the 2.5mm rods and they dont punch through at all. still need some non galvy stock to play with. keep welding a bit and going away to let it cool and to let the zinc fumes clear. before i see how ive done
quote:
Originally posted by Mark Allanson
quote:
Originally posted by The Shootist
.......is also recomended.
I weld on rare ocasions, and have found that baking the rods in a 250-300f oven for an hour or two prior to using makes a huge difference.
When working in the dockyard, we used to have heated quivvers to store the 8mm rods we were using (you want to see the size of a spatter ball you can make with one of those!!!)
The amps used were variable between 500 and 700A, there was a gismo in the welder which sampled the load and adjusted the amps. The welding transformers were on the dock and we were in the hold, a 15 min walk to adjust the controller - I think not! A bit dangerous really, if you got the cables wrong, they could pull you off the gantry VERY HEAVY
quote:
Originally posted by binraker
j...let it cool and to let the zinc fumes clear
quote:
Originally posted by David Jenkins
quote:
Originally posted by binraker
j...let it cool and to let the zinc fumes clear
Watch out for the zinc fumes! They can make you feel VERY unwell, rather like severe flu.
David