2cv
|
| posted on 29/10/10 at 06:09 PM |

|
|
Making an Aluminium Side Vent, Step-by-Step Pics
The kind of thing I've got in mind is a teardrop surround with an aluminium mesh infill. This might not look out of place on the side of a Fury
bonnet.
If one or two of you are interested, I'll be pleased to start another step-by-step thread.
[Edited on 30/10/10 by 2cv]
|
|
|
|
|
bitsilly
|
| posted on 29/10/10 at 06:25 PM |
|
|
I'll need to come up with something to fill the air filter hole in the top of my Phoenix bonet soon.
Please count me in.
Cheers
|
|
|
2cv
|
| posted on 29/10/10 at 06:33 PM |
|
|
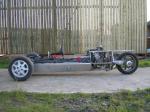
Something like this perhaps?
[img]
 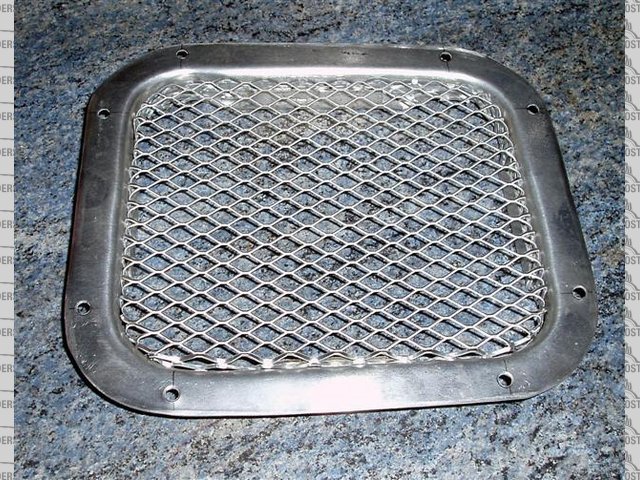
Description
[/img]
or this?
[img]
 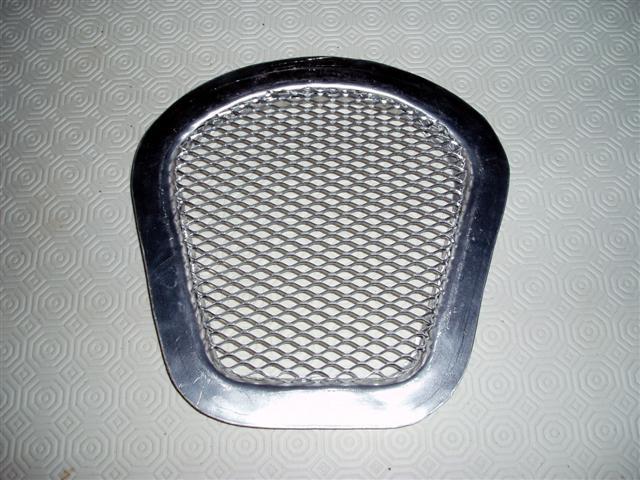
Description
[/img]
[Edited on 29/10/10 by 2cv]
|
|
|
FFTS
|
| posted on 29/10/10 at 07:10 PM |
|
|
I would love to see how they are made 
Chris.
|
|
|
matt_gsxr
|
| posted on 30/10/10 at 08:33 AM |
|
|
Ed,
For my Phoenix bonnet I also needed to fill a hole (ex-RGB racer)
I used one of these: from http://www.m-99.co.uk/Car_Bodykits/Bonnet_Air_Vents/bonnet_air_vents.html

Here it is unpainted,

And just after a bit of painting (pre SVA and stuff)

I mounted it from underneath and it wasn't difficult to get a reasonable finish (this was the first time I had done this sort of thing, so it
took quite a lot of time for filling and sanding nearly all the filler away).
Matt
|
|
|
2cv
|
| posted on 30/10/10 at 04:47 PM |
|
|
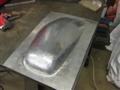
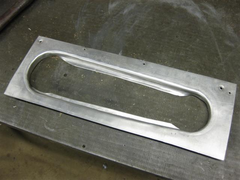
The first thing is to decide on the shape of the surround and then cut it out of a piece of ply. I used 12mm thick material. The same profile but
about 10mm larger all the way round is cut from a second piece of ply.
I used 18 gauge pure aluminium. Using hole saws, I cut out each end about 12mm smaller in radius than the equivalent radii in the ply. The straight
sides were 24mm inside the the straight sides of the ply. I annealed each end of the aluminium in the areas that would stretch the most.
[img]
 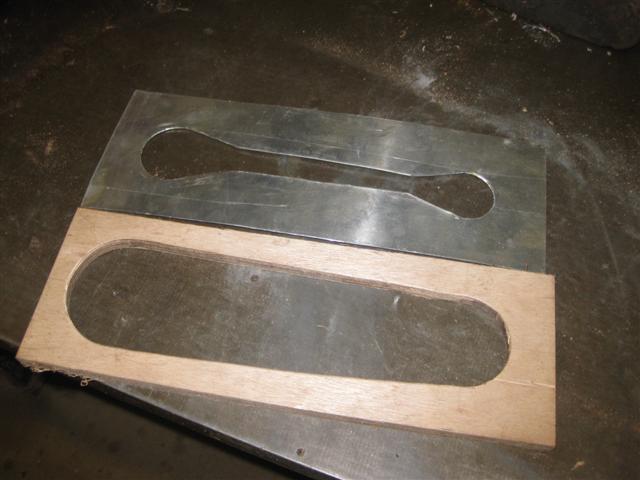
Description
[/img]
The aluminium was sandwiched between the two pieces of ply.
Description
[Edited on 30/10/10 by 2cv]
[Edited on 30/10/10 by 2cv]
[Edited on 30/10/10 by 2cv]
|
|
|
2cv
|
| posted on 30/10/10 at 04:53 PM |
|
|
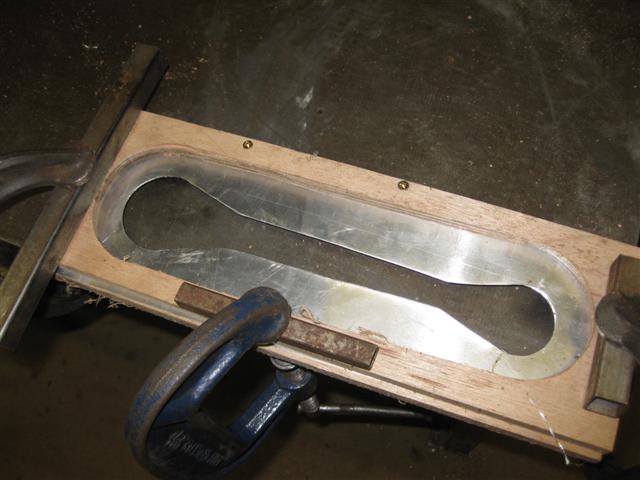
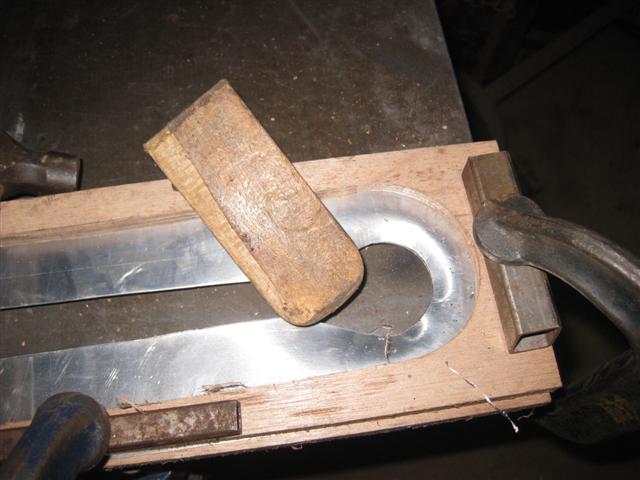
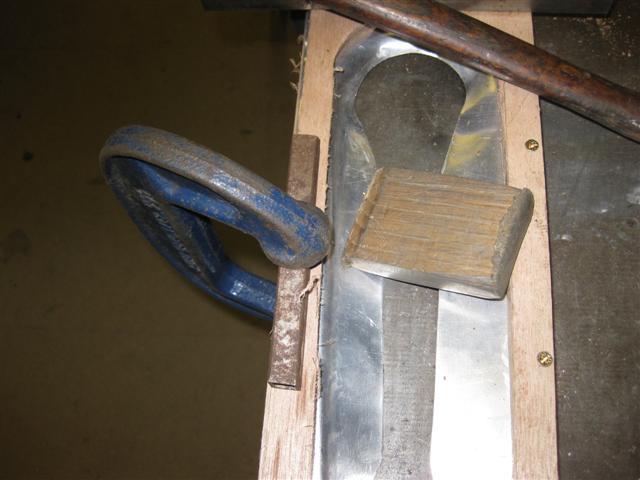
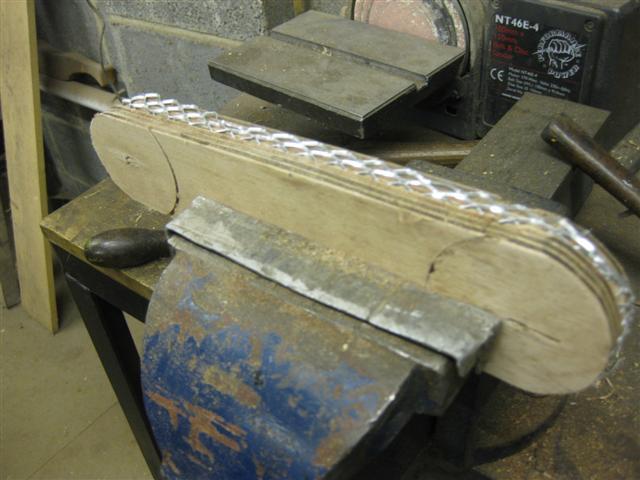
I used a piece of hardwood with a radius cut to match those on the aluminium to carefully tap the aluminium down at right angles. A straight edged
piece of hardwood was used for the sides.
[img]
Description
[/img]
[img]
Description
[/img]
[img]
Description
[/img]
[Edited on 30/10/10 by 2cv]
|
|
|
2cv
|
| posted on 30/10/10 at 04:56 PM |
|
|
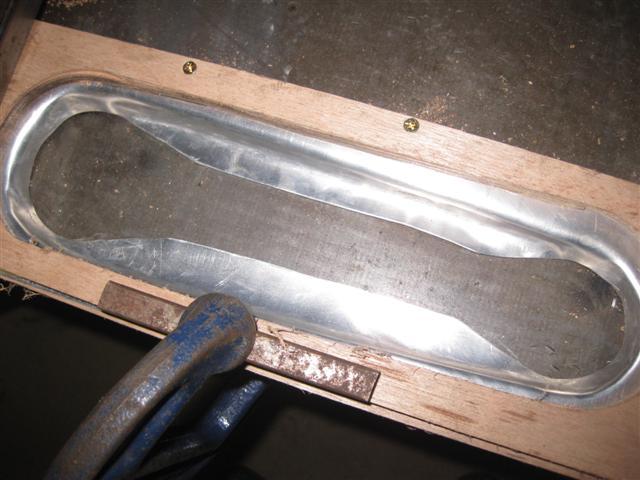
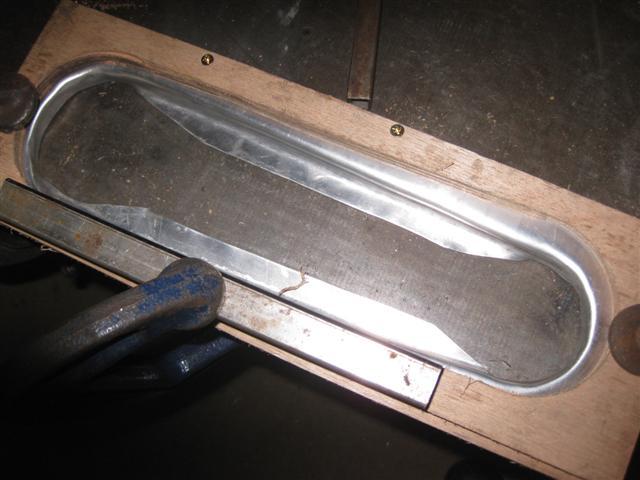
As you can see, the sides bent again when they came into contact with the bench.
[img]
Description
[/img]
The aluminium was removed from the plywood pattern and the two "Flanges" trimmed back a bit.
[img]
Description
[/img]
|
|
|
2cv
|
| posted on 30/10/10 at 05:05 PM |
|
|
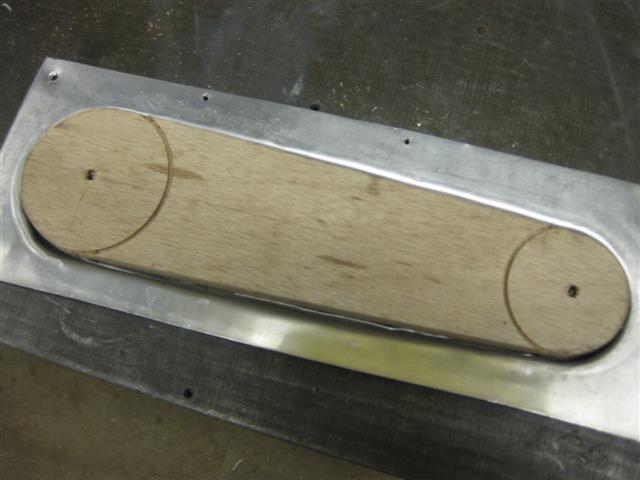
As I've mentioned before, once you have broken the line, you can tap the aluminium over and it will bend on the line. I've just realised
that there is no picture of the flanges which I bent upwards. Sorry!
Using the pieces of ply which were cut out from the centre, they were trimmed down so that they fitted with a gap, into the formed aluminium
surround.
Description
The aluminium mesh was trimmed to be about 10mm wider all round than the ply pattern.
[img]
Description
[/img]
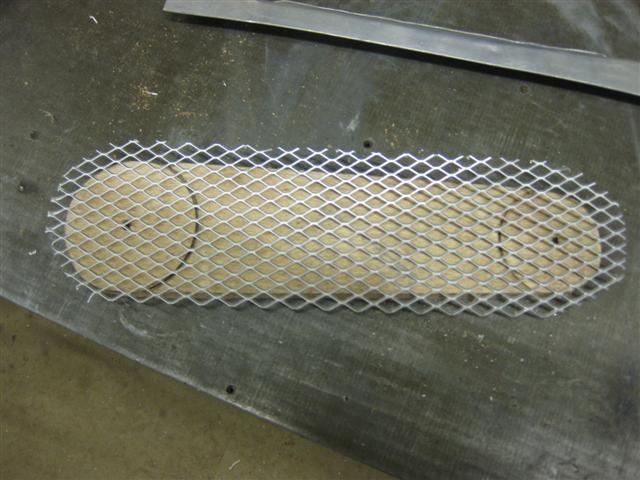
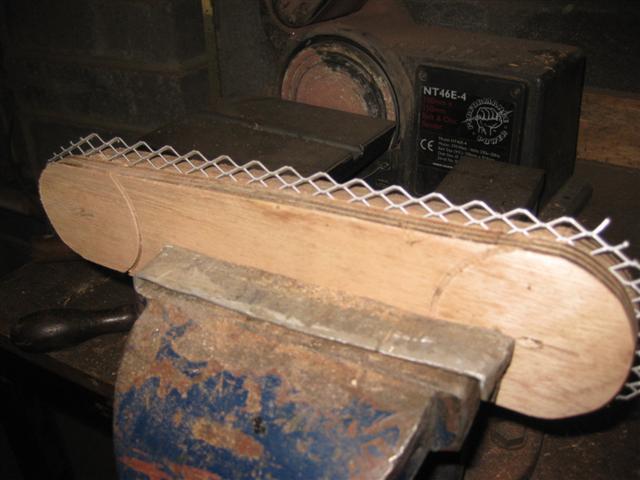
The mesh was sandwiched between the two pieces of ply and formed as shown
[img]
Description
[/img]
[img]
Description
[/img]
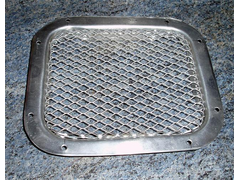
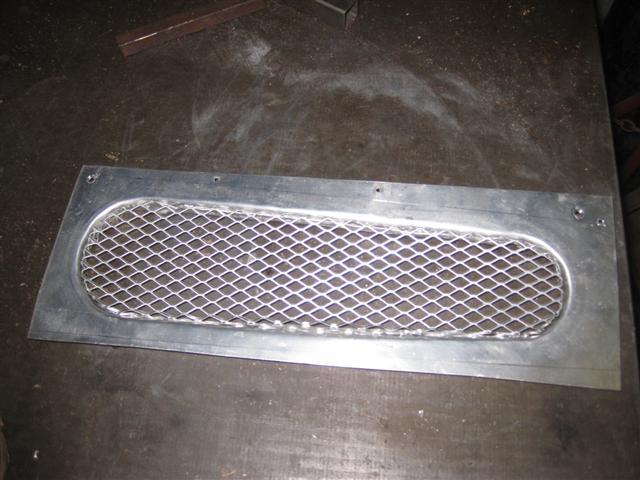
The mesh was then inserted into the surround
[img]
Description
[/img]
[Edited on 30/10/10 by 2cv]
|
|
|
2cv
|
| posted on 30/10/10 at 05:12 PM |
|
|
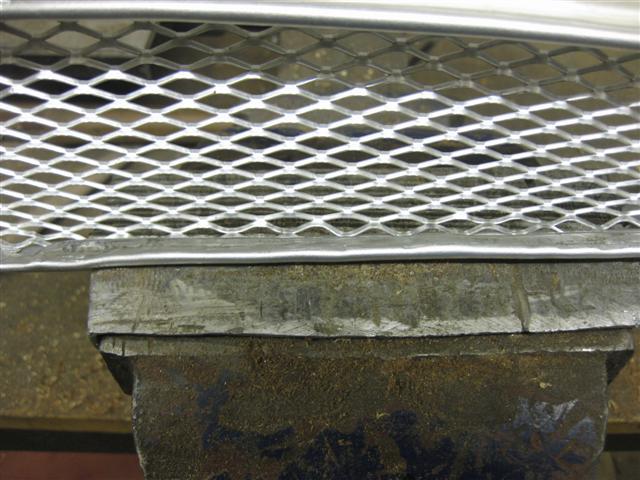
The mesh was clamped in position by crimping using a cross pein hammer
[img]
Description
[/img]
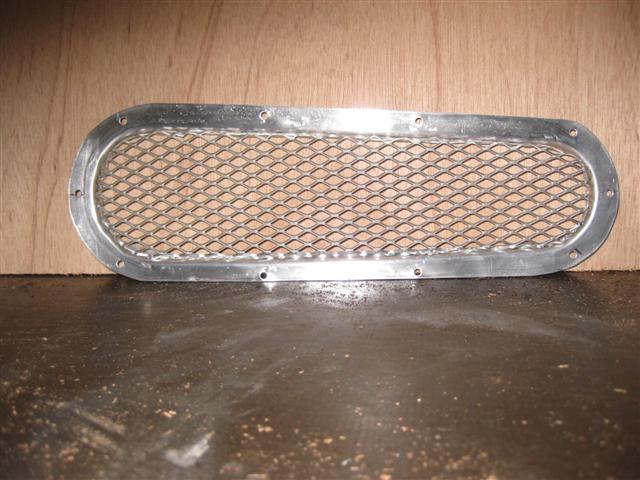
Lastly the flange was trimmed and 4mm mounting holes punched.
[img]
Description
[/img]
|
|
|
Fred W B
|
| posted on 30/10/10 at 05:16 PM |
|
|
Very nice work, with an excellent result.
Cheers
Fred W B
You can do it quickly. You can do it cheap. You can do it right. Pick any two.
|
|
|
2cv
|
| posted on 30/10/10 at 06:07 PM |
|
|
Thank you Fred, that's very kind of you.
This series of threads were a result of Razman's question about bending steel square tube which got me thinking about what other, on the face of
it, "Difficult" parts could actually be quite easily made using just the normal hand tools that most of us have. So, Raz, see what
you've started!!
|
|
|
kipper
|
| posted on 30/10/10 at 09:10 PM |
|
|
I have to thank you for this mini series as I will be starting on the bodywork on my three wheeler soon and am inspired to incorperate some vents ,and
scoops for the rear mounted radiator instead of just holes.
I look forward to future additions .
Regards Denis.
Where did that go?
<<<<
|
|
|
2cv
|
| posted on 31/10/10 at 05:57 AM |
|
|
You are very welcome Denis, I'm really pleased that they have been of help to you and have, perhaps, removed some of the daunting aspect from
some people's concept of metal forming.
Producing these parts has been no hardship to me; it's something I really enjoy doing.
Thank you to everyone who has replied and to all of you who have taken the time to have a look at my threads.
John
|
|
|
MikeR
|
| posted on 31/10/10 at 11:12 AM |
|
|
Perhaps we could collect them all together, along with other peoples helpful posts and make a 'how to' section that - although i'd
suggest posts only made it into the how too section when admin moves them so it doesn't get full of non useful posts.
(i appreciate this means some work from fozzie and its not really fair to ask her to do this as well - just a suggestion cause i'd like others
to be able to read and benefit from these threads)
|
|
|
FFTS
|
| posted on 31/10/10 at 04:20 PM |
|
|
I would second MikeR's suggestion, what a great idea and thanks for sharing your knowledge
Chris.
|
|
|
TheGecko
|
| posted on 2/11/10 at 12:19 PM |
|
|
For my own reference purposes, I lumped all of the important content of these posts together as a document. There's a link to a .PDF version
{removed - see new link a few messages down}.
John (2cv) , let me know if this is an unacceptable derivative use of your work, and I'll get rid of it.
Dominic
[Edited on 3/11/2010 by TheGecko]
|
|
|
2cv
|
| posted on 2/11/10 at 12:53 PM |
|
|
Hi Dominic,
I'm absolutely delighted that you have taken the trouble to put all the threads together and that my humble efforts are of some use to you. Well
done that man!!
Best regards
John
|
|
|
2cv
|
| posted on 3/11/10 at 08:36 AM |
|
|
This and the other threads in the hammerform series were not planned, they resulted from a question asked by Raz about bending steel square tube to an
exact radius. I came up with a method that could be easily achieved using just hand tools and a bit of welding. This got me thinking about what other
components that are needed by Locosters that could also be made fairly easily using just hand tools. The power bulge was the first followed by
ventilation flutes, bonnet scoop and a side mounted grille.
Unfortunately each component has been covered by a separate thread making it difficult to find them once they slip down the table. This has been
addressed by Dominic who has taken the trouble to condense it onto a pdf file.
I know one or two of you are interested in making these parts and if it would make reference easier for you, I would be happy to re-write and re-post
the pictures of everything that I made under one thread. It may take a little time but I will do it if it would help.
Do let me know.
|
|
|
TheGecko
|
| posted on 3/11/10 at 12:02 PM |
|
|
John, thanks for permitting the collation of these threads. I've found them very helpful and educational and I'm sure many others have
too.
The original document (linked above) didn't have all of the articles (I'd forgotten about RazMan's original query) so I've
added those plus the "Side Scoops" articles.
The revised version is available here
(about 3.8M PDF file).
Everyone please feel to send me any typos etc that you find.
I'm inspired enough that there's now a couple of sheets of 12mm ply sitting in the workshop, about to be turned into hammerforms
Thanks again,
Dominic
|
|
|
2cv
|
| posted on 3/11/10 at 01:02 PM |
|
|
A great piece of work Dominic, you've gone to a lot of trouble to collate the threads and put them all under one roof as it were. I'm
particularly pleased as it will save me the job so thank you.
I'm also really pleased that you are going to have a go at metal shaping. It's wonderfully creative and completely absorbing so, be
warned!
I'm not sure about the rules on this forum for advertising but if you were ask if there are any videos available I'd probably be allowed
to tell you and there are a couple of excellent ones that I could recommend. Sounds daft but I don't want to offend the good people who run this
site.
John
|
|
|
TheGecko
|
| posted on 3/11/10 at 01:22 PM |
|
|
John,
I don't think there's any problem with you mentioning any product you've found useful - unless you will personally benefit form the
sale i.e. you have a commercial interest.
For reference I already have on DVD:
- "Bodywork Restoration Tutorial" by David Gardiner
- 3 discs by Peach & Tomassini (google for them if you haven't seen their work)
I also have (ahem) "alternative licences" [aka pirate copies  ] of several Ron Covell videos. ] of several Ron Covell videos.
I say, unless you're selling it yourself, post away
D
|
|
|
scudderfish
|
| posted on 3/11/10 at 01:23 PM |
|
|
Do you know of any good videos available? Any that you recommend?
|
|
|
2cv
|
| posted on 3/11/10 at 04:47 PM |
|
|
Do you know of any good videos available? Any that you recommend?
Funny you should ask that
Frosts still sell them in the UK and possibly will export too. On page 3 of DVD section @£16 each.
http://www.frost.co.uk/productList.asp
but if not direct from Fournier Enterprises
http://www.fournierenterprises.com/cart/product.php?productid=16138
Ron Fournier covers everything you need to know about metal shaping in great detail all in real time on a series of videos or I believe now, DVDs.
They really are inspirational. After he's spent a few minutes knocking seven bells out of a piece of ally over a shot bag it looks fit only for
the scrap bin. He then begins smoothing and you can see it take shape into a recognisable component as it happens. There is no cutting to "Here
is one I finished earlier" you actually see the whole process from start to finish. His gas welding coverage is equally good. Not cheap I know
but I bought the whole series of his videos which form the basis of my knowledge.
The other recommendation was the one mentioned by Dominic, the DVD by David Gardiner which shows what can be achieved with just hand tools.
Ron Covell again as mentioned by Dominic does some nice stuff and I believe he learnt from Ron Fournier.
Just to give you a bit of encouragement (not that you need any, I'm sure) one of the challenges I set myself on turning 60 was to learn the
skill of metal shaping and to be able gas weld aluminium. The other challenge I set myself was to become fluent in French. I've made some
progress with the former but struggling a bit with the latter!
[Edited on 3/11/10 by 2cv]
[Edited on 3/11/10 by 2cv]
[Edited on 3/11/10 by 2cv]:
[Edited on 4/11/10 by 2cv]:
[Edited on 4/11/10 by 2cv]
[Edited on 4/11/10 by 2cv]
|
|
|
T66
|
| posted on 6/11/10 at 04:15 PM |
|
|
Some inspiration to have a go myself ....
excellent post thank you !!
|
|
|