my roadster haynes, first stepalex89 - 21/5/13 at 07:56 AM
Hi everybody, i'm Alex from France and i'm a new locost builder. I started my project on 21th april 2013 with buying my donor car, a Sierra
2.0 ghia with carb and MT75 gearbox. The goal is to replace my current car for trackdays, a 205 Rallye 1988.
here's the Rallye (125hp, 164 N.m, 783kg)
I show you the Sierra:
about 236000 kms i think
the engine, a little bit big
the first time was to disassemble the car, three day later, the result:
just mi-full
i wanted to know if the wheels of my 205 Rallye trackday put on it well
toooo loonng !!!
a little bit heavy
the wire!
heavy!
before i was a Sierra
alex89 - 21/5/13 at 08:05 AM
so in parallel, i bought steel tube and installing the board.
for my motivation, i made my futur logo
the board, not well and i moved it after you'll see
but a vid�o call better than pics so...
i must weld all tubes now, see you later for some news.
kj - 21/5/13 at 08:16 AM
Nice looking sierra, are you keeping the original engine or up grading?
Nice work
Not Anumber - 21/5/13 at 08:29 AM
Donor car looked in good condition. You should hopefully be able to get some money back by selling the leather interior
alex89 - 21/5/13 at 09:35 AM
i sold the interior the last week, it bring me back some euros.
In the first time, i will keep the stock engine. Thereafter, i will try to install a TU engine (TU5JP from Peugeot) with the Mt75 gearbox, because
it's a small engine with a very good potential when it is transformed into turbo (about 300hp).
But my only wish would be to install a motorcycle engine, like hayabusa or 1400 ZZR or something else more lighter.
but first, i must to finish the first step.
designer - 21/5/13 at 11:46 AM
Where in France are you?
alex89 - 21/5/13 at 12:18 PM
quote:Originally posted by designer
Where in France are you?
i live in Saint s�rotin, Yonne (89)
omega0684 - 21/5/13 at 12:29 PM
Welcome to the forum! lots of great guys on here, it looks like you are making great progress and you have lots of space!
just a personal note, if that is the dohc engine then i would bin it straight away (they are poop! virtually zero tuning potential) and build the car
around the engine that you WANT in there! my donor was the dohc and the engine went straight away and replaced with a Pinto.
I will be keeping an eye on this build, looks like it could be an interesting one!
ATB
alex89 - 21/5/13 at 01:55 PM
quote:Originally posted by omega0684
Welcome to the forum! lots of great guys on here, it looks like you are making great progress and you have lots of space!
just a personal note, if that is the dohc engine then i would bin it straight away (they are poop! virtually zero tuning potential) and build the car
around the engine that you WANT in there! my donor was the dohc and the engine went straight away and replaced with a Pinto.
I will be keeping an eye on this build, looks like it could be an interesting one!
ATB
the DOHC is for the first build, next i will change the engine for a more lighter and more appreciate to me.
alex89 - 29/5/13 at 08:22 AM
ok, so i welded this part of chassis firstly, because I had to move it for working on my 205 Rallye
after that, I tacked the transmission tunnel (?)
then, I started the bracket of the steering column because I thought " three tubes are simple to put on", but in fact it was not at all the
case!
when I got this part I made the pic that everyone must do at this point of the construction
today I will made the rear portion. See you later
alex89 - 29/5/13 at 03:40 PM
so today I made the rear parts
more than 10 tubes cut and this will be the end of said tubes.
Blackhole - 5/6/13 at 09:39 PM
Do you use the book drawings or the ones for the LHD?
alex89 - 6/6/13 at 09:29 AM
i use all the drawings in the book, just reverse some parts, like U8 & U7, TT2 & TT3, TT9 & TT11, TT12 & TT10 and the steering bracket
assembly.
The MT75 can fit just like that with LHD.
alex89 - 7/6/13 at 02:38 PM
Sockets for the front and rear wishbones (free)
first parts arrive from laser cutting (thanks to my wife because it's her job and it's free to!)
Blackhole - 7/6/13 at 07:31 PM
how will you bend those brackets?
alex89 - 7/6/13 at 08:36 PM
it's a job of one of my friend so i 'll bring those parts to him next week.
[Edited on 8/6/13 by alex89]
alex89 - 9/6/13 at 05:45 PM
i want to know if wishbones discribed in the book are good in their dimensions?
alex89 - 14/6/13 at 06:04 PM
parts returned from bend
Slimy38 - 14/6/13 at 06:13 PM
quote:Originally posted by alex89
i want to know if wishbones discribed in the book are good in their dimensions?
there are revised rear wishbone measurements. Along with a whole load of other changes that have already caught me out... alex89 - 14/6/13 at 06:27 PM
in my book there are the same wishbone measurements.
alex89 - 9/7/13 at 08:29 AM
the new place for the Sierra...
and installing the bracket front wishbone. Problems appeared at the center of bracket and i changed some tubes that is symmetrical on each side,
that's why you see some small plate between tubes and bracket.
alex89 - 1/11/13 at 06:16 PM
some update
the rear area:
the hand-brake bracket
bracket rear wishbones
engine mount
you know what is it
in place
with a friend who is constructing the same kitcar, we draw on computer all plates needed for the frame, printing on stick-paper, cutting them and this
the result:
some pics that i can explain with my poor english
back view
side view
the wiring loom just for start the engine and it works, just to finish it now
the parts for ... rear hub? (i'm not sure for the name)
and the first wishbone homemade because it's priceless
see you soon
[Edited on 1/11/13 by alex89]
mark chandler - 1/11/13 at 09:05 PM
Looks great Alex
Only one small problem that I can see, you have the steering wheel on the wrong side
Once welded and clad you will have a nice car.
alex89 - 2/11/13 at 09:32 AM
thanks a lot Mark.
the side is the good one , not because i'm in France but only because i am disabled with the left hand (no rotation), implying that shift
gears can be done with my right hand only.
I still have many things to finish before she already looks like a simple car.
[Edited on 2/11/13 by alex89]
[Edited on 2/11/13 by alex89]
RichardK - 2/11/13 at 11:06 AM
Hi Alex some great progress there and nice quality, you are very lucky to have a wife that laser cutting!
Cheers
Rich
alex89 - 6/11/13 at 06:29 AM
thank's a lot.
I am also lucky because she leaves me hours in the garage, she is very tolerant.
alex89 - 9/11/13 at 02:54 PM
manufacturing of the pedalbox
cut bushes
Ludo(a friend) had cut pedals, I just delivered a blow on the edge so that it is perpendicular to the faces.
implementation for perpendicular
a little bit hot
3 pedals welded , I also cut more rectangles of hardened stainless steel pedals (I have great poo to get in shape by following the way!)
manufacturing bushes erthalon to serve axis (6 for me and 6 for Ludo )
meanwhile , manufacturing support bracket.
and all mounted, not finish but i approch the end , and then paint.
Proby - 9/11/13 at 03:18 PM
Excellent progress Alex, looking great.
davidimurray - 9/11/13 at 05:36 PM
Great looking build.
You may want to add a stiffening rib up the side of the clutch and accelerator pedal. I bent my clutch pedal over easily as designed but a little 3mm
rib on one side has made it nice and stiff.
alex89 - 9/11/13 at 05:39 PM
quote:Originally posted by davidimurray
Great looking build.
You may want to add a stiffening rib up the side of the clutch and accelerator pedal. I bent my clutch pedal over easily as designed but a little 3mm
rib on one side has made it nice and stiff.
thanks for the tips!
baz-R - 12/11/13 at 08:55 AM
looking good and keep up the good work
check the cam chain on that twincam 8v engine if your going to use it i have repiared quit a few over the years
Not Anumber - 12/11/13 at 12:29 PM
Excellent work.
alex89 - 4/3/14 at 08:16 AM
some news
all we need to make the rear hub carriers
preparation of template
done!
all wishbone bushes for me and ludo
fabrication, welding and painting wishbones
some other parts
GAZ shoks
just for the picture
I made the mushroom strut plug but i don't know if it's good, telle me if i must change them.
closer
mounting blank
at the back, I had noticed that I had made a mistake on the positioning of the upper wishbones, and assembly of these largely confirm my mistake ...
we could believe ...
...but no!
see it later...
quickly as I started my drive shaft via a shaft Sierrra diesel. Did not have time to make my turner a spacer, I made a following with the means at
hand, there was 0.5mm to eat
result
see you later
[Edited on 4/3/14 by alex89]
samjc - 4/3/14 at 10:16 AM
Taking orders on the pedal setup haha looks great.
alex89 - 5/6/14 at 08:24 PM
Hey guys, here some news, and some great news, i must to show you!
2 wheels on the ground
Some modifications
And 4 wheels down at least
Futur problem...
Daft fuck! lol!
Body kit arrived, some modification are needed
Just for the picture
alex89 - 5/6/14 at 08:34 PM
Free exhaust from my brother, and a steering from 605 peugeot
I love this, you have put great workmanship into it. I only ask, why the diesel engine?
big_wasa - 19/8/14 at 06:11 PM
Diesel ? that's fords 2.0 dohc 8v petrol lump as fitted to late Sierra's / Granada's.
YODI - 19/8/14 at 08:59 PM
Thats what I meant mate, honestly lol
alex89 - 20/8/14 at 06:24 PM
Same power as a diesel engine, same noise, but it's for the begining, don't worry, the futur engine will be more than 200 bhp(i hope 250!),
for just a 1.6 l.
[Edited on 20/8/14 by alex89]
alex89 - 20/8/14 at 08:33 PM
I bought a hydrolic tube bender
My son must to learn...
This is my rollcage "road test". Not finish.
Welding tube for seats and aluminium floor panel
alex89 - 20/8/14 at 08:43 PM
It's raining a lot in France so i made some stuff
Cycle wing bracket and cut it for an agressive look
Put the rear muddgards
There's a lot of space between the tyre and the muddguard, i can install larger tyre later.
bad ass! 1,73m!
No courage for the second cycle wing...
alex89 - 22/8/14 at 09:34 PM
The left cyclewing is not at the same height but it's easy to replace it
The end is near(just missing seats, harness, paint, panel...)
coozer - 23/8/14 at 08:01 PM
Looking good, quick progress.
How thick was the roll cage tube? I thought that kind of pipe bender would crease the inside of the bend?
alex89 - 29/8/14 at 07:58 AM
It's 3mm thick. A little d�formation but that's not important because this rollcage is for my road test, and i will not be often on the road
with.
Looks great! My first drive was to the SVA test centre in London. Yours looks a lot less stressful!
alex89 - 27/12/14 at 03:42 AM
some update. I made bodywork few time ago. I'm very sad about the result: waves, deformations, the hood not fit as well as i wanted. That's
not my job, and the result is bad.
So i bought the new engine, a ZX12R. Over 700kms to get the motorbike but it was a good trip (lot of rain, wind, no power with the BMW...)
180hp, about 50kg win, it will be a good evolution.
i found new wheels on 6x13 ET16, it is good for the front but i need an offset ET0 or ET10 for the rear(if anyone know where i can find a pair).
[Edited on 27/12/14 by alex89]
alex89 - 12/1/15 at 08:07 PM
Some stuff
sprocket adaptator and sump plate
alex89 - 4/5/15 at 07:04 PM
some update
intake airbox finish
roll cage home made
alex89 - 28/7/15 at 08:27 PM
some paint
there it is!
air box not sure if i'll put a hoodscoop
not finished yet, but it comes.
alex89 - 29/7/15 at 06:15 PM
final shot
40inches - 29/7/15 at 07:07 PM
1st class job.
Badger_McLetcher - 29/7/15 at 09:22 PM
Shiney
v8james - 30/7/15 at 03:58 PM
Nice build.
How did you bend the pipe for the rollcage with that pipe bender without kinking it?
alex89 - 30/7/15 at 08:31 PM
quote:Originally posted by v8james
Nice build.
How did you bend the pipe for the rollcage with that pipe bender without kinking it?
thanks a lot
I put thick sand inside tubes. Not easy to do but the result is here.
alex89 - 30/7/15 at 08:32 PM
Nice job there Alex, nothing like driving what you've built. Enjoy!
Steve
alex89 - 16/1/16 at 06:39 PM
thanks a lot. that's right, it's such a good feeling to drive in.
yesterday was adjusting the geometry.
Otherwise my chassis is not that bad , there is default, but it's still very acceptable.
alex89 - 13/3/16 at 02:12 PM
Yesterday was my first trackday with my Haynes. 2 and a half years of work that I hoped, will give me pleasure and not pain.
Day organized by the Gentlemen Drivers with whom I did a lot of trackday with the 205 Rallye.
But before that i had to finish the car, replace a rigid hose that I had pinched, I asked my old workmen to finish my aluminum intake manifold because
the carbon I had done well not plastered on his plate and fled. I also acquired an air box BMC CDA and installed everything.
I had everything cut and i asked my old workmen to weld, as usual, great job!
Friday I was there, it was just a panic ...
but the big day, it's ready!
I arrived at LFG in the afternoon because of, I worked in the morning, and if I get out after three rounds, what a shame.
The arrival was at 13:00, I prepared myself, put the car heater, stress rises but not apprehensive.
I arrive to the meter control but I was arrested by the marshal because my car loses water through the overflow pipe from the expansion tank, bad
sign. Forced to put absorbent, tinker a recovery based on a plastic bottle and can move to the sonometer. In fact my car can not stand to stay warm at
rest and rises in temperature a bit, and beyond, for improvement thereafter, both cooling or the circuit itself. So when it set, I pass the sonometer,
93dB, impeccable, I'm starting.
In discovery mode, the circuit and the car, different sensations of the 205 Rallye of course, more thrust, sensations, driving position frankly to the
ground, not too comfortable in the cockpit with my lousy pedal and a little too close to the steering wheel, the apprehension of having the frame that
breaks, the mill that breaks or transmission or a wheel that is the trunk, but will make do. The cumulative all gives very low running speeds, random,
in haste I had not even tire pressure (1.3b there is almost 6 months ...), but I'm going to kindly ... beginning.
Then I was quickly calmed by the accelerator which is super violent to overshoot, I must also see that because it's not very pleasant, even
dangerous!
I made two 180� inconsequential because of the accelerator. Then by monitoring manos I let myself be surprised and I hit two cones, one was trapped
under the car, so I stopped next to a marshal who waved me the black flag and removed the cone, but not interfere with this action, I stoped the
engine, and he did not want to leave: no battery! So red flag and output of all cars, sad to be responsible for that. 4x4 arrives to start the car,
once done, I'll put me to leave.
Slowly I take my bearings, I increase the pace, the chassis like good j'i confidence in him, and I pull up reports 12000trs, for that test as
honestly go (300km / h meter , lol!) but a nasty vibration happens from time to time in some corners and even on the straights lines, but not easy to
identify, I would lean on the tires because if that were the driveshaft he would do me the time.
At time to pull the oil temperature soaring up to 135 degrees when I decided to calm things down and do a round or two of cooling, once back down to
around 100 degrees, I continu to track, and me barely takes 3 rounds we go again, another area for improvement. I do this two to three times and go
paddock.
I put the gas, I talk with people interested in my car, only Seven style of the day, I calm down.
I'm leaving for the last time of the day, always with overheating problems, and new phenomenon appears with the clutch begins to slip around
8000trs, to preserve, I accelerate less like a nag, and it's the job, I battle with a replica of Lotus Eleven (Hayabusa engine), a Twingo Cup,
and Z4M, and there is the drama, I started to overtake like a shoot gun the Twingo, I had the Z4M on my back, and in fact, tiredness helping (I am
looking for excuses ...), I locked the brakes and look in the corner that followed and inevitably, I did all right then I could have widely pass the
turn. I finished my race in a tire wall spoiling the car, making waving red flags again by my fault, and thus ending the day everyone's a little
early, no less!
The loose end of the day.
the only video I could do because I had not reloaded the GoPro ... somewhere as best seen my feat, lol
Bilan, my car works fine, I overtake more powerful cars and it's funny, the limits are pushed a max compared to what I know, I could tease the
edge of the chassis settings, engine, my behind (what I feel sick ass, mashed potatoes!), and I find myself with lots for improvement, and fiber to do
... I'm still mega happy nonetheless. The next time I would try more to calm down and concentrate more on the paths and settings, rather than
drawing as a twisted ...
photos of the damage (light):
the same on the other side
to the other side also
see you next round
alex89 - 14/3/16 at 06:31 PM
some pics
I love this one
alex89 - 13/5/18 at 08:22 AM
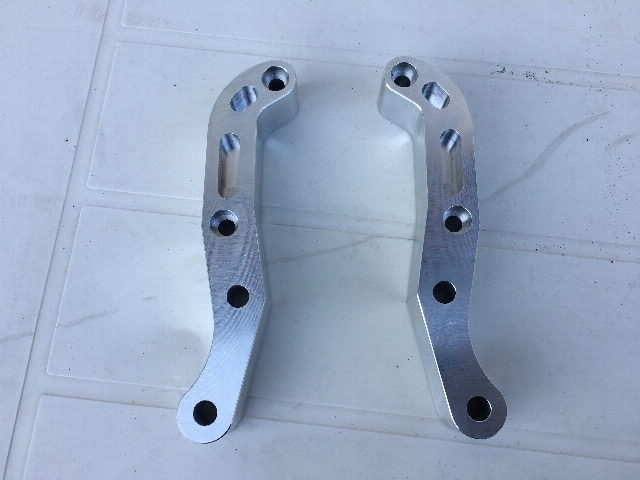
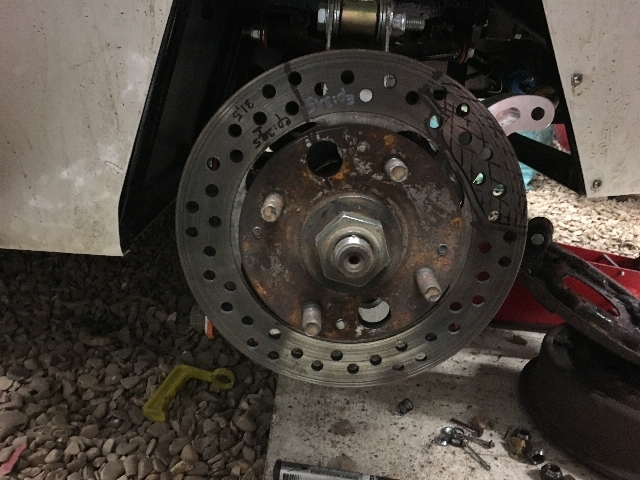
little update, rear conversion discs with a gain of 10.2kgs in all
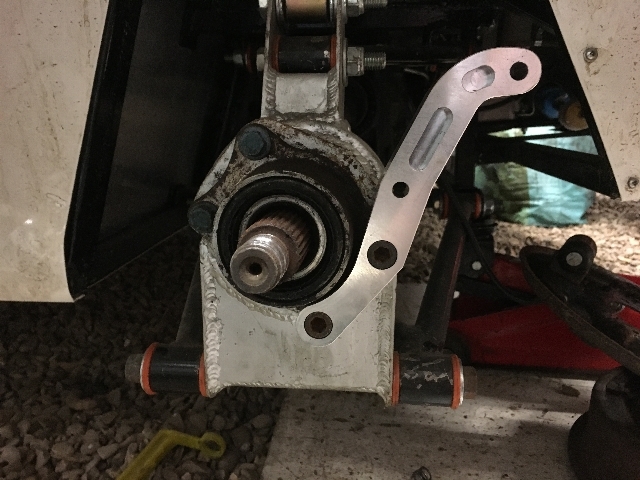
new brackets self-made in alloy aero
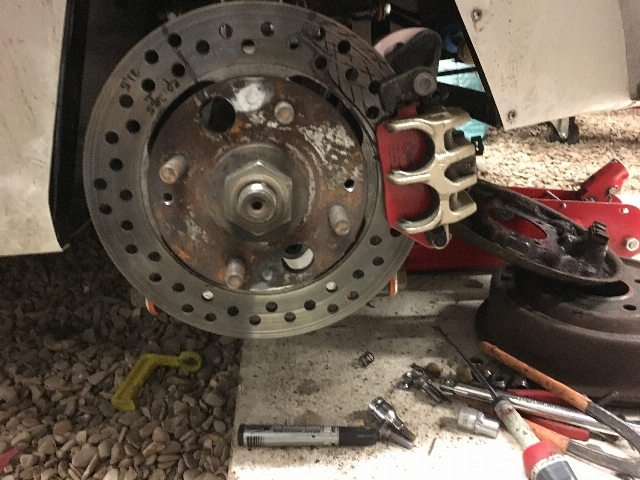
ZX12R rear disc
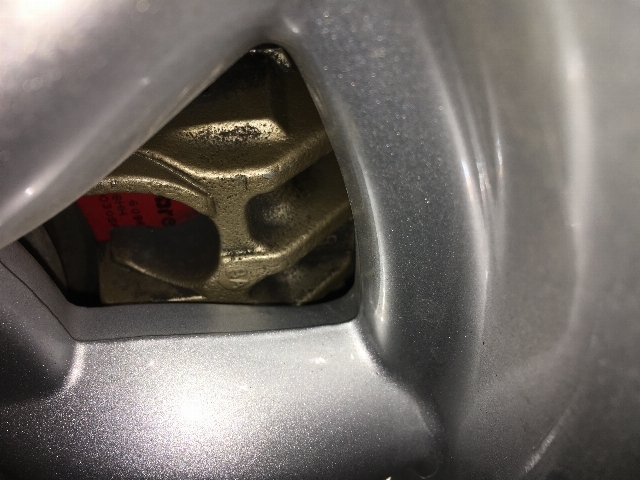
front caliper from a honda 600 Hornet 98
good fit
need just 10mm brackets
[Edited on 13/5/18 by alex89]
CosKev3 - 13/5/18 at 09:19 AM
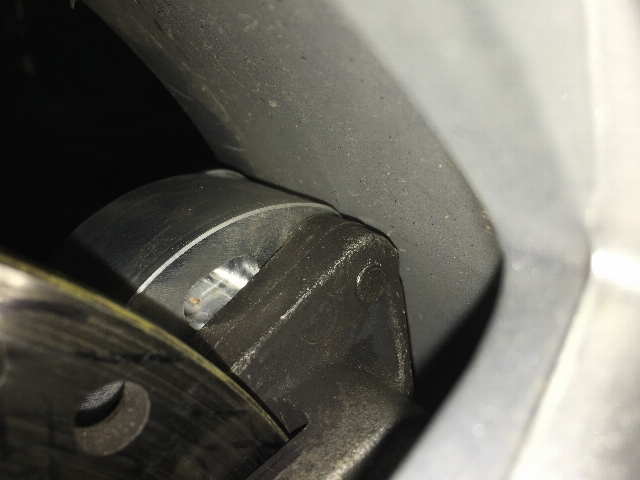
Surely running that close the alloy is a big risk?
If a stone gets caught in there with that tight a gap I would guess on our light cars it could well lock the wheel?
Also you haven't got enough space for parts flexing surely?
alex89 - 13/5/18 at 12:01 PM
that's why I made the brackets in a very strong alloy. and I am going to install 20mm wheel spacers because actually the calipers touch. The
effort on the back of our cars is really minimal, so I do not think it will break, it is 31mm thick, it's a lot.


 , not because i'm in France but only because i am disabled with the left hand (no rotation), implying that shift
gears can be done with my right hand only.
, not because i'm in France but only because i am disabled with the left hand (no rotation), implying that shift
gears can be done with my right hand only.