RazMan
|
| posted on 25/10/10 at 02:33 PM |

|
|
Home Brew ITBs - The story so far
As some of you know I am converting the ST200 (Duratec V6) lower inlet manifold into throttle bodies. It just made sense to me - why not use the
original casting rather than spend £1500 for a set of Jenveys TBs? The process was much easier than I thought but still took some time to design and
machine.
Basically I had to remake the spindles and make new oval butterflies to add to the original six, making twelve in total.
 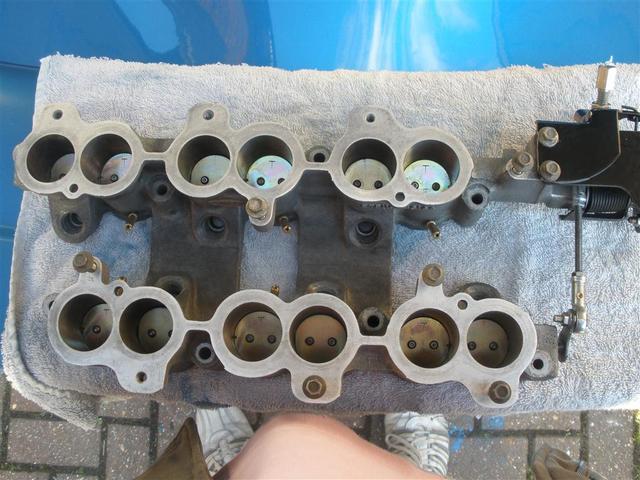
New butterflies
Then the TPS needed to be attached so a bracket was fabricated, mounting it on the end of one of the spindles.
 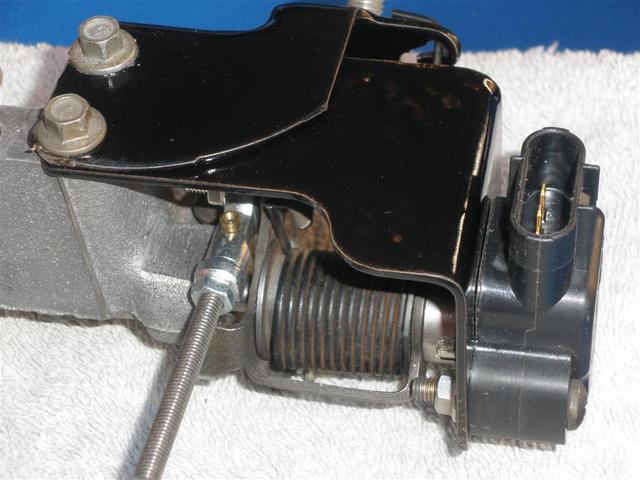
New TPS
I am not certain that the butterflies are sealing well enough, although they seem to be about as good as the original ones. I am a bit concerned that
they will let too much air past at tickover so we will have to see what happens on a test run later - just waiting for the injectors to come back from
being cleaned and tested.
Next we come to the upper section which will involve some fairly creative 'siamesed' trumpets, so I am looking at getting them machined -
more to come later as things progress .....
[Edited on 25-10-10 by RazMan]
Cheers,
Raz
When thinking outside the box doesn't work any more, it's time to build a new box
|
|
|
|
|
matt_gsxr
|
| posted on 25/10/10 at 02:58 PM |
|
|
That looks good.
I hope that they seal well enough to get a decent idle. If not you can always retard the ignition at low TPS.
How are you going to balance the individual banks of 3? You could tap the butterflies for jets. But how could you measure the MAP for each
cylinder.
You might also want to swap the rose joints for a left and right handed thread to allow the TBI's of each bank to be adjusted (by more than a
single thread).
Excellent work, I am sure you have some elegant solutions.
Matt
[Edited on 25/10/10 by matt_gsxr]
|
|
|
RichardK
|
| posted on 25/10/10 at 03:08 PM |
|
|
Nice work there mate, looking really good, looking forward to the start up vid 
Cheers
Rich
Gallery updated 11/01/2011

|
|
|
RazMan
|
| posted on 25/10/10 at 03:11 PM |
|
|
Hi Matt, If they don't seal well enough I will probably try again- machining ovals can be a bit tricky. Good call about retarding the ignition -
I didn't think about that 
I have inserted air bleeds in the casting - you can see them in the inside of the casting. I am not sure if I can use them for balancing but at least
they are there for vacuum if nothing else.
The link between the banks is simply made with a couple of M5 rod ends and studding which I had laying around, so this will be replaced with a couple
of M4 ones with L&R threads for ease of syncing the banks.
Cheers,
Raz
When thinking outside the box doesn't work any more, it's time to build a new box
|
|
|
boggle
|
| posted on 25/10/10 at 03:16 PM |
|
|
can you knife edge the butterflys? i found this helped on my subaru for sealing on shut...
just because you are a character, doesnt mean you have character....
for all your bespoke parts, ali welding, waterjet, laser, folding, turning, milling, composite work, spraying, anodising and cad drawing....
u2u me for details
|
PLEASE NOTE: This user is a trader who has not signed up for the LocostBuilders registration scheme. If this post is advertising a commercial product or service, please report it by clicking here.
|
RazMan
|
| posted on 25/10/10 at 03:54 PM |
|
|
This is a new area for me so I am not really sure how well they need to seal. They are quite an involved, oval shape and if not done right, they will
'bind' in the bores or seal badly. At the moment I can see a fair bit of daylight through the bores and knife edging wont make much
difference so maybe I need to take a closer look.
The original butterfly is on right - my new one on the left - they are in the closed position believe it or not
 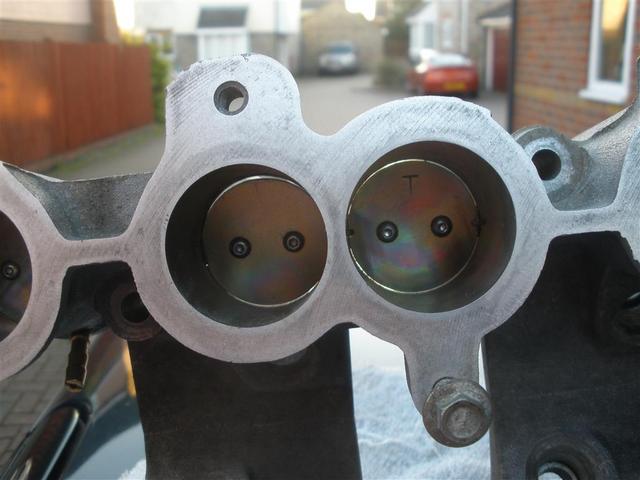
TB leak
[Edited on 25-10-10 by RazMan]
Cheers,
Raz
When thinking outside the box doesn't work any more, it's time to build a new box
|
|
|
jollygreengiant
|
| posted on 25/10/10 at 04:35 PM |
|
|
It may seem a bit simplistic, but surely could you not have just ordered a second set of butterfly's?
Beware of the Goldfish in the tulip mines. The ONLY defence against them is smoking peanut butter sandwiches.
|
|
|
RazMan
|
| posted on 25/10/10 at 04:39 PM |
|
|
If only it was that easy  The new butterflies are 33mm and a little smaller than the stock ones, so my only option was to fab them, along with the
new spindles which were turned from stainless rod - a jig was also made to support the fragile spindles while they were milled. The new butterflies are 33mm and a little smaller than the stock ones, so my only option was to fab them, along with the
new spindles which were turned from stainless rod - a jig was also made to support the fragile spindles while they were milled.
Cheers,
Raz
When thinking outside the box doesn't work any more, it's time to build a new box
|
|
|
matt_claydon
|
| posted on 25/10/10 at 05:52 PM |
|
|
Interesting project. Could you explain how the OE setup works though? Why are there throttles in the manifold and what are the 'open'
tubes for?
|
|
|
MikeRJ
|
| posted on 25/10/10 at 07:16 PM |
|
|
quote:
Originally posted by RazMan
If only it was that easy The new butterflies are 33mm and a little smaller than the stock ones, so my only option was to fab them, along with the
new spindles
I think I would have been tempted to bore out the throttle casting a little and use existing butterflies! As you say, it's very involved and
very precision work to create the right shape to the tolerances needed.
|
|
|
Project7
|
| posted on 25/10/10 at 08:13 PM |
|
|
quote:
Originally posted by matt_claydon
Interesting project. Could you explain how the OE setup works though? Why are there throttles in the manifold and what are the 'open'
tubes for?
I believe there is a conventional single throttle body 'upstream' of the ports shown here. At a certain RPM/throttle angle the original 6
butterflies open, controlled by the ECU, to allow greater air flow in to the engine. This has the effect of increasing air velocity at lower rpm and
maximising torque.
Seems like a good project, but i think you might be right and at present those butterflies will flow too much at idle.
|
|
|
matt_gsxr
|
| posted on 25/10/10 at 08:41 PM |
|
|
Only one way to find out!
I too am looking forward to the start-up.
My gut feeling from the bike ITB's that the gap is on the large side, but I am a pessimist.
The gap on the original butterfly isn't a useful reference as normally all the flow would go left, so it doesn't need to seal, so it
isn't like a normal butterfly which actually controls the idle.
Nice work on the bleeds, on 4 cylinder bikes where their is limited inertia there is massive sensitivity to throttle balance, so it would be good to
have a way of managing that.
Matt
|
|
|
RazMan
|
| posted on 25/10/10 at 09:24 PM |
|
|
quote:
Originally posted by Project7
quote:
Originally posted by matt_claydon
Interesting project. Could you explain how the OE setup works though? Why are there throttles in the manifold and what are the 'open'
tubes for?
I believe there is a conventional single throttle body 'upstream' of the ports shown here. At a certain RPM/throttle angle the original 6
butterflies open, controlled by the ECU, to allow greater air flow in to the engine. This has the effect of increasing air velocity at lower rpm and
maximising torque.
Seems like a good project, but i think you might be right and at present those butterflies will flow too much at idle.
That's absolutely right. The dual length runners are controlled by an actuator which opens the secondary butterflies at around 4000rpm so the
engine gets all the air it can when under wide throttle openings but still retains maximum gas speed (and torque) in the lower rev range. I had
already removed the secondaries as they were a pain to map, plus the extra torque was only needed for a car weighing three times as much as mine 
quote:
Originally posted by matt_gsxr
The gap on the original butterfly isn't a useful reference as normally all the flow would go left, so it doesn't need to seal, so it
isn't like a normal butterfly which actually controls the idle.
Damnit I think you just confirmed what I was thinking all along - I think I will have to remake all 12 butterflies and see if I can get a better seal
[Edited on 25-10-10 by RazMan]
Cheers,
Raz
When thinking outside the box doesn't work any more, it's time to build a new box
|
|
|
paulf
|
| posted on 25/10/10 at 09:35 PM |
|
|
How have you machined them? I would bore out all the runners to a standard size and then make a jig by machining a bit of bar the same diameter to an
angle to match that of the closed butterfly's.You could then rough machine the disks before gluing them to it and machining to finished diameter
which would leave them oval to match the bores.
Paul
|
|
|
RazMan
|
| posted on 25/10/10 at 09:57 PM |
|
|
The butterflies were done basically as you describe - tbh its one of the more fiddly jobs I entrusted to an engineer with better skills - I am fairly
ok on the simple stuff and he offered to have a go. I reckon with a bit of tweaking of the draft angle we will get there.
Boring out the smaller bores would mess up gas flow as the ports in the heads are matched to the smaller bores.
Cheers,
Raz
When thinking outside the box doesn't work any more, it's time to build a new box
|
|
|
RazMan
|
| posted on 25/10/10 at 10:27 PM |
|
|
I've just been googling for info on butterflies and it seems that a lot of the racing boys apply a small amount of sealant (not sure which type)
around the bore surface where the butterfly almost touches, therefore making a better seal. Interesting - has anyone else discovered this tip?
Cheers,
Raz
When thinking outside the box doesn't work any more, it's time to build a new box
|
|
|
interestedparty
|
| posted on 26/10/10 at 05:30 AM |
|
|
The sealant, if you choose to use it, will need to be really good stuff if it doesn't end up being sucked into the engine having worked loose in
what must be quite a hostile environment.
But how good a seal will you need, though? What is going to let the idle air through?
As some day it may happen that a victim must be found,
I've got a little list-- I've got a little list
Of society offenders who might well be underground,
And who never would be missed-- who never would be missed!
|
|
|
RazMan
|
| posted on 26/10/10 at 06:56 AM |
|
|
I think that some kind of silicone was mentioned - I will have another look later today and report back.
Looking at the old (single) 70mm TB, the butterfly seems to almost completely seal the bore. I didn't have an idle control valve but plan to on
this setup (hence the vacuum takeoffs) so I think I need to aim for as good a seal as possible on all 12 bores if I am to allow the ICV to do
it's job and get a stable idle.
*edit* Found a product called Throttle Coat which help achieve a better
seal on the spindles.
...and here's a thread
discussing a similar problem and Molykote 321 seems to be the stuff. It's a dry film lubricant and a few manufacturers apply it to butterflies
as standard - many people are 'cleaning' their TBs and messing up the idle as a result
[Edited on 26-10-10 by RazMan]
Cheers,
Raz
When thinking outside the box doesn't work any more, it's time to build a new box
|
|
|
MikeRJ
|
| posted on 26/10/10 at 01:39 PM |
|
|
quote:
Originally posted by RazMan
Boring out the smaller bores would mess up gas flow as the ports in the heads are matched to the smaller bores.
If it's only a small difference it won't hurt, or you could just blend the ports to the runners and get a better than factory match.
|
|
|
RazMan
|
| posted on 26/10/10 at 03:26 PM |
|
|
I've come this far so I don't want to change anything at this late stage.
I think I've found the problem - a combination of things really
- I made the butterflies from 1.2mm steel and they should be 1.0mm (schoolboy error - duh!)
- The angle of the chamfered edge is all wrong, causing it to bind in the bore.
Hopefully it will be sorted in a day or two
Cheers,
Raz
When thinking outside the box doesn't work any more, it's time to build a new box
|
|
|
coyoteboy
|
| posted on 5/11/10 at 04:16 AM |
|
|
Interested to see how this works and not wishing to be a pessimist but the reason it's a 1500 part is the work that goes into getting it right.
From experience on a bike engine (v6 is larger cc so gap size less critical so you may have some leeway) those sorts of gaps will see you at 3-4000
rpm with no load. It really is ultra tiny tolerances - I had a pinhole in an injector seal throwing one cyl into misfires on a previously perfectly
tuned engine. I've had a perforated weld in a plenum cause a 500rpm rise in idle. We had a single throttle plate made up for a 600cc plenum with
tighter tolerances than that and couldn't get the idle below 3000 without using the old palm-throttle.
Good luck though, I'm hoping you have better results than I, it being a larger engine.
|
|
|
Ivan
|
| posted on 5/11/10 at 07:49 AM |
|
|
I was reading this with interest - just wandered :
If your object is to get rid of the secondary opening interfering with your tuning efforts and you weren't too worried about low down torque,
why not remove the secondary butterflies completely with their spindles and retain the single throttle body or fit a larger one - that would give a
large increase in air flow at high revs as throttle plates and spindles have a significant impact on air flow.
You would also save weight and complexity and a lot of frustration and time getting this whole set-up working.
I think you will actually lose power with your proposed 12 throttle plates and spindles because their combined area when fully open must equal at
lease one of the runners and the turbulence they create will also reduce flow.
I think the above will work well for you and fits in beautifully with the KISS principal - also easy to test and restore if it doesn't work.
Another thought - if low down torque really didn't matter to me and the head runners suited I would machine out the web between the manifold
runners and make one large oval port per cylinder.
[Edited on 5/11/10 by Ivan]
|
|
|
RazMan
|
| posted on 5/11/10 at 09:10 AM |
|
|
When I built this engine I had already removed the secondary butterflies to improve airflow, then re-mapped it to make the most of the extra
breathing. The results were not too bad (over 200bhp) but I have read reports that ITBs can give another 30 ish bhp so this project was dreamed up as
a way to ditch the (now redundant) dual-length runners and install ITBs without the expense of going to the likes of Jenvey and get my wallet
lightened by £2K in the process. It all seemed so simple in the dreaming stage and making the spindles was a very straightforward procedure once a jig
was made.
The new butterflies however are a bit more of a challenge but once we figured out that the bores are very slightly tapered (only by 0.5mm) it all fell
into place again. We now need to hone out the bores and remake the butterflies again (hopefully next week)
I agree that the tolerances need to be pretty close and that is why we have decided to remake the new butterflies. They should be at least as good as
the originals by the time they are finished. I am hoping that the relatively small air gaps will allow a stable tickover but I guess we will just have
to wait and see how the engine runs. If neccessary I may have to apply a small amount of Molybdenum dry film lubricant around the sealing faces but I
am hoping it doesn't come to that, although it appears that many manufacturers like Honda and Suburu do this as standard practice.
The old inlet manifold is a very heavy and complex labrynth of twists and turns and if I understand the principles of using throttle bodies correctly,
it is more about the air's change of direction that saps power - ITBs offer the straightest route to the cylinder and the spindles are a
relatively small obstruction as a trade-off.
It's a theory anyway
[Edited on 5-11-10 by RazMan]
Cheers,
Raz
When thinking outside the box doesn't work any more, it's time to build a new box
|
|
|
coyoteboy
|
| posted on 5/11/10 at 02:46 PM |
|
|
FYI - there's the idle-stop throttle plate gaps on a monster american V8, with the one carb feeding all 8 cyls IIRC, so you're gonna want
to get them nice and precise - they'll have to fit much better than the originals that came with the fanimold.

[Edited on 5/11/10 by coyoteboy]
[Edited on 5/11/10 by coyoteboy]
|
|
|
RazMan
|
| posted on 5/11/10 at 03:04 PM |
|
|
I reckon mine should be a lot closer than that, although I agree that with a smaller engine (only 2.5L) they will have to be better than my earlier
effort. The original butterflies actually fit quite well and once the slight taper is removed from the bores, I stand a better chance of achieving a
good seal. As a last resort I will find some suitable sealant like the Moly dry film lubricant to close the gaps a little more.
Cheers,
Raz
When thinking outside the box doesn't work any more, it's time to build a new box
|
|
|


.jpg)

