
pinto rebuild continues........part 6: Sump Cleaning
omega0684 - 8/4/09 at 04:28 PM
well i continued on with the task of rebuilding and reconditioning the pinto i was given and taking the state of it into consideration i decided to
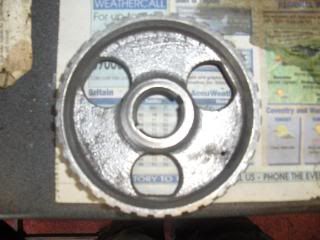
state doing some electrolysis, i left the cam pulley in a washing up bowl for 4 hours today for the electrolysis to take effect and the results were
to say the least spectacular, i spent 5 minutes with wire brush on the drill after to remove any left over paint AND LOOK!
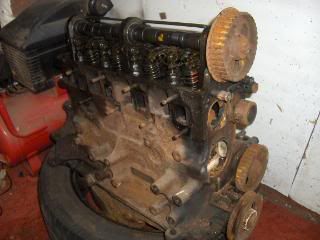
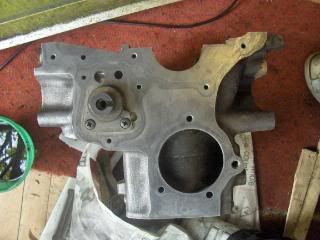
you can also see the state of the block in the above picture as well so guess what i did! Yep you guessed it i made a massive elctrolysis bin and
stuck it in!
hopefully it will come out like the cam pulley but im going to leave it over night so it has longer to work on the deep rust.
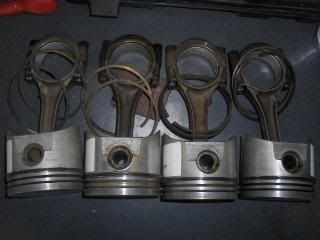
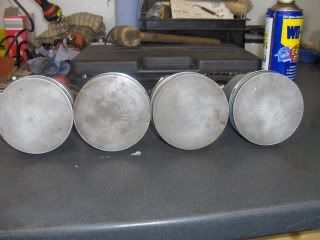
a managed to clean up the rest of the pistons and crank as well as most of the bottom end. long and exhausting day but im sure it will be worth it.
tomorrow will be drying out the block (in the oven) and then i might have a look at starting to take the head apart, not sure yet.
hope your day has been a productive one,
All the best
Alex
[Edited on 18/5/09 by omega0684]
blakep82 - 8/4/09 at 04:30 PM
will the electrolysis have any effect on the cylinders? 
i think maybe not, since they should be good solid metal, bet i don't know...
hydrogen embrittlement is what i'm thinking of
[Edited on 8/4/09 by blakep82]
omega0684 - 8/4/09 at 04:40 PM
personally i don't think that it will have an effect, the water temperature isn't hot enough and the concentration gradient of free
floating hydrogen irons is too low to cause any major damage. its only a '20' block so im not to bothered.
blakep82 - 8/4/09 at 05:15 PM
but the bubbles given off are hydrogen. i don't know... i thought u'd heard of people on here mention it before.
prawnabie - 8/4/09 at 05:30 PM
Hydrogen making eh? Whats the terrorist hotline number lol
vindicator - 8/4/09 at 05:33 PM
hope he hasn't blown his bloody roof off his garage with all that hydrogen in the air......
omega0684 - 8/4/09 at 07:36 PM
shhhhhhhhhhhhh im secretly making a new form of hydrogen bomb! 
hellbent345 - 8/4/09 at 08:50 PM
lol and now this thread is being monitored by the goverment!!
omega0684 - 8/4/09 at 09:23 PM
quote:
Originally posted by hellbent345
lol and now this thread is being monitored by the goverment!!
they can pop round for a cuppa tea and a bacon butty if they want! i will be happy to say hi.
vindicator - 9/4/09 at 08:30 AM
come on get out of bed and take a snap of that engine....how clean did it come up......
TimR
02GF74 - 9/4/09 at 08:52 AM
quote:
Originally posted by vindicator
come on get out of bed and take a snap of that engine....how clean did it come up......
TimR
it came out very shiny but shrunk just a bit  ....
....

omega0684 - 9/4/09 at 01:38 PM
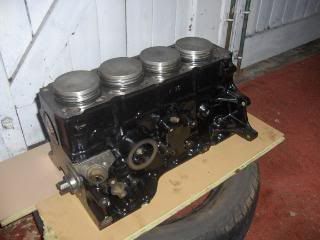
ok tim calm down, clam down, here are some photo's of the block after electrolysis, i had to spray it off with a power jet and then 10 minutes
with the wire brush on the stubborn bits
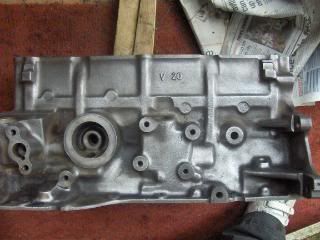
i have had to put it back in to do the other side of the engine as electrolysis only like to work on a face to face basis, what i should of done it
put another anode in on the other side of the engine and then the whole engine would have been done in one go.
just need to paint it next, i think i will just do it black, it will hide the dirt better! 
[Edited on 9/4/09 by omega0684]
cd.thomson - 9/4/09 at 01:42 PM
wow, thats awesome!
vindicator - 9/4/09 at 01:49 PM
That looks so smart.......are you going to paint it now........(had to ask the question!!!)
That is something I would like to do, but to strip down the whole engine........and get it back together again would be my nightmare......
Her in doors would not be happy if she opened the oven door and there was my engine block just warming up!!!..
Nice Job.....
TimR
omega0684 - 9/4/09 at 01:53 PM
im going to paint it black after its had its second blast of electrolysis to do the other side.
its not that hard to do tim, this is only my first time doing a strip down, i have only done the bottom end at the moment, i guessing the head will be
a little more complicated but its an easy way of learning. i still have loads of other stuff to electrolyse as well.
vindicator - 9/4/09 at 01:57 PM
Ok, I thought you were a seasoned mechanic with all your problems........
I would be worried about all the gaskets, shims, o rings etc.....and after putting it all back together having oil dripping out the bottom (like mine
does at the moment....can't seem to get the sump gasket sealed and have done it twice!!)
omega0684 - 9/4/09 at 02:03 PM
i am a young pinto mechanic enthusiast, i know feck all about engines really! (just kiddin)
i always work with the sierra manual by my side.
have you tried using a gasket sealant with a new gasket, you have to make sure both surfaces are totally oil free otherwise there is no point you will
always get leaks (sorry if it sounds like im teaching you how to suck eggs etc etc)
vindicator - 9/4/09 at 02:12 PM
yep...made sure every surface was clean and dry and used sealant on both sides of gasket and then pinched it up and left over night. Next morning gave
it another 1/4 turn on all bolts.
Still it drips a tea spoon over night after a drive. Good job I have a plastic sheet and metal drip tray on my carpet in the garage to catch
anything!!!!
omega0684 - 9/4/09 at 02:31 PM
where about is it coming out , is it towards the front by the crank bearing seal or the rear seal or the sides?
:{THC}:YosamiteSam - 9/4/09 at 05:03 PM
it will be coming out where the rubber cup seals join the side seals - they are hard to seal - it took me a few attempts to get it right
in the end i fitted the gasket on the sump - the corner joins i used liquid gasket plastered on but keeping it towards the outer edge to stop it
falling in - then put the sump on the jack and gently raised it to the block - the jack makes the big difference - stops your arms dropping off
getting tired - then using a small torch and a small mirror checked the aignment before fitting the small bolts right round very careful..
omega0684 - 10/4/09 at 07:41 PM
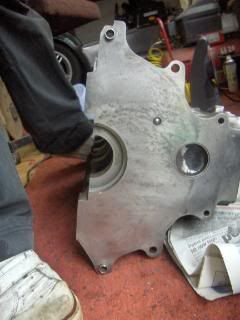
bit of painting done today and managed to get the block ready for the re-insertion for the pistons, have been cleaning the front end bearing housing
today which is taking ages cuz there is lots of nooks and crannies!
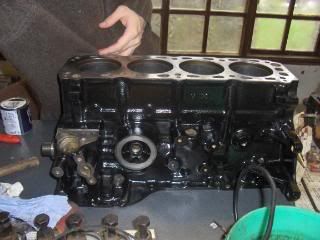
will keep you posted as things progress.
flak monkey - 14/4/09 at 06:15 AM
I hope after all this effort you are fitting new rings and bearings and honing the cylinders while you are at it?
Looking good BTW
vindicator - 14/4/09 at 09:02 AM
Hi Alex,
Sorry for the delay in replying but went up to skye for the easter break. The answer to your last question to me is... Yes. Don't really know
where it is coming out as I could not be bothered to get underneath and check it out as it has been a bit cold. Will wait until the weather has warmed
up a bit.
As for your engine it is looking very good. Just need to buy some replacment parts to make sure it all works ok......
Just a quick question .....how are you going to test that it works.....
TimR
02GF74 - 14/4/09 at 09:39 AM
quote:
Originally posted by omega0684
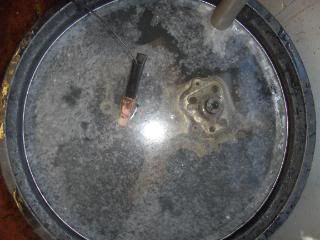
this is the interesting photo - as it shows the outisde fo the bore - this and the internals of blocks usually get rusted up;
I presume the rust was removed inside the block (i..e. the water jacket).
?
Not ever done this, is the rust dissolved or crumbles off ? i.e. is the water jacket full of crud or nice and clean?
pity I have painted my crossflow block ....
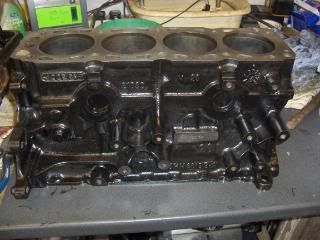
omega0684 - 15/4/09 at 07:33 PM
the internals of the water jacket have come up cleaner but not entirely rust free, i managed to get a screw driver in the to break alot of it up, the
electrolysis doesn't dissolve the rust but does separate it from the iron very efficiently. i power jetted the block afterwards to get rid of any
crud that was left on the side.
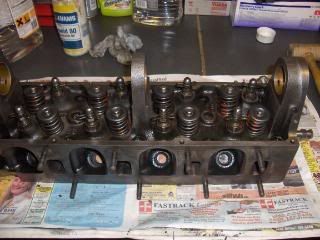
i have now dismantled the head and im working my way through cleaning up the valves and, i have managed to polish two of the inlet valves at the
moment and i will post up more photo's as i get through them all, more than likely tomorrow night.
i also have to re-seat the valves.
i will keep you posted
Tim: with regards to getting it to work, im not sure yet, im debating making a standing engine testing bay in the garage, should be fun.
Keith Weiland - 15/4/09 at 09:27 PM
That looks great Alex, I have changed my mind I want the engine back  .
.
Just kidding, any chance I can come borrow your engine hoist tomorrow?
omega0684 - 15/4/09 at 11:18 PM
yes mate no probs, just give me a bell when you want to come over
vindicator - 16/4/09 at 08:43 AM
let me know when it is all done and you are ready to test.....I'll come and watch from a very safe distance and take photos.....
TimR
omega0684 - 16/4/09 at 11:58 AM
mate your welcome over at anytime
omega0684 - 16/4/09 at 07:21 PM
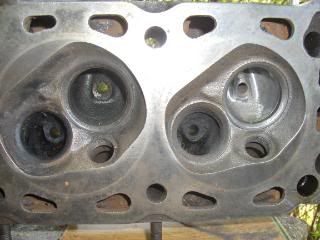
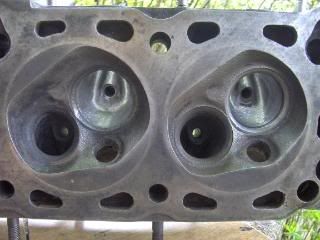
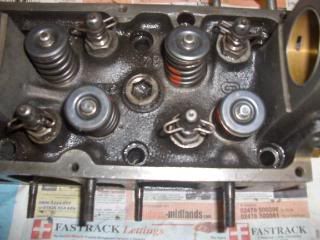
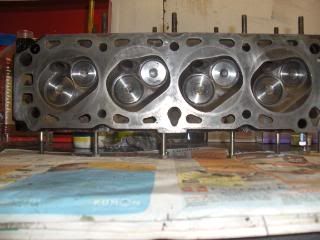
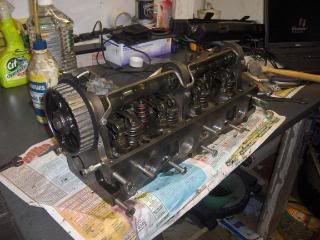
ok so spent yesterday afternoon and this afternoon dismantling the head and cleaning, the valve springs came off quite easily and had no major
problems apart from a collet flying away somewhere that took me ages to find. the valves on the other hand were in a bit of a state and some
mega-cleaning was needed to get them back into shape (this was most of my day!)
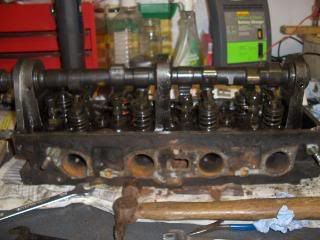
as you can see the head was pretty manky and covered in crud! but after a bit of cleaning it came up alright
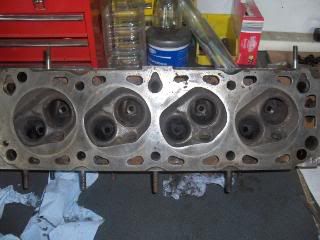
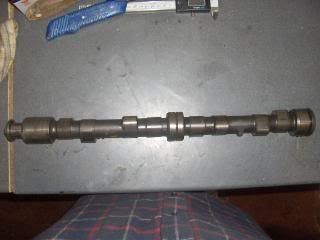
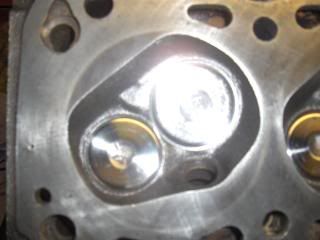
here are the valve ports, i have only just started working on these the seats don't appear to be in too bad a shape either, i was quite
surprised. the cam is in good knick aswell, no scroring on the lobes at all.

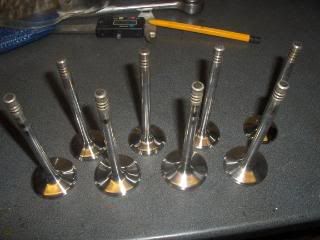
the photo doesn't really show the extent of how bad the valves were, especially the exhaust valves (inlet pictured on left), you can probably see
in the top photo, the exhaust valves that is. i have had to order some new valve stem seals because they were absolutely knackered! pretty much ripped
to pieces.
tomorrow im hoping to get the head finished and painted, i might even have a little go at some light porting of the inlets, and then get the head and
rest of the bits and pieces painted.
will keep you posted
vindicator - 17/4/09 at 08:12 AM
Fantastic pictures and article.
I have been informed that my 4th cyclinder valve stem seals need replacing and have intending to do all of them but was reluctant to take the head
off.
But seeing the picures and thinking what else I could do I may give it a go......
Keep up the good work....
TimR
Daddylonglegs - 17/4/09 at 08:54 AM
This is my next major stage of the build (1.6 Pinto) so watching this article with interest
Looking good, just hope my cam is in good nick too! Think I'll be taking lots of piccies throughout.
JB
MautoK - 17/4/09 at 06:43 PM
You can change Pinto valve stem seals in situ....
I did mine a week before SVA and only one collet flew across the garage!
quote:
Originally posted by vindicator
Fantastic pictures and article.
I have been informed that my 4th cyclinder valve stem seals need replacing and have intending to do all of them but was reluctant to take the head
off.
But seeing the picures and thinking what else I could do I may give it a go......
Keep up the good work....
TimR
omega0684 - 23/4/09 at 08:17 PM
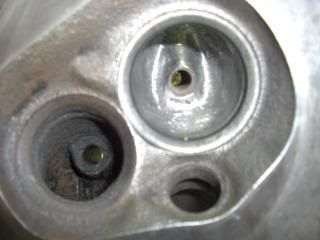
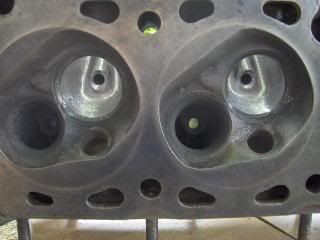
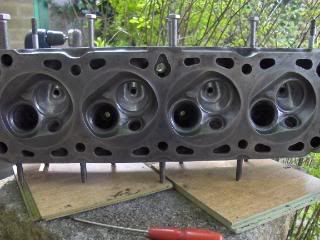
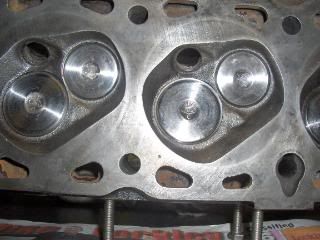
carrying on with my pinto rebuild today, i did a bit of porting on the head, took me pretty much all day to do as the exhaust ports were a right mess,
pictures below, i managed to polish up the valves as well
02GF74 - 24/4/09 at 07:08 AM
that must be hard going being cast iron head.
make sure you lay the gaskets on top to open out the inlet and exhaust ports to match.
I used a 1/2 round hand file and dremel stones but the don't last long. To finish off I use a small sanding wheel followed by 180 wet
'n' dry.
omega0684 - 24/4/09 at 07:55 AM
i used a tough die grinding stone and yes it took ages!
[Edited on 24/4/09 by omega0684]
DaveFJ - 24/4/09 at 08:33 AM
looking good...
you could loose some material from the valve guides in to allow a little more flow...
I had a document somewhere detailing how much material you can safely remove from a Pinto head that i used when porting mine.... you can take loads
off the exhaust ports but general consensus is that the inlets are pretty big already and just need fettling.....
Basically got some over sized cometic exhaust gaskets and opened the ports to to match
[Edited on 24-4-09 by DaveFJ]
omega0684 - 24/4/09 at 08:36 AM
i have removed some of the material from around the guides and removed all sharpe edges so they are all nice and rounded, the only problem with
removing valve guide material is that it reduces the longevity of the head and since im not having brass guides fitted im not going to remove a great
deal.
DaveFJ - 24/4/09 at 08:41 AM
I figured that if the engine only lasts 20k thats probably a lot longer than I need so hacked away loads! my inlet guides now are just a small
smooth bump!
02GF74 - 24/4/09 at 08:41 AM
quote:
Originally posted by omega0684
the only problem with removing valve guide material is that it reduces the longevity of the head
yep - you don't get something for nothing.
that may be an issue for a 10,000 mile commuter but we do lower mileages in aour kits and swap/rebuild engines out all the time!
NB going to bigger gaskets would need you need to open the inlet and exhasut manifolds out - the exaust may not be possible.
DaveFJ - 24/4/09 at 08:46 AM
On a Pinto head you can take loads off the exhaust ports
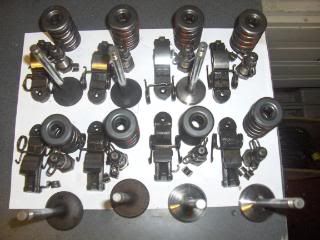
omega0684 - 15/5/09 at 03:38 PM
its been a while since i have posted an update on my pintorebuild but thats because i haven't been doing much lately, due to other
commitments,
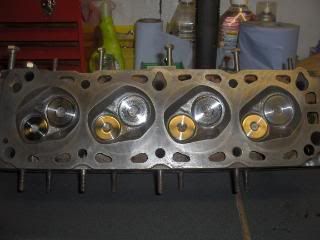
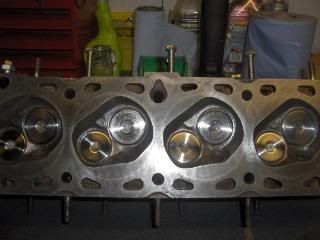
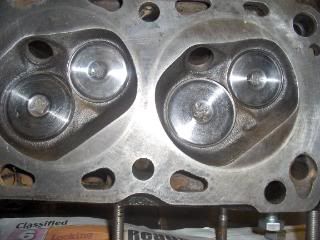
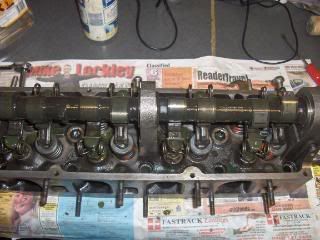
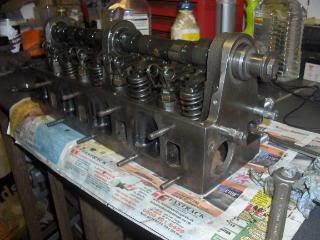
but last night i managed to get in to the garage and rebuild the head, i've reseated all the valves, new stem seals, new cam seal, new oil spray
bar. cam & followers are in very good condition with hardly any wear on them at all, here area few shots of the head being rebuilt. i managed to
get a lick of paint on the head too and the cam pulley and backplate as well.


i know some of you guys were watching the progress of the rebuild so my apologies for the delay in posting,
im off to set the valve clearences now.
All the best
Alex
vindicator - 15/5/09 at 08:55 PM
That head looks ok now....
omega0684 - 15/5/09 at 10:58 PM
looks a hell of a lot better than it used to
mcerd1 - 16/5/09 at 09:23 AM
quote:
Originally posted by omega0684
im off to set the valve clearences now.
your at the same stage as me now....
but I've got to mix 10 big loads of concrete before I can finish mine (4 years into the build and I'm finally sorting the garage )
have you got that spare head ported yet ?
[Edited on 16/5/09 by mcerd1]
omega0684 - 16/5/09 at 02:52 PM
haven't even looked at that head yet or the crossflow i've got. i thik i'll stick to one engine at a time for the moment. just got to
make a engine stand out of some small pallets i've got hold of.
mr henderson - 16/5/09 at 03:04 PM
When I looked at this thread last night, there was a big picture that meant I had to keep scanning across.
This morning, unless I dreamt it, it was gone and a series of pictures that fitted into the standard frame had taken their place.
Now the big pic is back
Did I dream it?
John
ps edit, nothing about editing in the post in question, must be the way it's displaying
[Edited on 16/5/09 by mr henderson]
omega0684 - 16/5/09 at 03:37 PM
i sometimes get the screen only on half of the page and other times its full page, its wierd, but thats on the whole forum not just one post
omega0684 - 18/5/09 at 09:08 PM
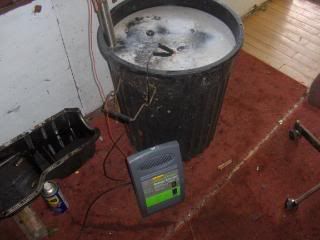
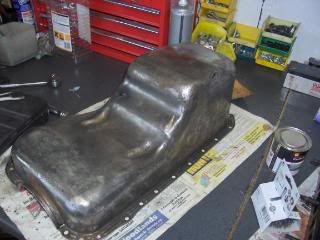
over the weekend and for today i went on the dirty adventure of cleaning the sump! it was aweful! the inside was fairly clean to be fair but the
outside was rusted beyond belief! it took 24 hrs in the electroysis bin and a couple of hours on the bench drill to get it looking half decent.
i managed to get it primed up today and will paint it tomorrow.
after elctrolysis and wire brush

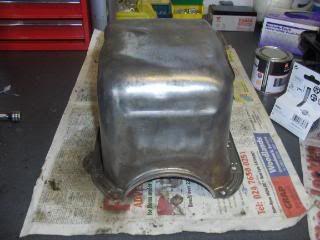
first layer of primer!

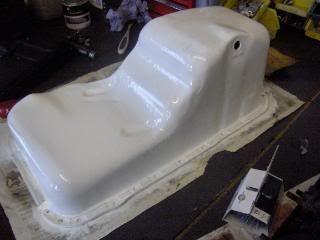
2nd coat of primer
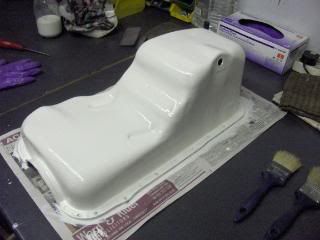
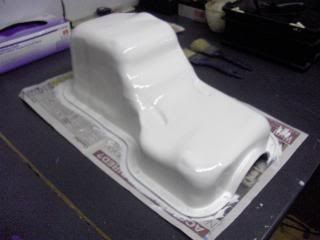
will post painted sump pictures tomorrow.!
mcerd1 - 19/5/09 at 07:34 AM
quote:
Originally posted by omega0684
...but the outside was rusted beyond belief! it took 24 hrs in the electroysis bin and a couple of hours on the bench drill to get it looking half
decent....
That doesn't look too bad at all - most of mine had holes in them
David Jenkins - 19/5/09 at 07:47 AM
Hate to say this, now you've started painting the sump - but had you considered shortening it for extra ground clearance?
DaveFJ - 19/5/09 at 07:58 AM
quote:
Originally posted by David Jenkins
Hate to say this, now you've started painting the sump - but had you considered shortening it for extra ground clearance?
yup, get it chopped!
vindicator - 19/5/09 at 08:20 AM
Sorry, but it has to be done, chop it now. You have rebuilt the whole engine and if you are going to sell it on, the first thing they will say is the
sump is too big........
You know you have to do the right thing......It is only the primer you have put on isn't it.......
omega0684 - 19/5/09 at 10:42 AM
have you seem how much it costs to get it chopped! and the time and effort it takes, whoever buys it can get it chopped! if i could tig weld i'd
do it myself, but i can't
02GF74 - 19/5/09 at 10:45 AM
??? It is steel, maybe 2 mm thick max so can be MIG welded without any great difficulty.
Unless you are really skilled, it won't look as nice as TIG but then who is looking?
omega0684 - 19/5/09 at 10:48 AM
can't mig either! i can't weld period and im trying to keep the rebuild cost to an absolute minimum. if some one could do it for a tenna
they i would have it done but im guessing it will be a lot more than that as the oil pick up pipe will also need modifying.
[Edited on 19/5/09 by omega0684]
DaveFJ - 19/5/09 at 11:07 AM
oil pick up pipe i did by brazing with a cheap blow torch. sump i copped and mad a new plate for nothing but paid Ł20 to have it welded by a local
engineering place....
the sump metal is VERY thin stell in places and is not good metal so can be a bitch to weld... i tried and just blew holes in it...
twybrow - 19/5/09 at 11:44 AM
Alex - you are welcome to use my MIG. I can help you too, but I wouldn't claim to be a great welder! I have welded plenty of structural bits on
my car (eg engine cradle) and it works just fine! I have no idea what needs to be done though....!
By the way, how is my die grinder? I take it I have no stones left now then!?
omega0684 - 19/5/09 at 12:29 PM
i only used one stone and a little bit of another, i was meant to give it you back at stoneliegh
vindicator - 19/5/09 at 02:25 PM
corrrrr, another offer of borrowing things.....I would snap his hand off Alex.....get another trade under belt.....welding.....mmmmm!!!!
We are all behind you!!!
jpindy3 - 30/7/09 at 09:56 PM
so whats next
MikeR - 30/7/09 at 10:30 PM
if you get yourself a spare sump and do all the cutting as per david jenkins web site, i'll have a go at welding it for you.
(i say get a spare just in case it ends in disaster)
Total cost will be the return of my laser infra red temp thingy and the owing of a favour at some point in the future.
omega0684 - 18/9/09 at 07:34 PM
ok guys so its been a while since i posted extra bits on the rebuild thread, but i plan to do some more over the weekend and put some more
photo's up on monday.
for those who don't know my current pinto (that was in my car) dropped an exhaust seat into cylinder 2 & caused some rather nice divots in
the top of the piston & around the coumbustion chamber on the head. so i've had to have 4 new stainless seats put in and have ended up
rebuilding that one as well.
i just got the head back today with 4 new stainless exhaust seats, 4 new stainless valves, all the inlets have been reseated as well and the head has
been skimmed.i also got a new piston and set of rings. All in for Ł160 cash, which i though was a bit of a bargain.
i will post up photo's of the damage if you want, more to follow...
[Edited on 18/9/09 by omega0684]
deano 777 - 2/10/09 at 01:57 PM
hi, was this due to too much porting near the valve seat?, i have been taking notes for when i recon my spare head. Dean.
omega0684 - 13/10/09 at 03:25 PM
hi dean, sorry for late reply, it wasn't due to too much porting, the valve seats that were put in were just incredibly shallow, i've had
nice deep ones put in now though so they won't fall out
iscmatt - 27/1/10 at 01:22 AM
are there any updates from over christmas?
sebastiaan - 9/12/11 at 07:43 PM
quote:
Originally posted by iscmatt
are there any updates from over christmas?
Or just before the next Christmas?
No, really, what happened to this in the end?
omega0684 - 22/2/12 at 07:40 PM
hi guys,
im sorry i haven't updated the build thread for what looks to be, well, over a year! in that time i have built 2 others and done a few track days
with the new engine.
The thread started as i was rebuilding a lonely pinto that was abandoned in the corner of a friends garage. it turned into a thread but then i got
side tracked with other commitments, started a new job and was recovering from bad health.
now the pinto lies in the garage, waiting for a little more TLC, i'll see if i can put up some pictures of the engine now. its been sat on the
engine stand for a while but i hardly have enough time to look after the DAX at the moment.
In the mean time if any of you want to u2u me questions tehn i will be more than happy to answer as best i can
All the best
Alex
Not Anumber - 22/4/12 at 04:22 PM
Does anyone happen to know the oil capacity of a chopped pinto sump and whether the standard dipstick can still be used to show the level ?
Smaller intervals between oil changes ?
omega0684 - 22/4/12 at 04:28 PM
when you remove the bottom part of the sump, you weld a small extension on the right hand side of the sump (none starter motor side) and you can also
weld in a pipe section at the front. thus not compromises oil volume