ShaunB
|
| posted on 27/7/10 at 10:29 PM |

|
|
Xflow sump split - how best to repair?
I had a couple of minor offs at Cadwell a couple of weeks ago and during one of those I obviously caught the sump on the kerbing putting a dent in the
sump base right near the drain plug and causing a small crack in the steel.
 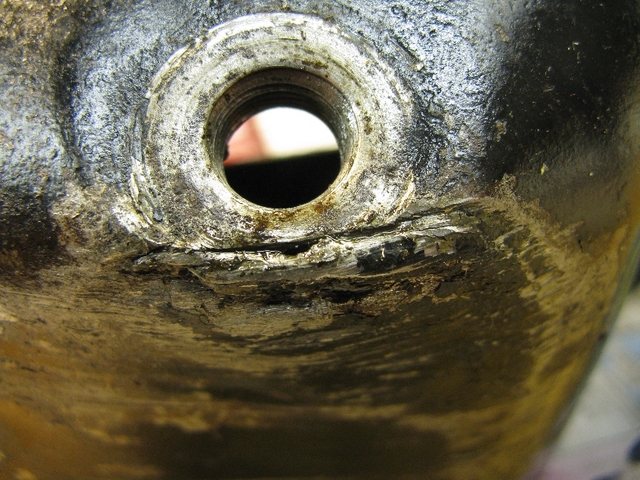
Xflow sump split
I obviously can't lay a bead of MIG over it as it'll most likely burn away the thin steel where the washer seats, so what would you lot
recommend? Brazing, Soldering, Chemical metal?
This is a baffled sump, so replacement isn't a straightforward option.
Cheers,
Shaun.
|
|
|
|
|
austin man
|
| posted on 27/7/10 at 10:31 PM |
|
|
braze it from the inside ore weld from the inside
Life is like a bowl of fruit, funny how all the weird looking ones are left alone
|
|
|
blakep82
|
| posted on 27/7/10 at 10:35 PM |
|
|
can't think of a reason why you can't mig it.
________________________
IVA manual link http://www.businesslink.gov.uk/bdotg/action/detail?type=RESOURCES&itemId=1081997083
don't write OT on a new thread title, you're creating the topic, everything you write is very much ON topic!
|
|
|
ShaunB
|
| posted on 27/7/10 at 10:44 PM |
|
|
quote:
braze it from the inside ore weld from the inside
Good thought, but the captive nut and the welded in baffle plate mean there's insufficient access from the inside.
quote:
can't think of a reason why you can't mig it.
I'm worried about melting away the thin steel where the sealing washer sits. Perhaps I'll get some thin sheet out of the scrap bin and
play...
[Edited on 27/7/10 by ShaunB]
|
|
|
blakep82
|
| posted on 27/7/10 at 10:47 PM |
|
|
how thin is it? i'd have thought to have the thread cut in, and a good flat seal, i thought it would be fairly thick?
no experience of xflows right enough
or mash some chemical metal epoxy resin into it. don't know how much i'd trust it though
[Edited on 27/7/10 by blakep82]
________________________
IVA manual link http://www.businesslink.gov.uk/bdotg/action/detail?type=RESOURCES&itemId=1081997083
don't write OT on a new thread title, you're creating the topic, everything you write is very much ON topic!
|
|
|
NigeEss
|
| posted on 27/7/10 at 11:10 PM |
|
|
quote:
Originally posted by blakep82
can't think of a reason why you can't mig it.
Likewise.
It's possible to mig very thin stuff. You may chase a hole at first but it can be done
then grind flat with one of those flap disks in the angry grinder.
Time is an illusion. Lunchtime doubly so.................Douglas Adams.
|
|
|
thefreak
|
| posted on 27/7/10 at 11:24 PM |
|
|
Mind me asking where you got the sump from? I'm looking to get one chopped and baffled and not having much luck.
|
|
|
MikeRJ
|
| posted on 27/7/10 at 11:48 PM |
|
|
I reckon that's easily MIGable, you don't need massive penetration, just a good bead of weld with no pinholes. Clean it up with some
solvent and burn of any oil in the cracks with a blowlamp to make sure you don't get any contamination.
|
|
|
David Jenkins
|
| posted on 28/7/10 at 06:25 AM |
|
|
Be aware that the metal is VERY thin on the curved parts of a x-flow sump - as I found out when I shortened mine. You'll find the flat surfaces
are about 1 - 1.5mm thick, but where the metal was stretched to make the curves it goes down to 0.5mm or less.
Here's mine after cutting the bottom off - shortly after I moved the sump plug nut further down, to a new hole. The metal looks thicker than it
really is, due to the rough edges after sawing.
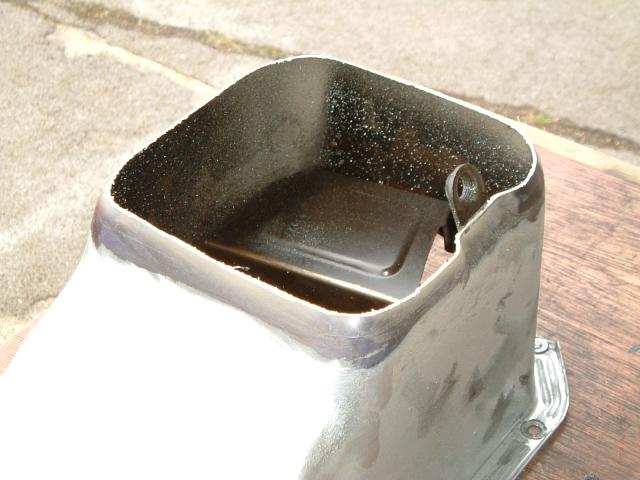
I managed to MIG it, but I did have a 1.5mm steel plate underneath to soak up the extra heat.
You could braze it quite easily, as you're only filling up a crack. However, you will have to make sure that the crack is *really clean* before
you start. Soaking the edge of the sump in solvents, boiling it in detergent, and so on. If there are any traces of oil in there then the braze
won't flow and fill the crack.
Had you thought about cutting out the whole section and replacing it with new metal? The sump plug is just a hole with a nut tacked on the inside -
the plug's washer seals against the outer surface, so as long as that bit's flat & clean then the shape of the remainder is
irrelevant. I had to do this when I shortened my sump - it's easy. Just don't put the plug on the bottom...
|
|
|
02GF74
|
| posted on 28/7/10 at 07:30 AM |
|
|
instead of welding the crack, how about making a shaped plate that goes over the area, including hole for supl plug?
the thicker metal should reduce risk of blow through plus you don't need to worry about cleaning your crack out.
|
|
|
mark chandler
|
| posted on 28/7/10 at 07:39 AM |
|
|
Looks like the bung is brazed so you will need to get the split brazed up or this will all fall apart and fizzle when you MIG.
Of course you could cut out the bung and relocate to a safer position and weld a bit of protection over the area.
No need to use the ford bung, you could weld a big nut on the inside of the sump and create a new bung.
Regards Mark
|
|
|
anup
|
| posted on 28/7/10 at 10:40 AM |
|
|
If you need a replacement, I think I have a spare in the garage.
Get in touch if so
|
|
|
David Jenkins
|
| posted on 28/7/10 at 11:21 AM |
|
|
quote:
Originally posted by mark chandler
Looks like the bung is brazed so you will need to get the split brazed up or this will all fall apart and fizzle when you MIG.
On mine the nut was part of a steel tab that was spot-welded to the inside of the sump (you can see it in the picture in my earlier post).
The nut has nothing to do with the oil seal - it's the nylon washer under the head of the plug that seals against the outside of the sump. The
thread just holds it in place.
If yours is brazed then you can just hack it off and start again (or braze a repair, as stated earlier).
[Edited on 28/7/10 by David Jenkins]
|
|
|
ShaunB
|
| posted on 28/7/10 at 01:05 PM |
|
|
Thanks for all the responses.
My threaded nut is as David describes, attached to a metal tab which is spot welded in place, rather than brazed. It looks like the metal about 1mm
thick, possibly thinner after being planed down by the kerbing.
I'll have a practise with the mig on some thin sheet and give it a go. As has been suggested I can always plate over this hole and put one in
further back. I've got some 2mm sheet so I was thinking of adding a layer covering that forward edge to give it a bit more protection.
Anup - I may well be in touch.
thefreak - It came with this engine, but I have a couple of photos of the inside that I could send to you. I thought all the baffling had been added
by hand, but looking at David's photo it would seem that there is a plate there as standard and it's simply been extended.
|
|
|
Angel Acevedo
|
| posted on 28/7/10 at 02:13 PM |
|
|
quote:
Originally posted by 02GF74
....should reduce risk of blow through plus you don't need to worry about cleaning your crack out.
????
 
Beware of what you wish.. for it may come true....
|
|
|
rusty nuts
|
| posted on 28/7/10 at 06:26 PM |
|
|
quote:
Originally posted by thefreak
Mind me asking where you got the sump from? I'm looking to get one chopped and baffled and not having much luck.
Vulcan engineering may be worth a call?
|
|
|
Mark Allanson
|
| posted on 28/7/10 at 06:37 PM |
|
|
The sump is 16g, heavy enough to arc weld if you wanted to!
Easiest option is to make up a plate 2" x 2" with a sump plug sized hole in the middle. Put the plug in the plate and fasten it into the
threaded hole and tighten. Peen the plate onto the sump and weld around the periphery.
This would also reinforce the area for the next time you bottom out!
If you can keep you head, whilst all others around you are losing theirs, you are not fully aware of the situation
|
|
|
Marcus
|
| posted on 28/7/10 at 07:51 PM |
|
|
As above, migging to that would be a fairly simple task. I managed to Mig a lawnmower grass box up, was like steel foil!!
Marcus
Because kits are for girls!!
|
|
|
ShaunB
|
| posted on 28/7/10 at 10:23 PM |
|
|
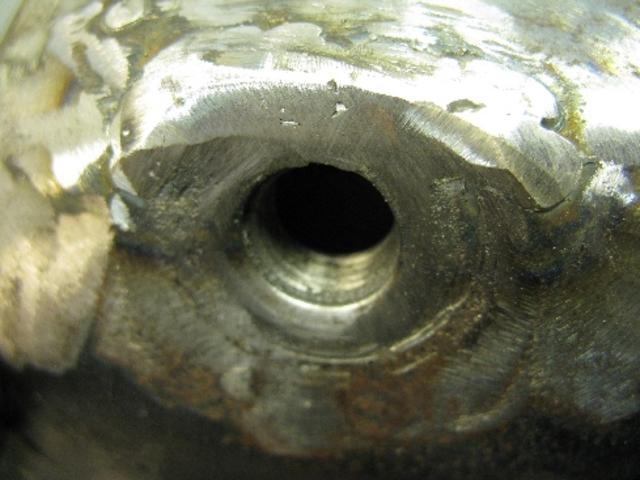
A bit of practise on some 1mm sheet gave me some confidence so I gave it a go.
First a run over the split and the gouge that was just behind it:
 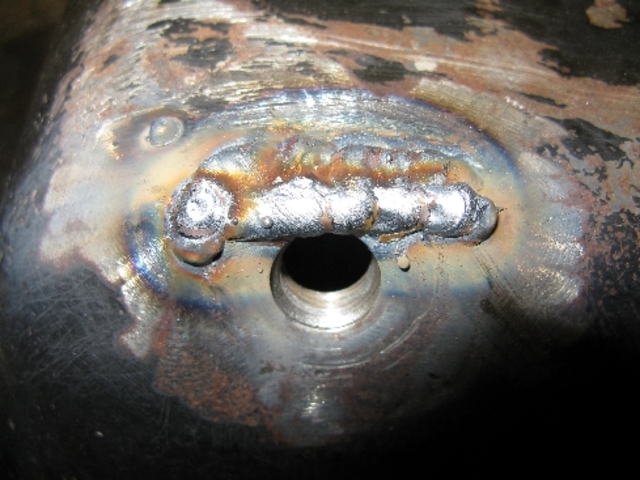
Split welded
Inside shot showing how the nut is attached and reasonable penetration:
Inside Sump
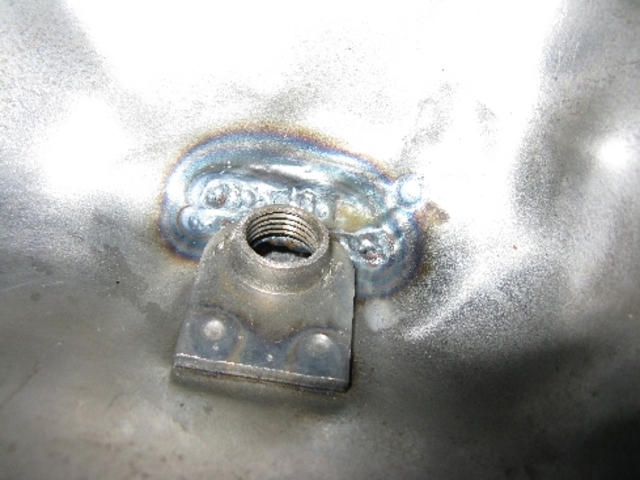
Ground that back and smoothed it with a flap wheel, think I may have just broken through again, but I'll check tomorrow by sitting some solvent
in it. If it is I'll just over-plate it as has been recommended:
Split dressed
Then I added some protection for the leading edge with some 2mm sheet:
 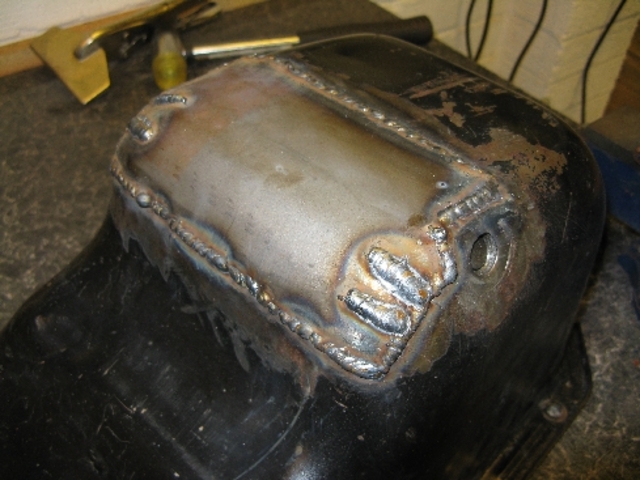
Sump guard
Finally an inside shot showing the added baffle extension:
 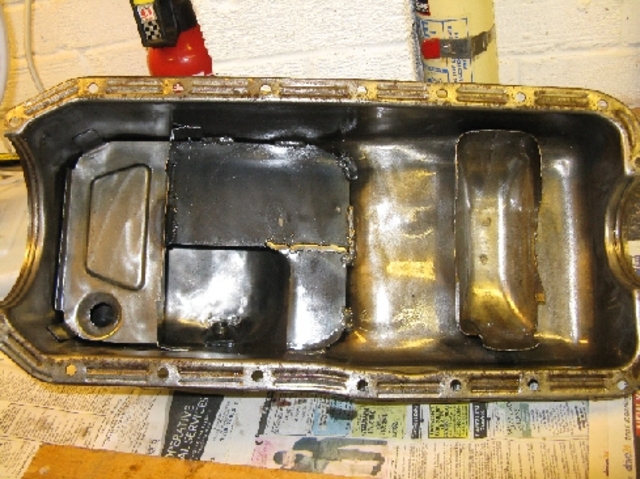
Baffled Xflow Sump
Thanks for all the comments - very helpful forum as always 
[Edited on 28/7/10 by ShaunB]
|
|
|
David Jenkins
|
| posted on 29/7/10 at 08:43 AM |
|
|
Looks like a good 'industrial' solution to the problem!
Just make sure that the area where the face of the sump plug will fit is nice and flat, to give the washer the best chance of keeping the oil in.
|
|
|
Angel Acevedo
|
| posted on 29/7/10 at 03:40 PM |
|
|
quote:
Originally posted by Mark Allanson
The sump is 16g, heavy enough to arc weld if you wanted to!
Easiest option is to make up a plate 2" x 2" with a sump plug sized hole in the middle. Put the plug in the plate and fasten it into the
threaded hole and tighten. Peen the plate onto the sump and weld around the periphery.
This would also reinforce the area for the next time you bottom out!
Just what I was about to add...
No, I wasn´t, but I`ve seen it before and works well on Stamped Sumps, not so on cast ones as you only move the place where it will crack somewhere
else.
ETA:
Damn!!!
Talk about SLOW!!!
[Edited on 7/29/2010 by Angel Acevedo]
Beware of what you wish.. for it may come true....
|
|
|


.jpg)


.jpg)