mark chandler
|
| posted on 24/11/15 at 06:08 PM |

|
|
How to build a turbo exhaust manifold
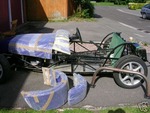
After building a few over the years I thought I would share a few pictures, this is for my blade engine although is just as applicable for N/A
cars.
Hopefully this slide show will work
https://picasaweb.google.com/102680160261680183167/BuildingATurboManifold?feat=directlink#slideshow/6220772202362351074
First thing to do is decide where to position your turbo, in this case I want it behind my engine, halfway out of the chassis for a straight exhaust
run down the back.
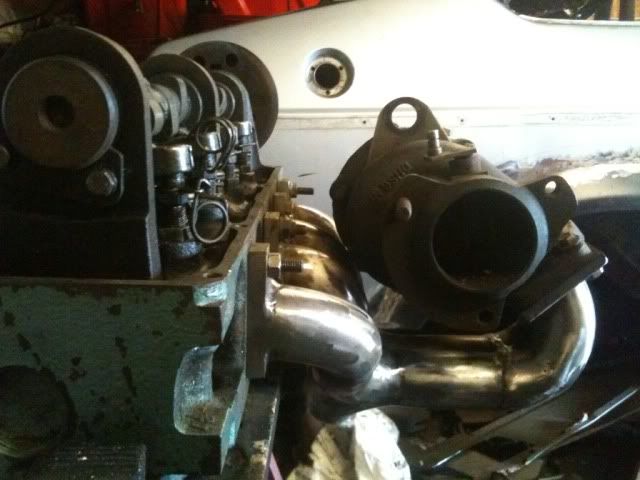
1st photo, no.1 pot is furthest away, I have chopped an aligned a 90 degree mandrel bend, further back hard to see is the turbo flange in place, this
is temporarily welded with a strip of steel to the chassis rail.
2nd photo, as above, just a bit clearer 
3rd photo, cut a plate in 1/4 steel oversize then use a hole saw to cut out four holes which will take the primaries, note this is the correct way to
join pipes where people blend bends you lose power. This is also easier to make.
4th photo, here I halve welded some small rods to join the flange to the collector top and dropped in a 90 degree bend, it is spaced away to give a
long tapered collector, the old bit of collector on the flame will be cut off later on.
5th photo, as above just clearer you can also see how the bends line up.
6th photo, two bends in now, by taking no.2 cylinder out I retain the same length as the no.1, note as I build up you tack the bends in situ, remove
weld up then refit, provided all is going well the collector end just pivots into the hole.
7th photo, all 4 pipes no in place, third comes out and around, again keeping the same length and the 4th pops up, across then back in.
8th photo, as above just clearer and a better view
9th photo, off the car, I have welded all the pipes into the collector from the inside, I did weld around the outside when lined up. Although could
only get 270degrees on each pipe. After welding then using a grinder shape the outside of the flange. You want a small step around the outside as it
helps stop back flow.
10th photo, here I have ground off the original stubby collector, then welded a straight pipe onto the turbo flange, squeezed in my vice, then cut 4
slots and driven out the ends to fit the header flange.
11th photo, all welded up now, just had to flatten a bit of exhaust pipe and cut into a V to fit the gaps and bolted the turbo.
Note, if you get a really good fit up on the tubes you do not need any filler wire, this also ensures no nasty wire hedge hogs on the inside.
Cost for this one was £125 for 13 X 90 degree bends and £10 for 1m of straight pipe.
Hope this helps someone.
Cheers Mark
[Edited on 24/11/15 by mark chandler]
|
|
|
|
|
snapper
|
| posted on 24/11/15 at 06:22 PM |
|
|
Nice to see how it's done thanks
Have you got the engine solid mounted? As those pipes either side of the top chassis tube means it could hit
I eat to survive
I drink to forget
I breath to pi55 my ex wife off (and now my ex partner)
|
|
|
mark chandler
|
| posted on 24/11/15 at 06:30 PM |
|
|
The engine is mounted on poly bushes, even with a pry bar it does not move much. All the pipes come under the chassis rail, they do get close, maybe
3/8".
The secret is to mount the flanges then join the pipes, then cut the bracing off afterwards. Trying to suspend things is a real struggle, it's
how I used to do it 
[Edited on 24/11/15 by mark chandler]
|
|
|
Smoking Frog
|
| posted on 24/11/15 at 08:43 PM |
|
|
Thanks for sharing. May have a go at it myself one day.
|
|
|
perksy
|
| posted on 24/11/15 at 10:54 PM |
|
|
quote:
Originally posted by mark chandler
The secret is to mount the flanges then join the pipes,
Trying to suspend things is a real struggle, it's how I used to do it
[Edited on 24/11/15 by mark chandler]
That's how Simpsons do it and they have boxes of bends etc that they tig up to make the desired primary length's
This is for the 'custom' work for individual cars, but for the more 'batch' work they have jig's
Spent a day there once watching their every move 
and they do some lovely work 
|
|
|
bi22le
|
| posted on 24/11/15 at 11:05 PM |
|
|
Quite long collectors, has that induced much lag into your throttle response?
Ideally they would be as short as possible.
Track days ARE the best thing since sliced bread, until I get a supercharger that is!
Please read my ring story:
http://www.locostbuilders.co.uk/forum/13/viewthread.php?tid=139152&page=1
Me doing a sub 56sec lap around Brands Indy. I need a geo set up! http://www.youtube.com/watch?v=EHksfvIGB3I
|
|
|
mark chandler
|
| posted on 24/11/15 at 11:17 PM |
|
|
Still building the car up, packaging forces this position.
Being that the exhaust gas will be flowing at maybe 150mph it will not make any difference to lag, some cars even have turbos placed where the rear
mufflers live which costs around 1psi in boost pressure relative to sitting directly under the exhausts.
I may get a slight lag due to a marginally longer run to the intercooler, however chopping 7" out the wheel base negates most of the impact of
moving the turbo from the front to the rear.
I,m hoping to pick up a couple of BHP with this one as its a much better design than its predecessor.
|
|
|
froggy
|
| posted on 25/11/15 at 06:45 PM |
|
|

I recently moved my turbo to sit over the gearbox and the extra length hasn't affected spool at all and the I'd has gone up 4mm
[IMG]http://i144.photobucket.com/albums/r187/froggy_0[IMG]
|
|
|
Rob Allison
|
| posted on 25/11/15 at 11:25 PM |
|
|
Did this for my pinto

|
|
|