
So, my Midlana begin's, off to get the mx5 uprights tomorrow..
However, its probably going to be years before anything else happens...
Keep tuned....
Doh,
Steve
Did you get mk1's ?
When you get the steering column make sure you get the ignition switch, lock, and key it's not as easy/cheap as ford to change them
subscribed
quote:
Originally posted by big_wasa
Did you get mk1's ?
When you get the steering column make sure you get the ignition switch, lock, and key it's not as easy/cheap as ford to change them
You now have more donor bits than me  off to ebay we go
Steve a lad down Middlesbrough had an engine engine bay loom ignition barrel ecu and new clutch Ł75 . see if I can find his user name if you like?
Will only need ignition barrel and key.
Also subscribed
This is going to be a laugh.. At the moment I have no were to build the chassis yet, and, seeing as the house has been for sale for 3 years so far
there's no end in sight..
Unless of course I get the jeep finished and moved on...
I've just moved. I swear the new garage is smaller 
While I save for a work shop I am going to finish a couple of smaller projects like the Rv8 and the turbo Zetec. Then I am going to start on the
smaller bits of Midlana like suspension and practice my tig work.
Target is a track day in 2020
I'm looking for a house with a grand garden, so I can dump a 45ft container in it
Or one we're the garage is down the back garden so I extend it to the front of the house!
Here we go picked up the front end bits late last night, grand old fanny on getting 25 year split pins and bolts out!
Heres the whole lot connected to the rack..

Bare column, but complete from the top to the rack..

Some nasty rusty split pins on castle nuts.. crap idea eh?

Anyone know the thread to blank the pas pipes holes up with?

Going back for the rear hubs later this week, 3 of us just couldn't budge the bottom bolt! Going back with mr angry, that will do it
Stay tuned, no idea whats next
Picked up the rears last night. Due to rust the long bolt through the bottom wasnt moving, even with a 3/4 drive breaker with a 3 meter bit of pipe!
So I used a thin cutting disc down the sides to remove the bottom part. Got the drive shafts as well cause we couldn't budge the big nut
either!

Both sides complete even with handbrake cables!

Just chucked the whole lot in the bath for a soak...

Remember the crusty split pins on the fronts? Got them out no bother!

Just bought a 29mm 3/4 drive socket for the hub nut, will have another go at them once they have been in the bath.
Never had any problems with split pins. Wiggle the ends off with a set of pliers and shear them off with a breaker bar then poke the bits out.
Rear carrier lower bolts, one was hard work but I did avoid cutting them off.
Any idea if if the front hub bearings are like the cortina's ? Ie nip up and back off or if there torqued up. I need to get the very rust back
plates of.
Found a thread when looking for info on the back hub nuts, no idea where though, something like torque up back off, do that 3 times and back off 25°..
if I remember rightly..
All I did with the back plates was remove the 3 12mm bolts and snip through the thinnest bit where the caliper lives and put them in the bin!
Wayhay, another build to follow. I'm starting one soon as well. Bought the book a couple of months back, had a good read and decided to go for
it. I've registered and started a thread on the Midlana forum but why not spread the joy 
So far, I've picked up an Alfa 166 3.0 donor for engine & box and probably/possibly a lot of the electrics/instruments/switchgear as well. My
build is going to have to be as budget as I can possibly manage so lots of donor car parts rather than shiny new aftermarket bits.
I'm on the midlana forum as well, username Steve!
Only forum I've actually managed to get my own name on!
I think I've decided to use a 1.8t 225 bam engine from a TT or cupra r.
Lots of tuning potential, 280 with a chip and easy tuning options for maybe 400bhp.
Still haven't ruled out a diesel mind... 300bhp and 400ft/lbs is tempting, but ooo the weight....
Steve
[Edited on 8/5/15 by coozer]
You'll have to start a build thread over there as well Steve.
I'm itching to get started on mine but got other stuff that needs doing first at the moment. I should have plenty of spare time next year though
- out of work come next April.
Have to satisfy myself with taking odd wee bits off the donor car from time to time when I can spare 5 minutes.
Think Ive found the motor for the build...
http://www.ebay.co.uk/itm/500-BHP-AUDI-A3-S3-VW-GOLF-SEAT-1-8T-20v-TURBO-BAM-AGU-FORGED-ENGINE-BREAKING-/181730565021?pt=LH_DefaultDomain_3&hash=i
tem2a4ffc5b9d

That should just about do it....
The ad. suggests you only get the basic engine, none of the 'extras' so it looks like it could add up quite a bit before you actually have a
running engine though?
Always thought one of those would go nicely in the back of a Strat copy but as you can probably imagine, that tended to get me some funny looks.
Mmmm, having a good time with one of the driveshafts... One side just slid out but the other is shaking its head.. no no no...
So, thought Id persuade it....
Drilled a couple holes in the disc and bolted it to the hub... Piece of heavy 5mm angle.. fastened down with the air gun... bent to bits using a 10mm
nut. So, thought Id spread with a thick bit of steel... Ratchet it down until BANG! Champion its gone.... No?

DOH!!


That looks a bit reluctant doesn't it.....drill down the middle possibly?? Ease out to close to the diameter then try again???
Sometimes a 50T press isn't enough.
Love that cad model so I've nicked it
quote:
Originally posted by big_wasa
Love that cad model so I've nicked it
Getting a bit carried away but could not resist this....

Upright is in the vice with some penetrating fluid and I keep topping it up but the shaft is still stuck fast
Mmmmmm.....shiny.......
Would like to thank BigFaceDave for his help, here it is, arrived this morning

Whats the best way to weigh this lot? been looking at some force gauges but just for a quick one off measure its not worth buying one....
That looks tidy Steve.
The good old mtx75.
They are so solid no one bothers to sell them used
Is it a mtx75?
I had no idea what box it is. Is there any upgrades for it, close ratio, LSD etc.
Or, is it worth trying to get hold of the 6 speed st170 box??
Yeh it's an mtx75 it's the mk2 box with hydraulic clutch.
Good solid box, bigger than the 6 speed but lighter. Yes you can get lsd's and the focus rs mk1 comes as standard with one as well as an ap
clutch.
The 6 speed is a getrag box ( also fitted to the mini ) and has a dual mass flywheel with a non traditional ford first motion shaft patern.
Stick with what you have. I've gone Getrag 6 speed and the clutch is going to be a pain in the ass. The clutch and fly in mine are shot and
barley upto the 170bhp of the st170. plus side is there are lots of cheap 6 speed boxes about starting at Ł25 so I will work somthing out.
Hello,
I've recently bought two Ford Pumas for Ł270! Ones going back on the road but I fancy a bit of fun with the other. Initially I thought about
prepping it for road rallies but I've always wanted to build a kit car or similar.
I think mid engined using a FWD drivetrain is the way to go. You guys obviously have the book but I'm still looking up various builds on the
Internet and will probably change my mind again tomorrow. Anyway I have a couple of questions:
-what nose cone and bonnet are you planning on using?
- is there room for movement with the design? With this I mean would it be simple to alter the chassis so I could fit Puma uprights, steering column,
rack and even the unaltered driveshafts? I'm guessing that the answer will be no but it would be usuefull to use most of my cheap donor!
As you can tell I'm pretty green with chassis modifications but have a decent workshop and am keen to have a project on the go!
Re st170 clutch. When I changed the clutch and flywheel in mine I looked into a solid flywheel. TTV racing make them around the same price as the Dmf.
The clutch plate everyone uses is the standard redtop f20? Clutch with the st170 pressure plate and standard st170 CSC. Supposedly really wakes the
engine up, the DMF weighs a tonne!! As an ST170 owner I can confirm, the standard clutch is sh*te. As already said, barely up to the job. The getrag
gearing would be great for a kit, not so good for a relatively heavy road car though.
Good luck with the build, I shall be watching with interest.
Midlana is based on a MX5 as its already rwd for the uprights, its also already on double wishbone suspension. That way there's hardly any mods
to fit the uprights.
If you want to use the Puma uprights they will need modifying to get rid of the strut, then redesign the wishbones to hold it and you still going to
need front uprights. Combine this with new driveshafts to suit the width your no better off using the Mazda bits where Kurt the writer has already
done all the hard work for you.
Although you can use the Puma to donate everything else, engine trans, wiring, ecu, steering column, rack etc.
You can get the book from the lulu bookstore. They do have offers on now and then so you can get the price down. I paid about Ł32 for mine.
Nice to see someone else keen on mid engine using fwd trans. Just shout up if you need any more advise.
Steve
And regarding the nose cone and bonnet... Midlana is around 4 inches wider at the front of the chassis so a custom modified one will need making.
For the original builder they are off the shelf in the USA but not here.
Front bonnet only covers the brake pedal so a bit of Ali bent to shape will do, the process of making it is detailed in the book.
Rear engine cover is up to the builder as the back end design is open to artistic licence!
All that stuff is a long way down the line..
I've got another engine to pick up this weekend😀
According to some engine comparison stuff in an old kit car mag, Zetec se weighs 85kg....certainly I was faffing with an engine crane with mine when
me and a mate said sod it and lifted it, inc gearbox......it was easy!
So to weigh it, a decent set of bathroom scales methinks!
(Watching with interest as I want to upgrade from my 1.25 engine one day...)
Another vote for sticking with the book design as far as the suspension and steering goes. Anything is possible of course, but re-jigging the
suspension geometry to work properly with totally different uprights is a lot of work to get right. No reason why you can't use the column out of
the Puma along with many other donor parts, but stick with the MX-5 for uprights and rack to avoid LOTS of extra work. I've done geometry mods in
the past on other kits, but it's fraught with issues.
FWIW, my build will be using everything possible from an Alfa 166 donor I have, but most definitely using the Mazda suspension parts.
Be good to have another on the go.
As I said I have a head full of projects so I need to decide which direction I want to take. I've been a member on here since 2004 for example! I
also have better facilities than I did then too as I'm now a mechanic in the armed forces where I only had a single garage and no idea before.
Now you mention the MX5 being RWD I understand that this would be the best road to take. I'm currently reading through the build blog and also
one for a 1.7 engined RIOT. I've also been looking at different engine choices such as the 2.0 and v6 duratecs. Since this will likely be locost
in spirit I think I'm better off sticking with the smaller, lighter and cheaper 1.7/ib5 combination. I could hopefully try and retain the awesome
standard Puma gear linkage. I've also rebuilt a 1.6 Se in the past and they are as you say light and also simple to work on.
Kirt says it weighs around 1500lbs which is over 600kg. I guess this is due in part to the engine, box and forced induction set up? Could a build of
around say 550kg be achievable?
Im also guessing that 15 inch wheels with suitable tyres to retain the rolling radius could be used but what about narrower wheels?
You could shave quite a lot of weight off by using thinner tubes than the book calls for. Some of the gauges are way up there compared to what we are
used to over here. As an example, the book calls for 0.125" 1.5" square for the chassis bottom rails. That's just a fraction under
10swg!! I plan on using somewhat thinner stock myself, closer to 16swg. Then again, the bloaty great V6 I'm using won't help the weight.
Rim/tyre width - why not go narrower - 205 should be fine, even 195 wouldn't be daft. Just a case of picking the right rim offsets to suit and
making up the arches to match. Probably the main hurdle is keeping the rolling radius up with a narrower tyre.
If you are adamant about using the Puma bits, you can always use 2 sets of front uprights. Honestly though, it's quite tight round the back end
and adapting it to suit a different geometry might be a 'challenge'. That said, anything is possible of course.
As above I also think the weight can be shaved down from the quoted 680 kg.
[Edited on 28/8/15 by big_wasa]
I think you are all correct when you say the chassis is best kept as Kurt designed it. Messing around with the chassis has stopped me trying to make a
mx5/BMW Haynes as it seems like too much trouble. What's the difference in weight per m between the different metals? Do the ROP bars exceed the
thickness required by the MSA?
If any one f you have build blogs elsewhere I would like to see them!
I've not looked at the weights as such, just felt some of the materiel was a bit on the OTT side.
This might help:
http://www.parkersteel.co.uk/doc/BS/WeightChart.pdf
All this talk prompted me to revisit my shopping list and I've opted for 2mm cold formed for the main sections. Reckon that'll be plenty
strong. CDS for the suspension links, ERW for the odds & sods.
For the ROP, I'm going to have a chap called Tom Wood do the material supply and bending. He does mail order and is pretty darn reasonable, so
pick a material that satisfies the Scrutes and off you go. Getting the design certified would be quite another matter though! I've also
approached Pilkington about a screen. Again, surprisingly reasonable to supply a proper IVA friendly E marked piece of laminated glass. They were
talking around Ł120 which I thought was excellent.
The best place for builds is probably Kurts own site really. I've grabbed loads of images from there already to help provide inspiration.
I'm particularly impressed with the chap from Oz that is doing a wider version - his CAD work & renderings are superb.
My own 'build' hasn't got very far yet. Bought a 166 V6 donor for engine, box, steering column, switches, wiring etc etc, an Elise fuel
tank (perfect fit), some hooky Aerocatches for the bonnet, a solid flywheel to replace the knackered DMF on the V6 and that's about it so far. I
plan to finish stripping the 166, pick up a suitably cheap MX-5 and strip that, prep all the donor parts ready to get busy then get stuck into the
build proper next year.
Looking briefly at that metal chart, 1 inch seems to be half the weight of 1.5?
With these type of cars I've always fancied just a fly screen over a full windscreen and wipers etc!
The knarrs I just cannot help meself...
Picked this up this afternoon...

And, just in case you think Im taking the piss....

You won't have room, in that garage of yours, to take a wee if you keep filling it up with motors and gearboxes
Have you finished your Jago yet, or has it been moved to one side ? ?
Regards
Jon
As you can see the chassis is on its side and axles all there to trip me up!
V8 needs rebuilding first!!
Need some electric bits and ecu to see if I can get one of them running!
haha that's like my place,
1 x zetec blacktop
1 x st170
1 x Rv8
1 x lt77
1 x Getrag 6 speed
And boxes and boxes of parts
Ha! Wish you were living next door!!
Hi Steve,
How did you get on with that reluctant CV in the end?
....guess why I'm asking.....
Well Chris, probably just like you its still stuck!
Drat. I was hoping you had a magic method that worked. To be fair, I've only made one attempt so far using my trusty but weedy 3-leg puller. Donor is pretty much ready for final stripping and butchery now but wanted to try my luck with the hubs before taking them off the car for good. Got all the bolts out no bother, much to my surprise. Hub nuts - easy....CV from hub, not so far. Only tried the one as yet. Watching lots of youtube vids of people struggling with similar problems.... Why the hell don't they put a touch of anti-seize on these things when they make them.
My next step is a bespoke frame to stop it flying out of the press and upgrade the 10 ram for a 20 ton bottle jack!
Only other problem I have is the long bolt through the bottom arm, had to cut it each side of the upright cause they are rusted solid!
Save your self the grief and pick up a pair of eblag 
Having shelled out on a donor...not really what I want to have to do Drilling them out is probably the last resort option but I was kind of hoping
I might be able to re-use the outer CV joints. Might even pay to just leave them be, remove the shaft and innards of the CV and do the
clean/tidy/paint on the upright as-is. I'll give it another go but will make sure I don't use any methods likely to knacker the wheel
bearings. Trouble with that option is it just saves up trouble for the future.
Couldn't just come out easily could they.....mind you, got a stuck one on the Jeep as well, so maybe worth buying a more meaty hub puller.
Thing is for me one side just slid out when I undid the nut, the other is refusing point blank!
Its a challenge now!
It gets that way doesn't it - a personal challenge from a hunk of metal. I've only tried one side so far - be nice if one came out without a
fight but I'm not usually that lucky.
Good luck mate - keep us posted.
One of mine was worse than the other but I was fairly lucky.
Managed to get the shafts out. Bought a cheap hydraulic puller. Supposed to be rated at 10 tonnes. Did the trick anyway, although it did rather make a
mess of the very end of one shaft - bent it. Gulp. Still, easily tidied up with the powerfile and the thread was OK. Don't yet know if I will be
able to sue any of these driveshaft parts or not at this point - probably not, but I'll hang on to them for now. An easy win would have been if
the Alfa outer CV fitted the MX-5 hub...no such luck. It was close though, couple of mm out.
I need to look at removing the MX-5 outer CV now. Manual says 'don't', so I need to figure out why that is. Trying to get away with
just having custom shafts made and using stock MX outer CVs with stock inner Alfa ones. Ideally, the ones I already have.... I don't think I
will risk doing a DIY cut & shut on the shafts though. Might be fine for making a template but not a wise idea for actually using. Still, all that
is a long way in the future.
One wheel bearing came apart in all the excitement, and the other one was a bit noisy, so I'll change them both anyway.
MX-5 donor is now thoroughly dealt with....just have to take a few trips to the local tip to get rid of the bits.
Now the fun starts...trying to decide what I really really need to keep just in case, what I actually know I need and hopefully some stuff I put to
one side that I was't sure about that I can convince myself to get shot of.
The MX-5 had 140k miles on the clock and looked pretty original. I stripped the engine into more manageable sized bits and the condition of the
internals was really pretty impressive. No wonder nobody wants to buy spare engines for these things!
For the brakes, at the moment, I am thinking about using the Alfa calipers (4 pot Brembo at the front, big single piston at the back) with some bigger
than stock Mazda discs and suitably sized master cylinders on probably a Wilwood pedalbox. Might DIY the pedalbox though- not decided yet. Just a
thought at the moment though, don't know how the basic dimensions work out so I have some sums to do. I want to avoid custom discs & calipers
if I can as they can get pretty pricey pretty quickly, and for what I intend using it for, not necessary. Do need to make sure it has good balance
though, so need to add a bit of effort to the back brakes to make use of the rearward weight distribution. I got the balance wrong on my Stratos rep
at first - way too much front bias, but once I had fitted some good sized rear discs, bigger piston rear calipers and a bigger front master cylinder,
the brakes were excellent. Got some really good advice from a guy on that forum that helped me a lot. Wish I still had the numbers from that car -
wold be useful now. Once again though, all very much a long way away.
So, way more than enough from me...any news from you guys?
[img][/img]
The Wilwood pedal box gets my vote, for the price its not worth the hours faffing about to make one is it??
And the iva man just might be impressed....
See what you mean - cheap enough not to bother DIYing it and a nice bit of kit. Had a Tilton unit on my last build and that was pretty expensive, the
Wilwood looks much better value.
Decided to keep it simple on the brakes in the end. I've got some 1.8 calipers & brackets now, so 255mm up front and I'll get some
adapters so I can fit 270mm 'sport' discs at the back.
Sell the Brembo calipers off the Alfa to help pay for it.
Come on guys....I'm in need of some motivation!!
Not done much on my project other than cooking rusty bits of Mazda and messing with wires really. I did manage to sell the Brembos, which was good,
and picked up some nice adapters so I can use the bigger discs at the back. Also sold the roof from the donor MX-5, which was a result.
The electrolytic cleaning has worked really well, but I think I'm going to finish it off with a bit of a bath in Citric acid, followed by
washing/drying then a final glass bead blast and paint process. I'm going to wait until the weather improves a bit before doing that though -
could do with warmer less humid air.
Stripped down the rack the other day so I can check/clean etc. Need to de-rust the steering arms then lengthen them, and clean the main casing but so
far, it all looks to be in good order. Even contemplated re-using the TREs, but they are a wee bit loose for my liking so have some new ones on
order.
After cleaning and painting, I'm happy to re-use the lower balljoints at the front. Still in very good order mechanically.
Made a small start on stripping out the many, many unnecessary bits from the 166 loom. It's going to take a while..... No idea what they used to
loom it up with, but it leaves a film of nasty sticky black goo all over the wires. Joy.
You need some motivation?? You've come a long way for me, that last pic of the motors on the garage floor has not changed one bit since I
posted!!!
Did have look round the black Friday and the sales now to see if anyone had anything off the Wildwood pedal box but no no no....
Ha hah.
I am around the same as you guys. Just skirting around the edges and getting way laid with other projects and toys.
I have started to have a clear out. Emptying my garage and filling Coozers
Really thinking of buying jolly greens Viento. Hmm 4.0 v8 in the garage would slot in nicely.
Thing is before I start stripping the zetecs down I need to put the V8 back together. Stripped it down in summer 2014, yes 2014 and gathered a new
cam, followers and a timing set.. That was thisntime last year...
Rocker assembly's have been soaking in diesel for about 2 months now for no other reason I can't be bothered..
Toying with cutting my losses on the Jago, ditching it and starting the frame for Lana.. Need to think of a new name for it, maybe Apachie Motors for
the manufacturer and 350S for the model. Apachie 350S
I've got no distractions other than a bit of decorating really. I'm just tinkering at the moment, trying to make best use of the odd hour or
two here & there before I get properly stuck in later in the year after I finish work. I should really start practicing my MIG welding and
learning how to TIG. Next day off I will probably go get some shielding gas in a sensible quantity and get cracking. Never know, could end up with a
small man-shed business that way! (man-shed business being the modern replacement for a cottage industry....)
Still not clear on what I will do about welding equipment though. I have a cheap but surprisingly effective MIG and I bought a stupid-cheap TIG to
play with. I think I'd like to TIG this build, and have pretty much decided to buy one new welder....just need to decide if it'll be TIG or
MIG, based on how I get on with my experiments. If MIG, I think an ESAB Caddy 200i looks favorite, if TIG....I have no real idea at the moment so
would welcome any suggestions. Ideally, similar budget to the Caddy, so about Ł700. Either way, I don't want to be doing a complete build using
the kit I have. Ideally, and assuming I can learn to TIG well enough, keep the trusty MIG for tacking and odd jobs, then do the bulk of the welding
with a half-decent TIG welder. Sell either the stupidly cheap TIG or the 'new' one after the build is done.
What are you chaps doing on the welding front?
I have a really good portmig 185. The best money I've ever spent on a welder. But I really want a tig as well. Was watching one of them Alaska series on discovery and the dude build a little grinder stand out of inch box with a tig off grid miles from anywhere. Not sure whether to start cheap or go the whole hog and get a 200 ac/dc from r-tech....
Just treated my self to the kemppi cousin of the Esab.
Only done two puddle welds upto yet but it's nice. That's the chassis sorted. I've got a Chinese Dc tig for manifolds and sumps ect
but I am saving up for a nice middle of the range Ac/Dc 200a tig.Thermal arc or Rtech are top of my list as I doubt I can run to the kemmpi.
[Edited on 5/1/16 by big_wasa]
Ah, thanks chaps. R-Tech or kemppi. Spec wise, I think I was looking at similar features for the TIG.
One of the manifolds on my donor V6 has some bad cracking on one runner so that will be good practice for the cheap DC TIG. It's stainless, so
that'll be interesting......
I think the R-Tech TIG161 would do me nicely. Can't see me needing 200A TBH, although the improved duty cycle on the TIG201 is worthwhile. Is it worth another Ł250 for a hobby user though?
Ł900 for the r tech..
What about this??
WELDER APEX TIG 200 AC/DC PULSE HF INVERTER ARC STICK AC DC
There are a few dodgy reviews of them.
I must be getting old but I don't fancy a Ł500 punt. At least with the Rtech it's well known it's Chinese but your paying for a
warranty that's worth the paper it's written on. Even the American Thermal Arc is Chinese.
That said my first gen chinese dc tig is still going strong. It's a bit like the TV, I fancy a bigger better one but it just keeps going.
I should probably have a play with the cheap DC one I bought first....never know, it might be perfectly capable of doing what I need. Next day off
I'll go get some HP Argon and get welding.
I think I would be a bit shy of spending Ł500 without some hope of support as well. R-Tech certainly seem to get glowing reviews.
Appreciate the thoughts chaps.
Another vote for R_Tech products and service. I have the R-Tech Tig160PDC and for the same amps as the BOC we have at work has a lot more power. When i upgrade my Cebora mig it will be from R-Tech.
I did spot the DC jobs, certainly a lot cheaper. The ability to weld aluminium adds a lot to that doesn't it. Over double the price, and I
don't really need that ability. Nice to have it for sure...but need it, nope.
Then again, spend Ł900 and you get AC, as well as a foot pedal they charge at least Ł100 for......aarrggghhhh!!
I just bought a Jasic 200 - very nice TIG machine, sold my old PARweld but didnt go far to funding the Jasic. Wish i had started with a TIG rather than the MIG.......
I think both have there uses.
Is this too good/cheap to be worth a punt??
http://www.eastmachinery.com/product/11706.html?pay=gbp&gclid=COPcmevjmMoCFQb3wgodjJsJQw
Ł150 sounds like an ideal amount to start with....
And, how on earth do I get rid of that massive turbo pic above so this thread fits my tablet????
That looks very similar to the cheap one I bought....and haven't actually used yet! Same spec and features, different case by the look of it. I
paid a bit less, it was an auction and I got lucky. They probably cost about Ł20 wholesale
This was the one I bought. Got it for just over Ł100.
http://www.tigmig.it/en/tig-wig/tig-dc/saldatrice-inverter-tig-alta-frequenza-200-amp-tigmig-inverter-tm-200-hf.2.1.49.gp.442.uw.aspx
Hi Steve,
Any updates?
I have got back to mine......
Keen to see your progress mate.
Rob
Just bought a boost gauge, arrived this morning... That progress??
Currently stripping a Jimmy to donate its engine box axles dash and wiring to the jeep..
No lol!
Let's get some photos, even I've managed to get the car out on the road outside my house over the summer...
http://www.locostbuilders.co.uk/forum/26/viewthread.php?tid=206679
Rob
Hope I am not intruding on this thread. I have been inspired to get the Midlana book by an inspirational chat with big_wasa. Ok mine is not going to
be the fastest build but I am negotiating to buy a focus ST 170 for engine and gearbox etc.
Reading the book I see the car uses the 'catfish' nose cone which is 4" shorter and 3" wider than a standard seven nose so I asked
Martin Batho if he could produce an aluminium nose to fit as he makes a complete aluminium set of panels for the seven. His reply was that he could
and if he could get 3 orders he would do them at the same price as his seven nose cone Have a look at http://bathoscars.simpl.com/shop.html for some
idea of his work. Price is a fairly hefty Ł475 but I must say his work does look rather nice.
Your welcome Ian, Im just going to either mod a standard nose or build one a lot different out of bits of mdf, ali etc..
Have you got the book? I got mine off lulu.
https://www.lulu.com/shop/search.ep?keyWords=midlana&type=
Keep an eye on it as they do have discounts often. Got mine for way less than half price!
[Edited on 29/1/17 by coozer]
Problem is storing a work of art like that for several years before getting around to using it.
2nd issue, out of the half doezen builds on the go none are 100% to the book.
Thanks Coozer - I'm jealous, whilst I did get 20% discount I can't say I matched your price!
Big_wasa - I agree about storage, I will not be sorting a nose cone out until I'm close to needing it. A friend of mine is trying to build an
aluminium bodied seven and will probably be investing in several of Martins products, I'm sure it will look nice but fiberglass does as well.
IanR
quote:
Originally posted by coozer
Your welcome Ian, Im just going to either mod a standard nose or build one a lot different out of bits of mdf, ali etc..
Have you got the book? I got mine off lulu.
https://www.lulu.com/shop/search.ep?keyWords=midlana&type=
Keep an eye on it as they do have discounts often. Got mine for way less than half price!
[Edited on 29/1/17 by coozer]
Mine is going to be full carbon, I'll make the moulds myself to fit the car. Mine is very none standard. Sorry can't help, Rob
Minor update from me. Not started actual construction yet, but it's getting close. Donor engine prep almost complete now, gearbox currently
underway then its just the brakes and uprights to finish off. I've now got some of the steel and all the rod end joints etc. Balance of the steel
will follow shortly, although still waiting to hear back from my chosen supplier on that order. Must nag them. I've sourced oversized sheets of
MDF to make the build table which is good. The alternative of using 8 x 4 sheets was cheaper, but to make a 10 x 5 table would mean doing a massive
jigsaw which is a loud of hassle and also not as good as a single piece. It'll cost about an extra Ł60 to do it in one piece - bargain I
reckon.
I've been experimenting with zinc plating on some of the parts I've refurbished - pretty happy with the results on the whole. Given how much
I spent on new bolts etc on the last Alfa engine I rebuilt, this has turned out a lot cheaper, is more effective (most of the OEM Alfa bolts are just
painted and start rusting as soon as you touch them with a spanner) and I've also been able to use it on many and varied brackets & fixings
that previously I would have painted.
Result so far.....


[Edited on 27/5/17 by CorseChris]
That looks very good mate..
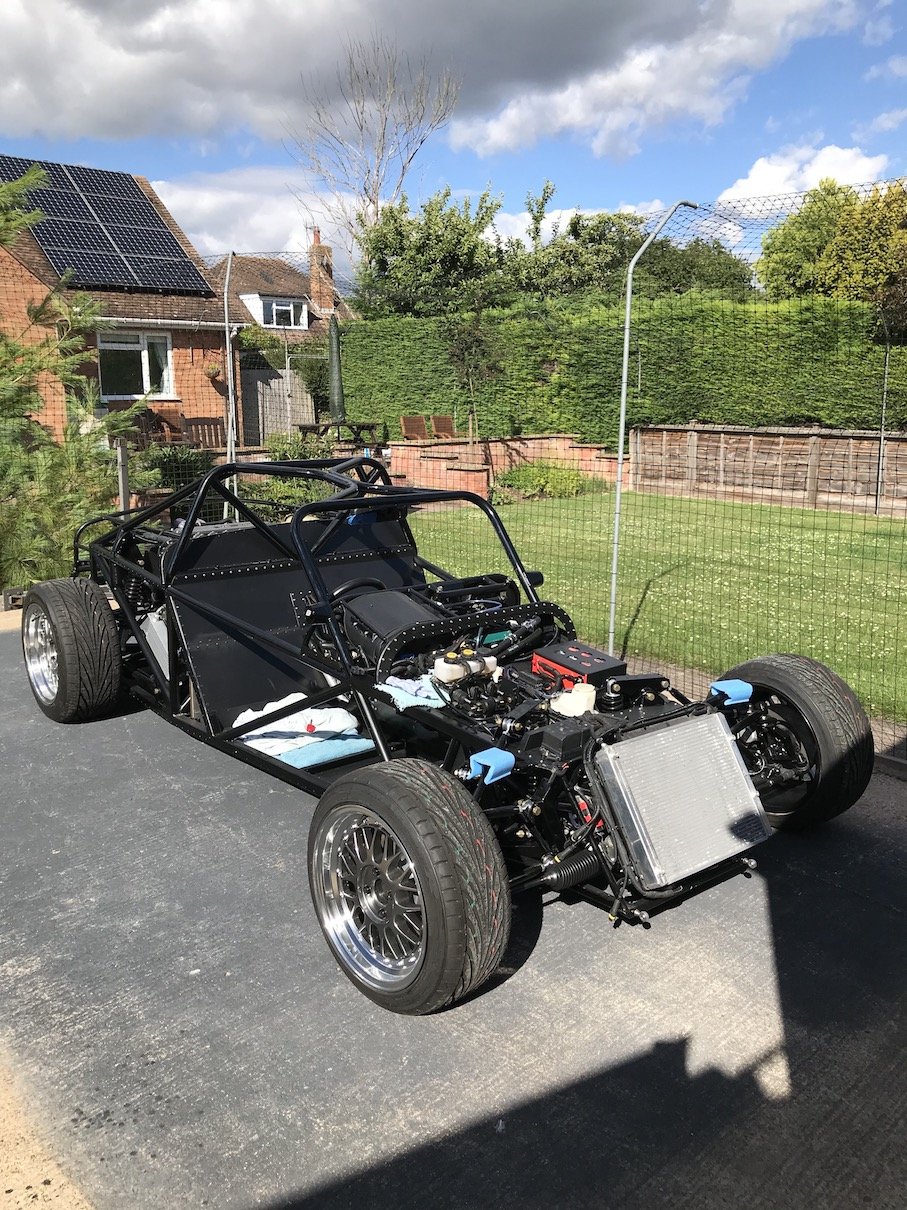
I've made a start on the chassis since my last post. Coming along OK on the whole and really quite enjoying the whole process so far.
This was taken a while back - I've since done the front suspension brackets, made the font wishbones & rockers etc, most of the rear
wishbones too as well as adding some more structure at the back ready for the engine.

That looks brilliant - er - I had better get properly started on mine er soon.
Seeing your chassis like that really does bring home how strong the Midlana chassis looks
I see this thread has been languishing a bit.
I'm still plodding along with my build. Basic structure is done, if I had wheels for it, it could be called a rolling chassis. I've moved
onto the fiddly bits now - plumbing etc. Engine install is all done, including a remote oil filter setup (had no choice about that) and an oil cooler,
as well as the exhaust system.
I've got the gearshift and handbrake sorted, currently trying to persuade coolant lines, hydraulics and electrics down the spine of the car.
Having the tank where it is makes getting them into the engine bay a bit of a mare TBH, but the other choice of having them go under the tank brings
another set of problems so I'll stick with it. I'm getting there, it's just a bit of a challenge.
Drivers eye view. Upper column, instruments and switchgear from the donor 166, lower column and rack from the donor MX5. Steering wheel is a
pre-enjoyed Westfield IVA friendly job (centre pad not fitted here, obviously...) on a home-brew adapter/spacer arrangement that proved annoyingly
awkward to sort out....

The exhaust system. Mostly it was OK to make, but it got a bit funky trying to get the two banks of the V piped through to a merge under/just in front
of the lower silencer can. It got very tight in there due to the rear suspension support structure. There's a CAT inside the first can. Keen to
hear how it sounds. I've gone for a single pipe system, rather than a pipe-per-bank for a few reasons. Only needs one CAT, will be quieter this
way, should sound better this way too. My last V6 had a pipe-per bank and even though the outlets were side by side, it always sounded a bit
'odd'.

After all the welder angst way back when, I recently succumbed and bought a half-decent AC TIG anyway, despite having built most of the car with the
comedy cheap but remarkably good for the money Chineseium DC only job I started with. I realised I was going to have to do a fair amount of aluminium
welding one way or another, so didn't have a lot of choice. Should have got one at the start I suppose. I've found I'm using way more
TIG than MIG. I use MIG when I can, but only if I have good access. Otherwise, it turns to poo. I find TIG so much easier to deal with.
Fantastic engineering 
Brilliant progress - sorry I've still not properly even started. Got lots of bits thanks to er - another - got a TIG - er - thanks to another - but still not made a start properly as I am changing the engine gearbox in my Haynes, helping build an ST170 engined Tiger Avon and also helping build another Haynes which started as a Zetec engined car but is now seeming to go MX5 ... and .. the boss (wife) wants me do do some house decorating (managed to get out of that for 12 years but maybe ought to do at least one room ;-)
I've been pretty free of major distractions thankfully. Didn't do much over the winter months, and more recently in the hot weather, had a
bit of a break as it gets fiercely hot in the shed when the sun shines. Wussed out and fitted aircon so that excuse has gone.
Had a small break from proceedings to fit a new clutch into the Westfield but that's it for excuses.
Did a bit more plumbing and aluminium welding yesterday. It really is pretty tight round the handbrake. Had to tweak that a wee bit to help but think
I've got it now. I'm using the same technique I used for the exhaust here - buying bends, cutting out angles to suit, then gluing them
together. Not the best way, but the chances of me being able to accurately describe what bends I need where, and getting tubes bent to fit..then
having them actually fit, are close to zero. The other option of lots of straight bits with hose joints is even less enticing. I'll be giving
them a thorough leak-test before final fitment though.

And an aluminium weld. Comments/critique always welcome. I'm hoping to get better as I practice. I know I should practice, practice, practice
before I get to the actual job, but, well, shan't
 beforebefore
In the spirit of me continuing to totally hijack this thread....
Did the first start on the engine on Friday. Overall not too bad. Took three goes. First one failed as some idiot (cough) had plumbed the fuel pump
bass-ackwards and had the HP fuel output and vapour recovery ports mixed up. Engine received fresh air, floor received HP fuel.
After I cleared up the worst of the fuel spill, 2nd go was better with it firing up but clearly unhappy. Realised I had forgotten to blank the brake
servo vacuum port on the plenum.
3rd go was much more as expected. It's a bit clattery at the moment as it's been sat built for over a year so the lifters are a bit dry.
This was, and they normally are, a very quiet engine so this should improve once the oil works its way round properly.
https://www.youtube.com/watch?v=bEsTHGm_9KQ
Couple of issues after the start. A MIL, which I traced to the absence of the A/C control relay and also the absence of the vapour recovery solenoid.
I won't have either on the car, so I've spoofed them with 220 Ohm resistors. I needed to make some minor wiring mods to do that tidily, so
that was done yesterday.
Other issue was a tiny oil leak in a fitting I welded up from some parts. This is in the oil cooler circuit and should be an easy enough fix. Slightly
miffed it leaked at all really, as it'll take some cleaning before I can re-weld it. Was thinking I might be able to cheat actually. I'm
going to see if there is enough room to push the hose on a bit more and past the leak, so I can use that to seal it up for now. I can do it properly
when the whole car gets torn down for paint etc.
As of now, mechanically, it's basically finished. Electrics are pretty much done as well, with just the loom tails for the front and rear lights
to tidy once I decide what the lights will be and where they will fit. A few small jobs here and there like fitting the screen demister but the bulk
of the remaining work is all about the bodywork now.
That is some lovley work you have done there.
I just wish I had more space and time.
I often find the engines are very noisy on a stand like that as you can hear every click of every solenoid, injector and even the relays.
True enough. Being inside the shed makes it worse too of course. Normally, all you get with one of these at idle is the sound of the injectors.
Found the oil leak yesterday. As suspected, a porous weld. By the time I had "repaired" it, I'd got rather too good weld penetration
and started to close up the oil path so I've junked it and ordered a proper fitting. I confess I never even looked at how much I could get them
for, just DIYed out of what I had to hand. Turns out Ł8 gets you a decent looking M18 banjo, bolt and a pair of Dowty washers too.
Another hijack post from me.....
Still working in this. I confess, most of my updates are on the Midlana site and a couple of others I frequent more....frequently.
Bodywork is almost done now, soon be time to strip it down and paint it all before the final assembly.
Recently been working on completing the cooling system to the point I can run the engine up properly. Getting increasingly paranoid about it siting
idle for so long and although I've been turning it over by hand from time to time, that's no substitute for a proper run up to temperature
now and then (although of course there are problems with constantly idling an engine too....).
Anyhoo, been having some fun with leaky silicone hose joints but getting there. Engine now sounds much better after getting the oil warmed up and
circulating properly.
https://youtu.be/voJxcTIKo9E
Currently sorting out a P0135 error it threw but pretty sure that's down to a new but dodgy cheap lambda probe I fitted. A genuine(!) Bosch one
is on the way so fingers crossed it's A) genuine and B) fixes the problem. I did substitute an old and iffy probe I took off the Jeep ages ago,
and that didn't display the fault, nor did substituting a 21W bulb in place of the heater circuit, so I think that's fairly conclusive.
Since last posting, I've discovered the joys of 3D printing and have to say, it's been incredibly useful to be able to design and print
plastic doo-dads to solve all sorts of problem on the car build. I've made loads of marking gauges of various sorts, a curved piece that runs
along the bottom of the dash to give an IVA friendly radius to it as well as providing a mounting for the under-dash panel, IVA covers for the
suspension pickup points, custom cable clips, replacements of missing covers on various OEM bits I've used, a casing to accept the Alfa light
switch and instrument dimmer that had to fit into a really awkward corner, internal structure for the rear light pods that carry the light units, hold
the vac formed ABS shell and provide solid fixings to attach the whole thing to the wheel arch, an adapter to fit the petrol filler to the curved
bodywork, etc, etc. There are limitations to what you can use the parts for of course, as the plastic I'm using isn't great with too much
heat. I could in theory print nylon or ABS but not got the required kit for that yet (have to enclose the entire printer and keep the whole thing hot
while printing)
[Edited on 30/11/19 by CorseChris]
Well done that is a very nice looking engine.
I always imagined my Midlana exoskeleton style.
[Edited on 30/11/19 by big_wasa]
A few folk have tried to encourage me to go that way with it. Doesn't appeal to me though (just not my thing), and I quite like the way it looks with panels.
Having driven a 7 (no screen or roof) in very wet conditions I cannot imaginge driving an exo thing in similar conditions, I like panels like you!
Still plodding along with my Midlana.
Now Photobucket is broke, I don't know if this will work?? Should be a shot of the car in the sunshine, as it is at present.
[Edited on 22/7/20 by CorseChris]
That looks like a really nice build Chris, well done, I am very jealous
Really nice, as ever.
Yes that’s coming on well, looking at it wishing I could get some real traction on mine!
That prompted me to do a quick update. Almost done now. So much so, I plan on filling in the IVA application tomorrow.
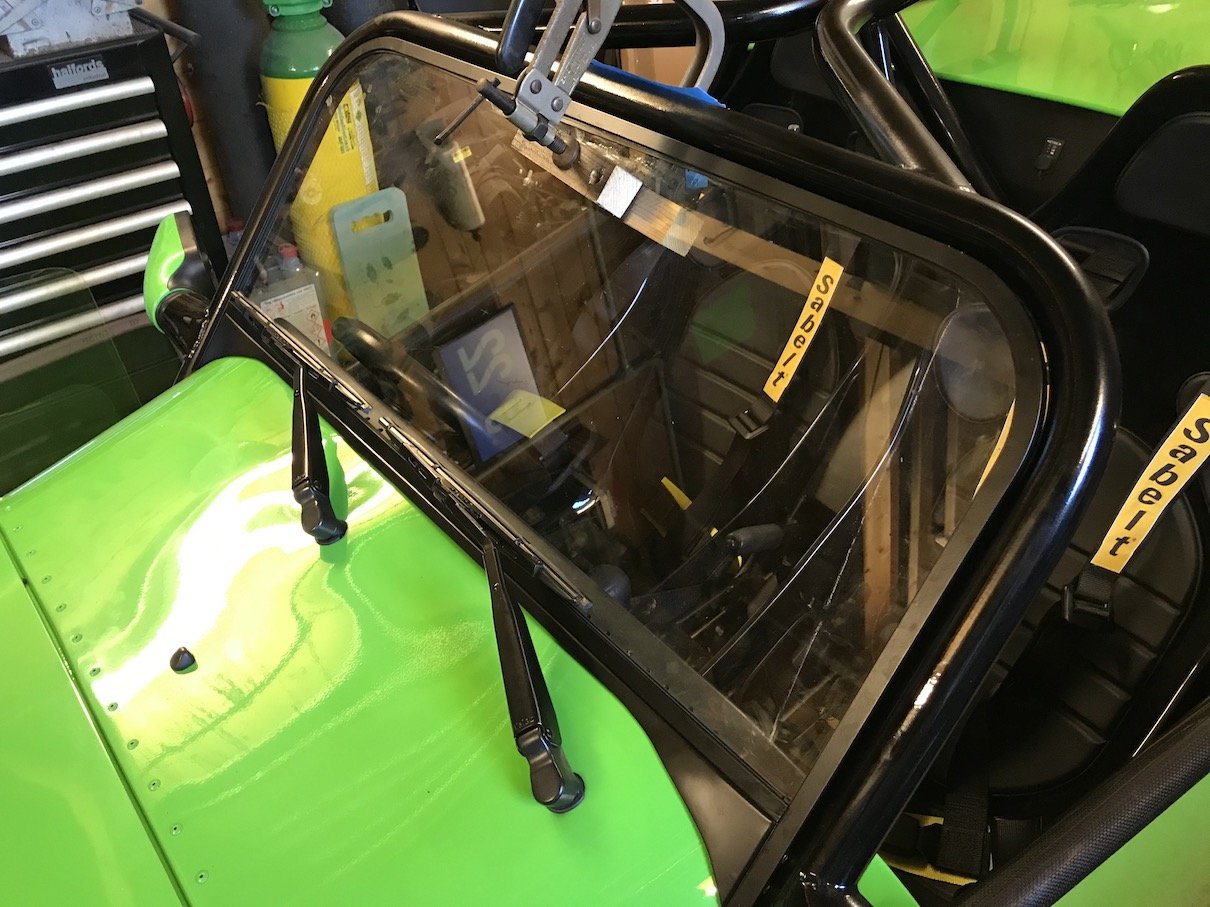
Anyhoo, couple of shots. Not 100% done but oh so close. Screen surround rubber trim to fit, a line of pop rivets at the front where the Clecos
currently are, PPF on the front face of the rear arches, fit the front mud flaps, fill the screen wash bottle.


And with the screen fitted. I cut this from a Defender screen. Took 2 tries Still, a LOT cheaper than a custom one. I was quoted well over a grand
from Pilkington now they have to comply with their Euro-masters. Was a bit scary clamping the rain sensor on though. The all-important compliance
marks are clearly visible, which is what matters. (That isn't a crack down the left side of the screen - it's a tide mark from the
wipers)
Wow, good progress. I said to my partner the lock down could have been a benefit to some for getting on with their builds, I’ve got two young children
so it hasn’t for me.
Any photos of the rear? What size wheels are you using? What’s it like to drive, bet it sounds nice.
Steve, how’s yours coming along?
Rob
Wow from me as well, that looks like a really nice car indeed, good luck with IVA - locally a friend applied for IVA in March and after eventually getting in touch (again) today they are guessing about another two months, hope yours goes through much quicker
quote:
Originally posted by b14wrc
Wow, good progress. I said to my partner the lock down could have been a benefit to some for getting on with their builds, I’ve got two young children so it hasn’t for me.
Any photos of the rear? What size wheels are you using? What’s it like to drive, bet it sounds nice.
Steve, how’s yours coming along?
Rob
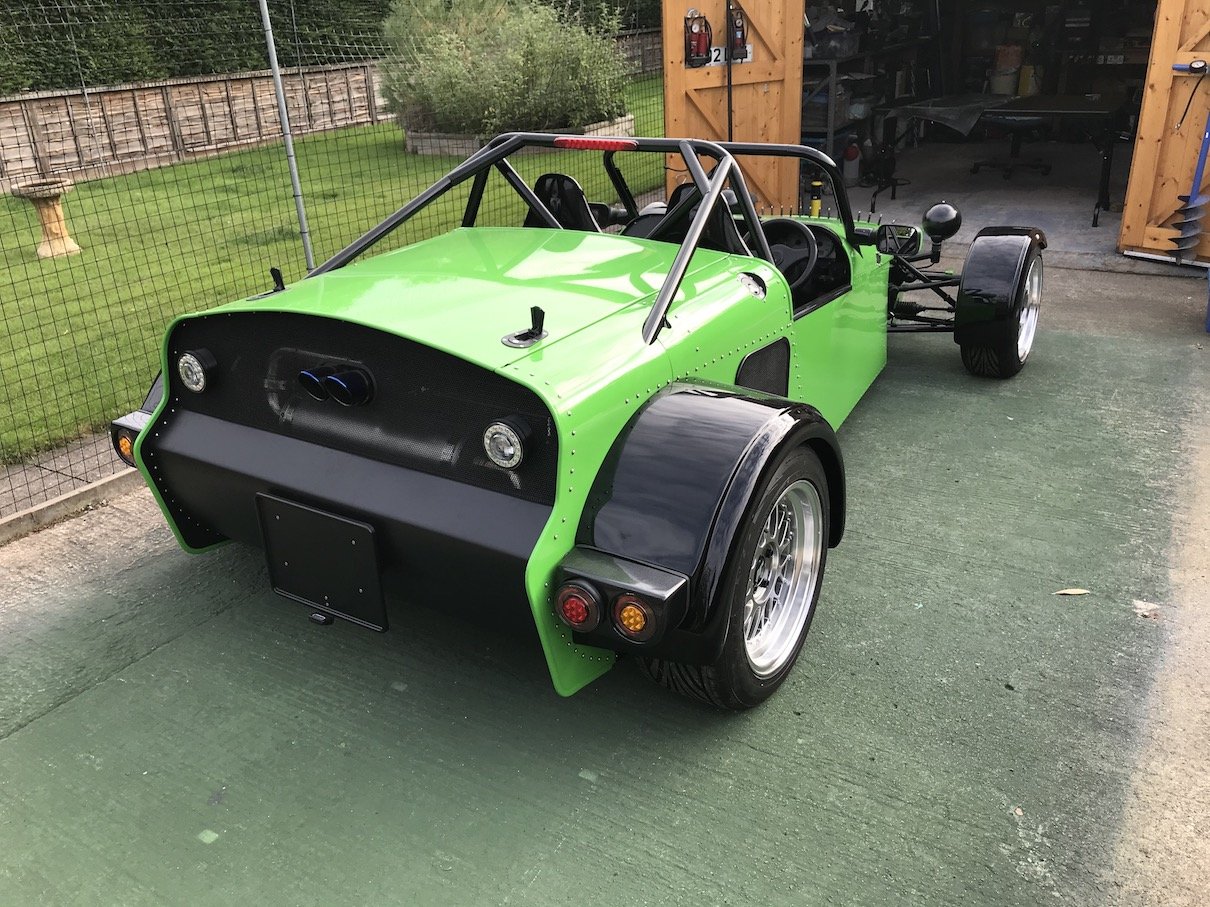
Thanks for the photo and detail on wheels. I went for a staggered fitment too. J9 rear J7 front. So was interested to see what you did, not sure what
Kurt used, can’t remember what the book specified.
Yer that Alfa V6 will be nice.
Your exhaust is neat, just wondered how you did the rear, think it’s the hardest part to finish.
Lol, I started mine in 2010.... and look how far I’ve got. Love to get some proper time with it. Eventually, just hope I don’t have to convert it to
electric before it’s finished!
you've done a terrific job of that car looks really cool from the back
Possible IVA edge issue round the filler cap cutout?
quote:
Originally posted by Mr Whippy
you've done a terrific job of that car
Possible IVA edge issue round the filler cap cutout?
quote:
Originally posted by b14wrc
Thanks for the photo and detail on wheels. I went for a staggered fitment too. J9 rear J7 front. So was interested to see what you did, not sure what Kurt used, can’t remember what the book specified.
Yer that Alfa V6 will be nice.
Your exhaust is neat, just wondered how you did the rear, think it’s the hardest part to finish.
Lol, I started mine in 2010.... and look how far I’ve got. Love to get some proper time with it. Eventually, just hope I don’t have to convert it to electric before it’s finished!
Looks like an excellent build, I would be interested in finding out more!
Is there a list of metals required to build the chassis somewhere on-line or I think someone mentioned a book?
Any links?
Thanks
quote:
Originally posted by BigDawgV8
Looks like an excellent build, I would be interested in finding out more!
Is there a list of metals required to build the chassis somewhere on-line or I think someone mentioned a book?
Any links?
Thanks
quote:
Originally posted by Mr Whippy
you've done a terrific job of that car
Possible IVA edge issue round the filler cap cutout?

Minor update. Took the car for a pre-IVA MOT on the 1st. No problem passing and it was a great opportunity to get the brake balance tested, headlamps
aligned, emissions checked and have an experienced eye look it over. My tester was disappointed as he couldn't find anything wrong He's
a great guy, always helpful but always straight too, so nothing gets by him...which is what I want from a tester, personally.
Two issues came to light, maybe three.
The speedo was playing up. I've used the donor Alfa instrument cluster, a SpeedoDRD calibrator and an ETB Instruments 'M8' Hall Effect
sensor, triggering of an ABS tone ring on the MX5 outer CV. It's this last bit that was the problem. Basically, I used the wrong sensor, or put
it in the wrong place, as the M8 sensor is designed for more crude triggers like bolt heads - it has trouble discriminating between the relatively
fine teeth of the ABS ring. I stupidly thought an ABS tone ring would be the perfect trigger source.... I did call ETB and they reckoned it could be
OK, but weren't enthusiastic. Basically, too polite to tell me I was an idiot I think. Anyhoo, time being tight, I panicked and ordered one of
their gear sensors (designed for ABS ring use etc) but meanwhile relocated the M8 sensor to pick up on the inner CV bolt heads and that worked. I used
one of these M8 sensors on my last build, which was the same gearbox, and put it in the same place. Worked fine. So, after some head-scratching over
calibration, I'm happy it's now reliable and stable and I think calibration is pretty good too. Hopefully I'll be able to adjust on
test if it needs it. Only takes a few seconds to re-program the SpeedoDRD.
So, BNIB ETB 'Gear' Hall effect speed sensor for sale....
Steering self-centring. It actually does the opposite. I only really tested it at full lock and close to full lock, but it felt OK when driving
normally anyway. Numerous suggestions have been received on that - so far I've upped the caster from 6 to 8 degrees, adjusted toe from about 1
degree toe-in to zero, upped tyre pressure and will reduce camber from where it was at about -1 to -0.5 I think. I'm also going to reduce the
rack travel to keep away from the ends where it all gets a bit extreme. I'll do the camber and rack limiting today then try to test it again now
the rain has stopped. It's going to be a bit tricky testing it given I can't use it on the road though.
It felt generally really good driving to the test - very happy given it's had zero setup other than some best-guess starting figures for
everything.
The maybe third thing is braking effort. The pedal is really dead. No spongy, just takes a LOT of effort to stop. I tried to bed the brakes on the
trip to the test, but there's only so much you can do in a relatively short trip on public roads, on the very first outing, so I'm sure
there's is more to come there. It passed the MOT brake test with decent numbers - Efficiency 72%, Brake lock 50%, imbalance 0% both axles,
handbrake 31% The tester said it was an easy clear pass. I forget the threshold values but it was way above them. Rears wouldn't lock, fronts
did.
So, anyway, I've been fretting about the braking effort but have finally decided to stop second-guessing it and just take it to the test as it
is. The only fix is either new master cylinders with smaller bores or start messing with new calipers and probably discs. New masters will be the
cheaper and easier fix, that fact it locks the fronts on the brake test suggests there's plenty of actual braking force, so it's a matter of
reducing pedal force....or maybe just get some more miles on it and bed the pads properly! My concern is just that I have no idea what the test
criteria are for pedal force.
Right, wish me luck with the steering testing and the IVA on the 14th
Apologies for the delay - forgot to update this site
IVA failed. 3 items.
Brake fluid reservoirs not labelled with fluid type - had the right symbol on top of the reservoirs but apparently need the actual fluid designation
too (DOT3, DOT4). Easy fix, sticker purchased. Ironically, the clutch reservoirs that had the original Wilwood cap on it was correctly labelled...
TBH, I'm not totally convinced about this one, the manual says:
"17. An indelible label must be affixed in a visible position within 100 mm of the filling ports of the fluid reservoirs to ensure that it is
possible for the end user of the vehicle to identify the brake fluid used in braking system. DOT fluid references and/or the Symbols and text in Table
1 are considered acceptable."
..and each cap has the correct symbol, but I'm not going to argue the toss about something so trivial when a small sticker fixes it and it
wasn't the only issue. Had it been, I suspect it might have got a pass given the proximity of the lid on the clutch fluid.
Axle weights. Total cock-up really. Overall number a bit low and I got the front/rear numbers reversed, and what should have been the rear axle weight
was too low anyway (front axle weight higher than absolutely necessary but that's OK). I had taken some advice on the numbers and my advisor had
a brain-fart...and I didn't question it. It's heavier than I thought too, by about 60kg, so I suspect the scale I used to weigh the heavy
bits isn't very accurate. Anyway, it's another easy fix, just get the paperwork amended for the re-test and now I know exactly what values
I'll need.
Brakes. As suspected, pedal force was way too high (efficiency too low). Balance etc fine, but just way too heavy on the pedal. This is
relatively easy to sort I suppose, but it is a bit expensive and a bit of a faff. After the fail I decided to go to town on it. My last project as a
very similar vehicle in terms of weight, layout etc so I've decided to take a leaf out of that book as well as using information from
Midlana's designer of course. My hope that the Mazda brakes would do the job was clearly misguided. With a servo, no bother, but I cannot go much
smaller on the masters so bigger calipers it is....and while doing that, I may as well go large all round.
Front brakes will be 300mm discs with Wilwood Midilite calipers on 44.5mm pistons. Due to the bulk of the caliper, I've had to fit 13mm spacers
to get them behind the wheel, which is a whole world of joy as it has cycle wings, so they need moving too of course. It doesn't need any more
width at the front either TBH, so I may try and adjust the suspension back a bit. This is a kit from Freakyparts for the MX5, although they usually
supply the calipers with the small pistons.
Rears will be 300mm to 316mm discs (probably) with, of all things, Hyundai i30N calipers. These are a large single piston sliding caliper from a
heavy, relatively powerful hot hatch, so will be fine I think. I'm not 100% certain yet as I'm waiting for them to arrive, but pretty sure
these will fit behind the wheels without issue as they are compact outboard of the disc due to being single piston sliders....which was why I picked
them.
On my last build it went through SVA with some Lancia Beta rear calipers and discs, and although it passed, the brakes were pretty poor. I fitted some
300mm discs and Sierra Cosworth 4x4 rear calipers and it was transformed. Rear brakes on a mid layout like this need to be rather bigger than one
might expect. I had fitted caliper spacers and the 276mm Mazda discs to the back but the calipers are too small for a non-servo setup I think.
The other issue I found during investigation was that I had the 5.1:1 ratio pedalbox, so to help improve the pedal force thing yet more, I've
swapped that for the 6.25:1 version.
Otherwise, all good. Inspector was very complementary, which was nice, as he gets to see some proper decent kit. Lack of self-centring sorted with
some minor adjustments. Not driven it far since doing those tweaks so don't know it they will stay like that or not longer term, but it felt fine
on a very short trip round the IVA test centre. Inspector actually commented on how nice a ride it was. Apart from the terrifying wooden brake pedal.
He thought it might be a pass based on the brake numbers until he actually drove it and tried the brakes.....then he changed his mind.
More anon.
That’s not a bad result.
Will yours be the second ever to get on the road ?
Not a bad fail all things considered. One maybe, one stupid paperwork mistake and one...well, should have known better really, and Kurt had already
given details on his setup.
As far as we know it'll be the first after Kurt's, but there could always be another out there I suppose.
Slowly working through the brake mods. Ended up with some Mini Cooper front discs at the back. They have the same PCD as the Mazda hubs, although the
centre bore is bigger, but that's easily sorted. Disc depth is such that it all just fits behind the wheel without spacers, which was
essential for me given how tight the arches are to the tyres. The hat is about 1mm thicker, which is a shame, but it isn't that tight!!
Modified the Hyundai HB cable fitting to take the Mazda cables and re-routed those. Yet to fully test them but fingers crossed...I had to
'lose' some excess length as the cable now comes in from the front of the caliper so they are a bit too long. Hopefully the re-route will be
OK, but if the path has caused too much friction, I can always shorten the cables as I made these up by joining two standard MX5 cables together. I
could have used the Hyundai cables, but just couldn't face digging in to the car to the depth required to achieve this. Sadly, a single MX5 cable
is too short, so that option was out too. The new cable route will require a very minor adjustment to one of the inner wheel arch closing panels each
side, but that's OK as it's a removable piece and not normally visible. I never really liked the original cable path, although I had got it
to work OK. Another bonus with the Hyundai caliper is that they are mounted the correct way round/up, meaning the fluid inlet and bleed ports are in
the right places. That said, it would have been easy enough to swap them round if needed. Better than the MX5 calipers in that regard. With those,
they had to be mounted upside down, meaning the only way to bleed them was to remove the caliper, block the piston and bleed them loose, holding them
so the bleed port was uppermost. A bit of a PITA, but at least not that common a job. Anyhow, no need for that any more.
Made a start on the caliper brackets for the back so not far away from having that done. They ended up being pretty simple - just flat plates with 4
holes and a couple of spacers. I was going to get these made, but decided to DIY in the end as they are pretty simple. I've done the tricky part
- getting the holes in the right place, just got the hard part now - cutting out the profiles from a big chunk.
Still waiting for the front brake kit to arrive, but it was always going to be a bad time of year to order stuff like that, and it's due soon, so
hopefully not too much longer and I can see how this is all going to work out.
Rear brakes have gone from a 276mm disc to a 316mm one, solid to vented (solid would have been fine, but finding a disc that fit was the main thing),
calipers have gone from 32mm to 38mm piston, so +40% area.
Fronts will be a 300mm disc with 4 pot Wilwoods giving a 50% increase in piston area over the original Mazda calipers and +45mm over the 255mm Mazda
disc.
I'll be selling a slightly used (40 miles) complete brake kit for a Mk1/2 MX5 soon. All calipers rebuilt, new discs and pads and Freakyparts
caliper spacers for the rear to allow use of the larger 276mm discs on Mk1/2 rear hubs.
New brakes all done, a quick trip to the MOT tester confirmed they are working really well. Put the new numbers into the IVA spreadsheet and it's
looking like an easy pass now.
Fingers crossed, re-test is this Thursday (4th)
Quick update - re-test was a pass.
Registration next, I'll get to that tomorrow. Now it's beer-O-clock
Nice work!
Well done Chris, enjoy your now rest time while waiting for registration, before the next hard step is getting used to your car on the road.
If you can, try to stop smiling, and leave some for the rest of us looking for a pass too
Jason
superb well done
Congrat's and Well done. I hope to see it in the flesh one day
Final update from me on this one I think - just received the V5C, so a quick trip to Halfords for some plates and we are done.
Thanks for all the ideas, advice, and kind words chaps.
If anyone fancies building one, I'm more than happy to share my experiences, just ask