
fuel gauge sender calibration
snowy2 - 28/4/16 at 07:10 AM
I know this issue comes up, so since i had a fair idea what would solve the problem i googled it and got the web site linked below...
Fuel gauge adjustment
and all credit for the following goes to the site linked above.....
but just in case the page ever disappears, here is a copy of the text.
Making sure all your gauges read correctly can be a tricky business sometimes after some changes have been made to your vehicle electronics or fuel
tank/instrument gauge etc...or even some case some retrofitting can couse some inaccuracy in gauge readout.
In some case, top of the range VDO fuel gauge might be supplied with built in calibration function but most of the kits are supplied with matching
sender unit to save the hassle of calibration. However sometimes it can be more hassle to change out the sender unit to make it fit on the original
fuel tank.
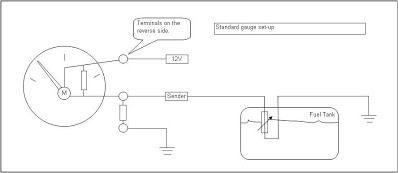
There is an easy way to modify your standard (original fitted to your car) gauge to make it adjustable.
In principle, the fuel gauge is an Ohmmeter with a indicator dial showing Full-Empty scale printed on it rather than a resistance read out.
There are 2 situations whereby the fuel gauge does not read correctly.
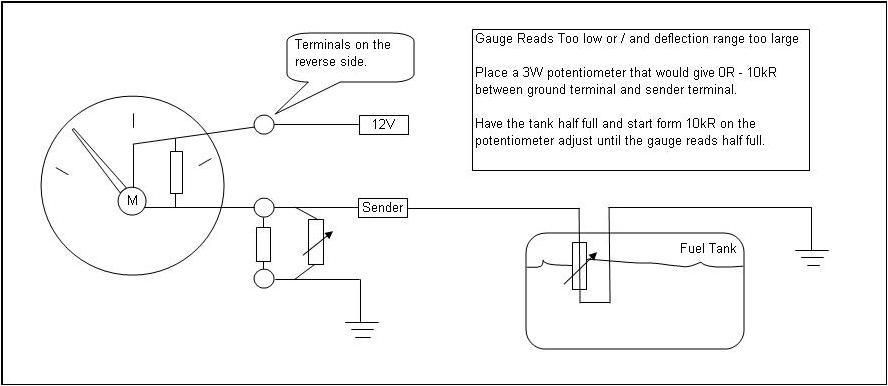
Out of Calibration Reason 1
The resistance range of the sender unit is wider than what gauge can indicate.
What normally happens is that even if you fill up the tank to the full the gauge will not point all the way to the full level and by the time the tank
is 1/2 full or even 3/4 full the gauge shows empty which can be a bit of pain.
Commonly used configuration is that when the fuel level is full the resistance will be low and resistance value increases as fuel level decreases in
the tank. If the gauge read out range for example is between 80ohm to 10 Ohm then when the tank is 2/3 full with 260 - 20 Ohm sender range the gauge
will read empty even though the tank is 2/3 full.
The way to fix it is this.
Purchase a potentiometer with range of 10000-0 Ohm with at least 3W rating and connect between the the fuel sender unit terminal and ground as shown
in the diagram below. Most cases the easiest way to do it is to splice the wire and join the wires together. It can also be soldered to the instrument
panel however it is not always practical to pull out the dashboard so take your time and make sure to set it up correctly before you reassemble the
dash.
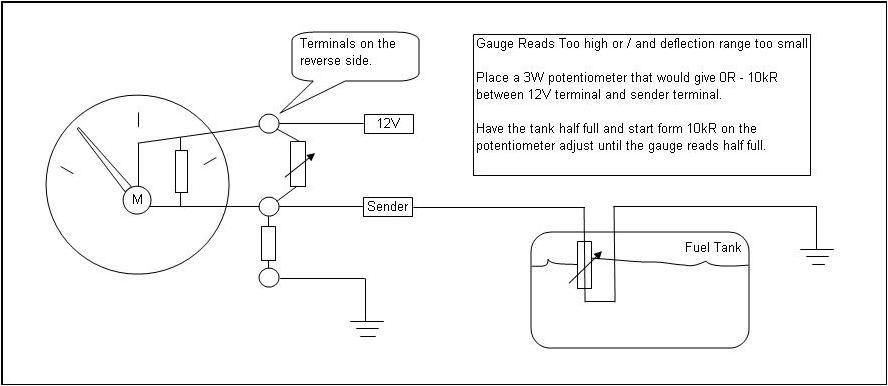
Out of Calibration Reason 2
If the resistance sensing range is wider on the gauge than the fuel level sensor wich is the reverse of above.
What normally happens s that the gauge will read half full even though the tank is nearly empty in which could cause some problem when you are on a
public road.
This is due to the fact that the fuel sensor (sender unit) is letting through too much current.
However it can be fixed by bypassing the 12V terminal and the sender terminal with a same 5k - 0 Ohm potentiometer with minimum of 3W rating.
Calibration Method
Once the potentiometer has been installed in place the you can now empty the tank to find your empty read out.
Basically twist the dial on the potentiometer until the gauge points to the correct level and there you go.
Job done.
[Edited on 28/4/16 by snowy2]
907 - 28/4/16 at 12:49 PM
It might be worth a mention that Smiths gauges run off 10v to allow for variations in running/battery voltage.
Back in the days of Cortina's & Escort's a little oblong gadget usually mounted on the rear of the speedo (for convenience)
and had the effect of reducing the voltage feed to the fuel and temp gauges.
My Smiths gauges have a more modern version made for me by a very nice man from this forum. 
He shall remain nameless so that he isn't inundated with business offers regarding mass production.
HTH
Paul G
terry brown - 28/4/16 at 07:34 PM
check this out - i have the older version fitted - fantastic! so easy
https://www.spiyda.com/magento/index.php/fuel-gauge-wizard-mk3.html
02GF74 - 28/4/16 at 08:46 PM
I dont think its that simple, the suggestions may work for the limits of full or empty but may be skiffed in between. I suppose it doesnt really
matter as long as you get an idea of how many miles you got left when tank is at empty or very low,
As an aside, i fitted two range rover guages (12v) to series landrover (10v) (yes it has two underset tanks) and callibrated senders and guages then
made an op amp based circuit that would scale the sender voltage for the guages and add an offset as the sender resistance was not compatible. Too
much faff tbh, a PIC would be easier.
terry brown - 28/4/16 at 10:49 PM
The spiyda fuel wizard allows for range of movement and where the start and finish of needle travel is. If im right your saying that the problem was
rate of movement across the guage isn't constant? I had similar issues with my own float sender. To cure it i had to move the pivot point of the
float arm. Making sure the point was as near to the vertical centre of the tank. Works great now. The wizard has an option to upgrade to cure fuel
slosh as well by slowing down drastically the needle movement. And lets you have a small LED low fuel warning light which is adjustable to whatever
amount you want left in when the low fuel light comes on.
The new version comes with more options.
The wizard works with any guage, any sender. No taking dials apart or adding pots. Give it power, divert the sender signal wire to it and set up.
Pretty straightforward tbh, with kit car fuel guages being so poor i dont see how more people havnt cottoned on to it. So many people i hear just buy
a sender matched to guage via ohm range, yea great but what about the other faults guages have? Modern cars work so much better, why kits and seperate
dials cant come much better is beyond me cos they aint cheap
[Edited on 28/4/16 by terry brown]
rusty nuts - 29/4/16 at 06:52 AM
I fitted the fuel gauge wizard a couple of years ago , it seems to work well and I have more confidence in the gauge
turnipfarmer - 15/6/17 at 10:03 PM
Why does the pot need to be 3 watt minimum for a fuel sender?
Also my sender only goes to about 340 ohms.
So why would I need a 10K ohm pot? Wouldn't a 1K one be better?


