locoboy
|
| posted on 18/6/12 at 08:21 PM |

|
|
roofing help.
Folks,
My cottage is made up of a selection of materials, namely stone and brick, often the same wall is made of both ie stone on the bottom and brick had
been added later on to extend upwards.
I have a pitched section of roof that butts up to a stone wall and as you can see from the picture the only way the builder could think to actually
join the two parts was to dump a load or mortar in the join and bank it up.
I can see that trying to get a tight neat join onto a rough lumpy stone wall could be quite challenging, the mortar has cracked and as you can see
needs replacing so how is best to do it?
Is there a specific product to buy...... a particular method to use or am I going to just have to replace the mortar with .....more mortar?
Ignore the cracking round the end of the lintel, its just mortar that has been bodged in there to give it a rough texture to match the surrounding
stone.
The lengths of timber on the roof are not permanent! and the new facia board has just been painted 
 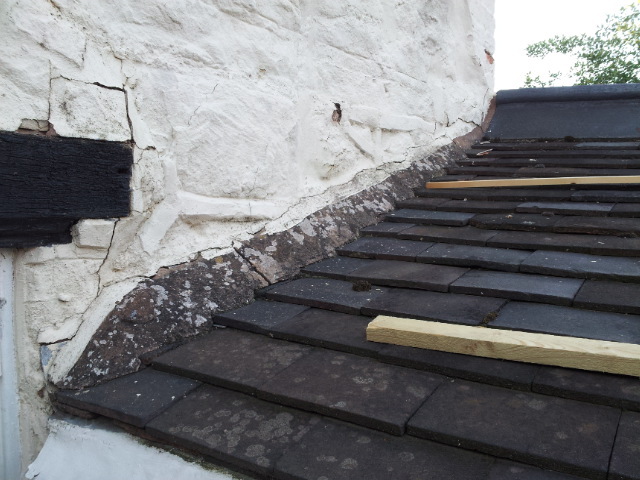
roof 1
 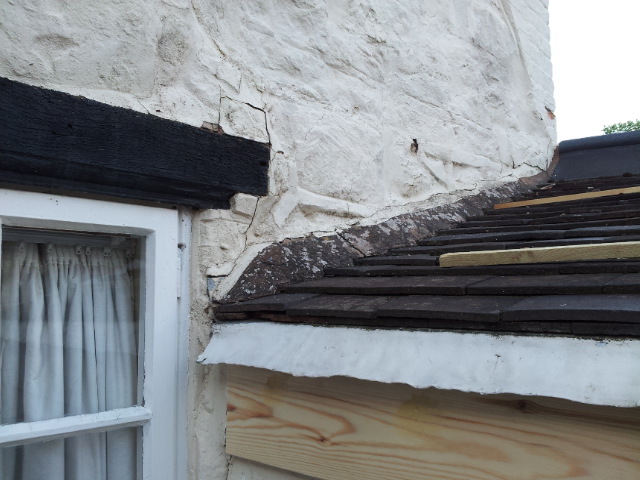
roof 2
[Edited on 18/6/12 by locoboy]
ATB
Locoboy
|
|
|
|
|
BenB
|
| posted on 18/6/12 at 08:36 PM |
|
|
Don't they have lead flashing in Shropshire? that's the standard way of doing it! Just be careful if it's a low roof- the roof next
to my garage was a low apex roof like the one shown and the local tealeaves helped themselves to the lead flashing of it....
|
|
|
richardR1
|
| posted on 18/6/12 at 08:38 PM |
|
|
That junction should be redone with a lead detail. Basically code 4 lead cut into lengths of no more than 1500mm which should be inserted 25mm into a
slot neatly cut along the wall approx 150 mm above the tiles and then down the wall and onto the tiles where it should be formed to the tiled with a
lead beater. The 25 mm lip which inserts into the wall should be secured with lead wedges and then sealed with mortar or silicone sealant. Each 1500
section should overlap the previous one by a minimum of 100 mm.
[Edited on 18/6/12 by richardR1]
MK Owners Club Member 1015
|
|
|
mark chandler
|
| posted on 18/6/12 at 08:49 PM |
|
|
as above ^^^I would use lead.
9" angle grinder loaded with 2 cutting discs to give a decent sized slot in the wall, then dress with lead  Just treat the same as a rendered
wall. Just treat the same as a rendered
wall.
|
|
|
SALAD
|
| posted on 18/6/12 at 09:10 PM |
|
|
You also want lead soakers under each tile (over lapping each other) and up the side of the wall before the lead flashing, as previously mentioned, is
put in.
|
|
|
locoboy
|
| posted on 18/6/12 at 09:44 PM |
|
|
Yes he have lead in Shropshire, My concern was how to do it on a ROUGH stone wall.
If i cut a slot 1inch deep, some of the lead will go into the slot and some of it will not as the lead has a straight edge and the wall has
undulations in it of more than an inch.
Am I going to have to shape the lead to the undulations of the wall first?
ATB
Locoboy
|
|
|
BenB
|
| posted on 18/6/12 at 09:53 PM |
|
|
Yes, I'd just lay a bit of scrap sheet wood / mdf in place and then block it out to get the shape of the wall and then lay that on top of the
lead and cut the edge of the lead to that shape. It doesn't need to be exact because obviously slight discrepancies will be hidden when you wack
it into the groove.
|
|
|
van cleef
|
| posted on 18/6/12 at 10:15 PM |
|
|
That type of cement work is common practice up here in the north of Scotland, as long as there are lead soakers with each individual tile it would be
fine but your cement is cracked to hell.
So I would take the old cement out to see what's going on underneath to see whats keeping ingression of water out away from the wall.
|
|
|


