907
|
| posted on 8/8/05 at 06:43 PM |

|
|
Finished my Dash
OK. I admit it. I couldn't resist posting this pic.
Interior more or less complete. A joint effort with myself, my son Gaz,
and the gorgeous lady next door who made the gear lever & handbrake gaiters.
I'm well chuffed. 
Paul G
 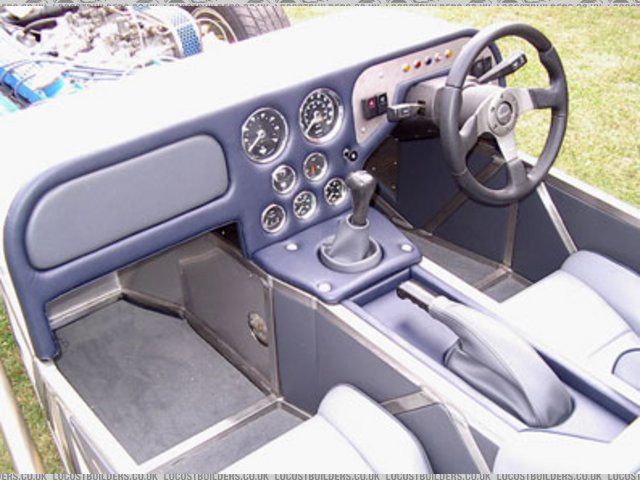
Rescued attachment Finished-Dash-s.jpg
|
|
|
|
|
mac1ZR
|
| posted on 8/8/05 at 06:50 PM |
|
|
that looks like a professional job!
|
|
|
Dillinger1977
|
| posted on 8/8/05 at 07:01 PM |
|
|
wow, very nice! 
-Rog
|
|
|
zetec
|
| posted on 8/8/05 at 07:03 PM |
|
|
Very nice, well done.
" I only registered to look at the pictures, now I'm stuck with this username for the rest of my life!"
|
|
|
bob
|
| posted on 8/8/05 at 07:04 PM |
|
|
Paul
You forgot the ashtray to empty your pipe into
|
|
|
DEAN C.
|
| posted on 8/8/05 at 07:11 PM |
|
|
I noticed you have left all the shiny stuff on show
I'm really interested to see how this chassis stands the rigours of use,I personally think it will be ok
Well done! Dean C.
Once I've finished a project why do I start another?
|
|
|
907
|
| posted on 8/8/05 at 07:15 PM |
|
|
quote:
Originally posted by bob
Paul
You forgot the ashtray to empty your pipe into
What do you think the grey panel on the left is ?
When I close it my ash goes down the exhaust pipe.

Paul G
|
|
|
donut
|
| posted on 8/8/05 at 08:17 PM |
|
|
Stunning! Looks like Zetec has some competition!!
Andy
When I die, I want to go peacefully like my Grandfather did, in his sleep -- not screaming, like the passengers in his car.
http://www.flickr.com/photos/andywest1/
|
|
|
Danozeman
|
| posted on 8/8/05 at 08:34 PM |
|
|
Nice work there matey. Ill come to you for my pipe and interior now then
Dan
Built the purple peril!! Let the modifications begin!!
http://www.eastangliankitcars.co.uk
|
|
|
Russ-Turner
|
| posted on 8/8/05 at 09:36 PM |
|
|
quote:
Originally posted by 907
OK. I admit it. I couldn't resist posting this pic.
Interior more or less complete. A joint effort with myself, my son Gaz,
and the gorgeous lady next door who made the gear lever & handbrake gaiters.
I'm well chuffed.
Paul G
All very well posting a pic of the dash but where's the pic of the gorgeous lady next door?!
|
|
|
bob
|
| posted on 8/8/05 at 10:57 PM |
|
|
Paul
I knew when i saw your cans that we would all be breathtaken by the rest of your build,you have not let me down its stunning and you should be very
proud of your work.
|
|
|
907
|
| posted on 8/8/05 at 11:03 PM |
|
|
quote:
Originally posted by Russ-Turner
quote:
Originally posted by 907
Interior more or less complete. A joint effort with myself, my son Gaz,
and the gorgeous lady next door who made the gear lever & handbrake gaiters.
All very well posting a pic of the dash but where's the pic of the gorgeous lady next door?!
O no, no no no, you'll never see her.
The only give away is the faint hum of her 175 bhp sewing machine......
the dip in the lights, as the national grid fights to maintain 240 volts....
and the slight whiff of 3 in1
Paul G
|
|
|
Rorty
|
| posted on 9/8/05 at 04:57 AM |
|
|
quote:
Originally posted by 907
The only give away is the faint hum of her 175 bhp sewing machine......
the dip in the lights, as the national grid fights to maintain 240 volts....
and the slight whiff of 3 in1
That hum may be her personal friend and I've found KY Jelly works better than 3 in 1.
Anyway, that's about the smartest and well executed interior I've seen in these pages. 
Cheers, Rorty.
"Faster than a speeding Pullet".
PLEASE DON'T U2U ME IF YOU WANT A QUICK RESPONSE. TRY EMAILING ME INSTEAD!
|
|
|
907
|
| posted on 9/8/05 at 06:48 AM |
|
|
Many thanks for the complements chaps.
Mmmmm, trust you to lower the tone of the thread Rorty.
I'm not joking about her sewing machine.
When she first got it, a 15 amp fuse had to be fitted as it blew a 13 amp one.
Just the side of the tranny tunnel to do.
The round hole is access to the speedo cable, being made at the moment by Speedy cables.
The idea of the chassis showing is so my passengers can watch the welds crack.
I'll pass the complements on to Gaz.
ATB
Paul G
|
|
|
Dick Axtell
|
| posted on 9/8/05 at 06:24 PM |
|
|
Method?
Agree with all the foregoing accolades - looks like a real pro job.
So, how didya do it? Those dials seem to be recessed - did you use a router, maybe? And what lies behind the leather/vinyl covering?
I'm still trying to sort out my dash layout, so your advice is keenly sought.
|
|
|
G.Man
|
| posted on 9/8/05 at 06:39 PM |
|
|
Very nice job, like the contrasting colours as well..
Opinions are like backsides..
Everyone has one, nobody wants to hear it and only other peoples stink!
|
|
|
zetec
|
| posted on 9/8/05 at 07:23 PM |
|
|
If you want to sink your dials flush and you use MDF just make the holes for the dials big enough for them to slip right thru (once covering has been
applied), then fix another piece of something (thin ply) behind the hole slightly smaller and this acts as a "stop" for the dial to
tighten onto.
Good news is as the dial is flush they don't have to have SVA style bezels as they are less than 5mm above the dash surface, same would go for
switches.
" I only registered to look at the pictures, now I'm stuck with this username for the rest of my life!"
|
|
|
907
|
| posted on 10/8/05 at 07:41 AM |
|
|
quote:
Originally posted by Dick Axtell
So, how didya do it? Those dials seem to be recessed - did you use a router, maybe? And what lies behind the leather/vinyl covering?
I'm still trying to sort out my dash layout, so your advice is keenly sought.
It's made from 12 mm exterior ply with 15 mm foam rubber stuck onto it, then covered with vinyl.
For the layout I photo copied the instruments, cut out the copies, and stuck them on the plywood
blank till I was happy with the layout. You don't want the gear knob covering the oil pressure gauge etc.
At this stage drill & c/s 4mm holes through the ply and into the scuttle.
Remove and open up the holes to 5.5mm in the scuttle.
Fit M5 c/s screws into the 4mm holes in the ply so they tap a thread in the wood and protrude enough
to go through the scuttle and use wing nuts on the back. These are your dash to scuttle fixings.
Cut holes in the ply and sand to size so that a gauge with a strip of vinyl round it is a tightish fit.
Stick the foam on with double sided tape and cut the hole in the foam the same size. Sand a 6 mm
rad on the foam so the vinyl when fitted curves into the hole.
On final fitting of the gauge the chrome ring will sink into the foam, trapping the vinyl against the ply.
The vinyl is only glued to the back of the ply and inside of the holes in the ply,
not to the foam. This lets the vinyl stretch across the face of the foam.
For the metal switch plate (unobtainium) a hole was cut in the foam, the foam blank pulled out,
cut to half thickness, and put back in, hence the use of double sided tape.
The glue used was "Time Bond" so adjustments can be made while covering.
The instruments were fitted to each hole while the glue was still setting.
Hope this helps
Paul G
A little different to you Zetec, but as my sig says....
[Edited on 10/8/05 by 907]
|
|
|
the_parson
|
| posted on 10/8/05 at 10:14 PM |
|
|
quote:
Originally posted by 907
The only give away is the faint hum of her 175 bhp sewing machine......
the dip in the lights, as the national grid fights to maintain 240 volts....
and the slight whiff of 3 in1
And a puff of Lambert and Butler?
Very nice work sir. I'll be around to have a look sometime.
I trust you've made it water-proof to withstand all manner of bodily fluids which will be splashed across at various stages of the Sutol's
life?
My contribution will probably be drool...
And possibly a foot print or two as I fly out the back of the car due to overzealous exceleration. My only hope is that the number-plate is flexible
|
|
|