fesycresy
|
| posted on 19/10/05 at 07:07 PM |

|
|
R1 Sump Baffle
I'm just about to start fitting a baffle plate in my R1 motor (03). Looks straight forward enough and I've got a link to Flukes site.
Just wondering if anyone has fitted one and if there was anything in particular to look out for ? Any tips would be appreciated.
Cheers, Lyn.
|
|
|
|
|
skydivepaul
|
| posted on 19/10/05 at 07:24 PM |
|
|
I've got one sat on my bench ready to go in over the winter period. Please let me know how easy / hard the job turns out to be. It looks
straight forward enough but the easy jobs often turn out to be the most difficult
http://www.smartideasuk.com
http://www.smartmapping.co.uk
HD CCTV
3D design solutions and integration
IP security systems
access control systems
|
|
|
ChrisGamlin
|
| posted on 19/10/05 at 07:30 PM |
|
|
Very easy to do.
One thing I would recommend is to do it when the engine is in the car. This may sound odd but to minimise the risk of any bits of ally ending up
inside the engine when you drill / tap the retaining bolt hole in the block web, you really need the engine upright so all the bits fall away from the
engine, if you laid it on its side on the workbench you'll have to be much more careful about the bits as they will tend to fall into the engine
rather than away from it.
Alternatively you could get someone to hang the engine over the edge of the workbench for you whilst you do the work
Another tip, make sure you locktite all the bolts, you dont want them shaking loose!
|
|
|
fesycresy
|
| posted on 19/10/05 at 07:41 PM |
|
|
Chris,
How many holes did you drill ? The pics show one but the text says two. I don't fancy fitting it in the car but I could suspend it from my
crane.
How did you find the wiring of the engine ? Mark at MAC#1 says it's straight forward (for him !) but every one else seems to think it's a
nightmare.
|
|
|
ChrisGamlin
|
| posted on 19/10/05 at 08:07 PM |
|
|
I drilled two, one either side of the water pump metal hose, you definitely need it otherwise it will flap around too much and probably break quite
quickly.
Yep suspending it will be fine too as long as you can keep it still, just as long as its upright when you do it. I only mentioned it in the car
because it was dead easy for me, just put it up on axle stands and as long as you have enough room underneath to get your drill in, its simple and
obviously rock solid to push against when drilling etc.
The wiring I didnt find too bad to be honest, slightly more wires than the blade but not really any more complicated. I would have found it easier
still if Haynes had released their updated R1 Manual sooner and Id had their wiring diagram from the off (if you buy one make sure it covers the
injected engine, and order direct from the Haynes website if you cant find one), but instead I had to make do with a US spec diagram from one of the
downloadable manuals, which was about 90% accurate but certainly not 100%!
|
|
|
Dillinger1977
|
| posted on 20/10/05 at 07:50 AM |
|
|
i fitted one of Paul Roger's, which needs 2 holes in the block drilled and tapped. Being a complete amateur I wasnt looking forward to this at
all but it turned out okay.
I did it with the engine out on its side. to stop any mess getting in the engine I taped a plastic bag to the bottom and cut holes for the drill.
like this:

you'll need a new gasket from yamaha (£5), and while it was all drained and on a bench I doubled the clutch spring. (new spring+clutch gasket
was another £25)
wasnt a hard job really, just a bit daunting... 
[Edited on 20/10/05 by Dillinger1977]
-Rog
|
|
|
Coose
|
| posted on 20/10/05 at 11:07 AM |
|
|
The JB7 plate requires no drilling.... 
Spin 'er off Well...
|
|
|
ChrisGamlin
|
| posted on 20/10/05 at 12:37 PM |
|
|
JB7, you mean Jon Rarity's machined ones?
|
|
|
Coose
|
| posted on 21/10/05 at 08:47 AM |
|
|
Yah, that'll be him old bean!
Spin 'er off Well...
|
|
|
Ben Smith
|
| posted on 21/10/05 at 11:59 AM |
|
|
A friend and I both have the JB7 version. He has fitted his already. He has not drilled and tapped these holes in the sump as there is no mention of
this in the instructions provided. But having looked at mine there are 2 hole drilled in the plate either side of this pipe. These hole are not shown
in the pictures on the instructions.
Before I fit mine and he takes his sump off, does the JB7 version need fixing here?
Ben.
|
|
|
Coose
|
| posted on 21/10/05 at 12:25 PM |
|
|
Nope.
Spin 'er off Well...
|
|
|
progers
|
| posted on 21/10/05 at 01:50 PM |
|
|
If you do not drill the additional fixing points, the only thing holding the plate in place is the oil pipe and oil pickup which are relatively close
together. This means there is the potential for the plate to flex.
Maybe JB7's plate is extra stiff and doesn't need it - Its best to get his advice on that.
Both mine and All bikes' baffle plate require these two extra holes. The last thing you want is metal fatigue causing the plate to split and
break up. Just my opinion though
- Paul
-------------------------------------------
R1 baffle plates £30 delivered
|
|
|
ChrisGamlin
|
| posted on 21/10/05 at 01:56 PM |
|
|
Mine's an early JB7 plate, but its the development one I found in my engine, Colin had previously lent JR the engine to measure up with and
he'd left it in there when giving the engine back to Colin prior to me buying it.
Personally I dont think my one is stiff enough to support itself just from the oil pickup etc so I have secured it by tapping the block (it already
had holes for this). This may have changed in the later production ones but the plate has to be very thin (not thickness) where it goes arond the
water pump and down the other side, so unless it was made of very thick ally, that side is alays going to flap around on that side of the baffle.
I think personally Id do it anyway, at least on the other side of the pump, JimG with the Pheonix who comes on here sometimes had his Allbikes plate
fatigue crack and it knackered his engine, so the more securely it can be held the better IMHO.
Chris
[Edited on 21/10/05 by ChrisGamlin]
|
|
|
ChrisGamlin
|
| posted on 21/10/05 at 02:13 PM |
|
|
Here's mine as I found it in the engine (before I drilled/tapped the block)
 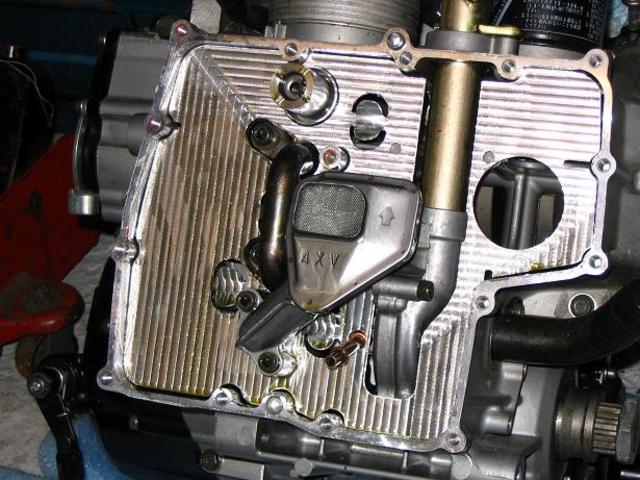
R1 Baffle Installed
The bit down the right hand side of the water pump is the part that would concern me if it wasnt bolted down, as you can see its less than 1cm wide at
its narrowest point.
Chris
|
|
|
fesycresy
|
| posted on 21/10/05 at 07:08 PM |
|
|
I emailed Jonathan and he said it's not a necessity to drill and tap the web.
I'll decide when I take it apart.
Lyn.
|
|
|