Damned book errors!!
Slimy38 - 13/6/13 at 09:10 PM
Just fell over one of the typo's in the Haynes book. The front upright sections ended up at least two inches short, so they go in the jig and I
find they just drop down before they even get from top to bottom. 
I'm more annoyed with myself though. I actually made a complete chassis, one fifth scale, out of balsa wood, just to find out these sorts of
problems. The only reason why I didn't find it at that point is that balsa wood doesn't bend, so I had to use the two separate measurements.
Which of course are correct!
Ah well, I'm happy that my first cutting error is not all my fault...
[Edited on 13/6/13 by Slimy38]
Talon Motorsport - 13/6/13 at 09:18 PM
Brings back memories.... how many a happy hour we spent sorting the front of the chassis working that one out......
You just wait until you come to put the top brackets on 
designer - 13/6/13 at 10:17 PM
This is why it's always best to cut parts as you go along.
Slimy38 - 14/6/13 at 06:33 AM
Go on, what's the problem with the top brackets? I don't remember anything mentioned in the error list?
I am cutting as i go, but it didn't help when the measurement was so far off. I cut the two sides together to make sure they were the same. And
they were, they were equally wrong!
steve m - 14/6/13 at 06:37 AM
If it was the first edition book, there are numerous errors, infact too many for me to recall,
I just made them up as i went along,
Talon Motorsport - 14/6/13 at 07:15 AM
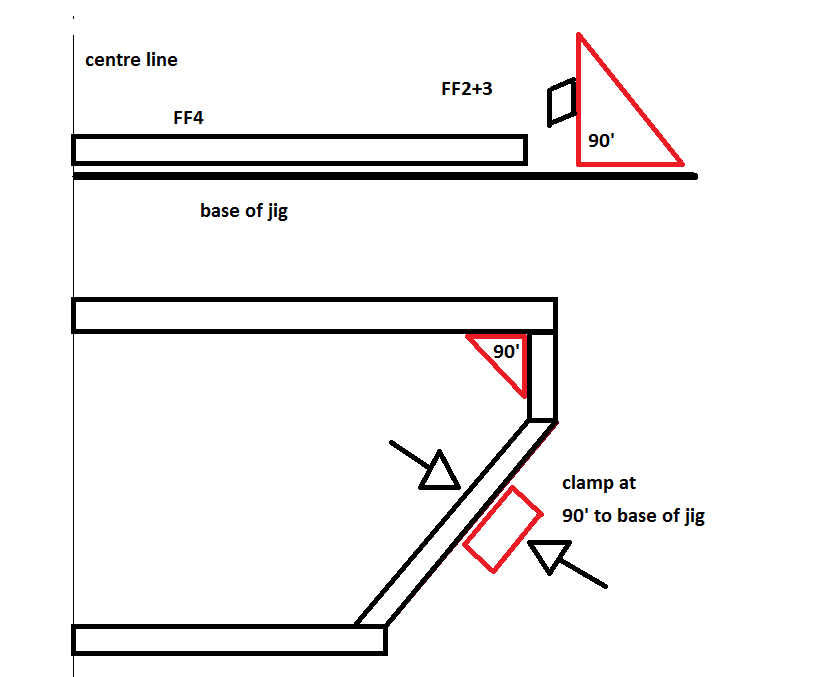
Top tube FF4 in the tube appendix says 630mm in the first book in the text it says 627mm which is the same as RS6.
In short cut FF4 to 627mm
FF2+3 are 290mm long with 13' cut at the top.
FF2A and 3A are 70mm.
If you just pie cut and bend the dog leg and weld it the top section too FF4 it will flare the lower section outwards.
Tack FF2+3 at 90' to FF4.
The side faces (ie where the brackets will be going) of FF2+3 need to be at 90 to the base of your jig,at this point it will look twisted.
Do not be tempted to clamp a tube across the top of FF2+3.

Slimy38 - 14/6/13 at 07:57 AM
Aha, that makes sense. So your method keeps FF2 and FF3 at right angles with the front of the car, which means when the suspension brackets go on
they're not twisted in relation to the brackets mounted on U1 and U2.
I've already pie cut the replacement FF2 and FF3, but if I simply continue the cut through the tube it should be ok.
It'll be fun trying to clamp that all in the right place though...
Thanks for the info, it's much appreciated.


