
Rescued attachment RollBar.jpg

Can I found full-rollgage dimensions somewhere?? http://www.aa-racing.com still working on english pages...
[Edited on 21/1/05 by TTK77]
You mean, you want dimensions for a roll cage? What sort of chassis are you wanting it for? I would just make one to fit, rather than to any dimensions you find on the web - maybe use a picture to get an idea where it mounts and where best to brace it etc...
I agree with joel, decide on the height you want, the radius of the turn, the seatbelt location you want and any reinforcements and GO
BUILD!


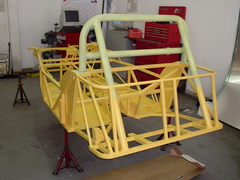
Rescued attachment RollBar.jpg
Did you make that yourself Mark Allanson?
I've got Ron Champiions book on how to make a buggy and it covers fish mouthing etc, but i'm not too covinced about his way of bending bits
of metal!
guessing about 5-6cm diameter tubing, but what sort of wall thickness did you use on the steel round steel?
[Edited on 21/1/05 by Lawnmower]
The main tube is 2 1/4" x1/8" round seamless and bent with a clarke type bender, the stays are 2" x 3mm seamed and the belt crossmember
is 2" seamless. I used tubemitre program to make the fishmouths, printed them out and fixed to the tube with masking tape, marked out and cut
with a hacksaw and file finished.
All the weldls are arc welded except for the belt crossmember which is migged.
It is not high enough to offer full protection in the event of a roll, but the proportions LOOK just right - aesthetics over safety? - I don't
intend rolling the car 
It looks bloody strong, but where do the people go?
quote:I have to say that your chassis looks stunning. Something to aim for.
Originally posted by Mark Allanson
I agree with joel, decide on the height you want, the radius of the turn, the seatbelt location you want and any reinforcements and GO BUILD!
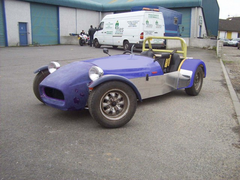
It's also VERY yellow considering that I am now going to paint the car blue
VERY photoshopped colours


Rescued attachment Blucar.jpg
Thats how they look now..

[Edited on 30/1/05 by TTK77]
Excellent welding, I like the multiple hole setup on the trailing arm bracket, you should be able to experiment with antidive geometry when you have
finished.
Really nice
quote:
Originally posted by Mark Allanson
Excellent welding, I like the multiple hole setup on the trailing arm bracket, you should be able to experiment with antidive geometry when you have finished.
Really nice

He might do a lot of reversing!
quote:
Originally posted by Mark Allanson
He might do a lot of reversing!
 Very good.
Lightening holes? O.K. as long as two of them are same spacing as the holes in rear axle brackets, unlike the original book measurements. I know someone who made the mistake and wondered why he was mashing bushes.
I think I will use blue ones..


[Edited on 31/1/05 by TTK77]
Are you also having multiple holes for your damper mounts. You might end up with trailing arms at a strange angle, don't know what effect that will have but it might affect your panhard rod mounting as well.