smart51
|
| posted on 16/12/08 at 08:55 AM |

|
|
making a mould from a buck
I've almost finished making a body panel but it's been hacked about so much that it weighs about 3.5 tonnes because of all the filler.
I've decided that it is now a buck so I'll take a mould from it and remake the pannel from the mould. The surface is almost entirely
filler and will be sanded nice and smooth.
How do I make a mould? Gel coat and GRP, but how much? How do I prepare the buck's surface? Wax? How many coats of wax do I need to guarantee
separation?
Thanks in advance for any useful suggestions.
|
|
|
|
|
fesycresy
|
| posted on 16/12/08 at 08:58 AM |

|
|
You need some carbon 
Have a look at this, may help:
Carbon Mods Video
I was just about to post a thread on this link (may still do  ) )
-----------------------------------------------------------------------------------------------------
The sooner you fall behind, the more time you'll have to catch up.
|
|
|
Howlor
|
| posted on 16/12/08 at 09:08 AM |

|
|
Good vid, now let me see what I can make! Litle lad will be the first at school with a carbon lunch box!
|
|
|
Mr Whippy
|
| posted on 16/12/08 at 09:23 AM |

|
|
Why did he do so many layers in one go? Surely it would have been easier to do the first, let that cure then do the others. That way he'd have
known the top outside layer was completely pushed into the corners. I'd have used glassfiber for the inside layers too.
Also is there much in a loss of strength when not curing these mouldings in the usual vacuum bag, autoclave setup. GRP never seems to need this
treatment, why is it just carbon???
Fozzie? You do this stuff all the time, can you shed some light on this?
[Edited on 16/12/08 by Mr Whippy]
Fame is when your old car is plastered all over the internet
|
|
|
Triton
|
| posted on 16/12/08 at 10:24 AM |

|
|
First you have to make sure that the mould can actually come off the plug..say for instance you moulded have a ball but went too far round then that
wouldn't come off..5 or 6 wax coats then pva to make sure it doesn't stick but no quarantee it won't especially taking mould from
filler.
Best option is to paint or laquer then wax etc.
CF needs vac bagging to ensure the resin is forced into the material and all air is removed because you can't really go at it with rollers as
distorts the weave. Too many layers in one hit will create too much heat and distort the mould and the part.
Gel coat then put too layers down making sure it's ALL down, let it cure then gritty paper to key it then start all over again with the
resin...4 o 5 times the thickness of the part you intend to make but thicker the better for moulds if you want them to last.
Easy really
My Daughter has taken over production of the damn fine Triton race seats and her contact email is emmatrs@live.co.uk.
www.tritonraceseats.com
www.hairyhedgehog.com
|
|
|
twybrow
|
| posted on 16/12/08 at 10:29 AM |

|
|
For making a mould, vacuum bagging is overkill. Simple GRP hand layup is sufficient for the sort of parts we might make. If you need to chase the
highest mechanical properties, and minimal weight, then vacuum bagging, infusion, prepreg etc come into play.
To make a mould, start off thinking about any flanges etc you need to add. Also think about the draught angle (release angle) - minimum of 3degrees is
good. It is best to add those to the buck now, before you get going. Once you have added these, use plastercine to radius any nasty corners, then you
are ready to start....
Seal the surface to ensure it is not porous - wax can help here, alternatively PVA solution works well. Once you have at least 5 coats of wax put on,
and buffed off, try an adhesion test - stick some masking tape to your released part (it shouldn't stick at all).
Next, apply your gelcoat (tooling gel, or gelcoat + wax solution). this needs to go on in 2 even layers - don't be tempted to wack a load on at
once. Once this has gone off, I would look at using a fine glass tissue, or very lightweight csm to back up the gelcoat. This will help stop
'print through' from the other materials. Once this has gone off, begin layup of your csm. I like to work with 450gsm - any more and it
wont take a radius without a lot of work. For your first layer, apply resin to the part, then add the mat, then work the resin up through the mat. Pay
particular attention to radiused corners, flanges, edges etc. Then continue to build up thickness, but not too much at once. If your part exotherms
(excess build up of heat caused by the reaction), then you can end up with an awful surface finish (pre-release), or even a fire!
Once you have built up sufficient thickness, you would need to add some support/stiffeners to your mould. USe steel, or wooden battens, and brace the
backside of your mould. Again allow it all to go off. Once it is good and hard, you can look at demoulding the buck from the mould, and admiring your
handywork....!
|
|
|
Mr Whippy
|
| posted on 16/12/08 at 11:16 AM |

|
|
I once left a glass bowl full of unused resin, got so hot it started steaming and shattered the bowl, didn't catch fire but made heaps of
volcanic like noise 
Fame is when your old car is plastered all over the internet
|
|
|
scootz
|
| posted on 16/12/08 at 11:49 AM |

|
|
Good wee video... never realised it was that straightforward... !
Does anyone have a good vid for larger GRP laying techniques?
|
|
|
smart51
|
| posted on 16/12/08 at 12:32 PM |

|
|
Should I use polyurethane varnish on the filler, then wax then PVA? I've used varnished and waxed MDF to good effect before. Never on filler
though.
|
|
|
Richard Quinn
|
| posted on 16/12/08 at 12:55 PM |

|
|
quote:
Originally posted by Mr Whippy
Why did he do so many layers in one go? Surely it would have been easier to do the first, let that cure then do the others. That way he'd have
known the top outside layer was completely pushed into the corners. I'd have used glassfiber for the inside layers too.
Also is there much in a loss of strength when not curing these mouldings in the usual vacuum bag, autoclave setup. GRP never seems to need this
treatment, why is it just carbon???
Fozzie? You do this stuff all the time, can you shed some light on this?
[Edited on 16/12/08 by Mr Whippy]
It's more to do with the resin than the reinforcement. Epoxy should be laid up in one go if poss as epoxy is not very good at bonding to cured
epoxy. The only way around this is to abrade the surface of the cured epoxy to get a mechanical bond.
Wet lay up will generally be inferior to vac bagging as mechanical strength is dependent on the correct fibre to resin ratio which is difficult to
achieve without vac bagging.
If you are going for aesthetics (2x2 twill being the bit of a giveaway in the video), reasonable results can be achieved using the technique in the
video. Patient stippling with the brush can remove a lot of the air bubbles.
If it is structural or the stiffness is important then plain weave should be used with different layers at different orientations (you will quite
often see lay ups described as 0/45/0 etc which is the orientation). This is less pretty but superior strength/stiffness.
HTH
|
|
|
Ross SA
|
| posted on 16/12/08 at 01:27 PM |

|
|
Hi All,
I made a mould for a nose cone as the ones you can buy here in SA are really not good. I would advise against waxing directly on to body filler, far
better to use 2K primer followed by top coat. On the plug for the nose I flatted the 2K with 1200 to give a smooth uniform but flat finish.
Whilst the mould released from the plug it wouldn't come off because of the shape, so eventually I had to split the mould to get it off the
plug. I ended up with a nose that I'm more than happy with. As a release agent I used Meguiars mould release wax, 8 coats allowing the wax to
dry completely before buffing, worked a treat.
Ross
|
|
|
Dick Bear
|
| posted on 16/12/08 at 02:37 PM |

|
|
Smart51 .... Perhaps this will help you get started.
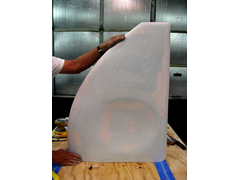
Here's how I did it for a part I made (nothing to do wit a car)
Bondo buck ... created over simple cardboard rough form sanded smooth and to correct shape.
Dick Bear
[Edited on 12/16/0808 by Dick Bear]
Rescued attachment Bondo buck.jpg
www.marketpointproductions.com
|
|
|
Dick Bear
|
| posted on 16/12/08 at 02:40 PM |

|
|
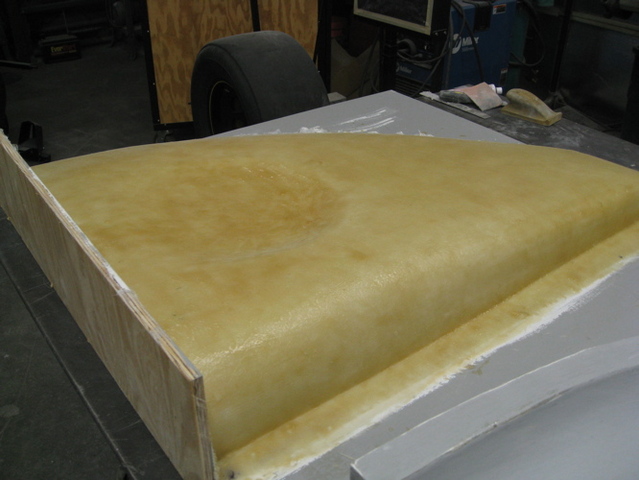
#2
Laid-up fiberglass and fiberglass pad over the buck
Dick Bear
Rescued attachment fiber mold 1.jpg
www.marketpointproductions.com
|
|
|
Dick Bear
|
| posted on 16/12/08 at 02:42 PM |

|
|
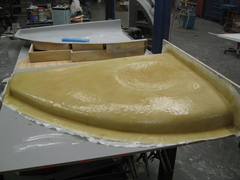
#3
Same image but on the unit in the back you can see the bracing I bondo(ed) to the mold to hold its shape.
Dick Bear
Rescued attachment fiber mold 2.jpg
www.marketpointproductions.com
|
|
|
Dick Bear
|
| posted on 16/12/08 at 02:46 PM |

|
|
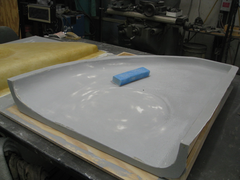
#4
Turning the mold right side up and filling, sanding and preparing the surface smooth .... gel-coat, and release etc.... ready to lay-in fiberglass for
the part.
Dick Bear
Rescued attachment Ready mold.jpg
www.marketpointproductions.com
|
|
|
Dick Bear
|
| posted on 16/12/08 at 02:49 PM |

|
|
#5
Primer painted finished part.
Sorry I couldn't figure out how to place more than a single photo per post.
Dick Bear
Rescued attachment Primered part.jpg
www.marketpointproductions.com
|
|
|
fesycresy
|
| posted on 16/12/08 at 03:29 PM |

|
|
quote:
Originally posted by Mr Whippy
Why did he do so many layers in one go? Surely it would have been easier to do the first, let that cure then do the others. That way he'd have
known the top outside layer was completely pushed into the corners. I'd have used glassfiber for the inside layers too.
[Edited on 16/12/08 by Mr Whippy]
Time is money in business, he's a pro, and I suppose the real answer is, because he can and still get the finish 
-----------------------------------------------------------------------------------------------------
The sooner you fall behind, the more time you'll have to catch up.
|
|
|
scottc
|
| posted on 16/12/08 at 06:44 PM |

|
|
quote:
Originally posted by fesycresy
You need some carbon 
Have a look at this, may help:
Carbon Mods Video
What did he make though?
|
|
|
Ross SA
|
| posted on 16/12/08 at 08:07 PM |

|
|
Hi,
Can someone help me by telling me how to upload images as attachments?
ross
|
|
|
smart51
|
| posted on 16/12/08 at 10:35 PM |

|
|
quote:
Originally posted by Ross SA
Hi,
Can someone help me by telling me how to upload images as attachments?
ross
When you reply there is a box between the word attachment and the button browse. Click the browse button and navigate to the picture you want to
post. Click OK and the pic is uploaded to the message. I think it takes jpg files but not bmp files.
|
|
|
Ross SA
|
| posted on 17/12/08 at 08:06 AM |

|
|
Thanks, I'll give it a go.
Ross
|
|
|
Ross SA
|
| posted on 17/12/08 at 11:01 AM |

|
|
Ok,
I clicked on the browse button and it opened up my pictures, I selected the image I wanted to load but I didn't see an "OK" to
click.
Ross
|
|
|
smart51
|
| posted on 17/12/08 at 11:22 AM |

|
|
Sorry, the button is called "Open" not "OK".
|
|
|
Ross SA
|
| posted on 17/12/08 at 12:43 PM |

|
|
Thanks, I'll try again.
Cheers,
ross
|
|
|
Ross SA
|
| posted on 17/12/08 at 12:45 PM |

|
|
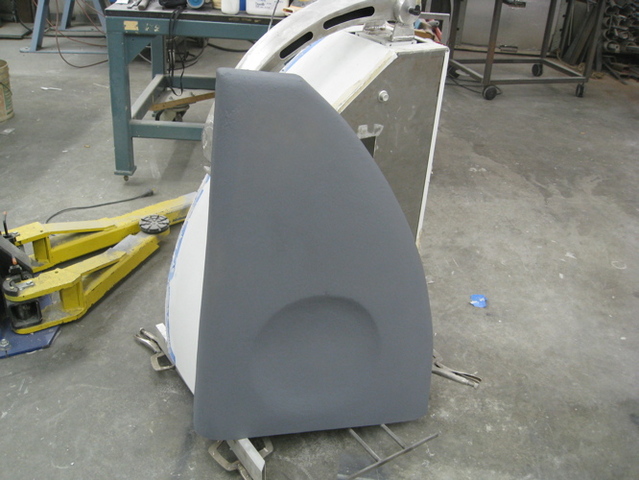
It looks like it worked this time, this is a picture of my nose cone.
Ross
|
|
|


