Padstar
|
| posted on 24/5/14 at 04:51 PM |

|
|
Welds
As many of you may know i have almost completed my chassis but have had concerns over teh quality of my welding. As a result i plan to pay a friend of
the family who is a fabricator to go over my work rewelding the joints.
A friend who does "welding" in a local garage came round last week and said that my work was fine structuraly but looked like sh17. As
most of the joints are not seen, their appearance is not a major concern, but safety of me, and future passengers and other members of the public most
certainly is.
My welding has improved over time and i have gone back over earlier welds which were pants. When i weld now, i seem confident in the structural
strenghth as the 2 sections always go "molten" and i can see the metal being fed in as i weld but they almost always look crap and most
have a larger pool at the end of the weld. There is always a lot of splatter as well but i have been told this is down to gas less welding and is
quite common.
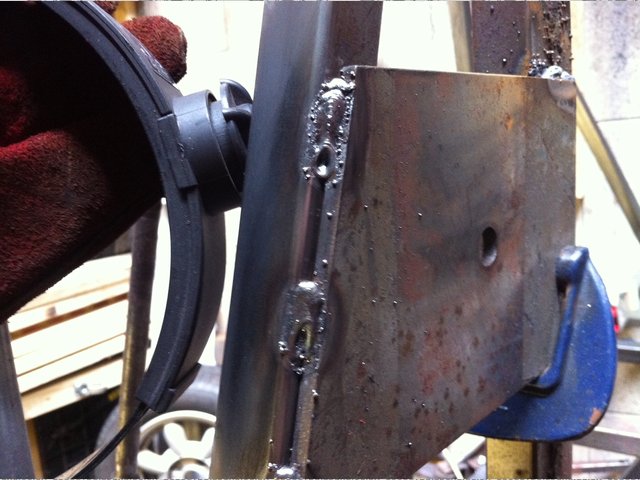
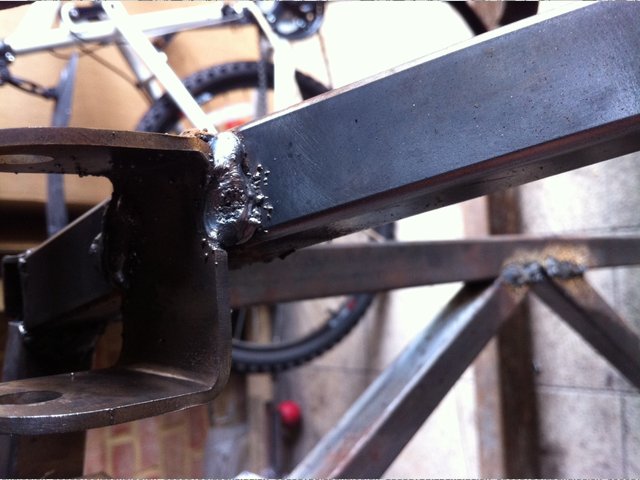
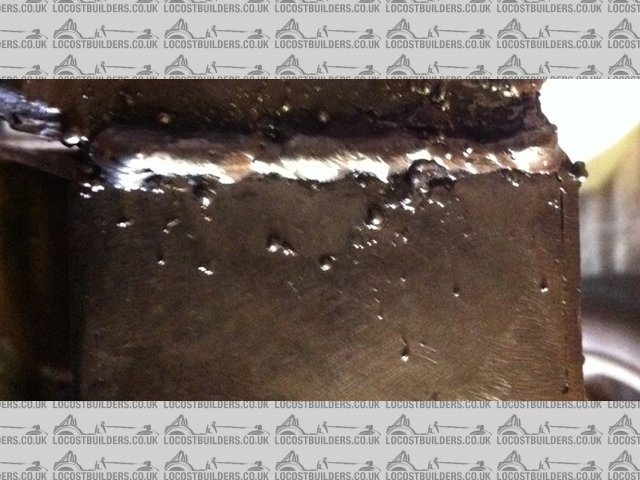
I have attached 3 typical welds bellow. Please can you give me your thoughts.
If they are crap please feel free to say so but please no abuse. If you think i should still get the fabricator round to go over the chassis, can you
tell me can he just go over the existing welds or will i have to grind them all back?
 
Weld 1
 
Weld 2
 
Weld 3
I only really get one chance to get this right as when i start bolting bits to it, the chassis will be impossible to correct. Even if you guys tell me
to scrap it and start again, i would rather that than an unsafe car or one that never gets on the road due to failure.
|
|
|
|
|
jacko
|
| posted on 24/5/14 at 05:01 PM |

|
|
The weld's are a bit rough but there not the end of the world
If i was you i would give them a grind down and get your mate to go over them and add more welds
Try and use a MIG with gas if possible
Jacko
Are they the worst welds you have on the chassis ?
[Edited on 24/5/14 by jacko]
|
|
|
joneh
|
| posted on 24/5/14 at 05:03 PM |

|
|
I would get some scrap. Weld it. Then cut through to inspect penetration.
You don't work for Porsche do you? 
|
|
|
hkp57
|
| posted on 24/5/14 at 05:15 PM |

|
|
On your first picture did you weld the piece in the position as shown? If yes then your direction of travel for welding in the vert is wrong, you
should push the metal up hill and not pull it down hill which would explain the slag traps in the weld. Some cleaning up with a grinder is needed here
to remove the slag traps and then re-weld. Is this an engine mount?
The second picture shows the same conditions but as you are welding a lighter gauge it is getting too hot hence the size of the weld pool, there is
also a lot of Porosity in the weld (aero bar). As this looks like a suspension pickup point i would grind this one back and do it over. It is
dangerous.
Weld 3 looks like it just needs the spatter cleaned off should be ok
Fleet
SKC Raptor R - Hayabusa
Toyota C-HR Hybrid Limited Edition
Honda VFR1200 CrossTourer
DCT
Marlin Roadster 1800
Mercedes Vito 116 Sport
|
|
|
designer
|
| posted on 24/5/14 at 07:59 PM |

|
|
The problem with welding is that even a perfect looking weld has no guarantee of the correct penetration.
|
|
|
steve m
|
| posted on 24/5/14 at 08:29 PM |

|
|
I cant comment on your welding except they look bad, sorry !
in fact as bad as mine with a Mig
I built my chassis with an Arc welder, and although that welding can look a tad poor it was ok
Yet i still had a profesional to go over all the welds with a MIg
We only get one life, and is it worth it for a little weld you did to break ?
NO its not
Thats was probably spelt wrong, or had some grammer, that the "grammer police have to have a moan at
  
|
|
|
DIY Si
|
| posted on 25/5/14 at 06:00 PM |

|
|
Whilst it's hard to say how strong those welds are, they don't look right. As said, when doing vertical welds, always go up not
down. You want any contamination/slag etc to sit on the top as it floats on the weld pool, and pulling down just traps it in the weld.
This is the standard I try to set for myself when welding. I don't always get it this pretty, but they are always attached.

To add, I do have a big Migatronic machine and it's a joy to use. I'd never use gasless if I had a choice.
[Edited on 25/5/14 by DIY Si]
“Let your plans be dark and as impenetratable as night, and when you move, fall like a thunderbolt.”
Sun Tzu, The Art of War
My new blog: http://spritecave.blogspot.co.uk/
|
|
|
DIY Si
|
| posted on 25/5/14 at 06:02 PM |

|
|
Another thought, how clean are you getting the steel before welding? It's hard to tell in a post-weld photo, but you want the steel back to
shiny metal before you start.
“Let your plans be dark and as impenetratable as night, and when you move, fall like a thunderbolt.”
Sun Tzu, The Art of War
My new blog: http://spritecave.blogspot.co.uk/
|
|
|
Padstar
|
| posted on 26/5/14 at 03:39 PM |

|
|
Thanks for the feedback. I have spent the last few hours grinding joints back. I will grind every joint on the chassis back nd then get the fabricator
to go over them all which should then leave me with a solid frame to crack on with.
When i am grinding back, should i grind/cut a grove into the butt joints where the 2 pieces meet or just leave them flush?
In your experience if the chassis is sat out on axle stands and clear areas to work in how ing do you think it would take a pro to go over all the
joints. I want to give him a good idea of if it will be a day or half a days work. I was thinking about 4 hours to go over the whole lot?
|
|
|
prawnabie
|
| posted on 26/5/14 at 04:04 PM |

|
|
Would it be better to put it on a flat surface so the welder can see any distorsion whilst welding it a correct it?
[Edited on 26/5/14 by prawnabie]
|
|
|
DIY Si
|
| posted on 26/5/14 at 07:52 PM |

|
|
Whilst it could all be welded in a few hours by someone who knows his onions, as sad, welding it in a way to stop/remove any twist is harder as it
will need to cool a bit before all the twist is shown. Do you know how flat the chassis in at the moment?
“Let your plans be dark and as impenetratable as night, and when you move, fall like a thunderbolt.”
Sun Tzu, The Art of War
My new blog: http://spritecave.blogspot.co.uk/
|
|
|
Padstar
|
| posted on 26/5/14 at 08:00 PM |

|
|
This is a very good point about the heat deflection. It is currently in a good shape with regards to being dimensionally true as I literaly did a
handful of joints a day when I was welding it.
Is it unrealistic to have done properly in a day?
Also should I just grind flush or open up the joints slightly?
|
|
|
DIY Si
|
| posted on 26/5/14 at 08:07 PM |

|
|
Opening up the joints a bit with shallow V would be my preference if doing the welding as there's less chance of any contamination/air
bubbles/slag etc hiding in the existing weld. And it's a bit easier as you won't need to burn through the old weld, so can weld at a lower
power, which should mean less distortion too.
“Let your plans be dark and as impenetratable as night, and when you move, fall like a thunderbolt.”
Sun Tzu, The Art of War
My new blog: http://spritecave.blogspot.co.uk/
|
|
|
Padstar
|
| posted on 26/5/14 at 08:10 PM |

|
|
Thanks. Is putting it back up on the leveled build table the best place for welding it? To highlight any distortion.
|
|
|
Fred W B
|
| posted on 27/5/14 at 04:45 PM |

|
|
If you want it done both quickly and well make a plan to be able to rotate/turn it, so that all welds can be done in the ideal downhand position.
Cheers
Fred W B
[Edited on 27/5/14 by Fred W B]
You can do it quickly. You can do it cheap. You can do it right. – Pick any two.
|
|
|


