DIY Si
|
| posted on 15/3/06 at 09:55 PM |

|
|
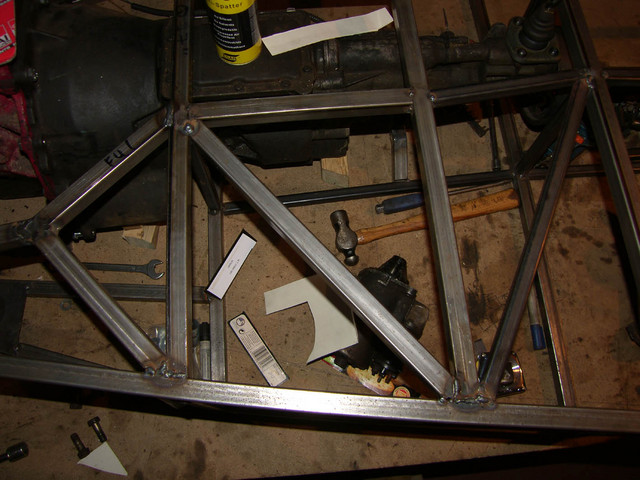
Is this right?
Below will hopefull be a pic of part of my nearing completion chassis. Is the triangulation the right way round? Would it be more effective another
way?
|
|
|
|
|
DIY Si
|
| posted on 15/3/06 at 10:01 PM |
|
|
I'll have another go.
Rescued attachment smaller chassis top1.jpg
|
|
|
DIY Si
|
| posted on 15/3/06 at 10:03 PM |
|
|
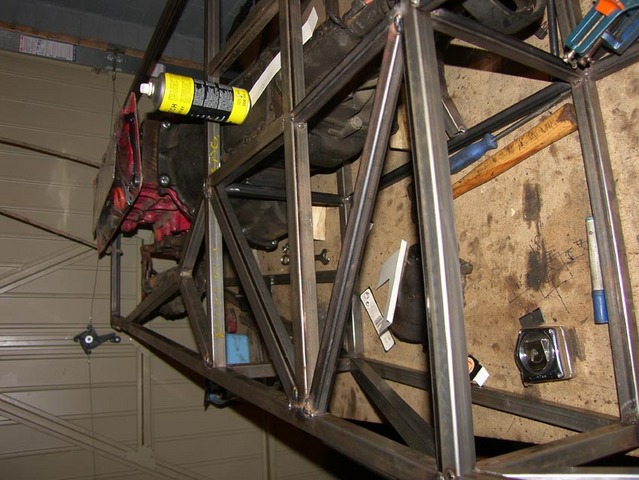
This one might be easier to see it.
|
|
|
DIY Si
|
| posted on 15/3/06 at 10:03 PM |
|
|
damn computers!
Rescued attachment smaller chassis top2.jpg
|
|
|
owelly
|
| posted on 15/3/06 at 10:11 PM |
|
|
I'm not being funny but I think the triangulation is the last of your worries! The welding looks a bit iffy!
http://www.ppcmag.co.uk
|
|
|
Avoneer
|
| posted on 15/3/06 at 10:12 PM |
|
|
You don't want the back horizontal - this will be where the dash is, and you knees.
The next triangle in towards the front of the car should be the other way.
Don't think the next digonal in towards the front is necessary either.
No trees were killed in the sending of this message.
However a large number of electrons were terribly inconvenienced.
|
|
|
DIY Si
|
| posted on 15/3/06 at 10:13 PM |
|
|
I know. Havinbg arguements with the ba$tard thing today. Should probably have given it a rets but hey ho. I'll just spend even more time cutting
it all off/out and redoing it.
The most rearward rail is there as it'll be underneath the dash. The passenger bit is 4 inches longer behind where that goes. If you see what I
mean.
[Edited on 15/3/06 by DIY Si]
|
|
|
owelly
|
| posted on 15/3/06 at 10:16 PM |
|
|
I didn't want you to hit a pothole and end up sat watching the engine and box being chased up the road by the back axle!
http://www.ppcmag.co.uk
|
|
|
stevebubs
|
 posted on 15/3/06 at 10:18 PM posted on 15/3/06 at 10:18 PM |
|
|
Did you realise your engine was wearing a hat?
|
|
|
DIY Si
|
| posted on 15/3/06 at 10:19 PM |
|
|
Don't worry mate. I'd rather someone tell me it's poo and I fix it rather than as you say watch the thing fall apart with me, or
anyone else, in it! Any good/passable welds in the pics or all poo? Been out there most of the day, and can't remeber what's new/old.
The gasket set is there so I don't stand on it, and to keep some of the poo out of the engine as the head is being cleaned at the mo. And
that's the clean, spacious end of the garage!
[Edited on 15/3/06 by DIY Si]
|
|
|
Avoneer
|
| posted on 15/3/06 at 10:27 PM |
|
|
Welds need to be better to be honest.
Anyway, remove the red bars and weld in the blue one:
Pat...
 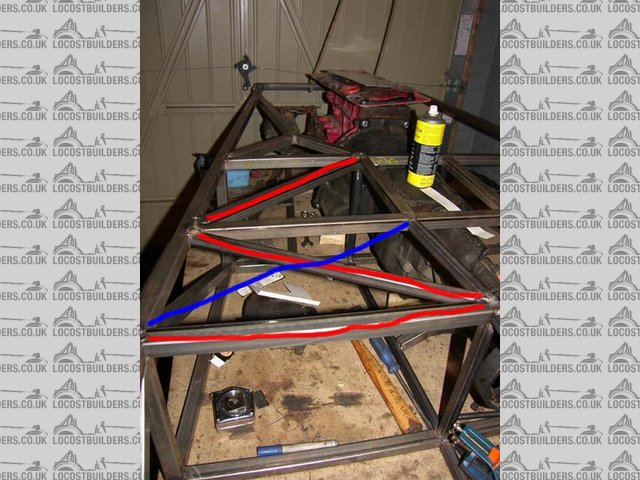
Rescued attachment smaller chassis top2.jpg
No trees were killed in the sending of this message.
However a large number of electrons were terribly inconvenienced.
|
|
|
DIY Si
|
| posted on 15/3/06 at 10:33 PM |
|
|
Would it be worth moving the rear bar forwards, or just ignore it all together? I only ask as the open bit of the passenger bay is where the extra
length's gone in. Oh, and any hints on how to generally improve the welding?
|
|
|
JoelP
|
| posted on 15/3/06 at 10:41 PM |
|
|
quote:
Originally posted by DIY Si
Oh, and any hints on how to generally improve the welding?
for a start, a better mask and use two hands to steady it. Some look a little wobbly, with a good mask (so you can see perfectly where you are going)
and two hands to keep it aimed well, you will see a big jump. Then you just need to ensure the welder is on the correct settings. Dont be shy of
grinding it back and redoing stuff til its good, i still redo some after 3 years of welding.
|
|
|
DIY Si
|
| posted on 15/3/06 at 10:46 PM |
|
|
Not shy about re-doing. I'd rather do it ten times and only get right on the tenth go than do it once and just leave it. And I amcurently using
a hand held thing. Can't call it a mask as it's fecking awful. Saving up for a nice sensible one. unless anyone's got one going for
a song?
|
|
|
JoelP
|
| posted on 15/3/06 at 10:51 PM |
|
|
trust me, the mask is a priority! That will solve most of your problems. Get an auto darkening one, around £50 these days. You will wonder how you
lived without it.
|
|
|
Gav
|
| posted on 15/3/06 at 10:53 PM |
|
|
You can get a flip down mask from B&Q for about a tenner, being able to use two hands will improve your welding no end.
It looks like you might have the wire feed set a little too high as your getting lots of lumps, although this might be todo with one handed
wobblyness.
Also when our tacking, try to make sure you get the tacks at the end of where your want to weld or on the corners of box section, this will help when
your fully welding it up as your not going over big tacks.
while i may not be the worlds best welder you want to end up with something that looks like this
http://gallery.rootpeg.net/displayimage.php?album=1&pos=36
|
|
|
DIY Si
|
| posted on 15/3/06 at 10:55 PM |
|
|
I'll have to look into that one then. Bar a better mask, any thing else that you can see that i'm doing wrong/could do better? Feel free
to be brutal, I'm looking to learn. But not so harsh I go cry in the corner
You might not be the world's best, but defintely better than me! Not too hard to achieve that though! Just glad I've only tacked just
about everything else together so far.
[Edited on 15/3/06 by DIY Si]
|
|
|
MikeR
|
| posted on 15/3/06 at 11:03 PM |
|
|
you shouldn't need the triangulation next to the y brace as that will (i assume) be a welded steel top (or perhaps stressed ali panel.)
|
|
|
Gav
|
| posted on 15/3/06 at 11:03 PM |
|
|
if youve got lots of spare scrap just do lots of practice then get some spare tube and make a cube and weld it best you can then get a hammer and beat
it good and proper, that way you'll get a good idea of how strong your welds are. then ask yourself, would you be happy riding in a chassis
that youve welded if the answer is no then practice some more
[Edited on 15/3/06 by Gav]
|
|
|
caber
|
| posted on 15/3/06 at 11:21 PM |
|
|
Those welds look pretty good and are probably sound however a sound weld does not have to be so neat. The important thing is to make sure your welds
fully penetrate the metal, unfortunately there are no non destructive ways of finding this out short of x-ray! If you are uncertain about a weld grind
it flush with the original metal and look for any cracks at the joint. If you see any cracks or movement then your weld has not penetrated so it needs
re doing. It is also worth doing a couple of welds using scrap tube on the bench then cutting through the weld then you will see how you are
penetrating, if you are just laying weld on top of the joint then you are in trouble!
Regards
Caber
[Edited on 3/15/2006 by caber]
|
|
|
ed_crouch
|
| posted on 15/3/06 at 11:27 PM |
|
|
I did a welding course a while back, and they key thing with MIG is to SET THE MACHINE UP WELL.
If the machine is set up well, even a monkey can do really top welds, but if its badly set up, even a pro welder would struggle.
Its one area where even a good workman will blame poor tools. If the welder transformer is a bunch of poo and wont hold a steady arc voltage, or if
the wire feed isnt up to it and stutters/slips, its not going to be good.
Ed.
I-iii-iii-iii-ts ME!
Hurrah.
www.wings-and-wheels.net
|
|
|
Avoneer
|
| posted on 15/3/06 at 11:31 PM |
|
|
Any reason why you 4" longer ?
Either way, you'll be fine with just the bars I drew.
Pat...
No trees were killed in the sending of this message.
However a large number of electrons were terribly inconvenienced.
|
|
|
DIY Si
|
| posted on 15/3/06 at 11:44 PM |
|
|
Many thanks for the advice one and all. The welder is not one of the best, and would be replaced if I could afford to do so.
Caber, why do you seem to say different to evryone else, or is it just about the neatness thing? Fairly sure on the penetration, if i slowed a little
i was blowing holes in it.
The chassis is basically a +44, but +4 sideways for the entire length with an eye to a v6 in the future. +4 in the middle as I didn't feel
comfortable in a standard one as I'm 6'3", size 13 feet, quite broad shoulders etc.
[Edited on 15/3/06 by DIY Si]
|
|
|
Avoneer
|
| posted on 15/3/06 at 11:53 PM |
|
|
No probs.
Chassis will be fine like my pic.
Pat ;-)
No trees were killed in the sending of this message.
However a large number of electrons were terribly inconvenienced.
|
|
|
NS Dev
|
| posted on 16/3/06 at 12:10 AM |
|
|
Just to second the welding advice, get a mask so that you can use two hands, if you are right handed, right hand on the trigger, support the shroud
with your left hand, tip the torch handle to the right with your right thumb and then weld right to left "pushing" the weld. Doing it this
way you can see where you are going, what the weld pool is doing and it will make a nice job.
Also turn the wire feed down a bit. In fact, get a lump of scrap and with your new mask on, keep the torch pointed at the scrap and the trigger pulled
and then vary the wire speed and have a play until you get the feel. I ALWAYS set the current and feed up on scrap before I start a weld.
good luck
Nat
Retro RWD is the way forward...........automotive fabrication, car restoration, sheetmetal work, engine conversion
retro car restoration and tuning
|
|
|


%20(WinCE).JPG)