welshboy
|
| posted on 27/3/07 at 07:23 PM |

|
|
Wishbone Brackets
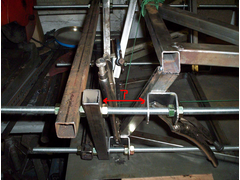
Hi guys can any one help me? i have lined up my brackets with the jig ( as in the pic) could any one give me the mesuments for the red line iv marked
on the pic? between the bracket and the upright of the jig thanks
 
Rescued attachment locost q pic.JPG
|
|
|
|
|
bilbo
|
| posted on 27/3/07 at 07:34 PM |

|
|
It's best to make this as wide as you safely can to increase your castor angle. Obviously you will also need to move the other top bracket as
well to ensure the wishbone will fit.
---------------------------------------
Build Diary: http://bills-locost.blogspot.com/
Web Site: http://locost.atspace.com
|
|
|
mark chandler
|
| posted on 27/3/07 at 07:52 PM |

|
|
If you are making your own bones then just place the bracket central on the vertical and weld up.
When you make the bones make the bottom symetrical, then using a plumb line make the top bone to the amount of caster you require.
Upside you get away from inaccurracies in the book, downside is they are custom to your car.
I made my bones an inch wider than standard, wish I had added a couple of inches now to maintain track front to back with sierra axle.
Regards Mark
|
|
|
welshboy
|
| posted on 27/3/07 at 08:17 PM |

|
|
hi forgot to say iv off set my top bones by 22mm so would i still want to make this mesurment as wide as pos thanks
|
|
|
mark chandler
|
| posted on 27/3/07 at 09:33 PM |

|
|
By offset 22mm I take it you mean that taking a centre point between the brackets top and bottom you have a 22mm difference, ie the centre of the top
top is 22mm behind the centre of the bottom set.
If so then the bones will be symetrical.
if you widen then you just have to offset the top bone making the top one handed.
The big question is are you making your bones or buying them ? Very easy to make especially as you have already produced the chassis.
If buying in then you need to obtain the bones before welding anything and trial fit when brackets are clamped/spot welded.
Making you own then you build to suit.
Regards Mark
[Edited on 27/3/07 by mark chandler]
|
|
|
907
|
| posted on 27/3/07 at 10:29 PM |

|
|
Hi
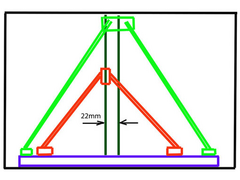
I can't give you the dimension as your w/b's might be different to mine, but I suggest you do the following.
Clamp a piece of box/angle/wood to the edge of your bench/sheet of metal/dining table (  ) )
and square up two lines, 22mm apart.
Lay a w/b on one centre line and mark the location of the bush tubes.
Lay the other w/b on the other centre line and mark bush tube locations.
The difference between the two sets of marks are the dims you are after.
I did both sides at the same time so that I could check they were parallel,
measuring across the engine bay from one to the other.
22mm is fine by the way, but no less.
See diagram.
hth
Paul G
 
Rescued attachment dims.jpg
|
|
|
welshboy
|
| posted on 28/3/07 at 07:53 AM |

|
|
thanks for all your help guys got the day off so going to try to set up now
|
|
|


