
Fury Rebuild with Duratec Install - build diary
FuryRebuild - 22/3/12 at 08:14 PM
I thought I'd create a build-diary thread to keep a lot of the posts I'm going to make about my fury and the duratec install in one
place.
As well as keeping a record here, I am also running a blog at furyrebuild.co.uk, where I'll keep the kind
of collated material that may be useful and more suited to a web-site format (such as the page of bolt sizes, and the page of weight-loss as parts are
sourced and fitted, as well as other ramblings about building things (such as pissing people off in the postoffice queue this morning) ).
If you want to stalk me further, there's a facebook page under "furyrebuild.com" so you can see what's going on without needing to
worry about friending me on FB.
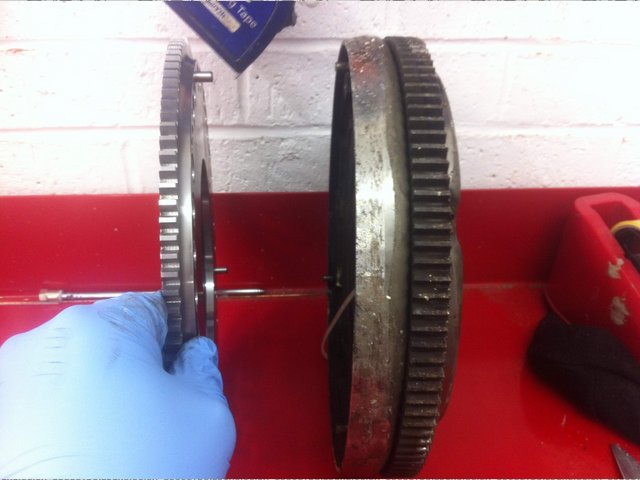
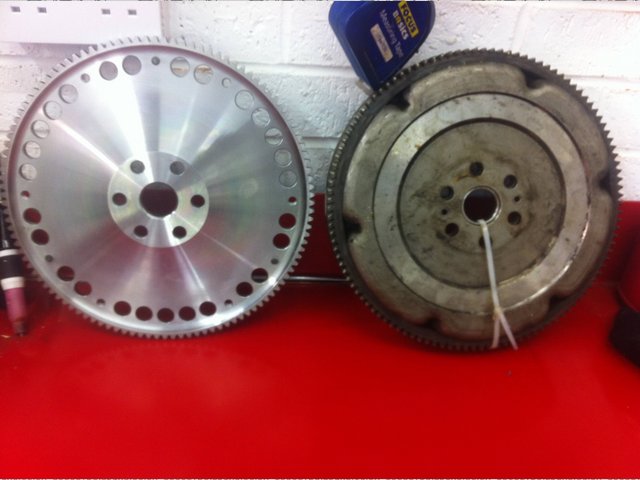
Without further ado, I thought I'd at least do an interesting weightloss post, which is - I've got my new lightweight flywheel. 12.3 down to
3.7 KG, I think. This should make it interesting.
Here are the photos for your onanistic pleasure:
Front On


Description
Side On

Description
Arse On

Description
big-vee-twin - 22/3/12 at 10:07 PM
That new flywheel makes the original look like a right porker, mine is an ST150 so not as big as that similar to yours but without the holes.
Keep up the good work, I'm not far away from you being in York.
Regards
Kev
nick205 - 23/3/12 at 09:34 PM
Is the OEM one a DMF type flywheel.....? Looks gargantuan by comparison.
FuryRebuild - 23/3/12 at 11:38 PM
Yup. Dual mass = many pies.
nick205 - 25/3/12 at 07:50 PM
So do most modern petrol cards have DMFs as well then?
If so all the down talk on diesels seems a little ripe (not aimed at the OP BTW, just a general observation)
FuryRebuild - 28/3/12 at 04:01 PM
So, it was an interesting weekend on the car.
I managed to get my pinto out (no problem) and separated from the gearbox. Box is out and drained. I've got the shiny new bits from RWD
Motorsport so it gave me a chance to measure the weight savings between the cast bellhousing (so used to save space) and the new shiny ally one. My
running total of weight saved and how is here (click me).
As well as that, many bits were put into the garden and power-washed. It looks like the lawn has survived when i washed the block although I do have
some footage of the oil pump being pumped to get the last of the crap out of it. To say it is obscenely biological is an understatement.
Now I have the new bellhousing and block, I can bolt them together and offer them up to the transmission tunnel. I ordered the hydraulic clutch option
which means I can get it nicely back and deep into the transmission tunnel. I'm going to chop about 2" out of the tunnel passenger side to
allow the bellhousing to go back as far as the startermotor. It's going to mean moving part of a leg over and repanelling part of the tunnel, but
bearing in mind it all needs to come off to get powder-coated, it's no big deal.
Once I get the details about the Dave Walker head on my pinto (got most of them, just waiting for the massive valve sizes) then I'll get that up
for sale. It's currently sat on a pallet with the oil still in (Valvoline racing oil - seems a shame to waste it).
At the moment, it seems to be clean, tidy, repair rather than the really interesting stuff of fabricate, weld, hammer, glue, bolt.
No pictures yet, but lots of video to edit and process.
FuryRebuild - 29/3/12 at 12:29 PM
Well, I have two small problems with the front rockers and the new gaz shocks (from spax).
The first issue is one of manufacturing in the bad old fisher fury days. The spax shockers (and gaz) had the fairly universal bolt size of 1/2".
Fisher drilled everything out to 12mm and fitted 12mm bolts. The end results was that much of the suspension was looser than it should have been, and
relied on friction between the bracket walls and the outside of the housing of the thing being bracketed to keep it in place. This meant frequent
tightening of the rear end and a general WTF sentiment from me. Whenever I've found this, I've reamed the holes out to 1/2" and used
the correct bolts. On the lower wishbone bushes, you can actually grab the wishbone and heave, and hear a slight clunk as the 1/2" bush moves on
the 12mm bolt. However, the new guys who have the car are much more quality focused.
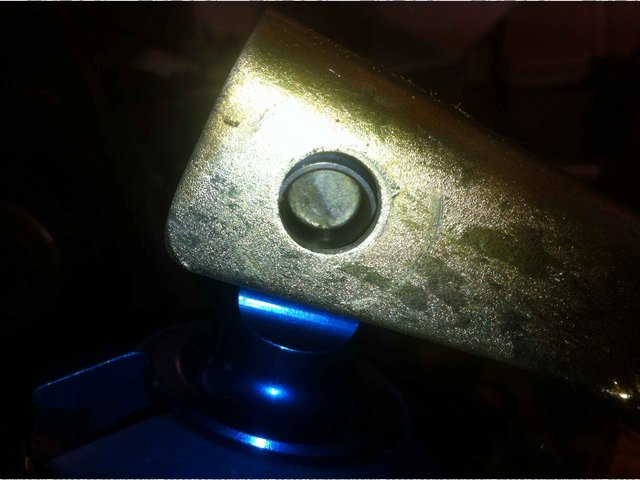
Secondly, it's one of fitment and clearance. The spax are on bushes and the gaz are on rose-joints. I'm not complaining - I wanted an
upgrade in shocks. This means the housing/mounting arrangement on the new shocks is slightly larger, and won't fit the rocker arm, as you can see
here:

Description
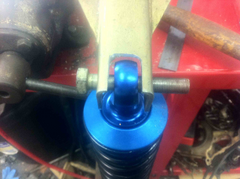
There's not much in it, but modifying the hole is a dumb idea. So, the top of the rocker arm needs to be recessed and then reinforced, so:
Firstly, chop a hole to fit the shocker:

Description
Secondly, make a little hat to fit on top of the home to reinforce it. This was 40mm OD, 2mm wall thinness pipe, with a 1x6 cm slice taken out of it,
then tapered to a point at the back (for no other than aesthetic reasons).

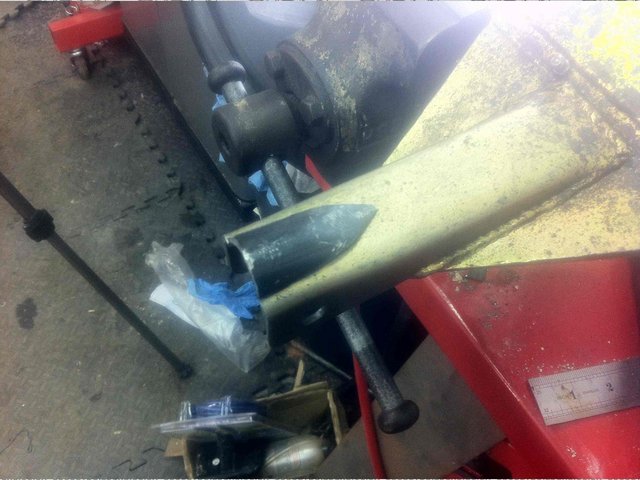
Description
Next, tig it into place and polish it.

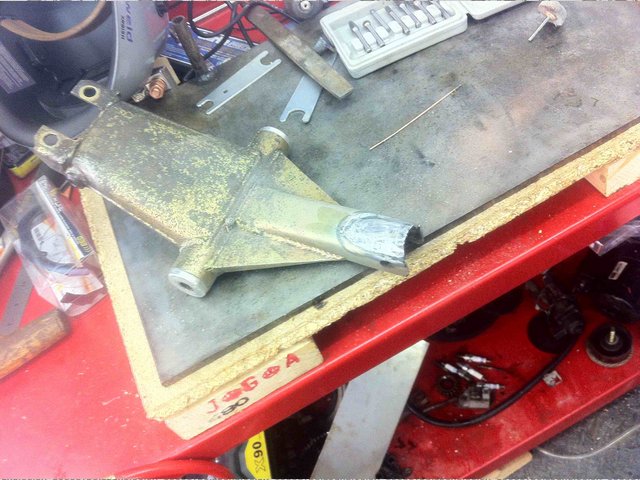
Description
If you make several mistakes tigging it into place, then get your tungsten carbide kit out and polish and blend it into the mating surface to look
like you meant it to be like that. My mistakes were:
1) not removing enough of the place from the weld area - it coughed some crap into the weld.
2) initially getting the current wrong - I started with 50A to nicely melt the 2mm plate, but got way better results with 75A to melt the rocker arm
3mm metal. The welds came together then.
then, admire the end result, before taking the lessons learned onto the other rocker arm and then the powder coaters.

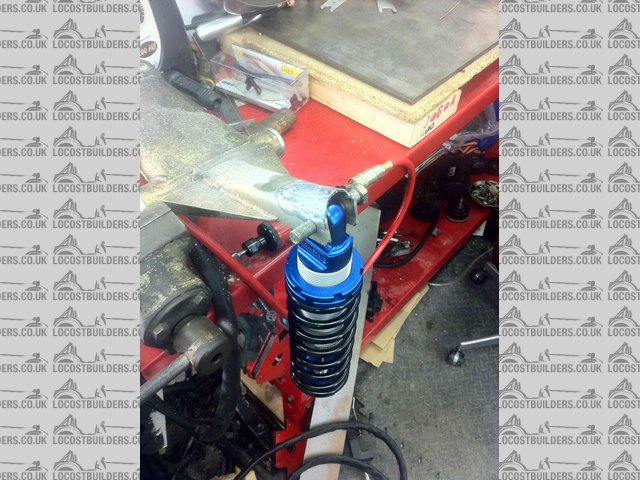
Description
pjay - 29/3/12 at 08:52 PM
quote:
Originally posted by FuryRebuild
My running total of weight saved and how is here (click me).
In terms of weight saving I went from a car - 641Kg Pinto to 612Kg Duratec (confirmed via re-corner weighting).
More details in http://viatron.websitetoolbox.com/post/S6-Duratec-conversion...-4754094?trail=180
[Edited on 29/3/12 by pjay]
FuryRebuild - 6/4/12 at 09:20 PM
Well, I've been busy stripping like a £20 tart.
I now have the entire front of the car back to the chassis, apart from the brake master cylinders and pedal box. I'm leaving them in situ just at
the moment because I need to convert the clutch pedal from cable to hydraulic. The plan is to cut the necessary circular hole in the right place and
fir a bearing in place in the pedal to take a clevis acting on the master cylinder.
I've started to take the side panels out, drilling out rivets and whatnot. One option would be to leave them in place and get them powder coated
with the rest of the chassis, but I just don't know if the rush has got in behind them. I'm going to go with plan-B. Get the chassis blasted
(a nicely keyed surface then) and epoxy the panels in place, securing with advel stainless rivets. These have upwards of 3000PSI clamping force rather
than the crappy soft alloy ones. You can't put them in with a hand riveter, but luckily I have an air-riveter. I may get the chassis done, then
epoxy them in place. Assuming the job is done well, I will be putting epoxy onto epoxy - not a bad idea if it's keyed first. Saying that, just
writing that down makes me want to go with plan-A.
I've also got the rear hubs and half-shafts out, and everything split down as needs be (again, the original IRS installation rear hub carriers
are rusting to buggery).
The half-shafts are in good condition. I will probably replace the handbrake cable. I've changed one without the car being stripped down and
it's a hellacious job.
I kinda wished I hadn't stripped things back so quickly - it means I don't have a rolling chassis in order to work with when I bend up some
side-intrusion bars. I still have the side pods and tub handy, so can certainly mock most stuff up.
The rear shocks are off as well - all that's left is the diff and diff-carrier then it's back to the bare chassis.
SBDev have got my bits ready, so I can proceed with the engine rebuild. I will at least need to get the sump on before I start offering
engines/bellhousings up to gearboxes and cutting the tunnel to get it as far back as possible.
Should be a good day tomorrow - the strip down will be complete and I'll start looking at how I'm going to tig in the new roll-bar.
FuryRebuild - 17/4/12 at 05:43 PM
I've added a post on my blog about welding in brackets on the diff-carriers to reposition handbrake cables and speedo sensor mounts.
There are pictures if you want them. I'm knackered and have a lot to do tonight, so won't be cross-loading them here.
click here to see the post
FuryRebuild - 10/5/12 at 09:38 AM
Time for further updates - I've been keeping the blog up to date as well (over here)
which has some different content on. You can read about three men and a festival of rubber.
I've now done a dry-build of the engine in order to start positioning and chopping the chassis. It's going to be interesting moving this
back into the tunnel as well as widening the tunnel to take the wider pedal box.
Here's the engine front-on with throttle bodies and front plate.


Description
slightly higher up, showing the polished ally top. it also shows off how mucky the block is - I think I'll have to polish that before I complete
the build.


Description
and finally side on showing the bell-housing and scruffy block


Description
One point of note was the throttle bodies fitting the alloy manifold - there was no way was I able to get a bolt (socked headed cap screw) into the
throttle body to screw into the thread on the manifold, so I had to drill out the threads on the manifold and use lock-nuts. Not ideal, but the kind
of tailoring that shouldn't put anyone off.
big-vee-twin - 11/5/12 at 07:26 AM
Looking good, I gave my block a good clean but to be fair over time it just goes grey and fluffy again and I'm not on the road yet, give it a
good clean down but I wouldn't spend to much time polishing it
FuryRebuild - 17/5/12 at 07:24 PM
I've put another two posts into the blog covering progress with the dry build and the sump kit.
I'm getting close to offering up the engine to the chassis and chopping where necessary. Very exciting stuff. If I get a flyer this weekend then
I'll ready to send the chassis off for a strip and coat in 2 weeks. Here's hoping.
pjay - 17/5/12 at 08:51 PM
Looking good!
Notice you have a bit of powdering corrosion on the timing chain cover. I've found GT85 is great to stop the corrosion - mask off, spray it on
and leave it to dry.
Any idea what changes you think might be necessary to the chassis?
Earlier on in the year I was helping Furyous with his Duratec conversion and we weren't sure whether the front of the chassis might need to be
modified (one of the diagonal pieces by the nearside front of the sump).
Furyous - 18/5/12 at 06:30 AM
quote:
Originally posted by pjay
Looking good!
Notice you have a bit of powdering corrosion on the timing chain cover. I've found GT85 is great to stop the corrosion - mask off, spray it on
and leave it to dry.
Any idea what changes you think might be necessary to the chassis?
Earlier on in the year I was helping Furyous with his Duratec conversion and we weren't sure whether the front of the chassis might need to be
modified (one of the diagonal pieces by the nearside front of the sump).
This was the problem I had.

Description
The rail comes under the front cover bolt in the corner.
Looking at this picture:
http://www.furyrebuild.co.uk/wp-content/uploads/2012/05/tacked-with-gates-in.jpg
It seems like I would have some trouble with this sump.
The MX5 bell housing is quite wide compared to the Type 9 housing, so the engine and box can't go any further back without widening the
transmission tunnel.
FuryRebuild - 18/5/12 at 10:28 AM
Hi Furyous
The sump at the moment bolts nicely to the block and whilst it aligns with the type-9 there aren't any bolt-on points. The sump isn't
structural so attachment to the bellhousing isn't necessary. It can easily be strengthened to take that attachment.
It's as wide as the block and as deep as the oil-filter housing so it shouldn't make your job worse. Chopping the chassis to get the mazda
bell-housing in is the concern I would think.
In my original pinto installation, I managed to get it so the back of the bellhousing was aligned with the passenger footwell and with 3mm clearance
when it sat in front. It was a right challenge getting the clutch to work.
I did have to make some modifications to the chassis - when I crashed it at harewood I took the opportunity to re-seat my pinto a little lower (also
meant I didn't need to modify the new bonnet to make it fit).
Here's the first change where I moved the cross member over to accomodate the clutch arm. It's a little messy now and I will tidy it up and
apply triangulation from the chopped member to the new member.

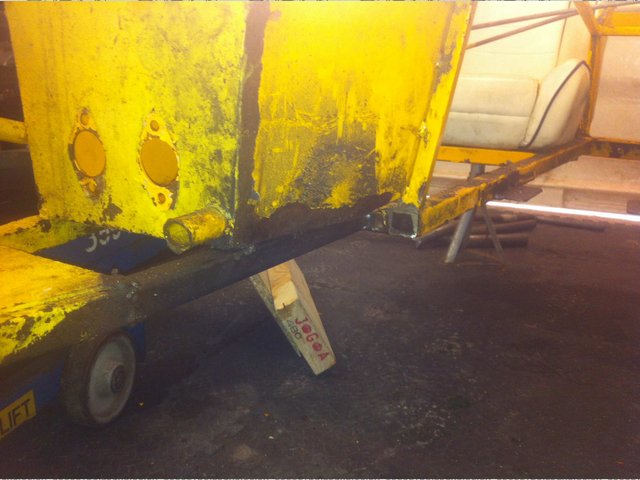
Description
When I lowered the engine and moved it a little further over make it fit in the tunnel, I then found that the alternator fouled the following
cross-member, and the exhaust was also now lower which meant the steering column fouled things as well - result was to move this cross-member down. I
need to tidy the welds up.


Description
This final one shows how the sump then fouled the same cross-member I think yours did, so I moved it an inch as well. It's now the right
shape.
What's also worth noting is the extra cross-bracing I put in place - the steering rack stood on pegs but with no cross-bracing which meant to me
that all the steering load forces were going into the chassis by bending the pegs, so I cross-braced them (more visible on the right hand side of the
photo) and the whole front which took the suspension loads was an open square shape, so I triangulated that as well. For good measure I replaced the
rack bushes with stiffer ones.
The end result is that you can think the car around corners and the slightest jink on the wheel can move you 3 ft over the road - ideal for missing
slippery manhole covers.
It has also meant that I need to counsel those driving it that they need BOTH HANDS ON THE WHEEL EVEN WHEN CRUSING. If they hit a brick the car
would be off and they'd lose control. Also to keep thumbs in a safe place lest they get broken. After all, it's more or less a race car, not
a fiesta 

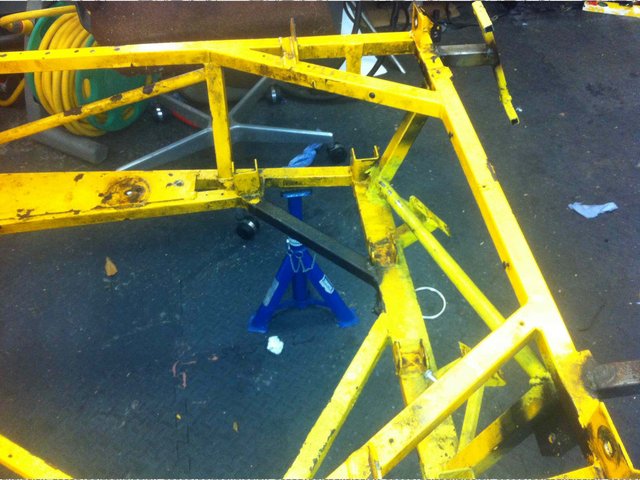
Description
FuryRebuild - 31/5/12 at 08:50 PM
I've updated the blog here with a lot of photos and narrative
about chopping the footwell to make the OBP pedal box fit. I'll upload the photos later and add the text later.
FuryRebuild - 20/6/12 at 04:47 PM
I've got a new post up about taking my OBP pedal box to pieces, chopping an inch out of it to make it fit, and nailing it back together again.
it's here: http://www.furyrebuild.co.uk/. I'll parcel it up for a thread on the forum, but that
involves moving the photos around and importing them - the site seems to struggle with more than a couple of external links to embedded photos.
Rich J - 20/6/12 at 05:02 PM
Done something similar on my Striker when changing from Crossflow to Vauxhall 1600 power. The same difficulties arose with an OBP set up in the
narrow footwell. Luckily I managed to get a used Tilton one on Fleabay for less money than the new OBP! Have'nt been that lucky since!!


Keep up the good work
FuryRebuild - 20/6/12 at 07:48 PM
Hi Rich
I really like what you did with the footwell to get the pedals in - I feel I may follow that.
I couldn't bring the front of the pedal box forward much - the car's not made for big-uns, and i'm only 5'8. Now that I've
also virtually removed 2" from the passenger compartment, it's going to get trickier. The loss of 2" comes from putting the roll-over
hoop in behind the driver - it's 40mm T45 and is designed to go in right down to the floor.
Thanks for the photos - really appreciate the update.
FuryRebuild - 21/6/12 at 07:17 AM
So, welded it in last night. It was really tricky to get all the intersecting plane angles right and to get the fitments close enough to get a good
gap for tigging. Got there in the end.
This is the top-shot. The angle just 'feels' right and intersects the horizontal top of the pedal box nicely. I think I'm going to chop
out all the remaining metal in the pedal box now, and go for a new enclosure. I'll keep the 1.5mm mild steel thickness of the original design.
Rather than stitch 1 inch, gap 3 as the current design is, I'll stitch one, gap one. If I'm in a bad enough shunt to need the pedal box
straightening, actually straightening it is the last of my worries.

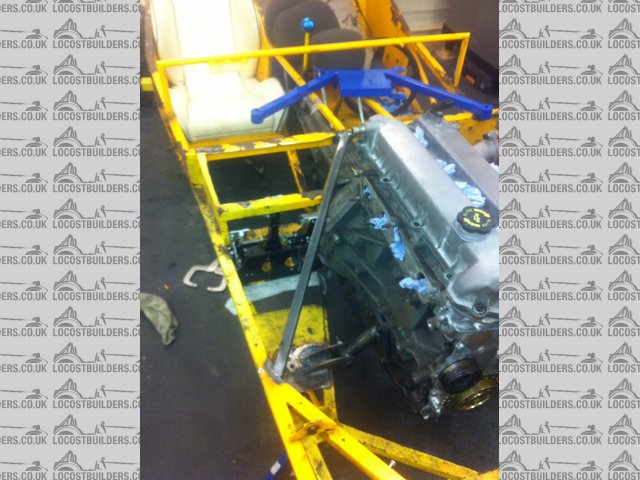
Description
Next we have the weld quality. I'm reasonably pleased bearing in mind it's not the easiest place to get to. I added extra filler around the
corners because I found it had a tendency to undercut there. The scattering of holes there are for the mounting of the tub, and other things I
attached straight to the chassis. They look a little random, but when you take the mounting patterns of the components into account, they make
sense.

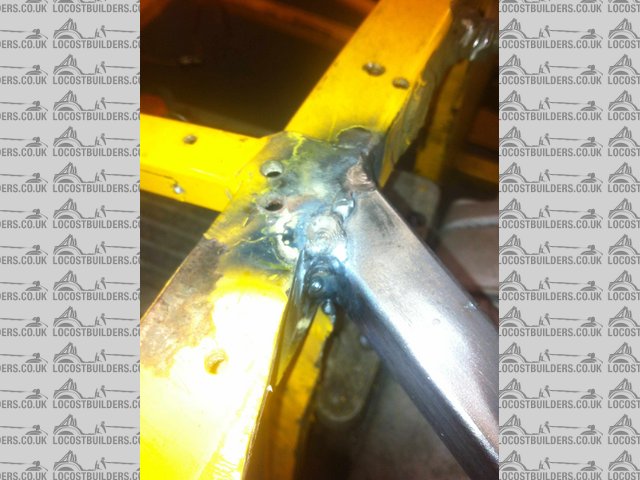
Description
Finally, this is the view from the exhaust's perspective. there's 50mm clearance between the cross member and the bottom of the flange.
There's also clearance now for the exhaust stud. If I find the exhaust is getting a little close to the steering column then I'll add a
little bend into it's travel to give decent clearance.

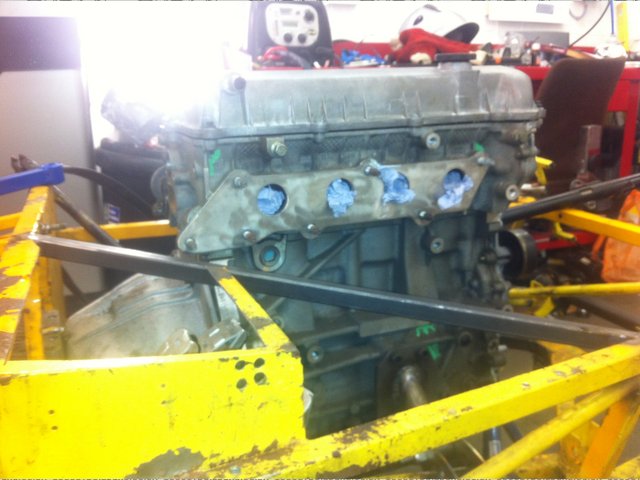
Description
DH2 - 21/6/12 at 08:27 AM
I too am playing similar games with my Stylus chassis at present:


Though I binned the OBP pedal box in favour of making mine from (mostly) scratch:


DH2
FuryRebuild - 21/6/12 at 08:36 AM
DH2
I'm impressed. Although, why did you decide to move away from the OBP box? Was it just the size of the unit? I assume everyone there is 7ft tall
with size 15 feet.
I did think mine was very nicely made and had a nice feel and travel for the pedals.
Cheers
Mark
DH2 - 21/6/12 at 09:01 AM
quote:
Originally posted by FuryRebuild
I'm impressed. Although, why did you decide to move away from the OBP box? Was it just the size of the unit? I assume everyone there is 7ft tall
with size 15 feet.
I did think mine was very nicely made and had a nice feel and travel for the pedals.
Thanks - the photos are no doubt flattering!
I moved away from OBP for a few reasons:
- I had the 'universal' set rather than the 'race' set, and the pedal pivot points are too high, so the pedal doesn't pivot
in the same arc as your foot pivots about the ankle.
- Yes, the size of the set was a problem - I would have had to chop the throttle pedal off to make it fit due to the width of the unit and shape of
the Stylus sills. The throttle pedal will have to be top-mounted.
- I have a couple of friends who have un-positive experience of the 'race' set, though that was for racing rather than road use - they flex
too much under hard braking due to their 'lightweight' construction.
- I was offered the laser cut pedal blanks I am now using for the price of a beer.
I am 6ft and relatively small feet at size 7 or 8. Also only have 5 toes per foot, none of which are webbed ;-) But I'm not a native
fen-lander!
I'm putting the baby-Duratec in mine - Zetec SE / Sigma engine, you can see the family connection between the engines.
DH2
[Edited on 21/6/12 by DH2]
Furyous - 21/6/12 at 12:07 PM
Mark, where do your exhausts point to in relation to the wheel? I've been welding my manifold up and I've had to make #1 twist back a bit to
clear the wheel arch. It's got about 10mm of clearance from the arch where it is now so I think I'll have to cut the corner off the arch. I
don't think my headers are going to be matched length but they won't be a long way off.
I should get on and take some photos of what I've been doing to update my thread.
FuryRebuild - 21/6/12 at 12:27 PM
I'm note sure at the moment - my front suspension's off and it won't go back on for a we while. I'm waiting from some bits from
the powder coaters to come back.
I used to have the arches and didn't have much grief, but number 1 and the others did angle back - in essence they all met at the joint of 2 and
3.
On my old exhaust they were all about the same length apart from 4, which was 100mm shorter - crap really.
From what I can gather, getting them within an inch is a great result, and 2 isn't *so* bad. 4-5" on the other hand is crap.
Furyous - 21/6/12 at 02:17 PM
quote:
Originally posted by FuryRebuild
I'm note sure at the moment - my front suspension's off and it won't go back on for a we while. I'm waiting from some bits from
the powder coaters to come back.
I used to have the arches and didn't have much grief, but number 1 and the others did angle back - in essence they all met at the joint of 2 and
3.
On my old exhaust they were all about the same length apart from 4, which was 100mm shorter - crap really.
From what I can gather, getting them within an inch is a great result, and 2 isn't *so* bad. 4-5" on the other hand is crap.
Funnily enough, I've just finished tacking them up to the collector and purely by chance, 1-3 are within an inch of each other and #4 is about
4" short. If I had any spare bends I'd have a go at making it a bit longer.
FuryRebuild - 21/6/12 at 02:49 PM
that sounds exactly like the way my pinto was. weird.
R1 STRIKER - 21/6/12 at 06:55 PM
Hows it looking for height and sump clearance? Just planning a new striker build and looking at this as an option. Hate the tall striker bonnet though
so would want to fit it under standard bonnet.
Would love to build it in phoenix but the cost of the bodywork puts me off!
FuryRebuild - 21/6/12 at 06:56 PM
I should have 4"
Given a good push at the car this weekend I want to get the suspension on for a dry build up to check for interference.
I should be able to give you an accurate ground-clearance measurement then.
cheers
Mark
FuryRebuild - 22/6/12 at 08:28 AM
Here's an interesting thing I discovered though - This picture shows the remaining footwell plate (lower left diagonal) separated from the cross
member (diagonal above it). To get this pic I ground the welds out and peeled one away from the other. When separating them I found that rust had
creeped in. There's not much but there's no powder coat where in there to protect things. I think this may be the slow creep of trapped
moisture rather than ingestion. However, it's there and would over a number of more years caused more pain. It's probably worth noting that
this is 10 years worth of grief, so maybe the correct plan is 'do nothing', or once i've welded the new parts together, smear a little
metal putty along the edges to get a seal before i send it off for coating.

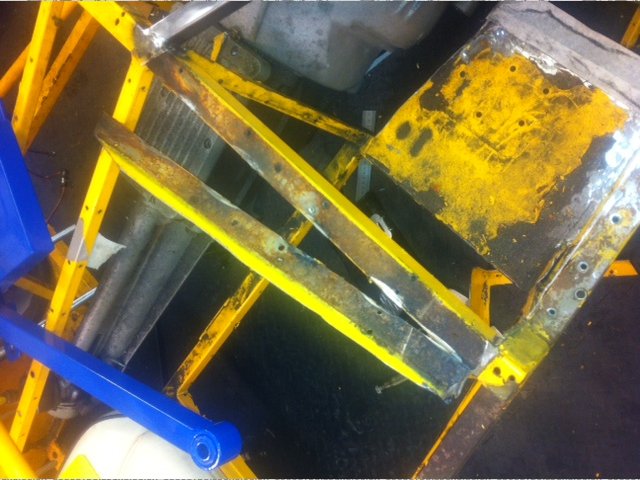
Description
Furyous - 22/6/12 at 01:12 PM
It looks like your #1 exhaust port is slightly further back than my #2 port, in which case you would probably be able to go straight out over the
chassis rail. My #2 header had to go back just a little bit to clear the arch.
FuryRebuild - 22/6/12 at 01:43 PM
I had wheelarches in my first incarnation, but when I stuffed it at harewood the bonnet was a write off (amongst other things).
I went for the light-weight bonnet second time around and didn't bother with arches.
FuryRebuild - 25/6/12 at 09:55 AM
So, just about the last job to do on the sump is to get the dipstick path routed. As per flak's instructions, I bought some 15mmOD stainless
tubing to match the hole cut in the side of the sump. My original plan was to route the pipe vertically up the side of the engine and emerge between
the throttle bodies. As you can see from the pic below, this isn't a great route, and runs far too close to many things, including the engine
mount bolts, and one of the water pump housing take-offs.


Description
So, I needed to either go for a simple route up, hoping i could get the angles so precise that it missed everything, or find a better way. Digging
through the heap of stuff I'd taken off the original engine, I extracted the dipstick tube (just pulls out of the sump - held in with an o-ring)
and took a look at the convoluted routing it takes - i found it to be good.
Now that I had a plan to take a route, i needed to plan the take-off from the block. Wrapping some paper around the pipe and using duck tape to make
it rigid, i now had a template of the pipe that could be cut with scissors until I had the angle right without risking multiple chops into the steel.
Here's the result:


Description


Description
Note that it comes off the sump at a slight angle away from the sump to move the dipstick into the void space there. I've kept the template in
case i make a sump for anyone else (Furyous is getting one if he likes this design).
Next came the plan to fit the dipstick tube onto the sump take-off pipe. When measured, the tube is about 0.3mm short of half an inch, and the ID of
the pipe is about 11.5mm, and i happen to have had my trusty 1/2 inch reamer ready. In order to make the dipstick pipe fit the sump, I reamed out the
end of the take-off pipe to 1/2 inch. This was a little tricky, needing to position and clamp the pipe in the drill-vice, and then gently ream down
and back (lots of cutting spray) in order to take it out. The end result is that the dipstick tube fits nicely into the end and has a little swivel
room:


Description


Description
I also cleaned the end up ready for welding. However, I decided not to weld it for a couple of reasons - no going back after putting that tack in,
especially if it's routed wrongly, and i'd also be welding stainless to mild. In the end, I decided that the better solution by far would be
to fit it all back to the car, make a support bracket for the tube so it hugs the engine nicely, and then epoxy it in. It will be a very strong
solution, easier than a weld, and will give me a couple of minutes wriggle time before it goes off.


Description
Here's the final run up through the void. In the background middle-right you can see the starter motor bolts, and i'm going to fabricate a
bracket to go onto this bolt as well - job done - dipstick now properly secure.
Here's another picture from a slightly different angle showing the take-off from the pipe, because i'm so pleased with it. It's a good
thing when something runs neatly and without fuss - generally simple is always best, and not necessarily the easiest to achieve


Description


Description
FuryRebuild - 6/11/13 at 02:44 PM
As ever, this post is replicated on my blog, where there's more content as well.
Wow Ė this mould is becoming a saga but itís worth it to get it right. So, as you can see from the two pictures, the mould is finished and ready to
pull a part. It's worth namechecking carbonMan here - he's been mentoring me through this process with extreme patience.


Description

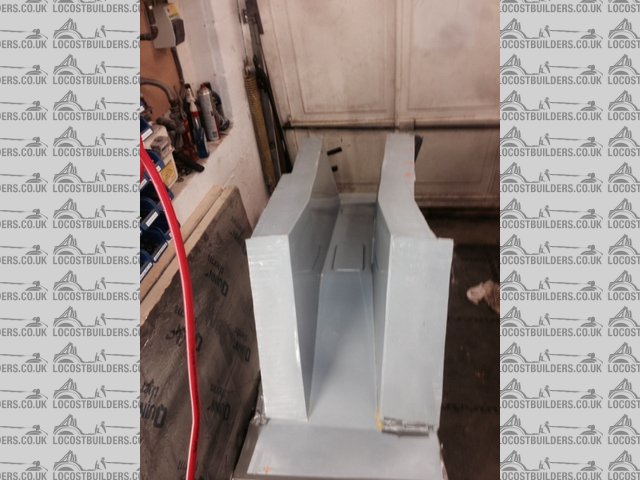
Description
So, the plan to get a part out of this mould was as follows:
- do a trial bagging session to understand how the bag falls in under vacuum and get a good handle on the pleats. write off the bag afterwards.
- lay in the first two layers and set them Ė this gives me a chance to examine the the quality of the finish and lets me decide if I like it before
continuing. This tunnel is going to be utterly structural and will have the thick end of £250 of cloth and resin going in there, so I want to be sure
it is right.
- If I like it, I can put the part back into the mould and infuse the further layers into it.
But Ö DISASTER.
The mould isnít remotely air-tight. It boils down to a fundamentally bad assumption on my behalf, namely that the wood I ordered would be vac-tight.
Itís not. I did a test on a patch of it and couldnít get it to hold vac at all. And thatís before I go investigating the other bits of it where it
mates and the flanges for the three-piece aspect of it.
So, rather than faff about for a week and get nowhere and waste a load of bagging material, I called Warren for suggestions.
His idea was a step beyond my initial one (throw it into the skip) which was to lay a chopped strand mat part in there (no need for a vacuum seal with
simple wet lay) and then take a mould from that.
This has many advantages:
- 3 layers of 450g CSM is cheap
- I can trial fit the part to the car. Itís not going to be anything like the final part (13mm thick) but will give me ideas
- itís a one-off, so best bet is get the part finish as good as possible and then I can use a standard moulding kit to make the final, vac tight
mould.
Lessons Learned
- I tried a hybrid technique of using part making material for mould making, which didnít work
- you can use any old cheap bits for pattern making but moulds require precise application of the right materials and chemistry for resin infusion
- I have a good mould but nothing like strong enough or sealed enough for epoxy resin infusion
- cut your losses
- growth through pain. 80% of learning is experiential Ė I have learned so much getting hands-on like this.
So, I can now see a positive from this, which is I will have a part that can be wrangled into the shape I need and surface finished. Then I can make
the right mould, out of the right materials.
ceebmoj - 7/11/13 at 12:22 AM
very interesting it shows how hard it is to get to grips with. I was thinking the other day about making a composite structure to support my side pods
but think I will give it a miss now. ;-)
FuryRebuild - 7/11/13 at 12:27 AM
Well, this was a silly "jump in at the deep end ambitious" kind of thing. The strong flat panels I've made we're way easier.
It is very satisfying when you get it right
quote:
Originally posted by ceebmoj
very interesting it shows how hard it is to get to grips with. I was thinking the other day about making a composite structure to support my side pods
but think I will give it a miss now. ;-)
me! - 7/11/13 at 07:21 AM
Out of interest- why are you doing a structural fibreglass tunnel?
FuryRebuild - 7/11/13 at 08:29 AM
Hi
Simple answer is that I'm not 
I'm making a fully structural composite tunnel. If you take a look at this post,
you can see how I was replacing the ali panels with carbon ones in order to save weight. However, I found on these panels that the positioning of the
mounting holes was too near the edge of the carbon panel to actually give a structural attachment.
I can see why manufacturers use ali panels - they're easy to cut and shape - the sides of the tunnel are actually quite a subtle but complex
intersection of many planes. To make this work in Ali, all you need to do is cut it, rivet and tap into place with a soft hammer. However, you are
using soft rivets on soft panels which means they don't add any kind of structural strength for the weight - their job is to keep the rain
out.
I then had two options in order to use the panels I'd made - either weld in lugs at the top of the tunnel so I could put mounting holes further
inside the panel, (add weight) or do the right thing, which is cut out the top rails and make a fully structural 3D tunnel. then I get the following
benefits: lighter, stronger as a stand-alone part and if properly bonded in place then it will actually strengthen the chassis considerably.
The layup from the outside in, will probably be:
- 200gsm profinish carbon outside layer
- 400gsm carbon inner layer
- 200gsm e-glass layer
- 200gsm uni-directional (front to back) carbon
- 200gsm e-glass layer
- 200gsm carbon
- 10mm closed cell foam (quite rigid)
- where I have curves, I'll use three layers of 3mm soric to get around the corners rather than use the closed cell foam
- 200gsm carbon
- 200gsm e-glass layer
- 200gsm uni-directional (front to back) carbon
- 200gsm e-glass layer
- 200gsm uni-directional (front to back) carbon
- 2* 350gsm aramid
This equates to 7 layers at 200gsm either side of the core material which (by the time i've cut the top rails out) will be lighter than the
original, and will be bonded into the chassis using the correct adhesive (which will make the bond stronger than the steel). 7 layers is typical for a
structural tub layout (very similar to an F1 layup).
If you look down the tunnel you can see panels set into the mould which will eventually be access panels, so even though it's bonded in for good,
you can get to the fuel tank, prop and other bits and pieces.
Once the tunnel is made, I will then make structural horse-shoe ribs (they only need to be 20mm dia) and will bond them in. Finally, I will put a rib
in the back over the prop which will be designed in situ. This rib will give the prop 10mm clearance and will double as a prop-catcher. I will set
hard-points into the rib at the bottom so I can then make a mating piece to come into it and bolt in from below to complete the prop-catcher. Imagine
how a big-end bearing bolts together: that's what I'm aiming for.
Bearing in mind my prop is part of an IRS setup, it doesn't really move around much relative to the car, and all the energy is angular, not
linear. As such the prop-catcher/strengthening rib will be made in aramid with a 10mm core and Ali hard-points set it.
This should give me massive amounts of strength for less weight.
quote:
Originally posted by me!
Out of interest- why are you doing a structural fibreglass tunnel?
scudderfish - 7/11/13 at 10:39 AM
quote:
This should give me massive amounts of strength for less weight.
And be cool as f**k 
FuryRebuild - 7/11/13 at 11:32 AM
(blushes), why scudderfish, you say the kindest things.
I'm not stopping there - the next thing is to replace the floor and back and side plates with a tub made in a similar manner to the transmission
tunnel. the only original steel left will be the bottom and top side rails. I'll be sitting in a fully composite tub at that point.
This is all learning and apprentice pieces (for a 44 year old bloke). who knows where this will lead in 5 years time. I don't think you can even
have meaningful conversations with people unless you've acrually got your hands dirty.
And in the locost tradition, DIY is important.
quote:
Originally posted by scudderfish
quote:
This should give me massive amounts of strength for less weight.
And be cool as f**k 
scudderfish - 7/11/13 at 12:35 PM
Have you ever been in touch with Rob Collingridge? (http://www.robcollingridge.com/) I don't think he ever comes here, but he has an R1 Fury and
is now toying with ideas to make a sub 400kg replacement with a composite chassis. I think you'd get on well 
me! - 7/11/13 at 03:23 PM
Haha, fair enough! Now get stuck in, I want to see the result :-)
ceebmoj - 7/11/13 at 07:10 PM
quote:
Originally posted by FuryRebuild
This is all learning and apprentice pieces (for a 44 year old bloke). who knows where this will lead in 5 years time. I don't think you can even
have meaningful conversations with people unless you've acrually got your hands dirty.
I look forward to seeing the composite tub you build next. :-)
HowardB - 7/11/13 at 07:57 PM
quote:
Originally posted by ceebmoj
quote:
Originally posted by FuryRebuild
This is all learning and apprentice pieces (for a 44 year old bloke). who knows where this will lead in 5 years time. I don't think you can even
have meaningful conversations with people unless you've acrually got your hands dirty.
I look forward to seeing the composite tub you build next. :-)
me too,.. I like the idea of something that wont rust,.. 
FuryRebuild - 7/11/13 at 09:11 PM
My confidence is growing to the point where I'm ready to remove the diagonal tubes as well - if I double skin that panel with carbon with a good
thick core, the diagonal isn't needed anymore.
RaceCar Engineering had an article recently that stated that for a competent driver who laps consistently, every 2.76 KG is worth 0.1s from the lap
time.
To quote the venerable chapman - "just add lightness".
ceebmoj - 7/11/13 at 09:48 PM
quote:
Originally posted by FuryRebuild
My confidence is growing to the point where I'm ready to remove the diagonal tubes as well - if I double skin that panel with carbon with a good
thick core, the diagonal isn't needed anymore.
RaceCar Engineering had an article recently that stated that for a competent driver who laps consistently, every 2.76 KG is worth 0.1s from the lap
time.
To quote the venerable chapman - "just add lightness".
Out of interest with the kit you have and tools available to the average home builder, how much to you think a car built with a composite tub would
weigh and cost to manufacture?
FuryRebuild - 11/11/13 at 09:25 PM
As ever, this post is also on my blog, as a lot of other stuff.

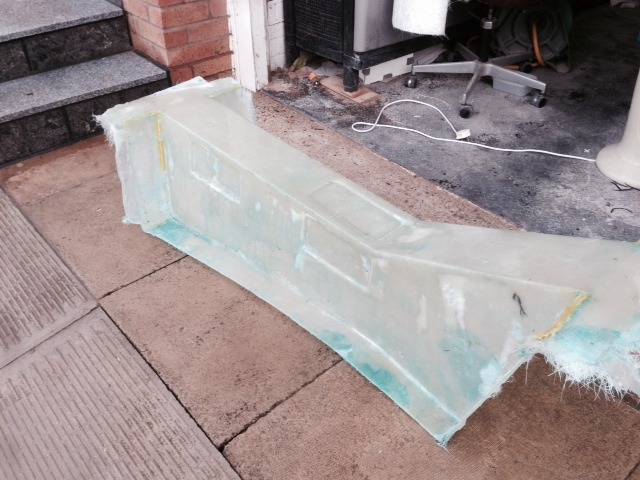
Description
So, I managed to get the wet-lay done last night. It took a couple of hours and about 4 litres of resin. The stuff I was using was simple non Lloyds
approved resin from Leeds Fibreglass Supplies which worked well. I mixed it at 2% catalyst and in 2L batches. It only started to gel-off right at the
end of the tub, which was a success. Also, the resin was pink not blue, and turned gray as the catalyst started to activate.


Description
The part came out of the mould in about 90 minutes which was a fair fight. I'm really glad I used PVA again because it's water soluble. You
just get a thin wedge in (I used a plastic bog-spreader) and spray some water down. It slowly starts the separation and all is well. Keeping forth the
birth metaphor, you can see the birthing remains stuck to the part. PVA is like a skin (rather than EasyLease which is a chemical barrier).


Description
Above is a nice shot down the top of the tunnel, or chute, or birth canal, if it were. What you can't see is the quality of the surface finish.
It's actually quite shiny but there's little sunlight to reflect off it (cloudy overcast day).


Description
It's not all perfect though - no matter how much resin I poured on and how manic I got with the bubble-buster (i.e. special wet-lay roller) I
just couldn't sort some of the white patches and it's come through the mould. There's the odd bubble between the layers (which I will
live with - this is the master buck, not the part) but there's also some dry patches of glass on the face.
Next steps are to dress the surface issues and then seal for a part ... can't wait.
Lessons Learned
- Making a master part from the failed mould was the right thing to do. Not only am I confident I have a good part but it was a step forward after
the frustrations of the mould not working due to bad mould material choices.
- Thoroughly wet through the first layer. Don't get resin on most of it and then try and catch up later. If I'd done this, even though I
may still have had bubbles, I wouldn't have had dry spots.
- Filleting wax is great.
- I rushed this a bit because I was concerned resin would be gelling off. Not so.
- 2% catalyst was right for this part in these temparatures. I was working with "winter catalyst" which is more aggressive.
- Laying large (300mm) strips down the side into the middle with lots of overhang into space means the glass is balanced on top of the part and
doesn't fall down into the mould. Once set, the overhang can be cut off and reused in smaller bits.
- Having lots of supplies (i.e. spare glass and resin) means you're not fretting about running out (which I did last time) which meant
rushing.
- Styrene stinks, and gets through the brick-work from the garage into the house. I need to think about what to do here.
Furyous - 11/11/13 at 11:24 PM
What are the inset rectangles for? Strength?
FuryRebuild - 11/11/13 at 11:30 PM
Good question. They're going to be access hatches. I will take a mould of the hole to make the part that fits virtually flush in the hole, then I
can remove it and have a flush access hatch. The tunnel is going to be bonded in for good so access needs to be there in advance.
I won't remove the entire part of each hatch. I will leave a flange (with inset hard points) for the hatches to bole to.
atm92484 - 12/11/13 at 08:34 PM
Great looking work. Having made a few molds for body parts and knowing how much work it is I wouldn't have the dedication to do what you are
doing - you deserve a lot of credit. I can't wait to see the finished product.
FuryRebuild - 13/11/13 at 12:04 PM
Thanks Andrew - sometimes a friendly comment like this is what is needed to keep one going 
This will be the last time I build the car I recon (it's the third time now :
:
- The initial build, with a nod to hill-climbing
- properly wrecking it at harewood and having to rebuild it again, with a much greater emphasis on motorsport
- realising it was rusting, and hence the current rebuild, and going for carbon not hammerite to manage the rust
Cheers
Mark
quote:
Originally posted by atm92484
Great looking work. Having made a few molds for body parts and knowing how much work it is I wouldn't have the dedication to do what you are
doing - you deserve a lot of credit. I can't wait to see the finished product.
FuryRebuild - 18/12/13 at 12:01 AM
Here's the low-down on the composite fuel tank I'm making. There's more on this tank at my blog
here, including my reasoning for doing this.
So, work on the tank progresses. I've got the top part mostly clad in sheet CSM, but now am focusing on the lower part - I need to do this in
order to be sure the top tank mates well to the lower tank - they're going to be made as two tanks then bonded. I can't make them as two
totally separate but connected tanks because the fuel level sensor wasn't bought to work like that.
Here is the tank on the bench - you can see where I've started to clad it in sheet chopped-strand-mat (CSM).


Description
Here is how it looks with some of the sheet clad into place. Note that I'm not stepping it as the cut kingspan in above shows. If I were to try
and follow that, there would be two consequences: Firstly, less capacity. Secondly getting cloth to follow tight right-angles won't work and will
lead to bridging and a weaker part. I will take the orbital sander to all the edges where the places meet to smooth them out. They'll then be
filled with bog and coated with resin so I can make a mould from it. Needless to say, I will have to be sure the bog is slightly recessed so after
being painted with resin (to seal it) I don't create an unwanted positive profile that gives me mechanical lock in the mould. Even half a
millimeter may make it so hard to get the part out without destroying the mould. I'm not intending to reuse the mould but it would be a massive
shame to destroy it in case I ever need to modify the part.


Description
Here we have the trial holder for the ATL Fuel Sender Probe. The housing is a cut down mixing cup and it's set at an angle to point the sender
down into the tank. Once the angle is right and it sits just where I want it in the lower tank I will glass over this so it becomes part of the main
tank (that is, part of the part of the main tank that becomes the mould.


Description
Here is the tank screwed into place on temporary brackets using self tapping screws. I know the fuel-sender will sit a little proud of the old boot
floor, but that doesn't bother me. I'd sooner make a demountable hat of some description for it rather than have the tank lower and lose
capacity. I had to screw the tank in early to be sure I had reliable datum points when locating and attaching the lower tank.

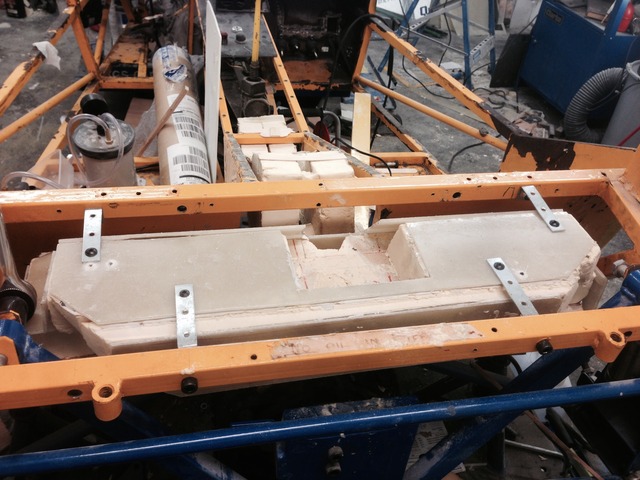
Description
Here you can see the tank avoiding the diff-attaching plate and the diagonal uprights that are part of the diff-carrier. The angle isn't great
but it I have at least an 25mm between the tank and all uprights. On reflection, the clearance is a little too great and I may be losing a little
capacity. However, if I'm in a sideways shunt I have a lot of room for things to deform. The layup will also be very tough - aramid and e-glass.
This will have massive impact resistance, and using layers of e-glass rather than carbon will add a little flexibility. This is not load-bearing or
structural.


Description
I had to build in two recesses, one on either side - the assembly order is specific here. The tank goes in first and the diff carrier second. This
means I need to leave enough room around the tank to get a bolt in to secure the diff carrier. And I did - I'm quite pleased with myself.


Description
Here's the top view of the top tank. Note the massive void behind it, which is where the old tank sat, well high and well outside of the axle
line. You appreciate how bad this is for polar moment of inertia, right? I was tempted to add some extra bulges on the back of the tank under the
roll-bar, but this will be putting mass outside/behind the axle line. What's the point of taking such a purist view if I then compromise? If I
find myself really struggling for range I can always add a tank in this void where the old tank was. If it's empty it will only add a kilo or
two. My future plan is to remove the tank-mounting frame at the back and replace it all with a single CF crush-cell. This follow's Warren's
law of composites. The new part will be lighter, and stronger than the rotting steel it replaces.


Description
Here's the lower part of the tank in place. The wooden bits show there the original guestimate cuts of kingspan need extending out to in order to
maximise volume available. This angle doesn't show it well, but there's an inch minimum between the tank bottom and the prop. Again,
it's an IRS so the prop isn't moving anywhere unless it lets go. The tank also swells out at the sides at the back (where the two sticks
cross). There's about half a litre or so to be gained by swelling out the sides like this.


Description
All these little additions to capacity may not seem a lot, but if every half-litre can be baked in then I make serious gains in capacity. Bearing in
mind the old tank weighed 6KG and carried 18L of fuel in the wrong place, I feel this will be a step forward.
FuryRebuild - 5/2/14 at 09:56 PM
So, a lot has moved on tank wise.
As ever, pictures speak louder than words. This is the tank-part now extracted from the car, and you can see itís more or less like a model from
StarWars. In the second picture you can see how it runs down the tunnel. The cut-outs in the top-left and top-right corners are to provide a recess
for the sockets (as in socket set) so I can do up the diff mounting brackets. In order to get the tank in and out, the diff and brackets need to be
dropped down to floor level (excluding the height of the the trolley jack it sits on) to get the tank in. What I needed to avoid was boxing myself in
with the tank. If I had forgotten this bit, then I wouldn't be able to get the tank in or out.


Description
On the sides of the tank, ttís important to get decent radius edges here Ė if the carbon is just shoved into whatís more or less a 90 degree bend then
it will bridge between the laminates, or between the laminates and the mould (filling the gap with resin). Not only does it weaken things, but youíre
putting unnecessary amounts of resin in. Donít forget this stuff is £20 per kg, so you donít waste it. In order to put a radius in, I originally had
started sanding around the curves and bogging in the gaps. I knew this wouldnít be perfect because Iím not a sculptor. However, the tank wouldnít be
on display, so I thought Iíd not be terribly worried. In retrospect, this clashes with the very pleasing weight-loss OCD I have developed around
weight loss.
Whilst looking for insulation in B&Q, and I had a revelation. They have 16mm quadrant beading.


Description
Itís cheap, and easy to put into the part. When I say easy, you cut a channel 16mm in from the edge and then stick the beading in. Once done, you
have to start blending with bog when you go around the corners.


Description
Here you can see the sharp edges, and the 16mm offset lines I've marked to cut out for the beading.
So, I went and cut out all the edges I had radiused (sp?) by hand, and put the beading in. Basically, you use your combination square to measure in
16mm from the corner in to each side, cut with an angle grinder and off you go.
Thereís a bonus to this, which is the quadrant beading squares up the edges to the eye. The gaps between the edges and the poly sheet are made up with
bog. So, itís win-win. The picture below shows how tidy it looks with the beading in place.


Description
Iíve tried a couple of ways to stick the beading in after cutting the raw part, and the main way is to use bog again. Hot glue is great for an instant
stick, but you canít sand it and it isnít as strong a set as bog. The only downside of bog is that it takes about 15 minutes to go off so you find
yourself doing all the work in batches, or alternating between one part of the tank and another. Itís fine and efficient swapping between the parts
until you have to join both bits together.
Here is the near finished tank, and you can see most of the radius edges. I reckon thereís 60 hours of work in this, 4 metres of quadrant beading and
nearly a full large tin of bog. A skilled part-maker would do this in half the time, to more accuracy. I'm not done yet - more bogging and
flatting, then bogging in the flange for the fuel level sender, then high-build primer, polish and we're done. Then I can take a mould.


Description
Myself, Iím chuffed. I think the tank will save me 5kg from the overall sprung weight.
matt_gsxr - 5/2/14 at 10:36 PM
Thanks for writing this up in such detail.
Do you think you will need lots of baffles in that? Just thinking about braking hard and all the fuel rushing forwards away from the pickup with
strange weight transfer effects on handing.
FuryRebuild - 5/2/14 at 11:33 PM
It's probably going to be a 4 piece mould with the top of the tank as one piece. As such I will put baffles in there, bonded in.. I was going to
originally go for flap gates but there's a slim risk they will stick. Each baffle will be cross drilled to allow some flow.
Once baffled in, the top will be bonded in and ... Ta-data, composite tank
FuryRebuild - 18/4/14 at 09:55 AM
As ever, more on the build is blogged at www.furyrebuild.co.uk.
So, Iíve laid up two of the four quarters of my composite fuel tank mould. Itís a simple layup of gel-coat, and then three layers of 450gsm chopped
strand mat, set in polyester resin. Nowt flash.
Since Iíve done the first half and the second half mated to it, Iíve learned a couple of lessons:
- cut a lot of cloth to templates to fit the major areas Ė handy that I had the spare flanges from the first mould-part to size the cloth Ė this
wasnít an option when the first flange went in.
- run at 1% to 1.5% catalyst Ė The gel-coat needs to form a chemical bond to the resin in the backing layers, and that is done with the exothermic
reaction when the resin goes off. In the first mould-part I found the exotherm was kicking in before the final layer went down. This meant that the
fibres were setting whilst sticking up and making lumps. lumps mean bubbles, gaps and bridging. With the second mould-part, I used the bare minimum of
catalyst and the exotherm only really kicked in as I was putting the last piece on. This is perfect and gives the gel a good baking. Each mould-part
needed about 2.2kg of resin.
- donít leave any spiky bits after a layer is finished Ė it just makes it worse the next layer. See above. Roller them carefully flat.
- Apply only one layer of gel-coat. Again, mixed with minimum catalyst in order to get it on once without gelling. I have other jobs to get done so I
wasnít watching the gel-coat go off. Experts spray this on and bank on about 0.4mm of gel-coat. Painting this on means 1-3 mm. However, that gives me
plenty to polish into.
- Donít try and paint gel-coat on if it starts to gel in the pot. scrap and mix more. my previous attempt with gel-coat did go a little lumpy, making
the lumps and bumps worse Ė see 3 above
Ok, picturewhores - here is the good looking mould-part, followed by the not quite so good looking first attempt.
good looking mould half - still needs trimming though.


Description
-
first mould half - I learned a lot doing this. You can see it's got more lumps than a junkies arm. Worst case if the gel-coat isn't
supported is that I redo this flange against the first flange.


Description
both mould parts together


Description
FuryRebuild - 23/4/14 at 10:42 PM
So, I had an idea about capturing some of the trickier flange shapes. I'd tried paper templates and had a reasonable amount of success, but then
I remembered I had a tile-shape transfer thingy stuck in the loft somewhere. Here it is, and here is it capturing the shape:

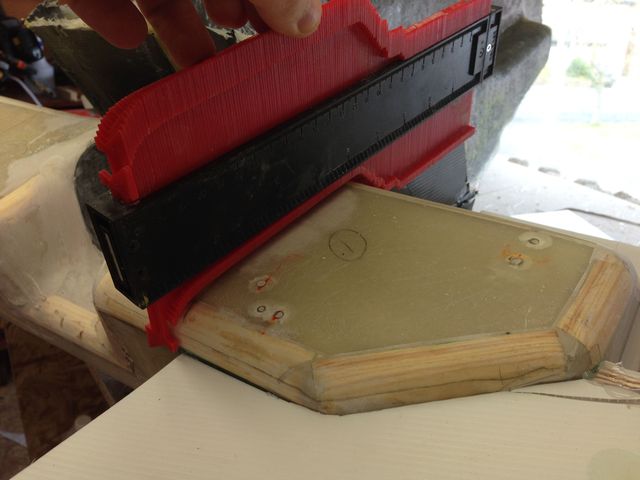
Description
Here's one of the top corners of the tank, flanged up, taped up and waxed up:

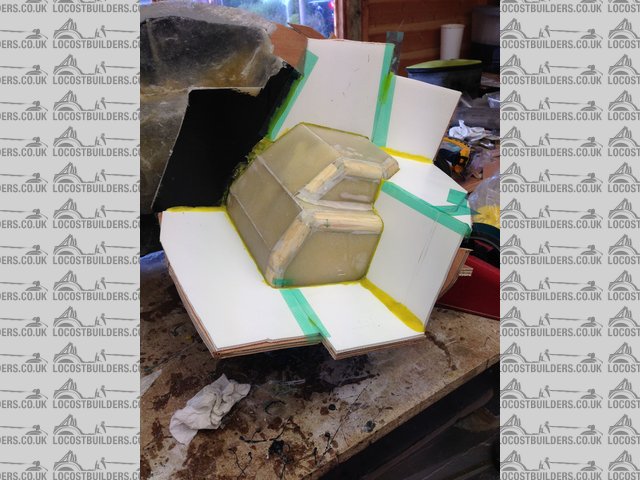
Description
I've also discovered that in anything like reasonable temperatures (10C and above) the winter catalyst means it will gel in the pot before
I've got all the resin down. It's already a speedy and physical process getting all the resin down on three layers of 450g CSM, rollered
flat and bubbles out. So, in order to not faff about with cutting cloth, I experimented with marking up and making all the pieces I needed for the
next layup. The other advantage is that I don't need to keep track of just which bits I've laid up - when I've ran out of piece
"thing" I know i've completed that part of the layup.


Description
And thus, we have the flanges in place

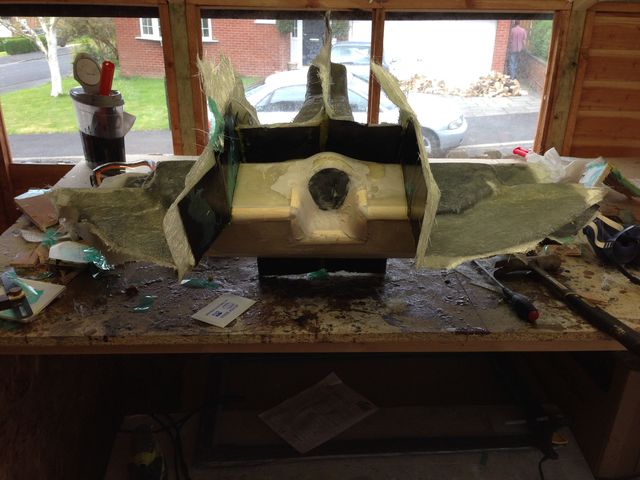
Description
designer - 24/4/14 at 11:19 AM
My question is:
Is this tank OK for IVA as it will not be certified? Or is it a retro fit only?
FuryRebuild - 24/4/14 at 11:28 AM
Hi
Firstly, this tank is a retro-fit, so I don't have IVA to worry about. Secondly, it should still be compliant. The filler neck will be as the
same as my original fury (back, top of the boot), and the tank is in the transmission tunnel, not the passenger/driver compartments nor is it in the
engine bay. It's actually far more protected than the original fury tank is.
I'm going to make a set of composite prop-catchers as well, so there shouldn't be any issue with impact. Even saying that, the majority of
the tank will be made with an aramid (that is, Kevlar) layup, so it's going to be proper impact proof.
From a personal testing point of view, I'm going to firstly pressure test it, and then vacuum test it. I reckon it'll be good for 10PSI and
full vac.
I am hoping to save mass with the tank, but most significantly I want to move the mass in front of the rear axle line to reduce polar moment of
inertia - I think I will achieve significant handling improvements in doing this. I can then replace the void where the tank is with a full carbon
crush-structure, should I get rear-ended.
Please keep asking questions - the more things I have to think about, the better a tank it will be.
Thanks
Mark
FuryRebuild - 24/4/14 at 11:29 AM
I've just re-read your question - what certification is required for IVA? interesting one, that.
mcerd1 - 24/4/14 at 01:16 PM
IVA
quote:
03A Fuel Tanks
2. The vehicle must be accompanied by satisfactory evidence that the tank is
designed for road use or the fuel tank is an original fitment to a mass
produced vehicle, or has been previously and is un-modified.(See Note 2).
Note 2: Plastic Fuel Tanks
Check that the fuel tank:
� Is unmodified and an original fitment in the case of a mass
produced vehicle or
� Appears to have previously been fitted to a mass produced
vehicle or
� Is accompanied by satisfactory evidence provided by the
tank manufacturer or approval authority showing that it has
been manufactured and tested to meet the standards
required for road use.
thats all the manual says
[Edited on 24/4/2014 by mcerd1]
FuryRebuild - 25/4/14 at 08:27 AM
"Satisfactory Evidence" is the interesting one.
My plan isn't to make these commercially, but were I to do so, I suppose evidence for a customer would be a certificate from a company
that's registered in England, and traceable. If you went down the aerospace route, then each part of the lay-up would be photographed as the tank
was made. Actually, whist that would add time to the manufacturing process, having the layup photographed with your certificate itself in the
background of the photo should provide outstanding evidence. Furthermore, I would also do an impact test on a trial tank only, to whatever the SEI or
others say is the standard impact penetration test, if there is one which would be a weight (say 10kg) and a surface area of 10mm squared dropped
vertically onto the piece from a height of 2m. After the impact, it would need a pressure test again. This would be repeatable and would show the tank
taking impacts. I'd video this and put it on the sales website.
It would be interesting to see how a standard steel tank (say mg midget from the fury originally) would stand up to this kind of impact. A pressure
test is an odd one (I'd want it for my own piece of mind) because the tank must have a vent valve. Obviously, one must be fuel and pressure tight
up to the vent pressure, but I'd test to at least twice that.
Thanks for getting me thinking
Mark
FuryRebuild - 7/8/14 at 07:48 PM
Right then - it's been quite a journey to get to this point, but here is the prototype composite fuel tank for my Fury.
It's gone from this set of moulds


Description
To this set of parts

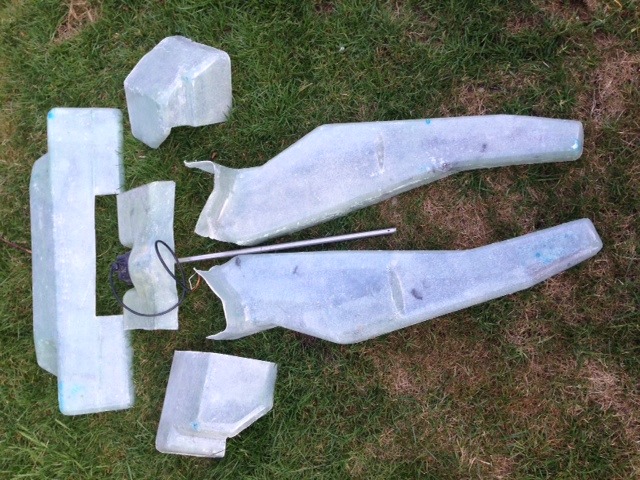
Description
To this completed prototype tank


Description
The old MG Midget tank weighed 5.85Kg, and this prototype weighs 2.17Kg. It's laid up in two layers of 450gsm chopped strand mat in a very
resin-rich wetlay, and bearing in mind i intend to use 2 layers of 350 kevlar, with two layers of 200gsm e-glass and some soric ribs, I think the
final tank will be a similar weight.
This tank is for checking fit and measuring capacity. Unfortunately, some of the seams I laid in to join the parts aren't the best sealed, so
I'll go over them tomorrow with tank-tape before I fill it full of water.
ceebmoj - 7/8/14 at 09:23 PM
Does it fit?
FuryRebuild - 7/8/14 at 09:27 PM
Weirdly, I timed out before I could check the fundamental thing. I will know tomorrow.
iank - 8/8/14 at 06:55 PM
quote:
Originally posted by FuryRebuild
"Satisfactory Evidence" is the interesting one.
My plan isn't to make these commercially, but were I to do so, I suppose evidence for a customer would be a certificate from a company
that's registered in England, and traceable. If you went down the aerospace route, then each part of the lay-up would be photographed as the tank
was made. Actually, whist that would add time to the manufacturing process, having the layup photographed with your certificate itself in the
background of the photo should provide outstanding evidence. Furthermore, I would also do an impact test on a trial tank only, to whatever the SEI or
others say is the standard impact penetration test, if there is one which would be a weight (say 10kg) and a surface area of 10mm squared dropped
vertically onto the piece from a height of 2m. After the impact, it would need a pressure test again. This would be repeatable and would show the tank
taking impacts. I'd video this and put it on the sales website.
That wouldn't even get close to the required level IMO (I work for a company producing automotive spec components and it's a minefield)
Automotive testing is extremely rigorous especially in safety critical areas like fuel components. Even buying copies of the standards would cost a
significant chunk of money and that's the only way to find out how things must be tested before you figure out what they must do to pass.
Repeatability is also massively important.
This place does the kind of testing required to get a commercial automotive tank to market. http://www.intertek.com/automotive/fuel-system/ Gives an
idea what tests would be needed.
Automotive is only a hair behind aerospace in the requirements these days. A lot being driven by big boys like VW.
FuryRebuild - 12/8/14 at 09:22 PM
Well, to answer ceebmoj's question - Yes, it fits. It fits well.
Here's a couple of pictures to wet your appetite.
tank from the top
you can also see the recesses (at least the one on the left) where I've left enough room to get the air-wrench in so the diff cradle can be
bolted back in place.


Description
fit in the tunnel
There's a good centimeter around the tank and everything else.


Description
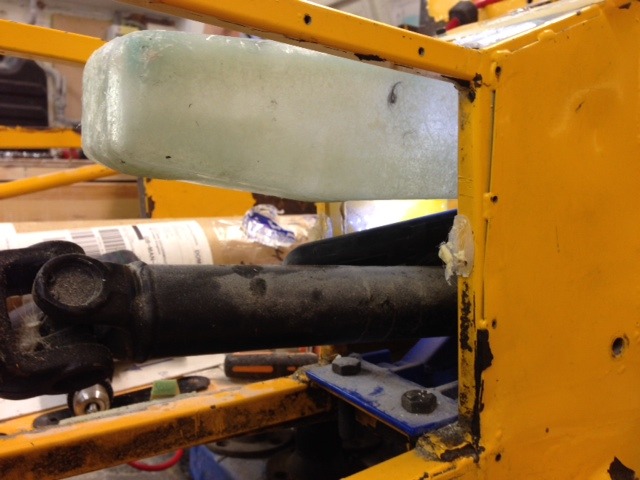
Prop Clearance
The clearance to the prop is great - this is it with the diff raised back into place. The end here also forms the sump for the in-tank fuel pump

Description
ceebmoj - 12/8/14 at 10:08 PM
Looks great and with all the effort you have put in I'm happy it fits.
stevebubs - 12/8/14 at 10:57 PM
Looks good. However 1 comment - surely it would be relatively easy for someone to replicate that in sheet metal now you've done the hard work of
figuring out the dimensions and mocking it up?
FuryRebuild - 12/8/14 at 11:12 PM
Hi Steve. Sure they could. Huge amounts of time to into the buck and the mould. Cracking the composite part out is trivial.
However, an ally tank will be heavier and way less strong and less resilient to impact.
This isn't a commercial venture, just making my are handle well 
Dopdog - 13/8/14 at 08:15 AM
HI Mark,
looks great but how much fuel will it hold? and do you need it that big?
FuryRebuild - 13/8/14 at 09:02 AM
Thanks - it was a real investment in time, but it's come off.
It was also an apprentice piece, as it were, so I moved cautiously, and had to develop some techniques on the way (such as using quadrant beading to
round the corners off).
quote:
Originally posted by ceebmoj
Looks great and with all the effort you have put in I'm happy it fits.
FuryRebuild - 13/8/14 at 09:08 AM
I reckon it's going to be good for 30L with my initial estimates. For endurance runs, and whatnot, that's what I need. If I want less, the
tank will be baffled at the bottom, and the lower part is good for 15L. If I only half fill it, I'm only wasting 1kg of unused tank space.
However, when I was trying to fill it with water it sprung multiple leaks. I'm not bothered because:
quote:
Originally posted by Dopdog
HI Mark,
looks great but how much fuel will it hold? and do you need it that big?
- two layers of CSM without gelcoat on the outside will always have pinholes
- I used a UV curing resin, which is great for the cure times, but tends to distort a tiny bit from the part if it cures too fast, and that's
what happened with a point on the seam
FuryRebuild - 13/8/14 at 07:57 PM
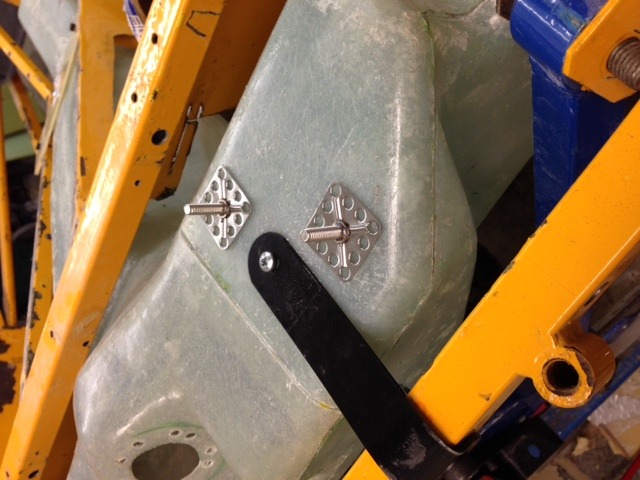
Here's how I intend to fit the tank to the car, at least at the top.
These are "big Head" fasteners. You key the part, and put a large glob of the special 2 part epoxy adhesive on there, push the fastener on
and let it set - instant captive bolt.

Description


