BigMac
|
| posted on 16/5/13 at 09:21 PM |

|
|
How to make a proper job of heat wrapping a BEC exhaust manifold?
Evening all
So I've decided I'm going to wrap the exhaust manifold of my 10R powered Westy- 50' of 1" wrap has turned up today and
I've had a play, but I'm not so sure as to how to go about doing it properly... Was hoping someone on here has done it and can talk me
through their process and possibly show me some pictures?
I read that it's a good idea to soak it in water for an hour or so first, as it makes it more malleable. The plan was to remove the manifold and
give it a blast with the air compressor, followed by a clean with spirits. I'm comfortable with the amount of overlap I need to add, but
I'm really not sure at what point to start wrapping multiple branches and whether I need to wrap each branch individually, then do another run
afterward over say 2 branches at a time...
I'm also confused by the stainless steel locking ties... I was thinking that you just thread through as per normal and they should stay put...
Mine seem to go together ok, but then can be backed off slightly without much effort... Duff ties??
Thanks in advance to anyone who can help shed some light on this for me!
Ben.
[Edited on 16/5/13 by BigMac]
|
|
|
|
|
number-1
|
| posted on 16/5/13 at 10:08 PM |

|
|
Ive just done mine........this is a copy and paste but contains the main points.
1. Wear safety glasses, gloves, and dust mask when wrapping your headers. You'll want to avoid contact of the header wrap with your skin. Header
Wrap contains fiberglass.
2. Keep in mind that wrapping headers and exhaust pipes requires patience. Going slow and taking your time will help to make the wrap as tight as
possible and that will hold the wrap on the pipe better and retain the most heat in the system. (If you are installing wrap on a power sport
application, we recommend a 50% overlap in place of the 25% overlap during the installation process).
3. This step is optional: Soak in bucket of water or spray exhaust wrap with water. Soaking and spraying exhaust wrap can make installation easier and
also reduce the amount of fibers.
4. It is important to start on side closest to exhaust port (closest to engine), wrapping down the system towards the exhaust tip.
5. Make an initial wrap around the pipe and secure end with a Thermal-Tie™ or hose clamp......jubilee clip is better
6. After securing end, continue to wrap around pipe, using 1/4 overlap with each pass and keeping tension on the exhaust wrap.
7. Every 2 to 3 coils use your hands to tighten the wrap up. If you soaked wrap, you'll see water dripping out. Getting the water out is not the
purpose for this, tightening the wrap is. The tighter your exhaust wrap, the better the job it will do.
8. If your primary tubes become so close together you cannot wrap them individually, wrap both pipes as one while using the same 1/4 overlap.
9. If possible, when wrapping the collector on headers, try to overlap wrapped primary tubes with same 1/4 overlap when wrapping collector.
10. When you get to the end, cut the wrap and secure with a Thermal-Tie or a hose clamp.
PLEASE NOTE: Your exhaust wrap will smoke lightly at first after installation. This will stop after a couple of complete warm up and cool down cycles.
Smoke is a normal by product of the curing process; your wrap will not burst into flames. Also, keep in mind that it is not advised to wash wrap after
installation.
|
|
|
number-1
|
| posted on 16/5/13 at 10:11 PM |

|
|
Forgot to say...get rid of the steel ties as they are pants....get one of these jubilee clip kits so you can make the size you need.....
Hose Clamp Kit Set Jubilee Pipe Clips Make Your Own Clamps 3m x 8mm | eBay
Heres a quick vid of how to make them if you have never used them before....its not me by the way lol
youtube link
Hope this helps
|
|
|
jossey
|
| posted on 17/5/13 at 07:43 AM |

|
|
Thanks for the guide number 1
Thanks
David Johnson
Building my tiger avon slowly but surely.
|
|
|
deezee
|
| posted on 17/5/13 at 08:37 AM |

|
|
Oh and don't be shocked when it smokes and stinks, when the engine is run up to temperature!
|
|
|
BigMac
|
| posted on 17/5/13 at 08:37 AM |

|
|
Ditto! Cheers number-1, I'll invest in some proper jubilee clips as opposed to the steel ties.
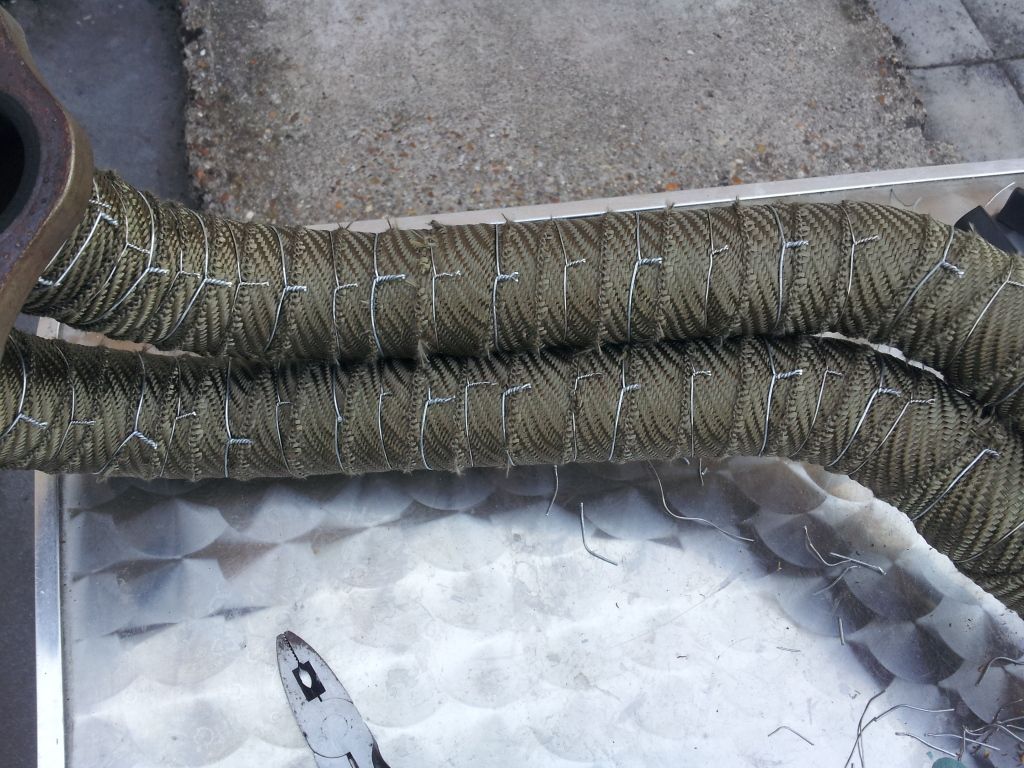
That said, I did some more searching last night after I'd posted this thread and found a guy who'd used a lattice of steel locking wire
that looked to do the job very nicely- I have some of that left so I may give it a go!
|
|
|
BigMac
|
| posted on 17/5/13 at 09:07 AM |

|
|
By the way number-1... Any photos of yours now that it's wrapped? Also, how much wrap did you use in the end?
I bought 50' but I'm thinking it's not going to be enough!
|
|
|
FuryRebuild
|
| posted on 17/5/13 at 12:46 PM |

|
|
I'm intrigued - I remember Mark Fisher recommending people don't wrap. I think it was because they were only wrapping part of the system
and it was leading to cracks as the thermal gradient over the transition point was making the exhaust brittle.
I suppose if you're wrapping the entire exhaust then it's not a problem and you squeeze more power out?
When all you have is a hammer, everything around you is a nail.
www.furyrebuild.co.uk
|
|
|
Ian Jones
|
| posted on 17/5/13 at 01:21 PM |

|
|
this is my old impreza exhaust manifold that i done. it is also worth spending extra and getting good heat wrap and not the cheap stuff.
I have all ways found locking wire the best stuff to hold it on with.


|
|
|
BigMac
|
| posted on 17/5/13 at 09:08 PM |

|
|
Well, I've now made a start- one branch is wrapped and partially tied off with locking wire... 3 more to go and then I can wrap the collector
etc!
Cheers guys!
|
|
|
BigMac
|
| posted on 22/5/13 at 09:31 PM |

|
|
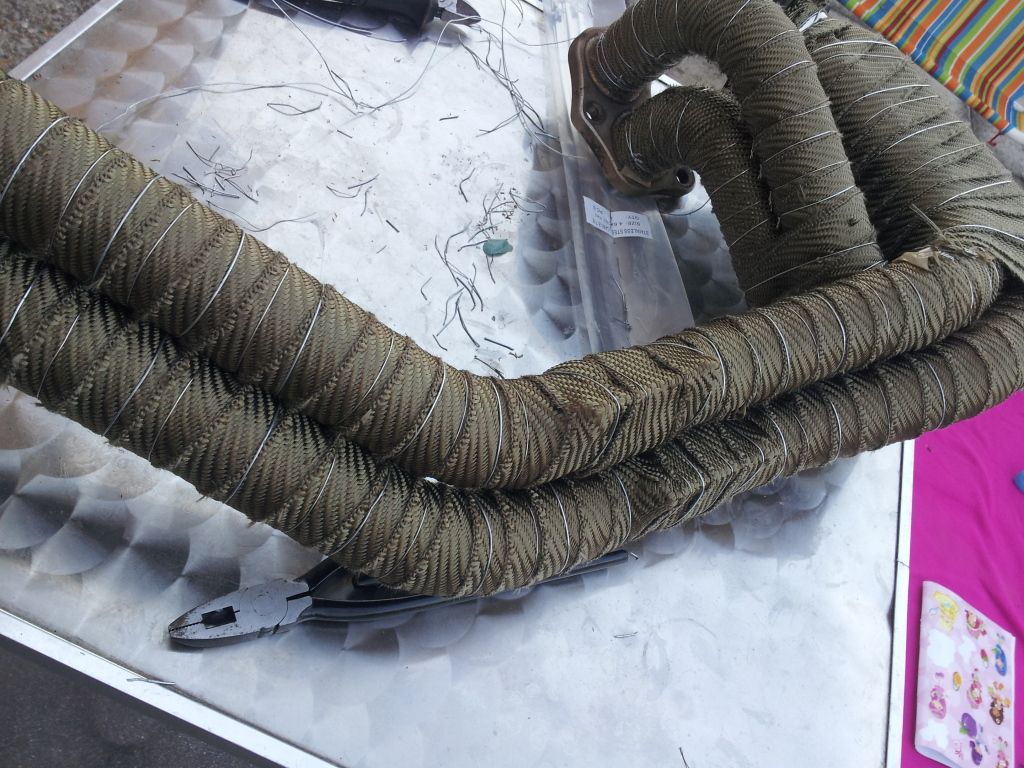
Well, it's done!
Just in case anyone was wondering about lengths you'll need- I used 1" wide and ended up using two 50' rolls. Being ambitious I
figured I wasn't wrapping a set of v8 manifolds, so bought one to start with. One 50' roll just about covered each branch about half way
before wrapping them up in pairs... Kind of underestimated the amount I need!
Also- definately soak it before you apply it, you can get it much tighter on the branches.
Decided that I'd go with zinc plated stainless steel clamps to hold it all in place, have to admit I'm happy with the result for a first
try!
Cheers all,
Ben.


|
|
|
SPYDER
|
| posted on 22/5/13 at 10:57 PM |

|
|
quote:
Originally posted by BigMac
Ditto! Cheers number-1, I'll invest in some proper jubilee clips as opposed to the steel ties.
That said, I did some more searching last night after I'd posted this thread and found a guy who'd used a lattice of steel locking wire
that looked to do the job very nicely- I have some of that left so I may give it a go!
That would be me.
A single long loop of lockwire, passed around the back then brought together at the front and a short twist section applied. Then both ends around the
back...etc.
[img] [/img] [/img]
|
|
|
BigMac
|
| posted on 23/5/13 at 10:40 AM |

|
|
Well you made an exceptional job, I love the look!
I had to pass on doing it to mine as whilst I had the lock wire pliers, I didn't have enough wire!
|
|
|
welderman
|
| posted on 23/5/13 at 11:55 AM |

|
|
looking very nice, but wait until you start it, do it outside 
Thank's, Joe 
I don't stalk people
http://www.locostbuilders.co.uk/forum/23/viewthread.php?tid=172301
Back on with the Fisher Fury R1
|
|
|
BigMac
|
| posted on 23/5/13 at 01:19 PM |

|
|
quote:
Originally posted by welderman
looking very nice, but wait until you start it, do it outside 
Yeah, I've heard! Smokin'!
|
|
|


