mark chandler
|
| posted on 8/10/06 at 01:49 PM |

|
|
Build update, only 1 year in....
Hi all,
Its now a year since I commenced my build so here's a few pics.
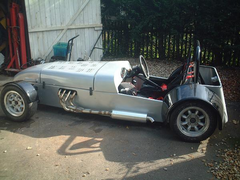 
Rescued attachment NSR_body_view_7oct2006.JPG
|
|
|
|
|
mark chandler
|
| posted on 8/10/06 at 01:52 PM |

|
|
I am concerned that a flat ali dash will meet with SVA approval, is this okay.
I have also spent a lot of time trying to keep the bonnet flat so have made this trumpet cover with 3" exit, just waiting for a £15 filter from
Ebay now.
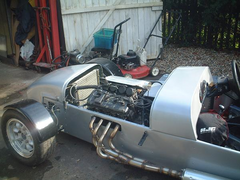 
Rescued attachment NS_engine_exhaust_7oct2006.JPG
|
|
|
mark chandler
|
| posted on 8/10/06 at 01:54 PM |

|
|
One from the other side !
Battery and regulator as low as possible so under the rad.
Note that the engine is pulled into the passenger footwell and as far over as possible. Lots of pedal room allowed.
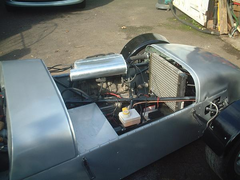 
Rescued attachment OS_engine_bay_7oct2006.JPG
|
|
|
mark chandler
|
| posted on 8/10/06 at 01:58 PM |

|
|
And finally the rear, just need to make the hoop stays and rivit on a lid !
Final cost is still under £3k including tools ( I threw in a plasma welder, great bit of kit and a small lathe), lightweight brakes and proprer
minilights, but after SVA and a set of tyres should be complete for £3.5k.
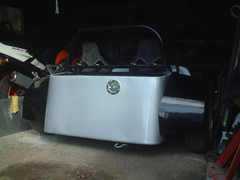 
Rescued attachment rear_7oct2006.JPG
|
|
|
zilspeed
|
| posted on 8/10/06 at 02:10 PM |

|
|
Nice to see a lot of your own ideas in there.
There real is more than one way to do everything 
Yes - I like it - a lot.
John F
Ugly car driver 
|
|
|
Winston Todge
|
| posted on 8/10/06 at 03:50 PM |

|
|
Fantastic lookig car Mark! 
Well done.
I'm very interested in the airbox that you've fabricated. Any chance you have a few close ups of it? And maybe a shot from underneath?
Any chance you have a link for the air filter you bought from ebay too?
Thanks bud,
Chris.
|
|
|
dilley
|
| posted on 8/10/06 at 03:54 PM |

|
|
Are they dax rear arches? if so can you post some more piccys please
|
|
|
mark chandler
|
| posted on 8/10/06 at 06:27 PM |

|
|
Not Dax or anyone elses arches I,m afraid, home brew. Sorry Calvin, if I provided the buck you would be disappointed !
I used Simon's technique here Making arches
with a slight difference:
I got some MDF from B&Q and cut two eybrows, one for the car side of the rear arch, other for the wheel end. I them cut some 2x1/2" bits off
wood to the correct width and joined the eyebrows directly above each other.
Next step was to get some hardboard and starting from the middle out screw around the circumference of the MDF, finally I removed the unwanted middle
braces leaving the curve.
For the external edge I used building plaster (because its really cheap) and pushed into the edge, then formed a curve using a rubber ball.
Once this was completed gave the inside a light sanding then rubbed well with wax before casting my arches.
Here's a pic:
Buck less
moulds
The front were made the same way, I just scribed a couple of semi circles 1" larger than the external diameter of the tyres.
I had a large gap around the rear panel so to hand the rear arches once bolted in place (I spaced a lower fixing with a bit of ali tube) covered the
ali rear with clingfilm (to stop the fibreglass from sticking, much easier than wax) then pushed wet glass matting into the gap.
Subsequent to this I used some fine body filler on the pin holes (not very good at doing this, I'll spend more forcing out air next time) and
painted.
Bit of sanding and trimming and all finished for 2 litres of resin £40 and 1kg of matting £10 and 1/2 litre of paint.
As for the air filter housing, better photo'ed from a distance, I'll get my camera out next week. The cone filter is for a supra, second
hand so only cheap. I made the orifice 3" as this is a standard size, its just flat ali bent around and welded.
Thanks for the kind words.
Regards Mark
|
|
|
mark chandler
|
| posted on 8/10/06 at 10:51 PM |

|
|
It literally took an hour to make the moulds from start to finish, as they are taylored to my car probally not suitable for you anyway.
I,d rather keep them incase I bash a wing and have to create another.
The hard part is getting rid of all the bubbles when casting, I ended up with lots of pinholes, have a go with some fibreglass prior to carbon and see
how you get on.
Regards Mark
|
|
|
mark chandler
|
| posted on 10/10/06 at 07:43 AM |

|
|
Pics of air filter housing in archive
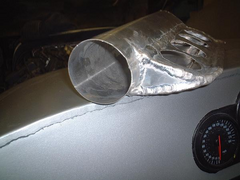 
Rescued attachment Airfilter_housing_Bottom_lhs.JPG
|
|
|
Simon
|
| posted on 10/10/06 at 10:38 PM |

|
|
Mark,
Sorry, missed this.
Looks like you've made quite a bit of progess - like nearly done!!!
Good looking car too. Hope to see it in the flesh again soon
ATB
Simon
|
|
|
Winston Todge
|
| posted on 11/10/06 at 05:00 AM |

|
|
quote:
Originally posted by mark chandler
Pics of air filter housing in archive
Thanks for that Mark!
Chris.
P.S. Gathering ideas for my intake system still... 
|
|
|
chris_harris_
|
| posted on 11/10/06 at 12:37 PM |

|
|
Well i'm certainly impressed, that looks like a lovly piece of work! I've been building my car for near on five years and its no where
near finished, As usual i've changed my mind on everything at least twice, but its all good fun...... i think!!
Regards Chris
|
|
|


