nitram38
|
 posted on 18/6/07 at 01:11 PM posted on 18/6/07 at 01:11 PM |

|
|
MotaLeira, todays, progress
A bit more done.
Diff in place on bottom mounts and chain with links removed and loose.
I need to fabricate the top mounts and then secure the two rear engine mounts.
You can see the cog on the left of the first picture, for the reverse starter motor. It piggy backs the drive sprocket.
 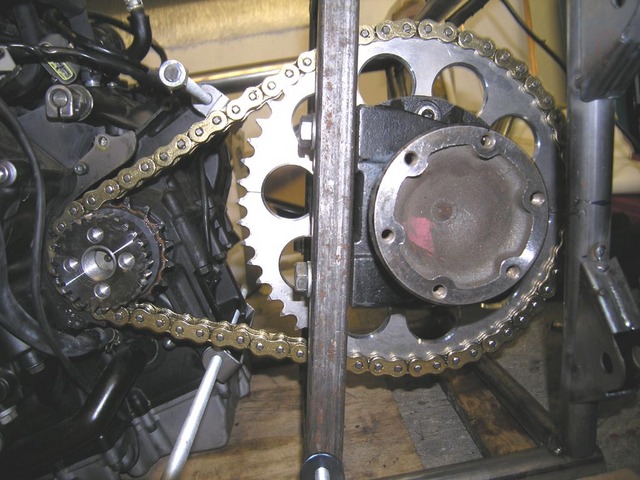
chain on!
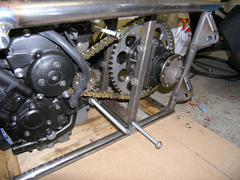 
chain diff side view
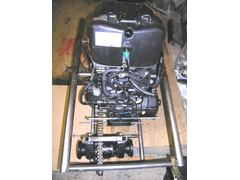 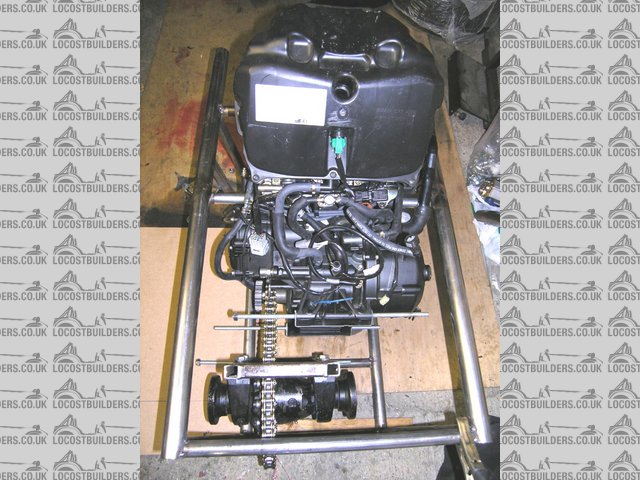
engine and diff

|
|
|
|
|
ecosse
|
| posted on 18/6/07 at 01:35 PM |
|
|
Looking good, following this with interest 
Question:
Will the diff mount remain adjustable as shown (wondering about the twisting effect going through it), or is there more work to be done on it?
Cheers
Alex
|
|
|
Minicooper
|
| posted on 18/6/07 at 02:22 PM |
|
|
Hello,
How accurate have you got the chain alignment, I recognise that diff by the way!
I'm trying to align my diff now and having a total nightmare, I get good alignment until I try and weld it, even being ultra careful, small
welds, tacked everywhere the poxy thing is moving out of alignment and by quite a bit, I'm using a steel rule as a straight edge.
Its moved so much I'm cutting it off and trying again, I've been told that it has to be co*k on otherwise you will break chains or at best
have them wear out quickly
Depressed
David
[Edited on 18/6/07 by Minicooper]
|
|
|
nitram38
|
| posted on 18/6/07 at 02:31 PM |
|
|
Alex, I will have two slotted guides at the top/sides with a stud right through and two stud tensioners from the top rear engine mount.
These will be fixed to a removeable cross brace on the top framework.
Hope that makes sense! 
I am just about to draw the curved guides in solidworks for my friend to cnc.
Minicooper, lining up the diff was simple. I just mounted one lug and checked the rotation with the chain on. You should be able to see/hear any
mis-alignment.
Once done I fixed the other mounting lug.
If you use a straight edge you may have different cog thicknesses which will throw your alignment out as they won't be centred in relation to
each other?
[Edited on 18/6/2007 by nitram38]
|
|
|
mangogrooveworkshop
|
| posted on 18/6/07 at 02:52 PM |
|
|
quote:
Originally posted by Minicooper
Hello,
How accurate have you got the chain alignment, I recognise that diff by the way!
I'm trying to align my diff now and having a total nightmare, I get good alignment until I try and weld it, even being ultra careful, small
welds, tacked everywhere the poxy thing is moving out of alignment and by quite a bit, I'm using a steel rule as a straight edge.
Its moved so much I'm cutting it off and trying again, I've been told that it has to be co*k on otherwise you will break chains or at best
have them wear out quickly
Depressed
David
[Edited on 18/6/07 by Minicooper]
Right how do you plan to do the tension and alignment ajustments? PAts bug
link
In the plans some where the diff is fixed and the engine is on a flat floating cradle. This enables you to get the alignment spot on as well as change
chains as they wear out.. On a bike the ajustment is at the wheels axle for tension and alignment. By using that idea and turning it to the engine
end it will get the chain perfect and as the chain stretches it can have some tension put back into it.
Trying to weld it to the perfect place has been tried on that scrapheap program with various results.
Hope this helps pat
[Edited on 18-6-07 by mangogrooveworkshop]
|
|
|
nitram38
|
| posted on 18/6/07 at 03:08 PM |
|
|
Pat, I am going to fit guides at the top and use studs as adjusters/tensioners like on lsdwebs car. In the cropped photo you can see the curved
guides
 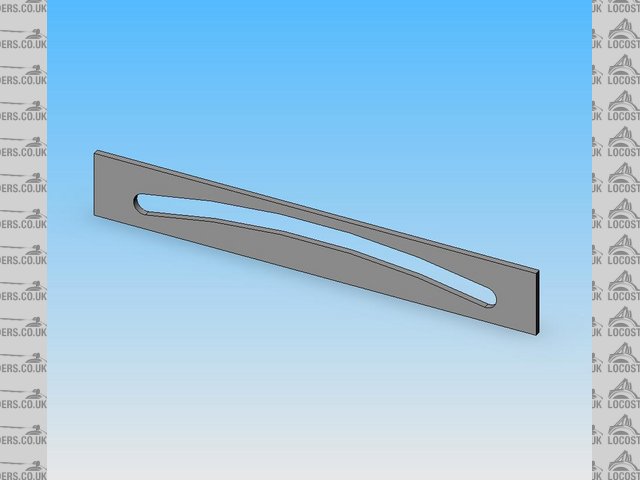
diff adjuster
[img][/img]
|
|
|
Minicooper
|
| posted on 18/6/07 at 03:37 PM |
|
|
Pat,
I'm not trying to weld the diff in static as in scrapyard challenge, it's the carrier which I have made, the slotted holes will provide the
tensioning for the chain as it stretches.
Whatever method you use, the end result is the diff must stay in alignment and I find it much easier to move the diff relative the engine as it's
considerably lighter, I'll have another go tomorrow if I can't get it co*k on I'll accept the closest I can get
Cheers
David
[Edited on 18/6/07 by Minicooper]
 
Rescued attachment DSCF0101.JPG
|
|
|
mangogrooveworkshop
|
| posted on 18/6/07 at 05:16 PM |
|
|
quote:
Originally posted by nitram38
Pat, I am going to fit guides at the top and use studs as adjusters/tensioners like on lsdwebs car. In the cropped photo you can see the curved
guides
diff adjuster
[img][/img]
That looks a good way to do it.. We will be coming up against this very problem in the next project so thats a way of sorting it.
I think the chain in the buggy will get a hard life due to running in the dunes and in the fields round here.
(I happen to have a grasstrack club several fields west of me so we have space to race.)
On the other lads carrier is it goin to load the bearings up in a bad way or could you shim or slot the diff to fit
|
|
|
Minicooper
|
| posted on 18/6/07 at 05:26 PM |
|
|
Quote "On the other lads carrier is it goin to load the bearings up in a bad way or could you shim or slot the diff to fit"
I'm just not sure what your getting at Pat, but if it's good enough for radical it's good enough for me, the chain is longer than
what renthal qoute as the minimun so that should be okay
Cheers
David
|
|
|
nitram38
|
| posted on 18/6/07 at 05:32 PM |
|
|
quote:
Originally posted by chris mason
it's comming on then Martin, my only concern would be with the length of the chain, thats going to run pretty hot, which isn't ideal.
are you going to duct air to it to help with cooling?
Chris
Chris, how long is your chain? can you measure between the sprocket centres for me?
As for cooling, I won't be running any rear panels.....................after sva!!!
[Edited on 18/6/2007 by nitram38]
|
|
|
nitram38
|
| posted on 18/6/07 at 05:42 PM |
|
|
Hopefully mine being totally airconditioned (compared to yours) will help!
Mine looks like 72 links.
[Edited on 18/6/2007 by nitram38]
|
|
|
mad-butcher
|
| posted on 18/6/07 at 05:44 PM |
|
|
am I right in assuming you've split the sprocket in half so as you don't have to strip diff down to change sprocket
Tony
|
|
|
nitram38
|
| posted on 18/6/07 at 05:47 PM |
|
|
quote:
Originally posted by mad-butcher
am I right in assuming you've split the sprocket in half so as you don't have to strip diff down to change sprocket
Tony
Most sprockets are supplied split, otherwise you would need to unbolt your driveshafts etc, just to change it.
I bought mine from Douglas at West garage engineering.
The one that came with the diff was too small and had a split too.
With 10 bolts holding it on, there should not be any problems.
[Edited on 18/6/2007 by nitram38]
|
|
|
Minicooper
|
| posted on 18/6/07 at 06:08 PM |
|
|
quote:
Originally posted by nitram38
Hopefully mine being totally airconditioned (compared to yours) will help!
Mine looks like 72 links.
A mate of mine has a ZCars mini, after being flat out for 20 minutes around Castle Combe, his chain was only slightly warm, I think his chain was 64
links, renthal quote 54 as being the limit for good temperatures and working life
Cheers
David
[Edited on 18/6/2007 by nitram38]
|
|
|
nitram38
|
| posted on 18/6/07 at 06:28 PM |
|
|
Cheers David, something less to worry about!
|
|
|