

I've started a bit of a build diary for my project.
If anyones interested, please take a look NBR Beast Mk2
The link should take you straight there, but if not, hit view in the middle of the page.
Cheers
Very nice Bob!
Bob,
Looking excellent!
Ready access to CNC laser and water cutters would be a beautiful thing to have!
Nice one - I particularly like the laser cut front end - it would make building a 7 chassis so much easier - anyone like to redesign the book chassis
to suit 
I've got my adapter plate for mounting Mazda 13b rotary to audi gearbox this week so I chucked the engine in to see if everthing fits right.
Need to get the brackets welded on now for the front of the engine and to mount the adapter plate to the chassis.
Steering rack mount also came so I chucked that in as well.
Column mounts and brake reservoir mount also now on.
Before anyone notices the MDF bulkheads, these are just dummies to be replaced by ally honeycomb when everything else in done.
Rescued attachment Front End.JPG
pic attached
Rescued attachment Engine from Rear.JPG
pic attached
Rescued attachment Chassis From Front.JPG
pic attached
Rescued attachment Rear End.JPG
Nasty-Bob,
Love your work!
Out of curiosity there's one question I have to ask though at the X brace in the frame side, to me its just begging to have another tube across
the top (see picture below).
Obviously you must have thought about this and decided to go without it so what was the reasoning behind that decision?
Oh and take down the noose, the project will never get on top of you that much!
[Edited on 26/10/07 by Doug68]


Rescued attachment Chassis.jpg
I didn't notice the noose till I saw the pics- I think I'll keep it just in case
Yeah I have thought about those braces and still might put them on. They will add a fair amount of extra rigidity but make the car a bitch to get in
and out of, and also interfere with ergomonics. The chassis is plenty stiff enough without them though.
My other thought, as a compromise, was this (below) and then gusset in between.
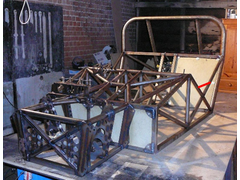

Rescued attachment Chassis.jpg
I quite like the idea of the car being a bit hard to get in and out of I think it demands a bit more commitment from the person getting in, it lets
them know that this is not a time for mucking about and that they need to pay attention as serious sh t is about to happen.
It should be easy enough to test the practicalities of it I'd think clamp on a bit of MDF and see what your right arm thinks about it.
I've been doing a bit of thinking about the body lately.
Here are some pics of the basic thing i'm going for.
This is by no means the final design, just an iteration.
Let me know what you think, good as well as bad. But nothing too insulting please
And before you ask,, no thats not me driving.
Cheers

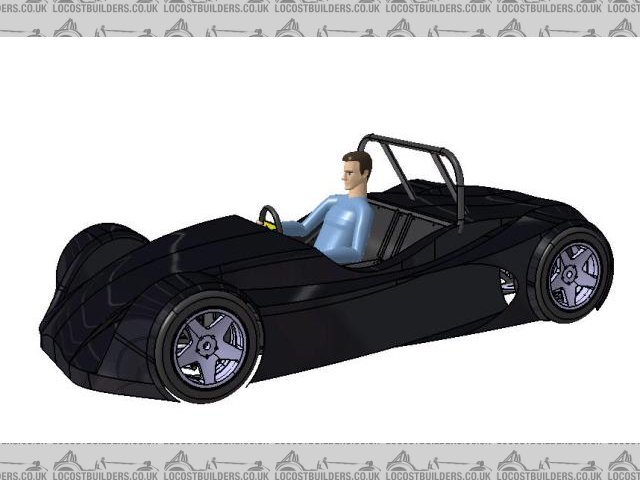
Rescued attachment side 2.jpg
and another
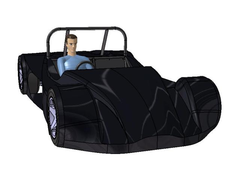

Rescued attachment front.jpg
and another


Rescued attachment rear iso.jpg

 Big thumbs up from me - would like to see what windscreen would look like on it as that could completely spoil the proportions.
re the cockpit area and access discussed earlier in the thread - wouldn't this be another ideal place for some of those laser cut steel bits rather than tubing?
quote:
wouldn't this be another ideal place for some of those laser cut steel bits rather than tubing?
Could you post it in a different colour? Since details are lost in the black.
Looks promising
Just another bit of an update on my project.
Since last time, I've had the chassis powder coated in graphite gey.
And I've panelled the interior. The ally panels have been laminated with carbon/kevlar.
Rescued attachment P1020024-1.JPG
and I've fitted the honeycomb floor.
This is bolted into the chassis using threaded inserts that are bonded into the panel.
Theres a few more detail on my blog
Cheers
Rescued attachment P1020027-1.JPG
(3 of 3, see page 2)
oh and here's the latest bodywork design. Have got another iteration under way though.
Any comments are more than welcome, good or bad.
Cheers
[Edited on 17/9/08 by nasty-bob]
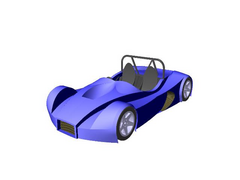

Rescued attachment 08-May-08 7-1.jpg
The bodywork is the hardest thing to get 'right' IMHO.
I've come to the conclusion that the the solid modeling tools such as Solid Edge - Solid Works, basically suck at surface modeling. I've
yet to decide what to use instead, I think Rhino may be the way to go but I'm yet to be totally convinced of that.
I use Catia V5 which is very good at surfacing. It's also made by Dassualt so if you can use Solidworks (judging by your avatar you've got
that bit sorted) it shouldn't be difficult to pick up. Solidworks/solid edge aren't really man enough when it comes to complex models and
large assemblies. Catia is built for modelling aircraft- its basically a more industrial tool.
The hardest bit is getting whats in your head, onto the CAD screen. I'm still working on that!
Cheers
quote:
Originally posted by nasty-bob
I use Catia V5 which is very good at surfacing. It's also made by Dassualt so if you can use Solidworks (judging by your avatar you've got that bit sorted) it shouldn't be difficult to pick up. Solidworks/solid edge aren't really man enough when it comes to complex models and large assemblies. Catia is built for modelling aircraft- its basically a more industrial tool.
The hardest bit is getting whats in your head, onto the CAD screen. I'm still working on that!
Cheers

hi there,
just read through the thread and would like say how simple an eligent the fount and rear suspentoion / gearbox mounting looks.
is there any reason why the fount did not end up more like the back i.e. rather than using the diagonal tubes using a plate with diagonal bracing left
in?
also how long did it take you to learn TIG? and what type of set do you have?
blake
[Edited on 17/9/08 by ceebmoj]
Are the front wheel arches large enough to to steer, they look a bit small.
Also the scuttle looks a bit odd (not clean enough)
Otherwise a smart looking car!
Chassis work looks great.
My opinion on the body....You have smooth flowing edges everywhere, except for the front radiator opening that is a square frame. I think it might
look even better if you soften the corners of the front opening.
Cheers
Fred W B
Thanks for the comments chaps.
Del- Yeah V5 is pretty pricey but then even 3k for Solidworks is out of the reach of most of us. Your modelling approach sounds similar to mine. Chuck
it on the screen, then try to do it properly.
Ceebmoj- I was looking at constructing the front end in a similar way to the rear (all sheet steel) but it was getting very complex and heavy. It
worked out much easier and lighter to keep the diagonal tubes for the front. As for learning TIG, I guess a few months really. Although my ally
welding still leaves a lot to be desired but I've not done much of that. I've tried a few different TIG plants but am using a Rehemann now
and am really pleased with it. Its a INV200 AC/DC and was only about £400. I've got a much more expensive transformer based plant as well but the
inverter is easier to use.
Ettore- yeah front wheels just about clear, I think the perspective makes it look tighter than it is. I'm not happy with the scuttle either-
especially as in plan view it looks like the car is wearing a bra 
Fred- I see what you mean, its a bit out of place. I wasn'y too keen on that bit myself but I tried a few rounded versions and it all looked a
bit soft. I wanted it to be a bit more aggressive. I've got a few other ideas for the front so will post the pics when I get round to modelling
it up.
Cheers
Rob
I first saw Catia back in 1990 when it was being used on Harrier GR7. I've never actually got the chance to use it unfortunately though.
Surfacing in itself is clearly an art, and one that I've not yet even begun to get to grips with properly.
The car looks great BTW, though I think you are in the same boat as me to a certain extent on being able to properly express the ideas you have in
your head on the body V what you can get into the 3D model.
I also preferred the previous (Black) version better.
Just a thought - has anybody out there tried any of the yacht design packages for 3d body shaping as that's basically what they're all about.
Apparently many of the yacht builders use Solidworks or Catia!
Doug - have you ever dissected a finished article made by a pro? It's about as intuitive as sticking your hand in a vat of molten iron. I joined
a few groups and several were kind enough to send out files I could backward engineer - even having those to hand it barely made sense! About the only
thing that became apparent was there was no way they could have created a lot of the surfaces with a finished article purely in their mind, which is
what lead me to the blocking method - once you have something existing on the computer it's a great deal easier to see how you can make sweeping
surfaces to start with and intersect them later.
Of course none of that helps with the fact that you'll suddenly get 101 "failed due to geometry conditions" messages unless you are
merely duplicating what others have produced and can figure out why by comparison!
Nope I've not got to that stage yet, once I've got the software choice done then I'll just bang heads with it until it gives in.
I was look at a tutorial on how to do an Audi TT the guy said it would take 100 hours to complete properly 
quote:
Originally posted by Doug68
Nope I've not got to that stage yet, once I've got the software choice done then I'll just bang heads with it until it gives in.
I was look at a tutorial on how to do an Audi TT the guy said it would take 100 hours to complete properly
Nice project Bob, I like your Black renderings best.....
Do you have other views of your renderings ?
Cheers
Italo
[Edited on 19/9/08 by FUORISERIE]
Any updates ?
Nothing much I'm afraid.
I've got most of my pannelling done. Covered my internal panels with Carbon/Kevlar and laminated it to the ally. Some pics are
here (on page 2).
I've also done some more design work on the bodywork and got something that I'm pretty happy with.
I bought a better lathe recently as well so have been trying to get my wishbones made, but havn't had much time.
I've redesigned my front uprights to be stronger and a bit lighter, so should get those made soon.
The trouble I have is that everthing is being designed from scratch (except engine and g/box) so it takes time to design, then earn the money to pay
for the bits, then make the bits, then do it all again because it's not right.
In the mean time I'm trying to figure out how the hell I'm going to mold the bodywork . . I think I've got a plan for that now
though.
I'll get there in the end, I hope.
Cheers
Rob
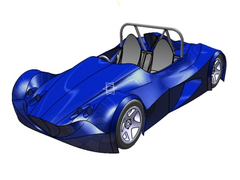

Rescued attachment 19-Nov-08-2.jpg
Hi bob,
I've been following ur progress for a while and think your frame design is spot on. I dont think that your body design compliments all that hard
work though. try slanting the front a bit forward and not so "seven-ish". Sorry for the criticism but i think u have a fantastic frame and
that front section is not too flattering.needs more work.
Don't worry about the criticism. All comments are welcome.
The front has been the hardest part to design (of the body that is) and I'm actually quite pleased with how it looks, finally. The front slants
back as I wanted to make it look more aggressive, but I do kind of see your point about it being slightly sevenesque.
I think if others agree with you and don't like it, I'll have another go, but at the moment I still like it.
Your comments are appreciated good or bad.
Cheers
Rob
Hey Bob,
Sometimes I simply wash everything out into a soft wash to help identify the basic panel shapes before I begin to shape the different areas in
aluminum. I took the liberty of doing that with your dark blue rendering and came up with the left illustration. There were some areas that I
wasn't exactly sure what you had planned, but for the most part I think you can see more clearly the different planes of the car using this
method.
The second unit is just a different take on the front end. I'm not sure but that I like the original one better but this may give you an
alternative or a start on a new design for the front.
I really like your project build and am confident that whatever direction you choose it will be a knock-out!
Dick Bear

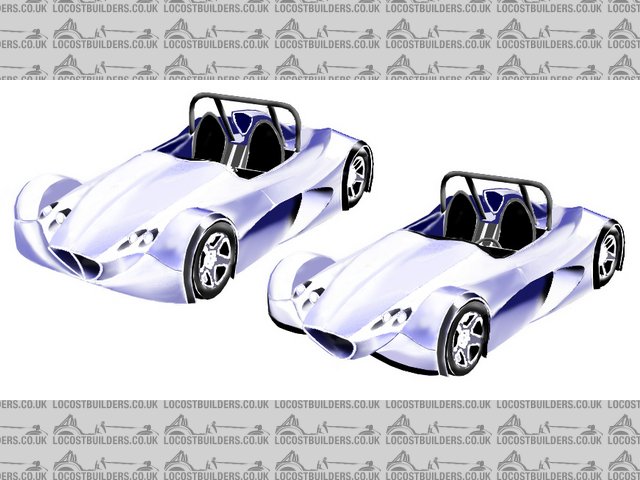
Rescued attachment Untitled-1.jpg
It seems to me that in the body designs shown above there is not enough room for the front wheels to steer, unless those wheels are very narrow. The
problem seems to be at the back of the front wheel arches.
John
i quite like the convex-concave knifed out look, kinda hints at BMW style, looks great. I would open up the grill/ airscoop area a bit wider, to make it look more aggressive.
Dick,
Thanks for that, I like that effect- how did you do it?
Gakes,
I have tried to add some BMW style flame edging, and will be adding some intakes in the front for brake cooling. Also there will of course be a
splitter which I think will add a bit of aggression.
Cheers chaps,
Rob
The scuttle is looking tight, I like it.
Not sure about grille and 'bumper' though.
hi there,
any updates?
Hi,
Nothing terribley exciting I'm afraid- been CADding mostly.
Most effort has been on the uprights re-redesign. This is done now so I just need to get the drawings done for the laser profiling and the bearing
housing turning.
They use Sierra rear hubs front and rear but with the drive flange turned off for the front ones
Front Upright
Front Suspension
Rear Upright
Rear Suspension
I have also had a go at designing my own hubs but decided in the end to stay with the sierra ones for the time being despite the weight of them.
I did manage to get my steering column made though as well, so I've been doing a little bit of sitting in the car turning the wheel and making
engine and tyre squeal noises 


Cheers,
Rob
[Edited on 18/3/09 by nasty-bob]
hi,
thanks for the update. keep updating the thread its an interesting build.
ceebmoj
What material and thickness are you using for the uprights?
And did you do some FEM analysis on them already?
Good to see progress!
Uprights are 3mm mild steel and I have stressed them already.
Cheers
Rob
Hi,
I've not updated for a while so thought I'd take a few pics of where I've got to:
Rear Suspension is now mostly complete
The calipers are Hispec Ultralite 4 pot, discs are Ford Mondeo front discs 300mm dia.
Hubs are Ford Granada so the discs had to be redrilled as the PCD was different.
Also, I fitted the pedal box:
Front suspension is almost done, I just need to make the uprights.
Once I've got the car off the build table onto its wheels I plan to remove the engine from the RX7 turbo donor to rebuild it.
Cheers
Rob
looks good do you have any other picks of your pedal box it looks cool with the initials on the pedals
I haven't got any more decent photos of the pedal box I'm afraid but I'll try to remember to take some next time I'm at the
workshop. It does look pretty good actually- it took about 3 iterations of the design to get something I am happy with. Like most of my designs, its
made from laser profiled plates tig welded together.
Cheers
Rob
Few more pics, bit of a wide boy now!!
Fuel tanks are nearly finished as well but will post pics when complete. I might even be able to weld ally to a respectable standard by the time
I've finished them 
Rob
[Edited on 14/8/09 by nasty-bob]
looking good
Do you have trustworty data that suggests decent airflow through the side radiator? I just ask because I'm facing a very similar situation, and went with a tradition front radiator because I was worried about turbulent/reversing air flow along the sides of the car... Just wondering.
No, not really. When I finalise the body design I plan on doing some CFD work on it to make sure the airflow isn't doing anything silly.
I've got a freind who is an aerodynamicist for one of the F1 teams so I think I may get him to cast an eye over the design when I get to that
stage.
I did consider front mount it doesn't really fit with the rest of the design for the chassis and body. I want to minimise front overhang as much
as possible as well.
Cheers
Rob
hi there,
can I ask who suppled the hunny come material and the carbon Kevlar fabric?
Hi
Honeycomb panel was supplied by Technical Resin Bonders and cost about £250 for a 8 x 4 sheet 1/2
inch core sheet.
The carbon/kevlar was from East Coast
Fibre Glass Supplies
Cheers
Rob
totally new here and still at the thinking about it stage, have to say this thread has been an inspiration to me
thanks and keep it comming
aitch