smart51
|
| posted on 8/11/08 at 05:35 PM |

|
|
sanding into tight corners
I'm making some fibreglass headlight shells for my new project. Some of the gaps are really tight, too small to get a finger in, in places only
a couple of mm wide. How do you sand in tight corners and difficult to get at places?
|
|
|
|
|
RichardK
|
| posted on 8/11/08 at 05:39 PM |
|
|
What about making some sanding sticks, glueing sand paper to some strips of thin ali?
Rich
Gallery updated 11/01/2011

|
|
|
blakep82
|
| posted on 8/11/08 at 05:45 PM |
|
|
have you got any work in progress pictures of your headlight shells? I'm needing to do the same sort of thing on my car soon, with the same
headlights
________________________
IVA manual link http://www.businesslink.gov.uk/bdotg/action/detail?type=RESOURCES&itemId=1081997083
don't write OT on a new thread title, you're creating the topic, everything you write is very much ON topic!
|
|
|
smart51
|
| posted on 8/11/08 at 05:59 PM |
|
|
Here's a pic. There will be a perspex cover over the top, which will be vacuum formed. The shell will be painted with spray on texture and grey
car interior paint but I want it reasonably smooth before applying the paint.
 
Rescued attachment headlight shell raw.JPG
|
|
|
blakep82
|
| posted on 8/11/08 at 06:07 PM |
|
|
thats exactly what i'm trying to make too (well, want to try to make  ) )
i'm going to go for the single hi/lo beam hellas, but i want a perspex cover with indicator and sidelight in there too
how did you make the mould (spelling?) for it?
________________________
IVA manual link http://www.businesslink.gov.uk/bdotg/action/detail?type=RESOURCES&itemId=1081997083
don't write OT on a new thread title, you're creating the topic, everything you write is very much ON topic!
|
|
|
blakep82
|
| posted on 8/11/08 at 06:09 PM |
|
|
as for sanding into corners, how about a thick piece of steel plate, 3mm perhaps, with sand paper wrapped around it?
[Edited on 8/11/08 by blakep82]
________________________
IVA manual link http://www.businesslink.gov.uk/bdotg/action/detail?type=RESOURCES&itemId=1081997083
don't write OT on a new thread title, you're creating the topic, everything you write is very much ON topic!
|
|
|
smart51
|
| posted on 8/11/08 at 06:12 PM |
|
|
Sandpaper on a stick sounds like a good idea.
The shell is made from flat pieces of fibreglass cut with an angle grinder and bonded together with glass fibre bridging compound (I love that stuff).
The round pieces are grp set inside a plastic tub of the right diameter.
|
|
|
Hadders
|
| posted on 8/11/08 at 06:14 PM |
|
|
Credit / loyalty cards with wet and dry wrapped round. However, the best are the extra thin promo ones they send you for things like Airmiles. Even
more flexible. I use them evey day on bumper mouldings and other tight areas.
For the really tight stuff just double or triple up the W&D and use that way. You'll need to be patient as it'll take a while with
1500, 2000 grit!
Edit:
Just seen you pic. If you're going to use standard car texture paint as used for bumpers then you will cover fairly heavy grit sanding marks
with a couple of coats.
With that shape i would use doubled up Abranet sheets which are very flexible.
HTH
|
|
|
HAL 1
|
| posted on 8/11/08 at 06:17 PM |
|
|
Mrs hal has some finger nail sanders, they might do the trick, but you'll have to get your own
|
|
|
smart51
|
| posted on 13/11/08 at 07:16 PM |
|
|
The shells are now complete. Thanks for all the advice. My first attempt at vacuum forming the covers was a little less than successful but
that's a topic for another thread.
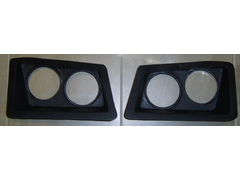 
Rescued attachment shells.JPG
|
|
|


