johnH20
|
| posted on 29/10/18 at 03:31 PM |

|
|
VHT wrinkle paint - what am I doing wrong?
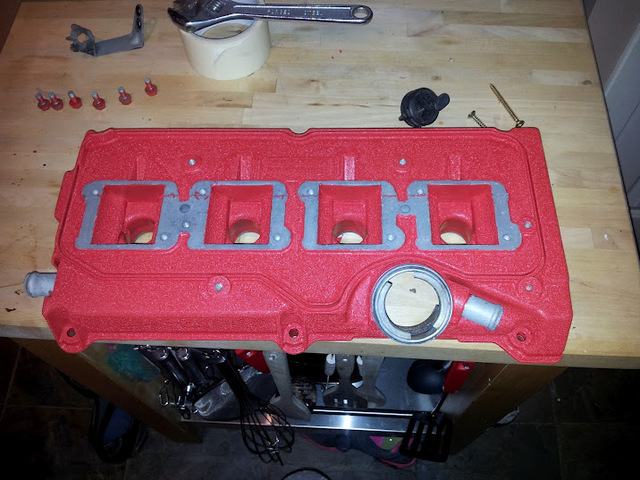
I am renovating an MX5 cam cover. Had it vapour blast cleaned and washed in dishwasher ( don't tell her! ). I am getting a very uneven result
when applying paint, some areas wrinkle up nicely others less so, and some do not wrinkle at all. I am guessing this may have something to do with
film thickness but even after reapplying paint as recommended on can some of the non wrinkle areas persist. I have tried using a heat gun with limited
success so I must be doing something wrong. HELP! TIA.
|
|
|
|
|
MikeRJ
|
| posted on 29/10/18 at 03:41 PM |

|
|
I find the VHT wrinkle paint quite fussy to apply. The ambient temperature needs to be reasonably warm (if it's too cold it just won't
wrinkle) and you need to apply several fairly heavy coats waiting 5 minutes or so between each, and try to get the thickness as even as possible.
|
|
|
sdh2903
|
| posted on 29/10/18 at 05:24 PM |

|
|
Yes helps loads if the part is pre-warmed aswell.
3 coats then leave for a few mins then gently heat with a heat gun til you get the wrinkles even.
|
|
|
johnH20
|
| posted on 29/10/18 at 06:54 PM |

|
|
Thanks for input, done the pre-heating and air gun. Still not working for me. There must be some other missing ingredient for success!
|
|
|
bi22le
|
| posted on 29/10/18 at 06:58 PM |

|
|
Make sure it's a really thick coat?
I baked mine in the oven and they come out super.
Track days ARE the best thing since sliced bread, until I get a supercharger that is!
Please read my ring story:
http://www.locostbuilders.co.uk/forum/13/viewthread.php?tid=139152&page=1
Me doing a sub 56sec lap around Brands Indy. I need a geo set up! http://www.youtube.com/watch?v=EHksfvIGB3I
|
|
|
coyoteboy
|
| posted on 29/10/18 at 09:33 PM |

|
|
Instruction says oven....
Mine worked fine when oven'd
 
v8 cam cover wrinkle red
|
|
|
jossey
|
| posted on 30/10/18 at 02:01 AM |

|
|
Etch primer first then warm up near fire. Will work. Fine then. 2 light coats then a heavy coat.
Thanks
David Johnson
Building my tiger avon slowly but surely.
|
|
|
dewbries
|
| posted on 30/10/18 at 06:24 AM |

|
|
I did one horizontal coat, and left for 5 minutes, one coat vertically, left for 5 minutes and then diagonally. I then Used a heat gun and jobs a
good'n. The layering up of paint needs to be sprayed in these different directions.
Hope this helps
Second build. Now refining and changing drive train
|
|
|
b14wrc
|
| posted on 30/10/18 at 12:08 PM |

|
|
interestingly I found the red harder to spray than the black. did my spark plug cover black and it looked great, the wrinkles on the rocker cover was
in red and I did it twice, was ok, but not as good as the black. I have yet to put them in the oven, so that might help....
20vt powered rear engined locost
|
|
|
sdh2903
|
| posted on 30/10/18 at 01:42 PM |

|
|
Just be aware it stinks the oven out. The Mrs was not impressed. Also as a side note when I oven baked it the wrinkles were really coarse and looked
a bit crap. However doing it with the heat gun worked really well.
Looks like it's a 50/50 product!
|
|
|
nick205
|
| posted on 30/10/18 at 05:10 PM |

|
|
No experience with the wrinkle paint, but with normal rattle can spray paint warming the part first helps and warming the can itself (sink of warm tap
water) also helps. I've also found hanging the painted part back over an electric heater helps cure and harden the paint as well.
[Edited on 31/10/18 by nick205]
|
|
|
johnH20
|
| posted on 31/10/18 at 08:36 PM |

|
|
Thanks for the tips most of which I have followed but I have still ended up with a bit of a dogs dinner! I just hope that added ignition leads and
other hardware will hide the worst of it. For the benefit of any one else doing this my conclusion is that a real heavy coat ( x3 as per instructions
) is key to getting a good wrinkle finish. The problem is this causes runs on vertical or near vertical surfaces and that in the end was my undoing.
Sadly I have no solution to offer. Good luck!
|
|
|
coyoteboy
|
| posted on 21/1/19 at 11:57 PM |

|
|
Unlike normal paint, when it runs, just blast a bit more on and rotate it about a bit.
|
|
|


