RazMan
|
| posted on 24/1/07 at 11:54 PM |

|
|
Making inner wheel arches
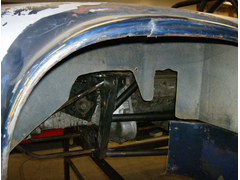
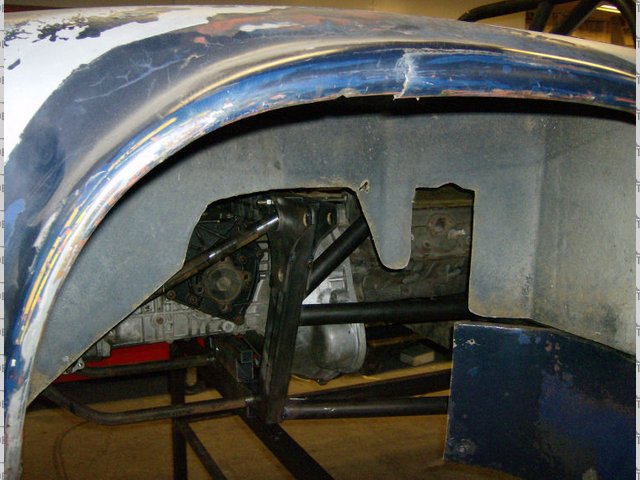
After a few hundred miles of wet & dry driving it has occurred to me that the engine bay looks as if the car has done 100 k miles  There is road
crap everywhere and when it rains, water comes off the back wheels and jet washes my rear lights with a grit & water mix, causing some electrical
problems too. The answer, as I see it, is an inner wheel arch or something similar. There is road
crap everywhere and when it rains, water comes off the back wheels and jet washes my rear lights with a grit & water mix, causing some electrical
problems too. The answer, as I see it, is an inner wheel arch or something similar.
Has anyone done this on a middy? I was thinking that a good starting point would be to find a plastic water butt, cut it in half and mount each half
around the wheels somehow, obviously allowing for suspension movement.
Would this work?
Cheers,
Raz
When thinking outside the box doesn't work any more, it's time to build a new box
|
|
|
|
|
worX
|
| posted on 24/1/07 at 11:59 PM |
|
|
I'm not experienced in this at all, and neither have I measured it (so at this point I suppose I should just shut up LOL) but I reckon that a
normal size bucket with the ends cut off and slit vertically wouldn't be a milion miles away in size when opened up/stretched?
you could also be a bit clever (if it was sort of right size) by using the base cut a multidude of times as a sort of "back/rear spray stopper
for the brakes/suspension???
either way, it'll only cost you a quid or so to try it at local hardware store/B&Q etc.

|
|
|
graememk
|
| posted on 25/1/07 at 12:08 AM |
|
|
a 2nd hand set of front wings from a 7 should give a good start
|
|
|
Dick Bear
|
| posted on 25/1/07 at 01:56 AM |
|
|
Hi Raz,
You know I'd suggest forming them of aluminum as my first choice but without an english wheel and other tools that is probably not practicle at
this point.
My second suggestion would be to vacuume form then over a form or into a form. I've done this a lot while making one-off prototype fixtures for
clients and it's not only relatively easy, it's fun!
Start with a male buck of the shape you want formed in styrene and a thick (1/4 inch) covering of bondo. Once smoothed (sanded) build a vacuume
platform using plywood. Position the buck on the platform,... attached a shopvac to the platform, ... cut a plywood frame and attach the plastic to it
using screws or staples,.... heat the plastic in your wife's oven until it sags evenly down through the hole in the frame,... quicky remove from
oven and position over the buck while your assistant starts the ShopVac,.... press the frame down tightly against the platform and watch the vacuume
pull it into shape!
Trim the edges as needed and mount the part with frame welded tabs in appropriate places.
Depending on the overall size and your oven's limitation you may have to create two pieces to make the whole.
Not everyone of them will comeout perfectly but it is a simple matter to heat another and start the process over again. Sometimes you can reheat the
same plastic!
Once you've done this home process you'll find a hundred other things to vacuume form on your 7!
Dick Bear
www.marketpointproductions.com
www.marketpointproductions.com
|
|
|
airframefixer
|
| posted on 25/1/07 at 03:11 AM |
|
|
vaccum forming.
another way to enhance the speed and intensity of the vacuum surge, is to use a vacuum tank. we used an 80 gal air compressor tank. the tank was
plumbed to t fitting, one side there was a valve, and was plumbed to the vacuum source. the other side was plumbed to a valve directly to the
mold/plug which was perforated with tiny holes of the face of the tooling. we let the pump run untill, we got atmosphere, somedays 29.92 standard
atmosphere or 14.7 PSI, some less some more. once we got all of the air out of the tank, we closed the valve on the vaccum source side. once the
plastic was over the mold/plug, we opened the the valve from the tank to the plug. a big surge and the part was formed within seconds.
and as Dick said, once you have the know how, youl find many more apps for it.
andrew
|
|
|
RazMan
|
| posted on 25/1/07 at 06:10 AM |
|
|
Dick & Andrew - Vacuum forming is a bit out of my league I'm afraid  I love the idea of it but I do all of my work outside and it's
snowing at the moment I love the idea of it but I do all of my work outside and it's
snowing at the moment  Apart from that, the sizes involved would mean quite a large oven and I struggled to get the Christmas turkey in this
year! Apart from that, the sizes involved would mean quite a large oven and I struggled to get the Christmas turkey in this
year!
Worx - The bucket would have to be a big one as I have 245/35/17 tyres but your idea is on the same lines that I was thinking.
graememk - The front wings would certainly give me something to build on but maybe some rear ones would give me more room to allow for suspension
movement. Either way if they are fibreglass I can chop & change them to suit 
Thanks for all the ideas guys - much appreciated
Cheers,
Raz
When thinking outside the box doesn't work any more, it's time to build a new box
|
|
|
Fred W B
|
| posted on 25/1/07 at 08:20 AM |
|
|
Hi Raz - Have you considered attaching some panels to the underside of the rear clip, rather than mounting something over the wheels from the chassis
- Like this?
Cheers
Fred W B
inner
|
|
|
macnab
|
| posted on 25/1/07 at 09:15 AM |
|
|
B&Q are selling large green plastic buckets that are big enough to go over wheels. I you cut you inner arches from them I would be a quick and
cheap solution...
|
|
|
02GF74
|
| posted on 25/1/07 at 09:15 AM |
|
|
I don;t know the arrangment you have but I wouldn;t put more waight onto the wheels but panel up the body work. Thin sheets of ali plus fibreglass
should do it.
|
|
|
mookaloid
|
| posted on 25/1/07 at 10:07 AM |
|
|
I bet there would be some plastic liners on something in a scrap yard which you could trim/adapt to suit.
Just a thought
Cheers
Mark
"That thing you're thinking - it wont be that."

|
|
|
RazMan
|
| posted on 25/1/07 at 11:25 AM |
|
|
quote:
Originally posted by Fred W B
Hi Raz - Have you considered attaching some panels to the underside of the rear clip, rather than mounting something over the wheels from the chassis
?
That probably makes more sense than other solutions Fred - it would also add some rigidity to the clip which would be good. Perhaps attaching
fibreglass or alloy panels with PU adhesive would do the trick. Hmm got me thinking now
Cheers,
Raz
When thinking outside the box doesn't work any more, it's time to build a new box
|
|
|
rav
|
| posted on 25/1/07 at 07:24 PM |
|
|
Raz, I'm thinking of doing something similar to form rear arches for mine - was also thinking cutting up some sort of cheap container could be
an easy way to do it - hadn't thought of a water butt, time for a shopping trip I think!
I suppose locost rear arches might do?
If anyone finds anything good while out choosing colours for thier bathroom etc let me know!
Cheers
|
|
|
gttman
|
| posted on 25/1/07 at 07:32 PM |
|
|
I'm doing inner arches on mine... I have one that you could take a splash from if it suits as it is curved above the wheel.
Failing that the Ultima ones are simple flat pannels at 90deg to the body, this would be easy to replicate.
edited to say that mine will be attached to the body.
[Edited on 25/1/07 by gttman]
Andygtt
Please redefine your limits
|
|
|
RazMan
|
| posted on 25/1/07 at 08:36 PM |
|
|
Andy, I would like to take a closer look at your inner arch - maybe a splash mould is the way forward as it might save some work. Give me a bell when
you are back in the UK and we can get together.
Cheers,
Raz
When thinking outside the box doesn't work any more, it's time to build a new box
|
|
|
Spyderman
|
| posted on 26/1/07 at 03:05 PM |
|
|
Another cheapish option would be trailer mudguards. From your local caravan/trailer suppliers.
Could be mounted to chassis easily enough and mudflaps could be added if necessary.
Spyderman
|
|
|
gttman
|
| posted on 27/1/07 at 08:01 AM |
|
|
quote:
Originally posted by RazMan
Andy, I would like to take a closer look at your inner arch - maybe a splash mould is the way forward as it might save some work. Give me a bell when
you are back in the UK and we can get together.
Came back Thursday, I'll give you a ring over the weekend.
Andygtt
Please redefine your limits
|
|
|
sgraber
|
| posted on 29/1/07 at 06:07 PM |
|
|
dealing with the same issues at the mo. My plan has been the plastic sheet formed in the shape of that big bucket and attached to the inside of the
bodywork with aluminum tabs glued to the fiberglass. Should be quite light and effective and make a lot less noise when rocks hit it than similar
aluminum ones?
I would love to see what you come up with though!
Steve Graber
http://www.grabercars.com/
"Quickness through lightness"
|
|
|
RazMan
|
| posted on 29/1/07 at 10:33 PM |
|
|
Hi Steve,
I was having a look at Andy's car today (which is REALLY taking shape now) and he showed me an inner arch he had cut off an earlier project.
I think it will have to be made from fibreglass - mainly for strength but your idea about noise is certainly another good reason for not using
alluminium. If a small return is formed on the adjoining edge, I think that PU adhesive would be more than adequate and will spread the load better
than brackets so I will probably give that a try.
I will have a search round the local DIY store at the weekend and see if there is a suitable sized bucket / water butt etc to use as a form for a
splash mould. Something around 700mm diameter would be ideal. Failing that I could make something from ally sheet and take a splash from that,
although the more radiused edges of a water butt would be stronger.
Cheers,
Raz
When thinking outside the box doesn't work any more, it's time to build a new box
|
|
|