
Project Thread: Duratec into Fury
Furyous - 20/1/12 at 10:45 PM
I thought I'd start a thread for the work I've been doing. I'll start off by saying this isn't meant as a guide because I'm
not an expert and don't entirely know what I'm doing. I'm learning as I go along and I've learnt a lot! If someone sees something
wrong, please tell me. I've got some photos in my archive but I'll just post some of them on here.
I thought the relatively low powered Crossflow would be a good starting point to get used to quick cars before going all out. The plan was always to
upgrade later on. I decided on a Duratec not long after I got the car and planned on doing the swap in the Winter. I liked the idea of an easy 180bhp+
and the Duratec is more modern than the Zetec. The downside is it would be more expensive.
I was going to get a bellhousing to use with the Type 9 that came with the car. But then I heard the MX5 gearbox fits straight on and has a much nicer
mechanism. I think I read it can also take more power reliably, but maybe I'm assuming things. There are plenty on eBay with Buy-It-Now prices
around Ł400-500, which is a fair bit more than going down the Type 9 and bellhousing route. But I saw one on eBay with a low starting bid being sold
locally. I ended up being the only bidder and collected it for Ł125. It's a 5 speed N7 box from the NC MX5, late 2006 onwards.
The engine was from eBay and I collected it for Ł210. It was completely bare apart from a tensioner, spark plugs, knock sensor, broken electronic
thermostat housing (being replaced with a mechanical one) and the oil breather valve and cover.
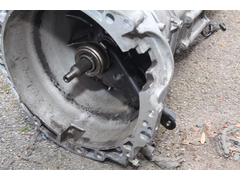
The input shaft on the gearbox is 15mm, so the standard Duratec spigot bearing fits. I also bought a standard MX5 flywheel, clutch pressure and
friction plates, and starter. The flywheel weighs 7.3kg, which is a reasonable saving over the standard Mondeo dual mass at something over 10kg.
I'm just guessing the standard clutch will be ok because I think the MX5 makes around 160-170bhp. I'll probably find out within a couple of
thousand miles.
I got some 2001 GSXR1000 throttle bodies which I was planning on splitting and attaching to some tubes on a flange from FastDan. I don't have a
TIG machine but I can MIG weld, so I thought I'd read up on MIG welding aluminium. Having given it a go, I now completely agree that it's
difficult and messy. I'm going to go with PJay's suggestion of using the original GSXR rubber mounts and bolt them onto the flange.
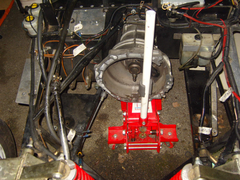
Speaking of PJay, he came over last week and helped with getting the engine out and giving lots of advice. That brings me onto the photos.
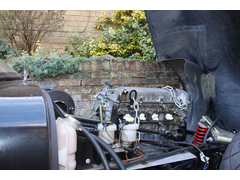
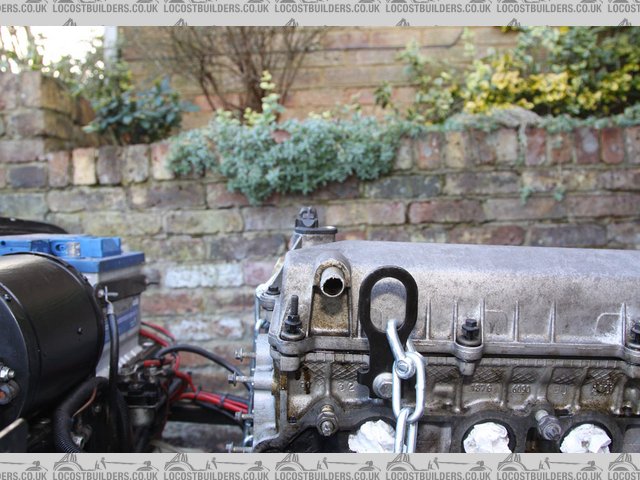
First, we have a side shot before things were removed.
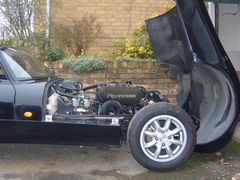

Description
Before Pete came over, I unplugged things and removed the side pods, then we both took the bonnet off. The car was then jacked up and put on axle
stands front and back.
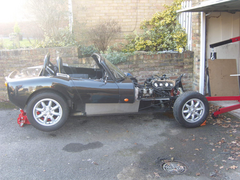

Description
We then took the radiator off, but I couldn't see any connectors to completely remove it without pulling the wires right back. So we just put it
to the side, out of the way.

Description
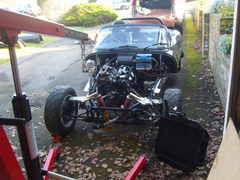
The load leveller was attached. This made things much easier. The engine and gearbox had to be lifted, tilted, moved forward, lifted, tilted, moved
etc.
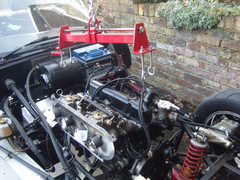

Description
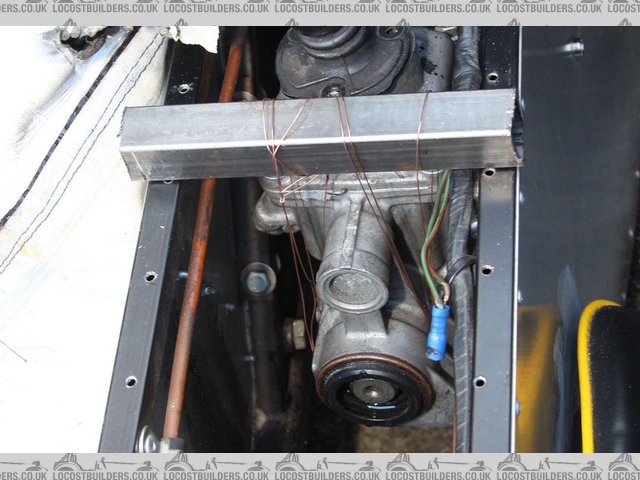
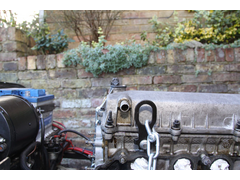
Once the Crossflow was out, Pete then looked over the Duratec. He found a problem where the timing chain suddenly goes slack on top with a
"ping" at a certain point. I think it was just after the exhaust cams made contact with the caps (forgot the technical term for the top of
the valve stem). He had a set of tools for setting up the timing. With the pin in the side of the engine holding the crank at TDC on cylinder 1, the
two slots on the back of the cams were not lining up properly. I'll get some photos later on. We'll have to get the timing chain cover off
and see what's going on.
The compression wasn't fantastic but I've since put some oil down the spark plug holes and it has improved a lot. Hopefully that
doesn't mean the rings need replacing. I was hoping not to take the engine apart too far.
Having set those jobs aside for the time being, I was eager to check the MX5 box would fit. I'm going to buy a shortened sump but I don't
want to splash out on a 10* angled one only to find the gearbox won't fit. If it doesn't, I'll go with a bell housing on the Type 9.
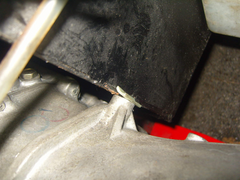
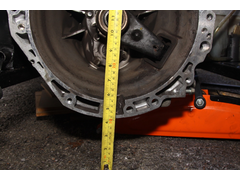
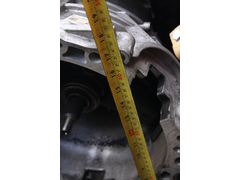
After some wiggling and jiggling we had it into place but it's a little dubious. The Type 9 is about 6" wide at the narrow point but the MX5
is about 7" wide. The trapezium shaped transmission tunnel is 6" where the top of the Type 9 was. But the top corners on the MX5 slope
inwards, and the actual tunnel is about an inch wider because of the chassis rails at the front of the tunnel. If that makes sense.
Next problem is that the MX5 bell housing is quite large. The rim for mounting it to the engine sticks out further than the driver's footwell so
it can't go back a long way. It's about 11" long, while I think the Type 9 bell housings are about 7" long and not as wide.
You might notice it was dark by now. 

Description

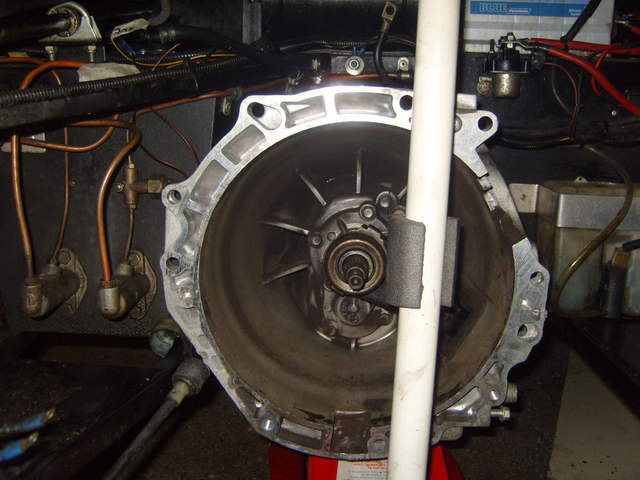
Description
I can move it back to within 10-15mm of the drivers footwell but I would need space for the bolt heads. I would also need to flip the brake switch
around.
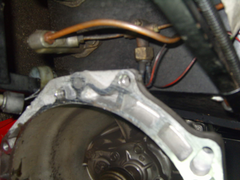

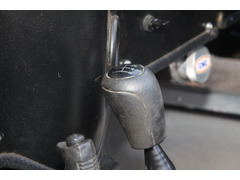
Description
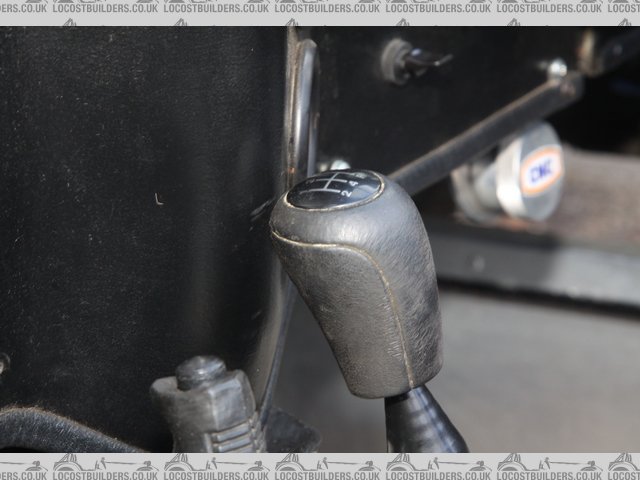
Unfortunately, that means the gear stick will be further forward than the Type 9 and will foul with the dashboard. The Fury has a dashboard with a
lump in the centre, right where I don't want one. I might need to shorten the gear stick or fit a flat dash board.

Description
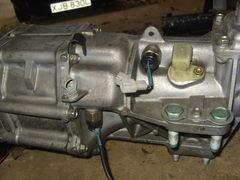
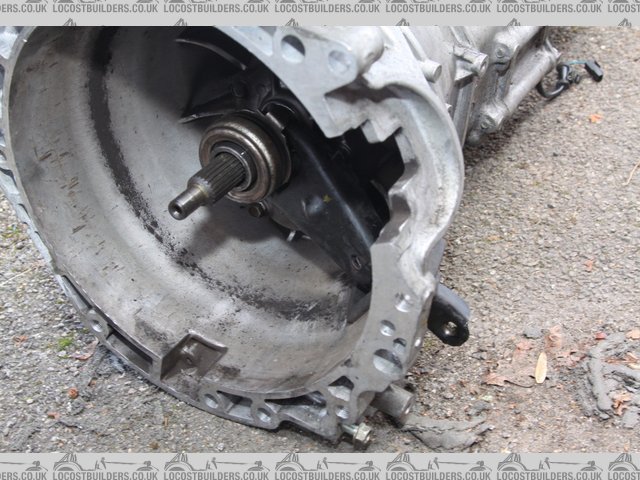
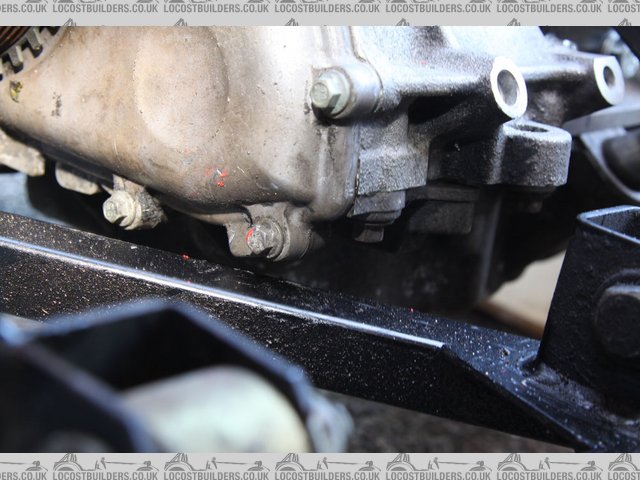
There are some mounting brackets on the gearbox that can be ground off, but I want to be sure it's going to fit before I ruin any chance of
selling it. This threaded hole at the front doesn't go anywhere, so I would grind it off. I'd imagine it's used for something like a
temperature sensor.

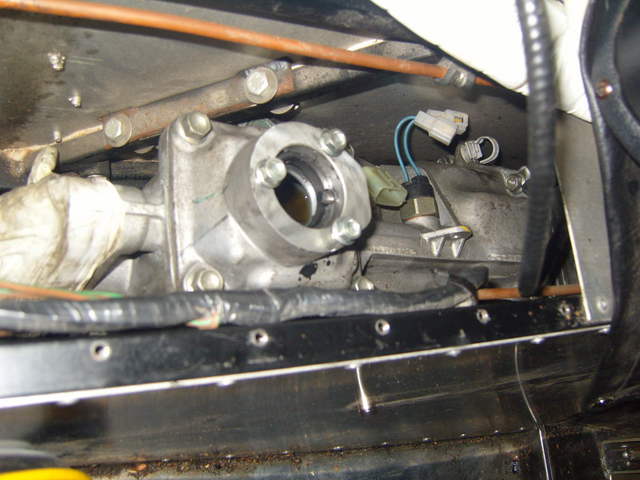
Description
In this photo: The lower switch is reverse. I think the top one is neutral, but I can't get anything out of it when I wiggle the stick around.
The connector on the right is blank plastic and there's nothing underneath, just a hole into the casing.
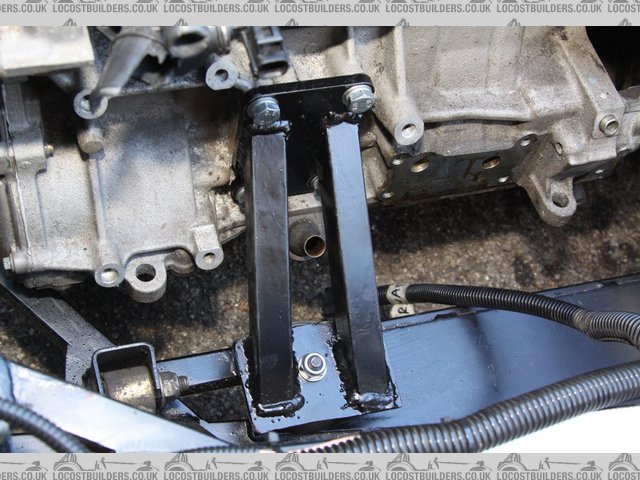
Two photos above you can see a diagonal chassis rail near where the gear stick would be. The mounting with the two bolts on the gearbox hits that
rail, so it will need to be ground off. There are two studs at the bottom of the gearbox that I've taken out. I'll replace them with bolts
going upwards to save some ground clearance.

Description
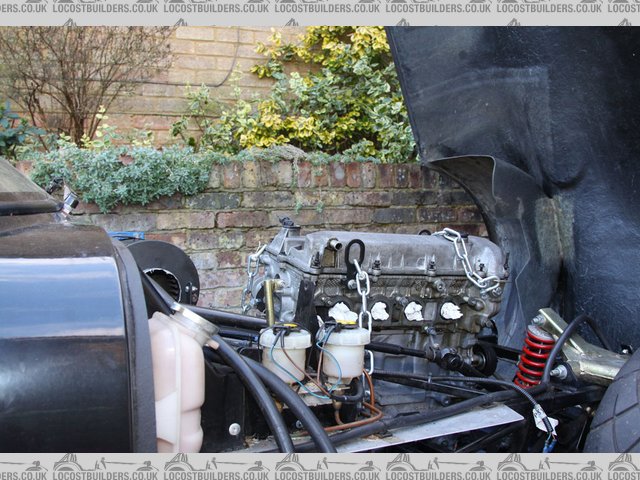
I have a low pressure fuel pump, high pressure pump, swirl pot, and HP filter. I haven't worked out what to do with the tank yet. It has a 6mm
supply and no return but I want to use an 8mm supply. I could use the 6mm as a return but I don't know how to add a supply line. Would it need
welding? In which case, I don't want to do that on a used tank. Would it be bolted and glued up with sealant? I might take the tank right out and
see what I can do about a fuel sender.
I'm leaving the ECU and exhaust manifold until it's nearly ready to run. I'm going back to New Zealand in February, probably back some
time around June. There's no point spending money on those things if they won't be used for a long time.
atm92484 - 21/1/12 at 02:25 AM
Wow nice score on the gearbox. Glad to see it going into something cool.
I can't wait to see more of this conversion - the Fury is a great looking car.
Poorscousertommy - 21/1/12 at 04:17 AM
I picked up my N7 box today too - still to source an engine though! I'll be watching in anticipation, hope the build goes well! I know Mkindy7 on
here has already done the mating, albeit to an indy but I'm sure his posts would be a good resource to help you through!
Good luck with the conversion!
scudderfish - 21/1/12 at 10:46 AM
Good luck 
se7ensport - 21/1/12 at 01:02 PM
Looking very promising.
Do you have bonnet clearance or will it require a bit of modification?
Furyous - 21/1/12 at 01:33 PM
quote:
Originally posted by se7ensport
Looking very promising.
Do you have bonnet clearance or will it require a bit of modification?
It's more a question of ground clearance.  I think with the Mazda bellhousing I'll have about 4" ground clearance, which is the same
as the crossflow before. The dips on the sides of the engine bulge might cause problems with the intake and exhaust but I'll see when I get
there. I'm reluctant to spoil the lines. Someone on JPSC bought a part built Fury with the standard bonnet and a Duratec where the original owner
had cut holes in the bonnet. I think the new owner moved things around and found it didn't need the holes but they were going to put a small lump
in those places anyway.
I think with the Mazda bellhousing I'll have about 4" ground clearance, which is the same
as the crossflow before. The dips on the sides of the engine bulge might cause problems with the intake and exhaust but I'll see when I get
there. I'm reluctant to spoil the lines. Someone on JPSC bought a part built Fury with the standard bonnet and a Duratec where the original owner
had cut holes in the bonnet. I think the new owner moved things around and found it didn't need the holes but they were going to put a small lump
in those places anyway.
I've just spent two hours trying to get the fuel tank out. After getting everything loose I found it's too big to fit between the
differential and the rear body work, despite a 2" notch cut out of the rear sill. Looking at it, I think the axle is held on with four bolts
separate to the suspension so I think I'll undo them and shift the axle slightly.
Unfortunately, I have to work on the drive and it looks like it might rain soon!
Edit: Well, it took three hours but I finally got the tank out. In the end, I dropped one side of the axle down and took the tank out through the
wheel arch. What a pain in the bum! I'm going to be using an 8mm supply line but the tank only has a single 6mm supply, which I was going to use
as a return.
What are people's thoughts on drilling a hole in the sender unit to add a fuel hose for the supply? It would save trying to get my hand through a
2" hole to put a nut on the inside of the tank. I'd bolt something like BRASS BSP Taper x Hose Tail Pipe Fitting
Connector Fuel | eBay to the sender, maybe a 90* version, and have a hose and filter on the inside.
[Edited on 21/1/12 by Furyous]
scudderfish - 21/1/12 at 06:35 PM
What tank are you using, the MG Midget one? I too had fun and games getting mine out, I ended up pushing the front above the axle and then dropping
the rear down and pulling it out backwards. For my return I fitted a fuel sender with a plastic top. I drilled it and araldited in a length of 8mm
copper with a small radius 90 degree bend in it. I fitted a short length of hose to it so I wouldn't have to worry about trying a attach a
length of hose to the pipe once the tank was back in place.
Regards,
Dave
ETA. Dumbarse me, I'm talking about the return, not the feed.
[Edited on 21/1/12 by scudderfish]
Furyous - 21/1/12 at 09:10 PM
quote:
Originally posted by scudderfish
What tank are you using, the MG Midget one? I too had fun and games getting mine out, I ended up pushing the front above the axle and then dropping
the rear down and pulling it out backwards. For my return I fitted a fuel sender with a plastic top. I drilled it and araldited in a length of 8mm
copper with a small radius 90 degree bend in it. I fitted a short length of hose to it so I wouldn't have to worry about trying a attach a
length of hose to the pipe once the tank was back in place.
Regards,
Dave
ETA. Dumbarse me, I'm talking about the return, not the feed.
[Edited on 21/1/12 by scudderfish]
It's a Midget tank with an extra bit welded on underneath.
This picture shows where the supply hole is, on the front:
(Nice big watermark to stop people like me stealing it)
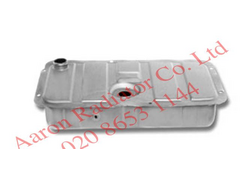

Description
Furyous - 22/1/12 at 08:53 PM
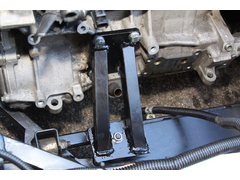
Small update. I got the gear box back into the car today to have a rethink on the clearances. After some umming and ahhing I decided to go ahead with
chopping bits off.
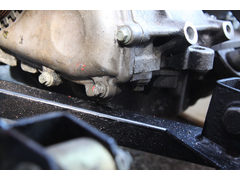
This mount was hitting the chassis rail, pushing the back of the box too far over.

Description
It came off roughly along this line:
Description
I had a lot of trouble taking a photo showing the space on the sides. Black corners don't show up well.
Description
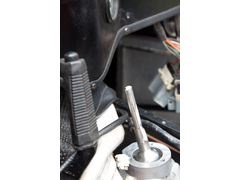
This shows the gear stick problem. The dashboard has a lump in the middle right where the stick needs to go for 1st and 3rd. My three options are a
new, flat dashboard; shorten the gear stick; put a bend in the stick so the knob is further back from the base. I sat in the car and tested the reach
but I think it's a little too far away to be comfortable over a long time. Bringing the knob closer by putting a bend in the stick seems the best
option to me. But I'd need to work out how to do it.
Description
The ground clearance at the bottom of the bell housing is around 100mm.
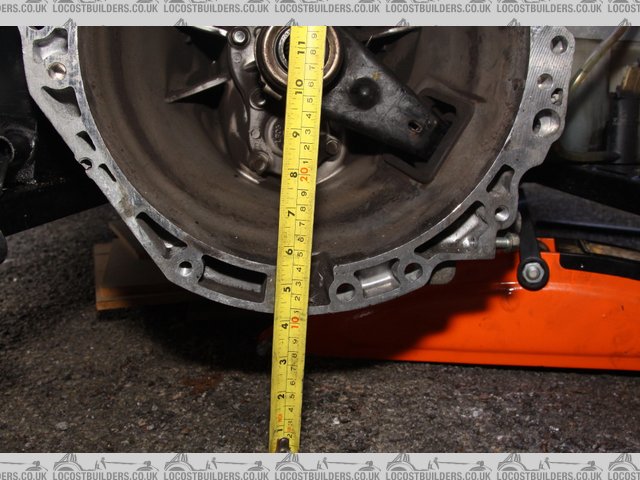
Description
In that position, the ground to the mounting hole near the starter motor is around 430mm

Description
On the engine, that hole to the top of the engine (Oil filler) is around 280mm. From the ground to the bonnet is around 710-720mm. So there will be a
very small amount of clearance, but I'm wondering if the 10* tilt would be enough to save a centimetre or two. I'll find out when it goes
in. I can probably shave 5mm off the plastic oil filler cap if it comes down to it.
The front of the bell housing to the back of the suspension springs is 530mm. The engine is 490mm from the pulleys to the bell housing. That gives
some space, but I'm going to need around 560mm to be able to split the engine and gearbox in the car. PJay and I had some trouble getting the
engine and box into the car in one piece, but that might be different with the knobbly bits ground off. The Type 9 chassis brackets are too far
forward so I'll have to put some new ones on further back.
Now that I know I'm using the MX5 box, I'm going to order a Raceline sump for Mazda use. I've got some ARP con rod bolts and new big
end bearings, so I can probably fit all of those at the same time. I'm thinking of a Raceline horizontal oil filter housing but I'll wait
and see on that one. The Duratec Fury on JPSC had the standard housing but the chassis had a notch cut out in it. I don't like the idea of
removing the whole engine to change the oil filter.
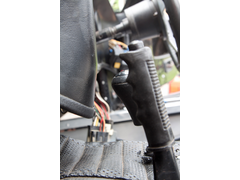
The MX5 uses a hydraulic clutch, but it has an external slave cylinder pushing a lever from the front. I'm planning on keeping my cable clutch
but I would need to make up a bracket to put the cable behind the lever in order to pull it. There's plenty of clearance to the bulkhead on the
passenger side.
Description
Furyous - 30/1/12 at 04:48 PM
Update!
Big thanks to pjay for helping out yesterday and lending me his engine crane.
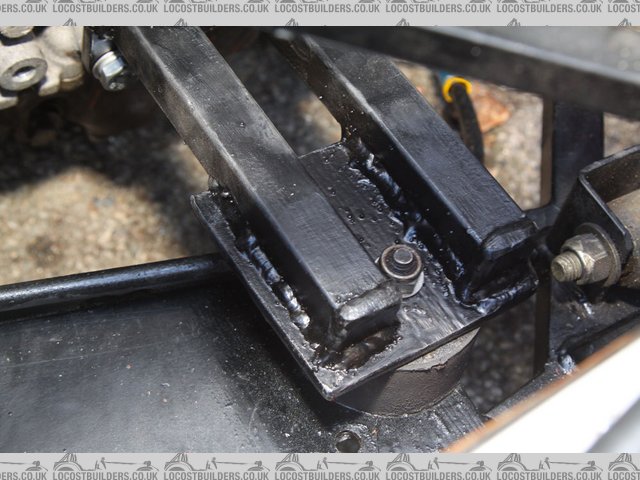
We worked on getting the engine into place. I eventually tacked up some engine mounts and I finished welding them today. They're not the
prettiest welds, but they should hold.
Description
Description
The standard sump has 3" ground clearance. Raceline are going to be about 4 weeks with getting some 10* short sumps in stock, so that will have
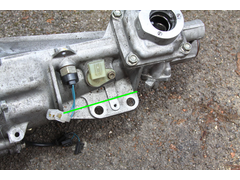
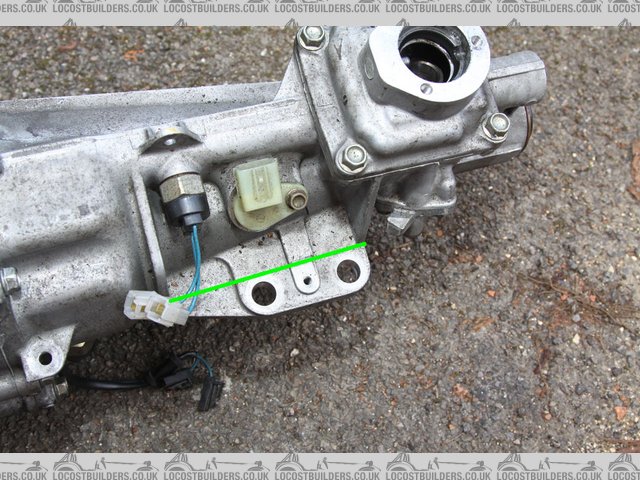
to wait until I'm back from New Zealand in June. The green line shows roughly where I think the shortened sump will come. I should have 4"
clearance to the bottom of the bell housing then.


Description
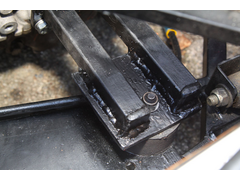
This is my nice, strong transmission mount.
Description
I'm trying to work out how to mount it properly. The bottom of the gearbox mount is almost level with the bottom of the car. I was thinking of
putting some brackets at the top of the chassis rail, then have some rubber mounts going downwards to a steel plate, which would be bolted into the
gear box. I could do with some suggestions on that.
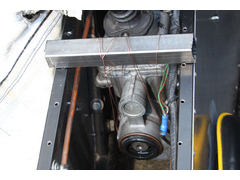
The bonnet clearance is just right, although the cam position sensor is too high. The back of the gearbox will go down a little when it's
properly mounted anyway, so it should drop the back of the engine down.
Description
Description
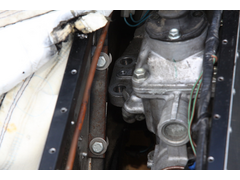
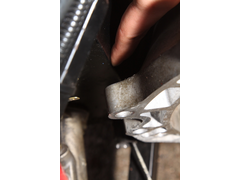
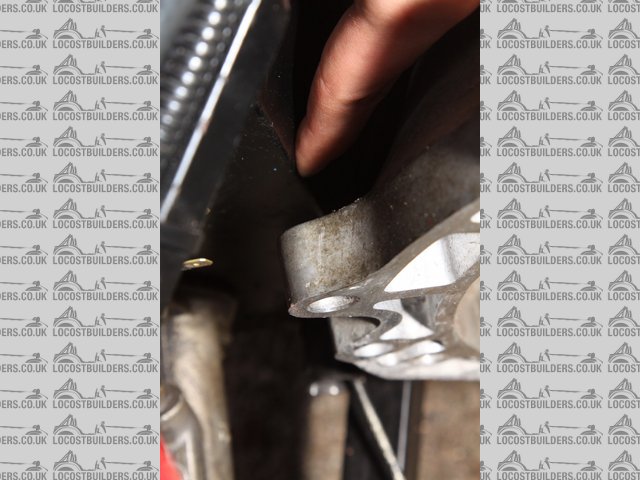
There's a chassis rail at the front of the engine which might cause problems if the Raceline sump comes straight down.
Looking at this photo, it seems like it's just the timing chain cover that's above the rail. The car is all tucked away now so I can't
easily go and see in person.
Description
Furyous - 21/6/12 at 09:23 PM
I've been back home for a few weeks and done some work on my car.
First job was to install some new rear lights. I didn't like the old ones where the brake and tail were on the same, dim bulb. So I've gone
for some LED rings. I don't have a photo but I have an inner pair with a tail light in the middle and a ring of LEDs around the outside which
double as brake and tail. Then I have an outer pair with indicators in the middle and brakes on the outer ring. I quite like them, and they're a
lot brighter. They need straightening up, though. The way the body angles points them downwards a little.
Once I had the lights in I was able to get the petrol tank back in and do some plumbing in the back. I've bolted a swirl pot behind the
driver's seat and a lift pump behind the passenger seat. I couldn't get a good photo but this one shows the swirl pot. The top pipe is a
return, which goes to the top of the tank. Top left is the return from the engine. Bottom right is the supply from the lift pump. There's a pipe
on the bottom that you can't see which goes to an 8mm supply line to the engine bay.
I'm going to put the HP pump in the engine bay to keep the high pressure section short. I still need to mount it.

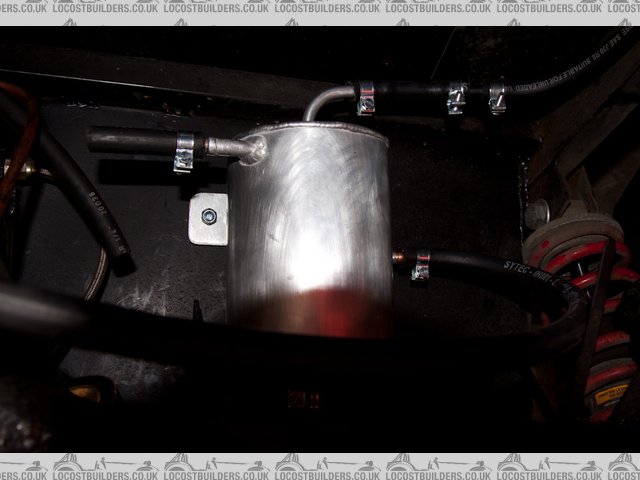
Description
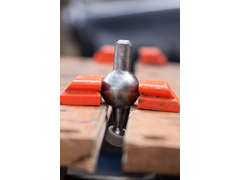
I had a problem with the MX5 gear box in that the gear stick was hitting the dashboard. I was trying to think of how to work around it because the MX5
stick has a thick top section pressed onto a narrow bottom section. You can see the thick black part on the photo higher up in the thread. It occurred
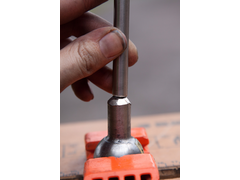
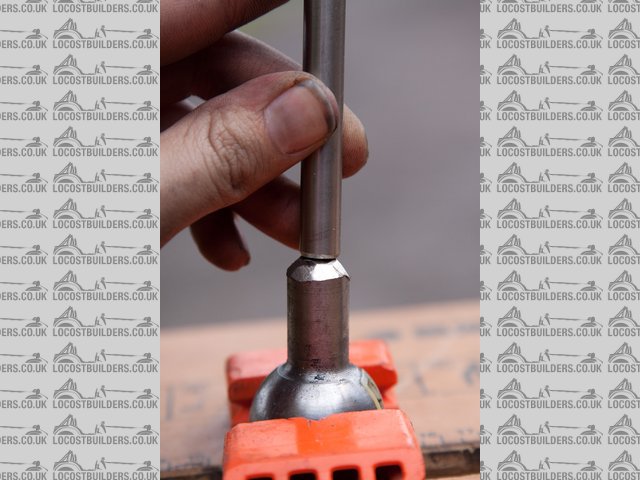
to me that I could just chop the stick off at the base and weld a steel rod onto it. So that's what I did.
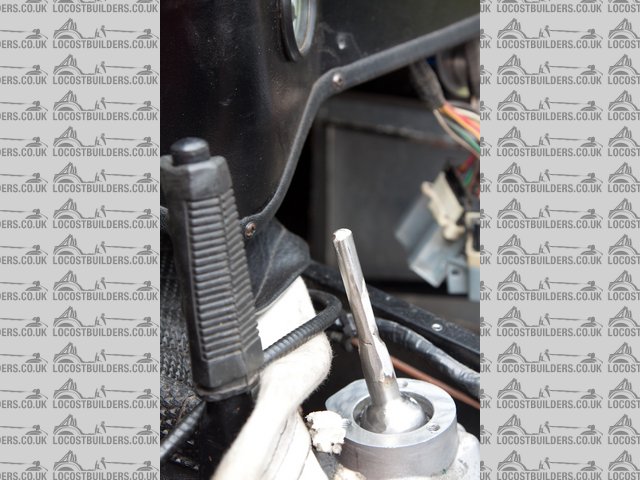
Cut near the base to keep the ball joint:

Description
Description
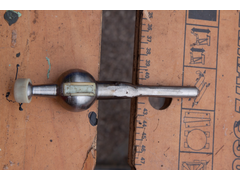
Ground it down to be fairly smooth (It will be hidden under a gaiter anyway)

Description
Trial pitted:
Description
My fingers still make contact with the dashboard but the knob will need to be pressed down about a centimetre more once it's all sorted, and that
should give me enough clearance.

Description
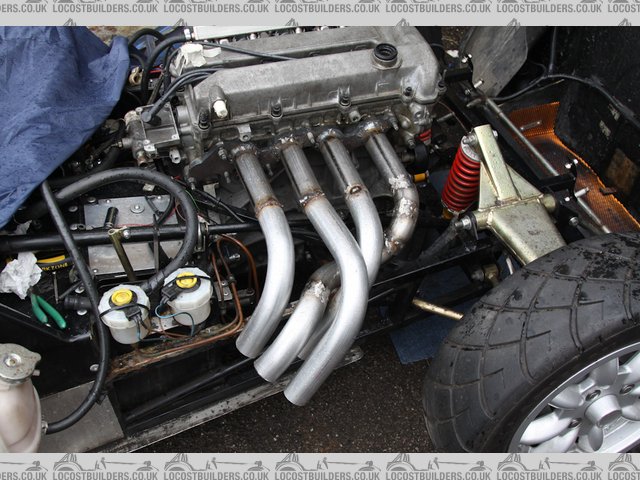
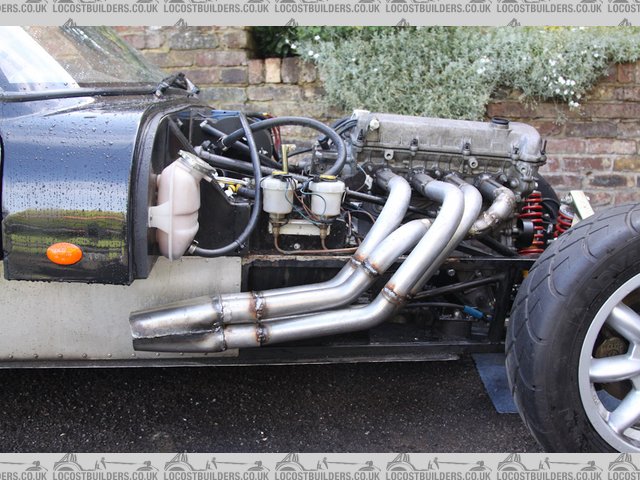
I bought a manifold kit from ebay but obviously it's meant for a 7. I couldn't work out how it would go together either way but I had to
chop it to fit in the Fury anyway. If cylinders 1 and 2 went straight out and over the chassis rail they would hit the wheel, so I've twisted
them around to go back before reaching the wheel arch. They're quite close to the arch so I think I'll have to chop the corner off the arch.
I wanted to get the manifold tacked into position before I took the engine back out, so it's not completely welded up yet. I'm going to
grind the welds down after then use a flap wheel to smooth them down some more. Top Tip: Just tack the pipes onto the flange while you make up the
rest of the pipes, then take them off the flange to grind them down smooth. I stupidly fully welded them on then went about making the rest of the
headers. Now I can't get all the way around the pipes to grind them down. I'll have to see if my dremel will fit.
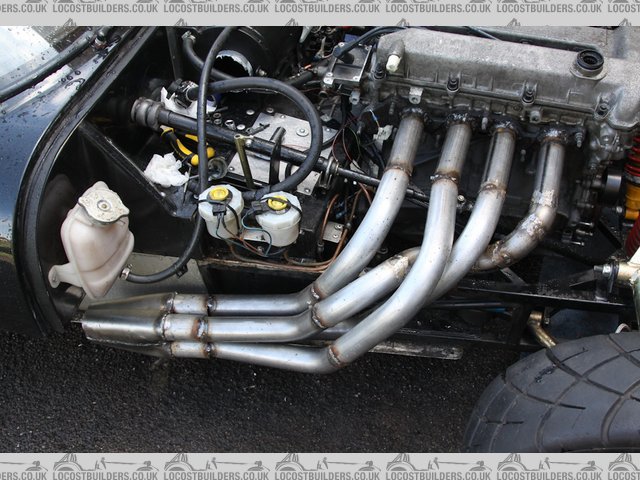
Headers 1-3 are within an inch in length but pipe 4 is about 4" shorter. If I had some spare bends I would try to make it a bit longer. In
hindsight, I should have made pipe 4 go to the outer part of the collector and pipe 1 go to the inner side.
Another point - I know the exhausts are close to the brake pipes. I'm still undecided about trying to adapt the MX5 box to use a clutch cable or
to go for a hydraulic system. If I go with hydraulic I might get some cylinders with an integrated reservoir.
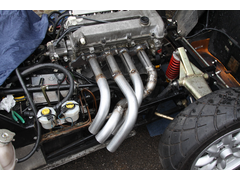
Description

Description

Description
Some of the welding I'm less embarrassed about showing:
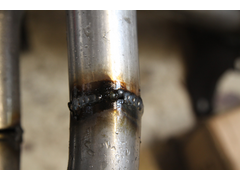
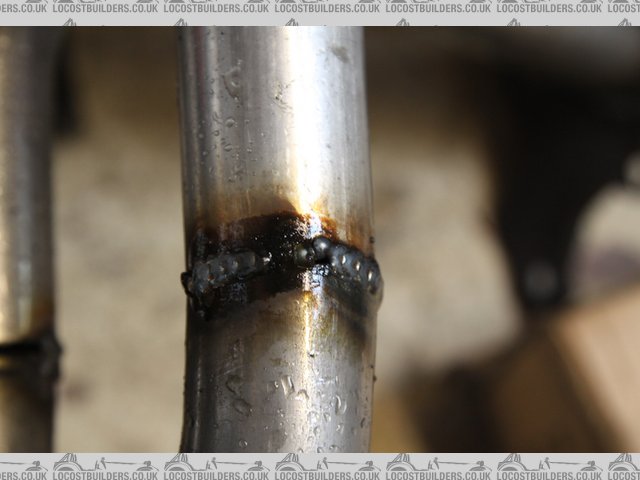
Description
(I can see the hole, it's not finished yet )
Tomorrow I'll get the timing chain cover off and see what's going on with the tensioner. Once I know it's the tensioner I can get one
ordered. On Sunday I'll swap the con rod bolts to ARP with pjay and maybe swap the con rod bearings depending on their condition. It might be too
awkward to replace just the con rod bearings without taking the whole crank shaft out, especially if they don't need doing.
I had been hoping to have it running next week before I go back to New Zealand but there's still a lot to do. At least I'm making progress.


