David Jenkins
|
| posted on 16/5/11 at 03:54 PM |

|
|
A new challenge for LocostBuilders!
Right - this forum hasn't yet failed to find a solution for other peoples' problems, so here's the ultimate challenge!
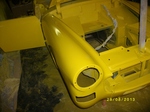
I have just spun an aluminium disc into a nice insert for my new horn button. Now that it's been painted a nice bright yellow to match my car,
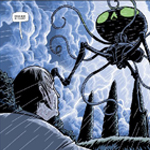
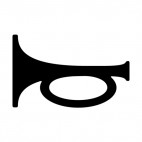
I want put a logo onto it before I give it its final clear protective coat... something like this (but very small)...
I may also include a fun image to reflect my wife's nickname for the car (The Frog):

So my question is - how could I get a computer image onto something like a water-slide transfer?
UPDATE: Is that water-slide transfer paper for inkjet printers any good?
[Edited on 16/5/11 by David Jenkins]
|
|
|
|
|
RACER101
|
| posted on 16/5/11 at 04:06 PM |
|
|
How about a self adhesive one? Any high street graphics/sign maker will be able to make one up if you have a .jpeg image (or similar).
Peel off the backing, stick it on, peel off the cover sheet and Bobs your Aunty Mary!
Probably cost very little to do and you will almost certainly get a few spares too.
Just a thought.
Cheers.
|
|
|
AndyW
|
| posted on 16/5/11 at 04:09 PM |
|
|
these do ink jet printable transfers which you then soak in water and apply.
linky
hope thats the thing you mean.....
|
|
|
Irony
|
| posted on 16/5/11 at 04:12 PM |
|
|
You could vinyl cut a teeny weeny vinyl cut horn I suppose but teeny tiny vinyl cut things sometimes can be a bit funny and the vinyl is very easy to
deform being as it so small. The logos will be bent out of shape when applying but it could be done with a few attempts. I would recommend cheap
vinyl over good quality as it tends to be more brittle and therefor less likely to deform.
You could also digitally print a horn onto clear vinyl and shape cut it to the exact size of the button. So in essence a small clear disc with a horn
printed on it that stick over the whole button.
[Edited on 16/5/11 by Irony]
|
|
|
trextr7monkey
|
| posted on 16/5/11 at 04:15 PM |
|
|
You could have the whole image pinted onto an aluminium disc (has to be coated with polyester) by dye sublimation then if necessary for stregth stick
it to a thicker bit of plate underneath. I 'd offer to doit here but the printer is foo kd and can't afford a new one this week. If you
are interested in the process have a look onthe Mega (electronics) website and they have videos and examples etc, we have some offcuts of the ali
which would easily go in a steering wheel centre.
Your frog along withy our wife's name could be done in same way.
The black horn sticker is straight forward although you could make a stencil then paint it on with enamel which might be more durable than vinyl, if
there's no one local we could cut either option ,
atb
Mike
http://www.flickr.com/photos/14016102@N00/ (cut and paste this dodgey link)
Our most recent pics are here:
http://s129.photobucket.com/albums/p211/trextr7monkey/
|
|
|
blakep82
|
| posted on 16/5/11 at 04:18 PM |
|
|
inkjet water will normally run if it gets wet, which it almost definitely will
________________________
IVA manual link http://www.businesslink.gov.uk/bdotg/action/detail?type=RESOURCES&itemId=1081997083
don't write OT on a new thread title, you're creating the topic, everything you write is very much ON topic!
|
|
|
jollygreengiant
|
| posted on 16/5/11 at 04:26 PM |
|
|
2nd picture or cartoon would have been better if it was a frog blowing a horn/bugle.
A Frog-horn.
Beware of the Goldfish in the tulip mines. The ONLY defence against them is smoking peanut butter sandwiches.
|
|
|
Doctor Derek Doctors
|
| posted on 16/5/11 at 04:28 PM |
|
|
Could you not get the Aluminum laser-etched? Would be very very cool.
|
NOTE:This user is registered as a LocostBuilders trader and may offer commercial services to other users
|
iank
|
| posted on 16/5/11 at 04:37 PM |
|
|
Get it engraved, buy a kiln and then enamel it.....
 Only joking Only joking
--
Never argue with an idiot. They drag you down to their level, then beat you with experience.
Anonymous
|
|
|
David Jenkins
|
| posted on 16/5/11 at 05:45 PM |
|
|
quote:
Originally posted by blakep82
inkjet water will normally run if it gets wet, which it almost definitely will
Once the transfer film has been printed, the artwork is sprayed over with varnish - stops the water dissolving the inks.
I might get a couple of sheets of the slide transfer paper, just to try it out. I intend to cover it all with Plastikote clear protective spray when
I've finished, so hopefully it will be durable.
|
|
|
r1_pete
|
| posted on 16/5/11 at 06:14 PM |
|
|
How about printing the image, laminating it, gluing it to the disc, finally plasticote the whole thing to seal it.
|
|
|
steve m
|
| posted on 16/5/11 at 06:17 PM |
|
|
Print the picture to the size you want, on normal paper
then paint clear nail varnish over the piccy, 3-4 coats
allow to dry
immerse in water and allow to soak, for a while
remove and rub the paper off the nail varnish, most will come anyway
you now have a perfect image in colour to mount were ever you want
It always worked when i did it to "custom" my motor bikes!!
|
|
|
Daddylonglegs
|
| posted on 16/5/11 at 07:19 PM |
|
|
I agree with the Frog blowing a bugle idea. Also, when you've done th epicture, why not use some of that resin stuff that folks use to make
paperweights?
It looks like the Midget is winning at the moment......
|
|
|
David Jenkins
|
| posted on 16/5/11 at 08:22 PM |
|
|
The button badge is already made - spun out of aluminium this afternoon. It's also painted to match the car!
So it's just the picture/artwork/logo, then a coat of clear stuff.
|
|
|
Neville Jones
|
| posted on 16/5/11 at 08:58 PM |
|
|
You could have the image printed straight on using the 'hot metal foil' system or whatever the name is. They use it to print your own
images onto cups and similar.
There's p[eople advertise on ebay who do it.
Cheers,
Nev.
|
|
|
David Jenkins
|
| posted on 23/5/11 at 06:20 PM |
|
|
Just to round this topic off - here's what I ended up doing (I've mentioned this elsewhere, but I thought I might as well give info here
as well)
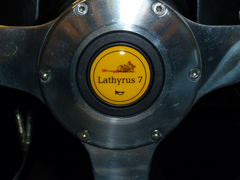 
Horn logo
This is an aluminium button cover spun out of 1.5mm sheet, sprayed with aluminium primer, white primer, yellow cellulose paint and clear lacquer.
The design was printed onto lazertran water-slide transfer paper using my HP inkjet printer. The advantage of
this brand of inkjet transfer paper is that you don't have to spray it with varnish before cutting the images out and applying them - the
transfers are waterproof if allowed to dry for at least 30 minutes.
The oddity with this brand is that the applied transfers end up with a white background once they dry. If you want a white background then you have
to finish off with a water-based spray varnish, but if you want a transparent background then you must use an oil or spirit based varnish (which is
what I did). Other brands come with white or clear backgrounds from the start - but they require a coating of varnish before cutting out and
applying.
I'm very happy with the result - with the added bonus that if I get bored with the image I can sand it all off and do something else! 
|
|
|
steve m
|
| posted on 23/5/11 at 06:34 PM |
|
|
So not that different to my idea of clear nail varnish?
oopps, and it does look good
[Edited on 23/5/11 by steve m]
|
|
|
iank
|
| posted on 23/5/11 at 06:44 PM |
|
|
Came out really well
--
Never argue with an idiot. They drag you down to their level, then beat you with experience.
Anonymous
|
|
|
David Jenkins
|
| posted on 23/5/11 at 07:09 PM |
|
|
My next plan is to do a similar logo for a nose badge (that's the car's nose, not mine! )
...without the horn symbol, of course...
|
|
|