Humbug
|
| posted on 11/9/05 at 08:40 PM |

|
|
Front suspension covers, etc.
Thought I would just pass on what I have done to keep the man with the soft balls happy...
A - half one of the flexi rubber tubes that protects wires going from the body to the door (Metro)
B - rubber cut from Metro door seal and glued round spring adjuster ring
C - bolthead covers from Mac#1 (domed)
D - Rubber "ferrule" with a hole cut in the end
E - wiring sleeve from between Metro body and tailgate
F - hose split and stuck with PU adhesive
G - leftover bits of self-adhesive edge trim
H - NOT SURE WHETHER I NEED TO COVER UP THIS FOR SVA? IT IS FOR THE HEADLIGHT CASING
X - Nut cover (from Tifosi) - I had to cut some of these down as they tend to pop off bolt
heads.jpg)
|
|
|
|
|
RoadkillUK
|
| posted on 11/9/05 at 09:50 PM |

|
|
Mine failed on the upright itself.

(yes I know it says 'less that' 
Roadkill - Lee
www.bradford7.co.uk
Latest Picture (14 Sept 2014)
|
|
|
wilkingj
|
| posted on 11/9/05 at 09:58 PM |

|
|
Excellent... Thanks for the great ideas and info.. 

1. The point of a journey is not to arrive.
2. Never take life seriously. Nobody gets out alive anyway.
Best Regards
Geoff
http://www.v8viento.co.uk
|
|
|
MikeR
|
| posted on 11/9/05 at 11:07 PM |

|
|
Roadkill - silly question, how did you get round the upright problem? Stick something on or grind some metal off ?
|
|
|
Petemate
|
| posted on 12/9/05 at 12:04 AM |

|
|
Hi Roadkill
Strange that the uprights failed on the sharp edges. Mine were exactly the same, but I can only assume he didn't fail them 'cos they are
inside the wheel rim. Hmmmm. Interesting....
Pete
|
|
|
RoadkillUK
|
| posted on 12/9/05 at 12:30 AM |

|
|
Ground them down and painted 'em. Only took a little off to comply with radius.
Roadkill - Lee
www.bradford7.co.uk
Latest Picture (14 Sept 2014)
|
|
|
Humbug
|
| posted on 12/9/05 at 05:43 AM |

|
|
So, anyone any thoughts on whether I need to cover the headlight casing screw head (H in my original pic)?
|
|
|
NS Dev
|
| posted on 12/9/05 at 11:49 AM |

|
|
quote:
Originally posted by MikeR
Roadkill - silly question, how did you get round the upright problem? Stick something on or grind some metal off ?
I radiused mine when I stripped the uprights Mike.
|
|
|
Humbug
|
| posted on 12/9/05 at 02:21 PM |

|
|
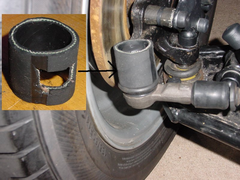
To avoid a) SVA problems and b) having to grind off bits of the upright I came up with this solution: a section of 32mm i/d coolant hose with a slot
cut in it, slipped over the upright then the track rod end joint refitted. Hey presto!... not sure if it might "fall off" after the test,
though
 
Rescued attachment 2005-09-12 2 Locost shroud for bottom of front upright fitted.jpg
|
|
|


