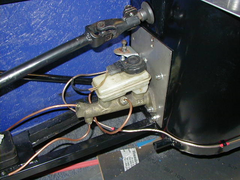
Brake Pedal Help Please
VinceGledhill - 13/10/03 at 08:57 AM
I've bought the pedal assembiles from MK and also bought the brackets that fix them to the chassis.
Martin showed me where to fix them to the chassis and even loaned me a felt tip pen to write A,B,C on the brackets and pedals.
I have found a solution to the clutch and accelerator but what about the brake? I don't know how far up from the pivot point to drill. Nor do I
have a clue how to attach this to the master cylinder. I have a Sierra master cylinder and my plan was to use this without the servo.
Please could someone let me know the solution.
Thanks in advance
stephen_gusterson - 13/10/03 at 09:04 AM
there is a very recent thread covering brake pedals (by ned) put up recently.
atb
steve
VinceGledhill - 13/10/03 at 10:04 AM
Thanks steve. I've read the post by Ned but was looking for some more specifics about mounting the master cylinder and fabricating the bracketry
to the push rod etc. Or even a picture (Mark?)
JoelP - 13/10/03 at 10:10 AM
can't do pictures myself but put the pedal in the other day, admittedly not a standard chassis but near enough.
the sierra MC aims upward a bit, so i put in two off-vertical inch tubes, drilled holes an bolted the MC in. angled so that the resevoir is level. the
pedal is top mounted, 5 to 1 ish ratio, carefully done so that the sweep of the pedal stays in a roughly straight line into the MC, if you see what i
mean. i used the rod from the original, by cutting it out of the servo. lost the end in the process but it still works fine, just doesnt sit in the MC
as well. quite tricky to describe actually. also had another bracket type thing at the pivot point so that the rod wasnt bent as the angle of the
pedal changes.
feel free to come down to have a look anyway... 
[Edited on 13/10/03 by JoelP]
VinceGledhill - 13/10/03 at 10:39 AM
Where in Leeds are you Joel? Have I asked this before.... ?? Can't remember. head's a shed... If you give me a call on the mobile 07736
202101 I'll call you back.
James - 13/10/03 at 10:42 AM
Vince,
Look for a post about 2/3 months ago started by Mark Allanson about doing his with Sierra stuff. Judging by his description he did it much the same as
me ie. just using bits chopped out of the servo etc.
HTH,
James
macspeedy - 13/10/03 at 10:53 AM
here is how bob did it i will post a pic soon of the setup i used.


Rescued attachment bobs master cylinder mount and cable routes.jpg
VinceGledhill - 13/10/03 at 11:13 AM
Thanks Guys. Looks like I'm getting the angle grinder to the servo this evening. It's a 9 inch... take no prisoners... rattle the whole
neighbourhoods teeth kind of a thing. Should be fun.... and noisey.... can't wait now.
JoelP - 13/10/03 at 12:36 PM
did anyone out there get the bar out of the servo in one piece? i opened it with plyers, but couldnt get the last bit apart so just chopped it off...
lost the last inch that goes into the MC.
James - 13/10/03 at 01:12 PM
quote:
Originally posted by JoelP
did anyone out there get the bar out of the servo in one piece? i opened it with plyers, but couldnt get the last bit apart so just chopped it off...
lost the last inch that goes into the MC.
Yeah, came out fine IIRC.
I just cut all the way round the outside of the drum to get it into two discs. I seem to remeber cutting the springs apart to get it all apart but
that's all I think.
I was really pleased with the way it all worked out. I used the short push rod from the servo (with the adjustable length end) and cut the other end
(little ali disc thing) off. This left a small 'pin' for which I drilled a corresponding hole into the threaded end of the Micra clevis pin.
I welded the two together and voila!
This way it's position is adjustable because of the Micra having the adjustable portion of the clevis pin and it's length is adjustable with
the Sierra screw in end.
I made a plate to mount it that's welded to the chassis and I cut out the plastic cup shape of the servo to keep the m/c barrel clean.
First bit that's gone well! 
James


