kevyo89
|
| posted on 9/1/19 at 03:24 PM |

|
|
Locost Wishbone revisions - anyone point me in the right direction
I've spent almost every free minute on this forum in advance of my build beginning this week. I've seen so many people say about
'fixes' to the Ron Champion book (I have the Second edition).
I am certain that I've come across these already but now my head is pickled. Can anyone point me to a definitive list of the Ron Champion locost
fixes or specifically, the revision relevant to the front wishbones as that's my first job when my second hand 'Unfinished project'
chassis arrives?
Thanks in advance 
|
|
|
|
|
big_wasa
|
| posted on 9/1/19 at 05:20 PM |

|
|
It’s the top wishbones. To get the needed castor (7 deg rings a bell) the joint needs setting back from the center line ( 22mm rings a bell again
).
Good old uncle Ron managed to half this in the book drawings.
Trouble is, with a simple “V” style wishbone, the further back you push it the harder it is to get the shock absorber through and anywhere near the
middle of the bottom wishbone. A bent U shaped wishbone makes it easier as does the more unusual and thinner 1.9” shocks.
2.25” fit but it’s a little more work lining it all up.
|
|
|
Angel Acevedo
|
| posted on 9/1/19 at 05:39 PM |

|
|
I went for two straight tubes coming out of the Tubes that hold the Bushings and then the V tubes that hold The threaded insert where the Upper
Balljoint (TRE) screws.
I am sure I´ve seen an example here, but can´t seem to find it.
They were a b!tch to fabricate, but with a little bit of patience they are doable.
For sure someone may chime in with picture later.
HTH
Beware of what you wish.. for it may come true....
|
|
|
kevyo89
|
| posted on 9/1/19 at 06:58 PM |

|
|
quote:
Originally posted by big_wasa
It’s the top wishbones. To get the needed castor (7 deg rings a bell) the joint needs setting back from the center line ( 22mm rings a bell again
).
Good old uncle Ron managed to half this in the book drawings.
Trouble is, with a simple “V” style wishbone, the further back you push it the harder it is to get the shock absorber through and anywhere near the
middle of the bottom wishbone. A bent U shaped wishbone makes it easier as does the more unusual and thinner 1.9” shocks.
2.25” fit but it’s a little more work lining it all up.
Any links to plans?
|
|
|
big_wasa
|
| posted on 9/1/19 at 07:07 PM |

|
|
Have you got the book ?
Where it tells you to put the bush 11mm off center it’s actually 22mm. Infact I rounded mine up to 25mm.
Thing is the photo attachment thing on here is broken, I removed most of my pictures when I sold the car, I built it 15 years ago, all my photos are
on a Cd and I don’t currently have any pc with a cd rom.
If you have a look at the photo archive of a guy called 907 he has some photos that may explain a little better.
|
|
|
kevyo89
|
| posted on 9/1/19 at 07:41 PM |

|
|
quote:
Originally posted by big_wasa
Have you got the book ?
Where it tells you to put the bush 11mm off center it’s actually 22mm. Infact I rounded mine up to 25mm.
Thing is the photo attachment thing on here is broken, I removed most of my pictures when I sold the car, I built it 15 years ago, all my photos are
on a Cd and I don’t currently have any pc with a cd rom.
If you have a look at the photo archive of a guy called 907 he has some photos that may explain a little better.
Thank you mate, I will have a look around now. I replied to you again in my other thread about lengthening the Locost front arms - I just asked how
you meant about moving the steering rack to suit? Do you just mean to ensure that the steering arms are parallel with the wishone bushes?
|
|
|
MikeRJ
|
| posted on 9/1/19 at 07:46 PM |

|
|
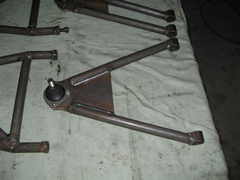
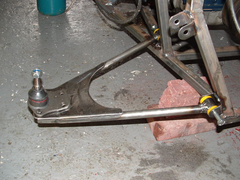
The original book design lower wishbones were also pretty dodgy. The straight rear edge on the shock mounting plate creates a big stress raiser that
has resulted in a number of wishbone failures. The rear edge should have a large radius to reduce the stress in the tubes.
Bad:
 
Description
Better:
 
Start of the front suspension.
|
|
|
big_wasa
|
| posted on 9/1/19 at 07:54 PM |

|
|
The rack is to long for the chassis so you get bump steer but by moving the rack up/down forwards/backwards you can move the affect to beyond the
normal travel of the shocks.
The way I did it,
Attach a laser to the cortina stub axle, remove the spring from the shock.
Point the laser at some card on the wall.
Move the axle through it’s full travel from full droop to full bump in small bits and plot the laser on the card with a pen.
You will see at some point it’s not a straight line and the stub axle will move forwards or backwards. This is bump steer.
You then pack washers under the rack moving it and repeat.
The aim is get the rack in a position so during normal travel of the shock you avoid bump steer. If it goes in or out dramatically out side of this
range it wont afect the handling.
|
|
|
kevyo89
|
| posted on 9/1/19 at 08:09 PM |

|
|
quote:
Originally posted by big_wasa
The rack is to long for the chassis so you get bump steer but by moving the rack up/down forwards/backwards you can move the affect to beyond the
normal travel of the shocks.
The way I did it,
Attach a laser to the cortina stub axle, remove the spring from the shock.
Point the laser at some card on the wall.
Move the axle through it’s full travel from full droop to full bump in small bits and plot the laser on the card with a pen.
You will see at some point it’s not a straight line and the stub axle will move forwards or backwards. This is bump steer.
You then pack washers under the rack moving it and repeat.
The aim is get the rack in a position so during normal travel of the shock you avoid bump steer. If it goes in or out dramatically out side of this
range it wont afect the handling.
Great advice mate, thank you for your help! I will come back when confused! Lol
|
|
|


