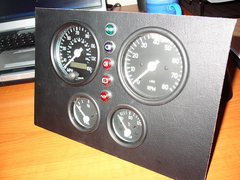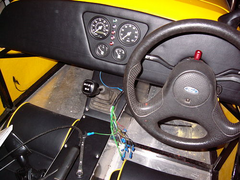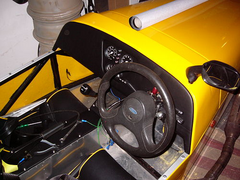
Finished my dashboard - comments please
nick205 - 17/8/06 at 08:01 AM
Well after this thread...
http://www.locostbuilders.co.uk/viewthread.php?tid=49187
I finally got my thumb out of my arse and got on with making my own dashboard.
Thanks in particular to "Zetec" who offered some good advice and pointers on how to tackle it.
Here are the results, which I'm quite pleased with - your comments good or bad are welcomed 


Rescued attachment dash-1.jpg
nick205 - 17/8/06 at 08:02 AM
and another...
nick205 - 17/8/06 at 08:02 AM
oops...


Rescued attachment dash-2.jpg
nick205 - 17/8/06 at 08:04 AM
and finally...
Instruments from ETB
Lights from SVC
Vinyl and spray glue from Woolies Plywood from B&Q


Rescued attachment dash-3.jpg
muzchap - 17/8/06 at 08:46 AM
Agreed - some excellent craftmanship there! 
I loved getting my dash finished and in - just seemed like a major step forward 
nick205 - 17/8/06 at 08:48 AM
Hi Mark - thanks for your feedback!
Yes, the flat bottom is due to the position of the gearstick, but I may make another panel that sits vertically between the bottom of the dash and top
of the tunnel.
All the wiring is completely hidden behind ally panelling under the dash, with the fuse box and relays mounted above the tunnel out the way of knees
and SVA balls etc, so should be OK.
The bottom edge is made from 2 x 18mm quadrant strips of wood glued together then glued to the dash panel. The 3mm foam padding and vinyl covering
means the finished dash has a padded 20mm rad on the bottom edge - should keep Mr SVA happy 
Muzchap - definately a big step and I did have to sit in the car, with the harnesses on just to savour the moment 
[Edited on 17/8/06 by nick205]
cryoman1965 - 17/8/06 at 08:56 AM
Very nice Nick. Puts mine to shame
You cant be far away now.
How long till you get your sva. Do you think we could get a trip out this year?
ATB
Cheers Nige
mookaloid - 17/8/06 at 08:58 AM
Very smart
How did you fasten it to the scuttle?
Cheers
Mark
nick205 - 17/8/06 at 09:18 AM
Nige - looking to send off SVA paperwork in the next week or so. Hopefully we can catch the end of the summer for a couple of blats round the
hampshire countryside 
Mark - it's not secured yet, but will be bolted to the scuttle with M6 dome head socket caps, same as the trimmed panels on the top of the
tunnel.
nick205 - 17/8/06 at 09:34 AM
The same method Zetec used and described.
I kind of like the bolted look though and will be using top quality stainless fastners so should stay looking good 
Danozeman - 17/8/06 at 12:54 PM
I was making mine last night. Those have put mine to shame. Will post a piccie when i get home if i get time.
zetec7 - 17/8/06 at 05:14 PM
As I am something of a purist (no digital dash things for me, thank you), and old-fashioned (proper gauges have black faces, white numbers and white
needles, thank you very much!), I like your dash!!! It looks RIGHT. Now then, where did you get the gauges??? (I'm from the Great White
North, and guages like that are rare hereabouts...). Thanks...


quinnj3 - 17/8/06 at 06:34 PM
hi i think it looks smart, tidy, clear and functional. No glitery bits just a very nice clean job. Excellent
nick205 - 18/8/06 at 07:59 AM
Zetec 7 - the guages are from ETB Instruments and can be bought with a variety of coloured faces and
finishes. Not cheap, but not expensive when you see how well made they are either. Excellent customer service and support and very fast mail order
service.
HTH Nick
02GF74 - 18/8/06 at 08:41 AM
where's the fuel guage? 
zetec - 18/8/06 at 02:56 PM
Well done mate looks first class, will really finish the car off.
Shamrock GS - 28/8/06 at 09:14 PM
Where did you get the 3mm foam from?
Gary
nick205 - 15/9/06 at 01:35 PM
Gary - had the foam out of my dad's workshop, but you can get it from Woolies (doa google for woolies for trim) or you may get it from a fabric
shop too.


