Upholstery questions
Jasper - 22/7/08 at 03:29 PM
So the time has come to get busy with the interior.
I've got a solid plastic dash top, front and bottom to which I need to attach a foam layer and then the alcantara. So am I right in presuming the
following: Stick the foam lay down all over with spray adhesive, but only stick the alcantara to the wrapped around edges?
And will contact adhesive do the job properly? I presume it's best the rough up the smooth plastic finish first?
Anything else I should be doing? I'm going to make templates from old sheets first as I don't want to be wasting any of the alcanatara as
it's bloody expensive.....
BenB - 22/7/08 at 03:41 PM
Definately only use adhesive on the edges of the foam / alcantra join as planned otherwise you'll get horrible wrinkles.
Obviously it's worth checking that the foam and contact adhesive are compatible (timebond worked well for me). Keying the plastic makes sense to
get a good bond but it's only loosely holding the foam in place, it's not structural 
If you have cut-outs for dials etc make sure you don't cut the daggers to the very edge of the cut-out otherwise you may get a visable dagger and
/ or creasing.
Other than that it's just a matter of making sure you get a constant tension across the length and width of the dashboard.
Mr Whippy - 22/7/08 at 03:42 PM
if your using any vinyl read this -
http://www.locostbuilders.co.uk/viewthread.php?tid=91840
[Edited on 22/7/08 by Mr Whippy]
stevebubs - 22/7/08 at 06:56 PM
Pretty much as above
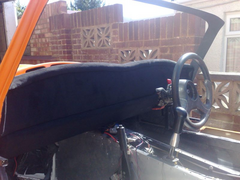
One I prepared Earlier...

stevebubs - 22/7/08 at 06:58 PM
FWIW, I used a faux alcantara material (was already foam backed) and the hardest part was keeping the material taut in order to avoid wrinkles
Oh.. and the convex and concave shape meant I had to put contact adhesive all over.
[Edited on 22/7/08 by stevebubs]
Shamrock GS - 22/7/08 at 07:29 PM
Watch the spray on adhesive. I used it on the foam which was fine but it goes soggy when its hot and can lift. Make sure the contact adhesive goes
over the foam and onto the back of the dash itself.
Cheers
Gary
austin man - 22/7/08 at 11:04 PM
Evo Stick, it works a treat ps you also get high as a kite if u wanna sniff it
Jasper - 23/7/08 at 07:36 AM
Thanks chaps, all really useful stuff... Steve, that dash looks great mate, hope mine turns out as well!
stevebubs - 23/7/08 at 09:32 AM
Cheers...here's a picture of the fitted article...

Jasper - 24/7/08 at 09:24 AM
It all went on very well indeed, just got to cut the holes out now. Thanks again 


Rescued attachment ABCD0002.JPG
stevebubs - 28/7/08 at 01:37 PM
Looking good!


