irvined
|
| posted on 17/12/09 at 10:09 PM |

|
|
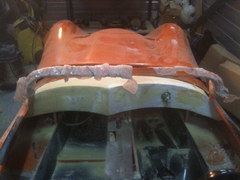
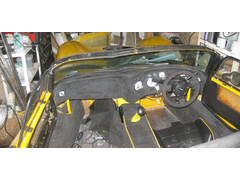
Dashboard Buck
Spent the evening in the garage making my own (Somewhat toxic and not very tasty) snow...
I used some polystyrene boards glued together with acrylic mastic (cheap no nails stuff.) to form the larger parts. It took a few attempts to get the
shape I wanted.
I then shaped it with an angle grinder and flap wheel to the rough shape, and used expanding foam to fill the gaps to the edges.
Then with more flap wheel action, then with a sanding wheel in the drill, and then by hand to do the final shaping and a bit of foam, I think I'm
getting pretty close to the final shape.
Once I've got the shape, then I'll cover it in duck tape, and release agent and create a dashboard from it. THe plan is not to make a mold,
just use the buck as the end result will be covered in Alcantara so surface imperfections and roughness isn't such a big problem.
What do you guys think on the shape (Obviously need to radius the edges a bit more. I've spent quite a few evenings sanding, and I quite like
it, but then again I could have just inhaled too much foam.
Cheers
David
Rescued attachment photo.jpg
http://irvined.blogspot.com
|
|
|
|
|
irvined
|
| posted on 17/12/09 at 10:12 PM |
|
|
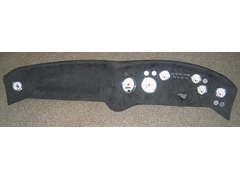
A closer shot
 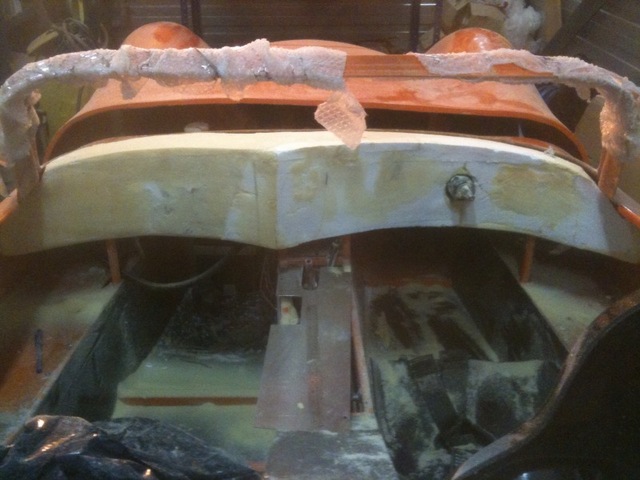
Rescued attachment photo2.jpg
http://irvined.blogspot.com
|
|
|
Andybarbet
|
| posted on 17/12/09 at 10:28 PM |
|
|
Looking tasty 
As you say your going to round off the sharp edges, it will really match the style of the car, lots of nice curves.
|
|
|
Nash
|
| posted on 17/12/09 at 10:36 PM |
|
|
I like that centre profile!
Looking forward to see it finished. How are you going to mount the clocks and guages?
...............Neil
It's What You Do Next That Counts.
Build It, Buy It, Drive It:
Southern Kit Car Club
|
|
|
adithorp
|
| posted on 17/12/09 at 10:50 PM |
|
|
Nice.
Seeing those pictures you might want to make a couple of props to push the 'screen top rail up. They sag and the 'screen won't fit
unless you push it up. It should have a much more pronounced arch.
adrian
"A witty saying proves nothing" Voltaire
http://jpsc.org.uk/forum/
|
|
|
stevebubs
|
| posted on 18/12/09 at 05:10 AM |
|
|
Looking good....here's one I prepared earlier for inspiration...
Rescued attachment SJDash2.jpg
|
|
|
irvined
|
| posted on 18/12/09 at 11:03 AM |
|
|
quote:
Originally posted by adithorp
Nice.
Seeing those pictures you might want to make a couple of props to push the 'screen top rail up. They sag and the 'screen won't fit
unless you push it up. It should have a much more pronounced arch.
adrian
Hi Adrian,
I Was wondering if i should do anything about that? do i need to heat it up a bit or is it just a case of using some wood or whatever and leaving it?
http://irvined.blogspot.com
|
|
|
irvined
|
| posted on 18/12/09 at 11:16 AM |
|
|
Not sure how im going to put the clocks, it depends on two things - the datalogger - as if it has a nice digital display i will probably use that,
mounted behind or on the wheel. Else the clocks will be offset to the left of the steering wheel on the curved bit.
I had originally planned to put vents there, but originally i had envisioned the center bit being more 'flat' and sticking forward a bit.
I need to do some more playing with cardboard cut outs.
Steve - I like your dash - what's it covered in and how did you attatch the fabric?
[Edited on 18/12/09 by irvined]
http://irvined.blogspot.com
|
|
|
stevebubs
|
| posted on 18/12/09 at 06:43 PM |
|
|
False Alcantara attached with contact adhesive...
Rescued attachment SJDash3.JPG
|
|
|
stevebubs
|
| posted on 18/12/09 at 06:44 PM |
|
|
Falsa Alcantara, Piping and Carpet sandwich..
 
Rescued attachment Interior 001.jpg
|
|
|
adithorp
|
| posted on 18/12/09 at 07:48 PM |
|
|
I just cut some lengths of roof lath and propped it up. You could apply a heat gun to it. I didn't and probably should have.
"A witty saying proves nothing" Voltaire
http://jpsc.org.uk/forum/
|
|
|