yellowcab
|
| posted on 13/4/13 at 04:43 PM |

|
|
Not much of an update really.
All ready to rock and roll with the car - first time I've been in the garage in a few weeks.
Got the tracking & basic geometry setup, so the rears are now parallel looking forward (nottowing out), and both have 1degree negative camber.
The fronts were also towing out horrendously, and now towing in by 1mm
Rear rosejointed arms are fantastic for that very slight adjustment - just can't wait to get it set up professionally.
Sytec inline fuel filter plumbed in and fitted, coolant pipes checked over, still have a slight oil leak from a couple of the dry sump pipes, but
nothing too serious.
Indicator stalk swapped over as I had a faulty one.
Just need braided lines now to go from my copper pipes to calipers, then it's on the road! waaahayyyy!
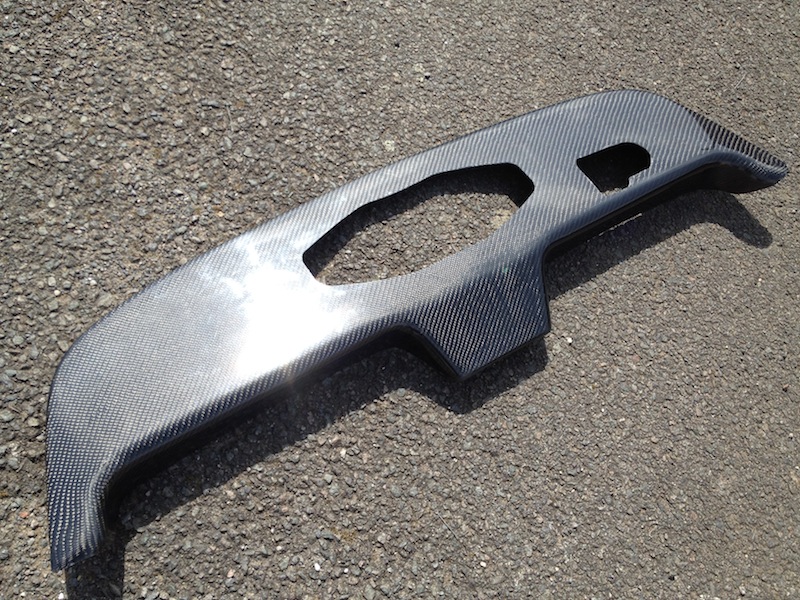
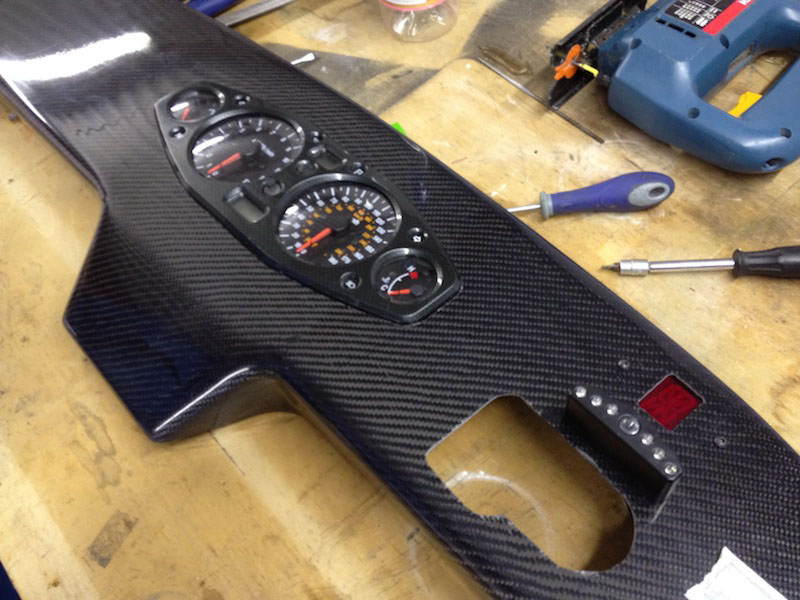
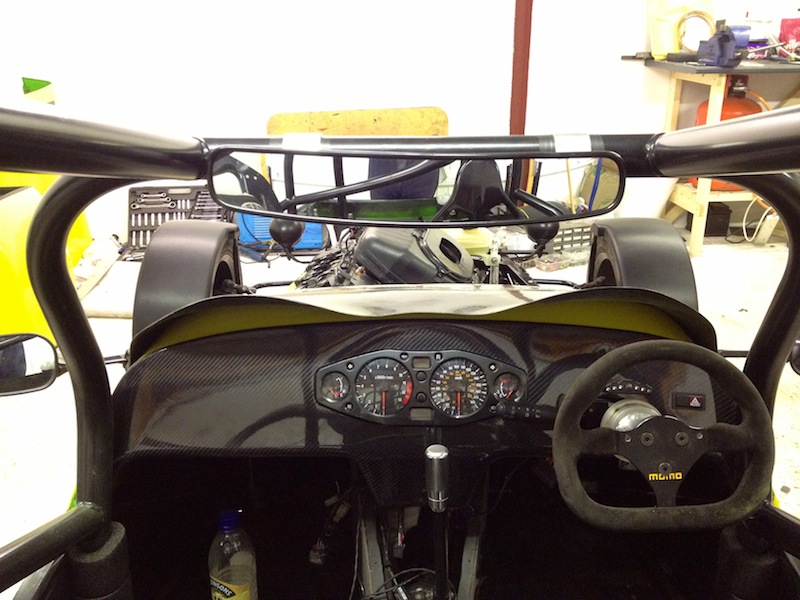
Got a new carbon dash from Danny Keenan @ MK Sportscar, just need to muster up the courage to cut it for the new clocks...
|
|
|
|
|
yellowcab
|
| posted on 13/4/13 at 04:50 PM |
|
|
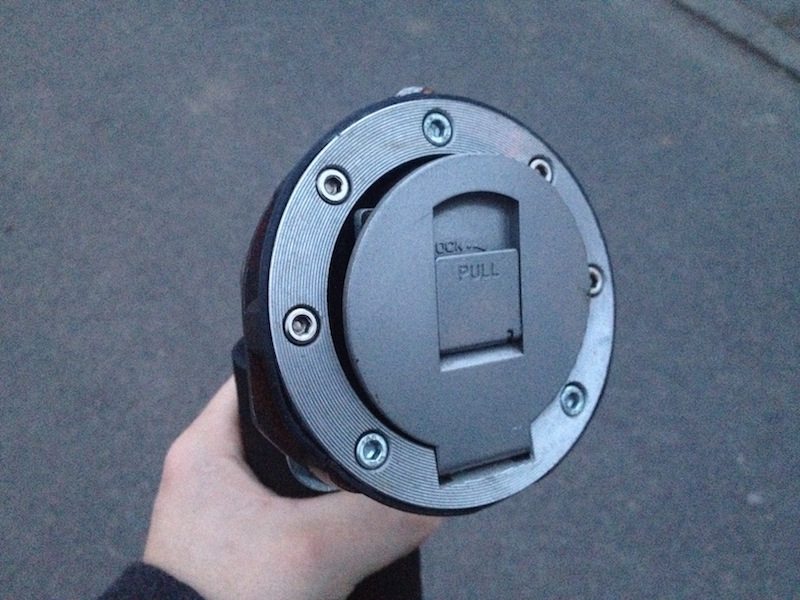
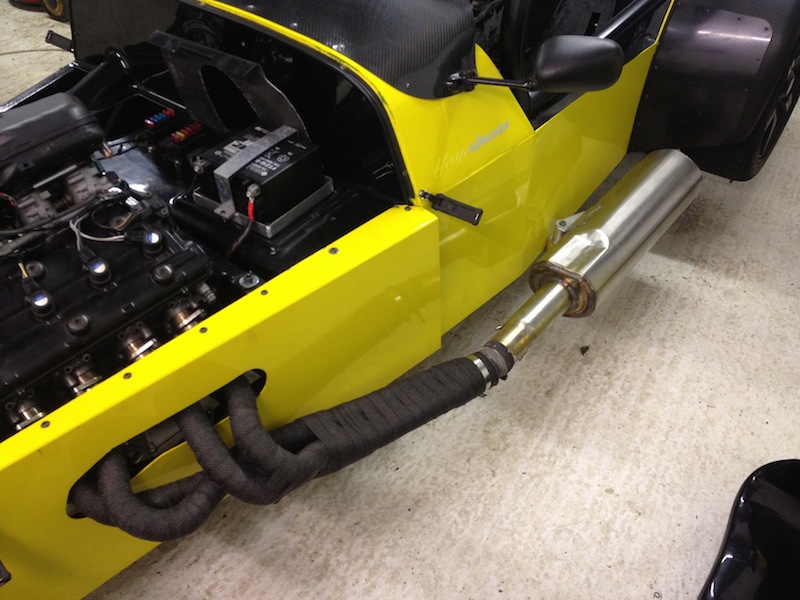
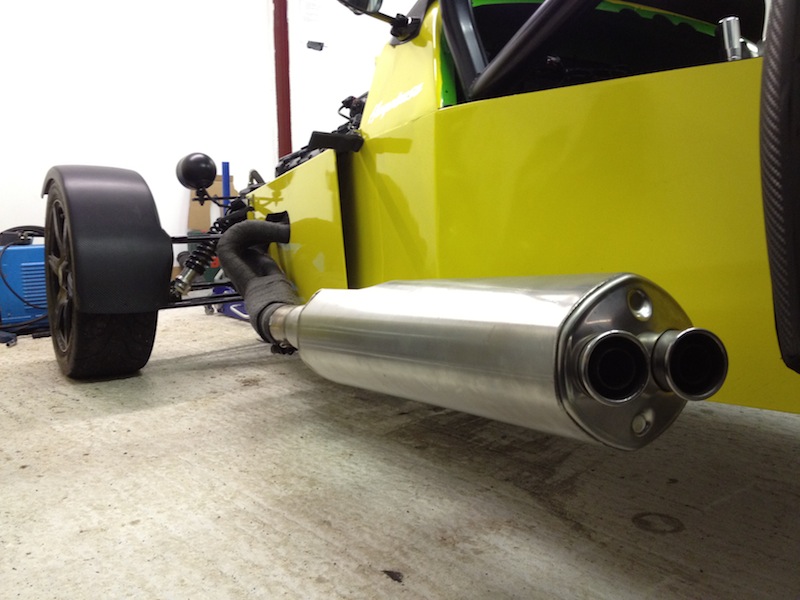
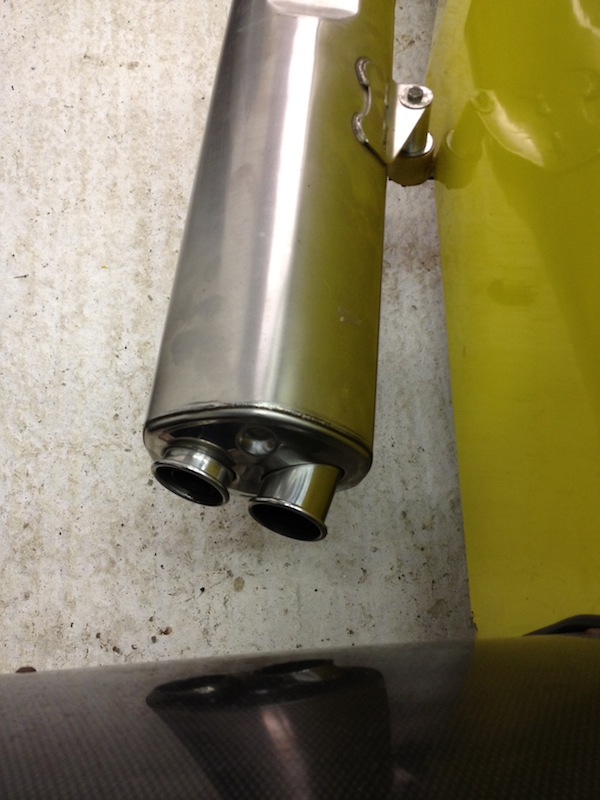
Couple of pics of the filler I bought from tank81, and also someone was asking about my exhaust, can & tailpipe angle, so here are a couple of
pics
|
|
|
Ben_Copeland
|
| posted on 13/4/13 at 05:08 PM |
|
|
Any idea what the fuel filler came off? Or what manufacture it is?
Ben
Locost Map on Google Maps
Z20LET Astra Turbo, into a Haynes
Roadster
Enter Your Details Here
http://www.facebook.com/EquinoxProducts for all your bodywork needs!
|
|
|
yellowcab
|
| posted on 13/4/13 at 05:11 PM |
|
|
Suzuki Hayabusa mate :-)
|
|
|
yellowcab
|
| posted on 14/4/13 at 06:42 PM |
|
|
Bit overkill on photos for such a simple job, but its the kind of photos I could have done with whilst doing it, and I couldn't find any,
anywhere, so thought I'd share how I achieved a simple (yet quiet satisfying) dashboard with Hayabusa clocks, sequential shift lights @ 10degree
angle LEDs, and a geartronics gear indicator, hidden, rather than ontop of dash...
It's all straight forward, but I enjoyed taking the photos along the way anyway.
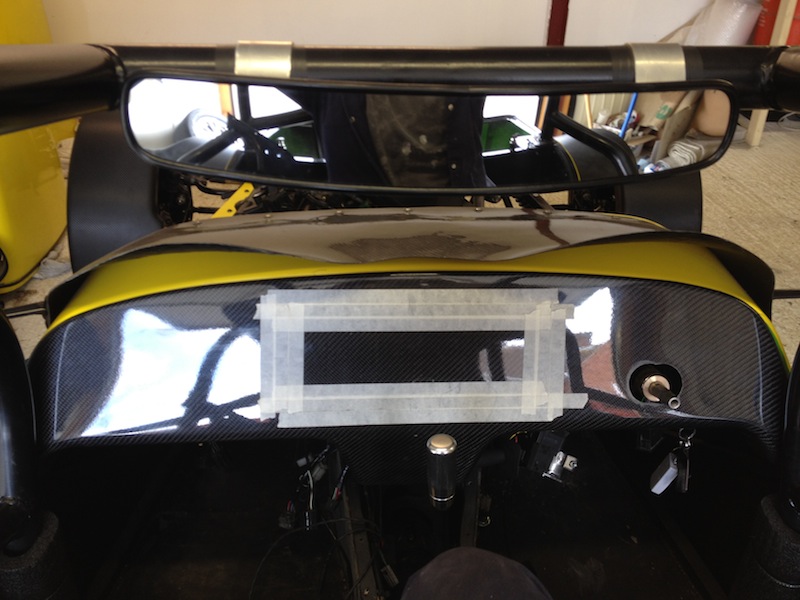
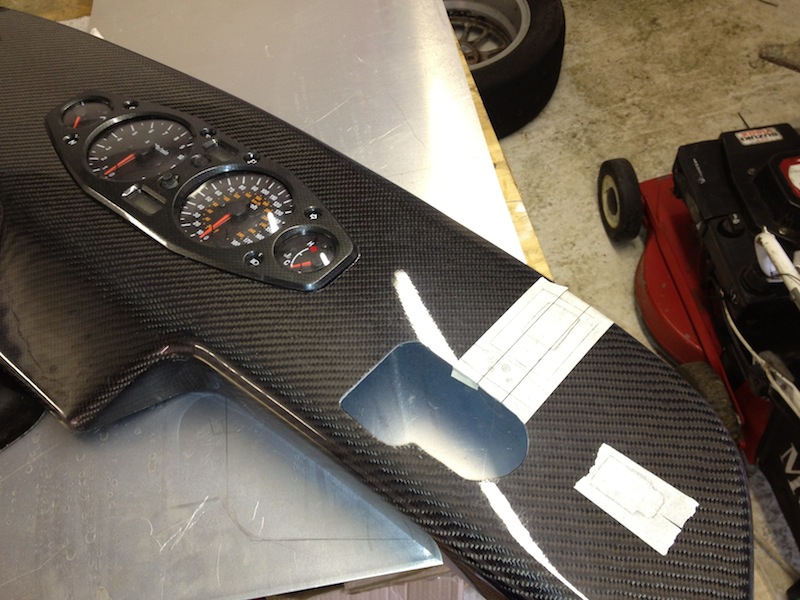
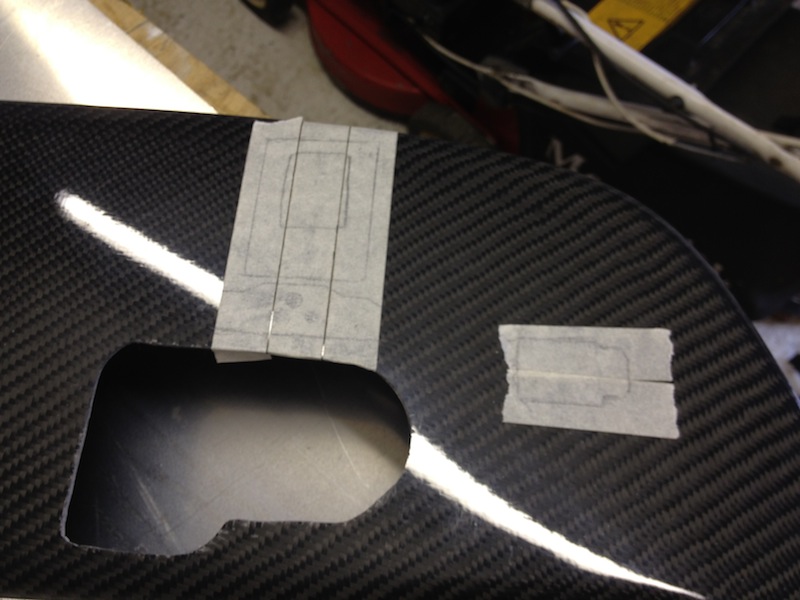
I decided I wanted the clocks bang central to the car, and central top to bottom of the dash itself, so after nervously getting the holesaw out for
the steering column to begin with, I settled into just how robust the carbon dash is, they're not as fragile as they may look to begin with...
simple masking making it bigger than the clocks, so your jigsaw doesn't scratch the carbon
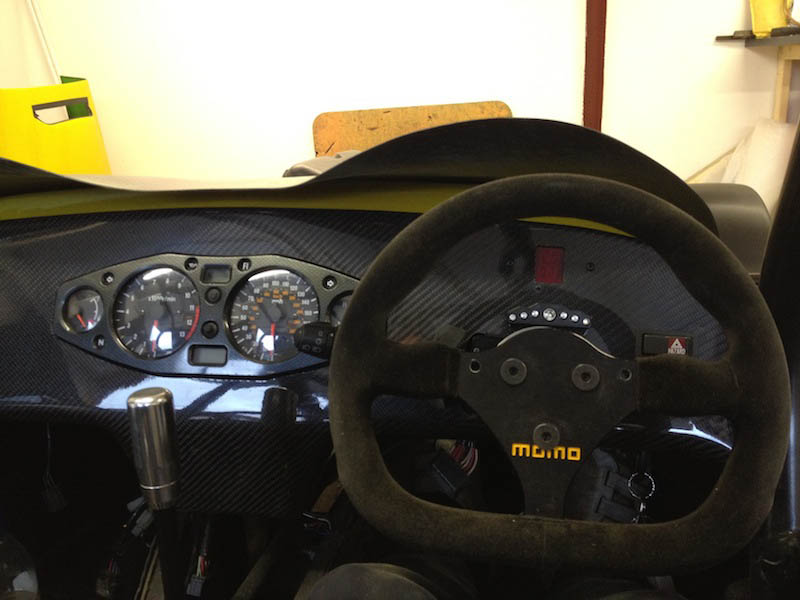
I've converted over to a single Renault Clio MK2 indicator stalk that does just about everything, and makes the dash look a lot cleaner, so I
masked off where the indicator stalk will be pushed back into the dash

Trial fit, everything clears, and can access the bracket that holds the indicator stalk in situ
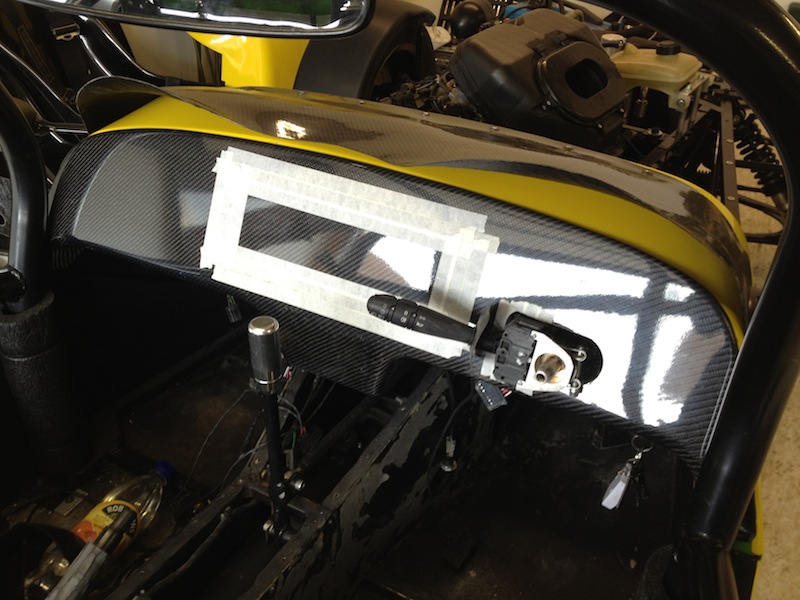
All cut out - very easy to do, time consuming, lots of intricate filing to get it tip-top, but very rewarding
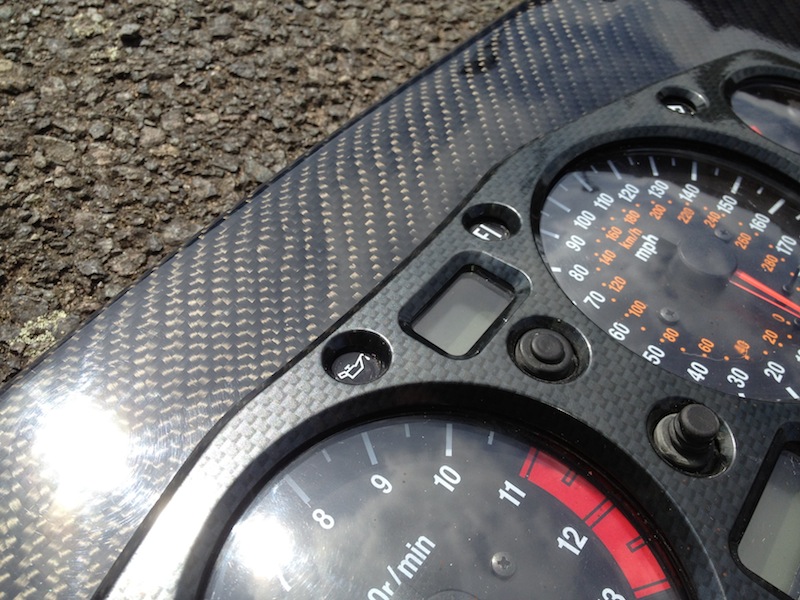
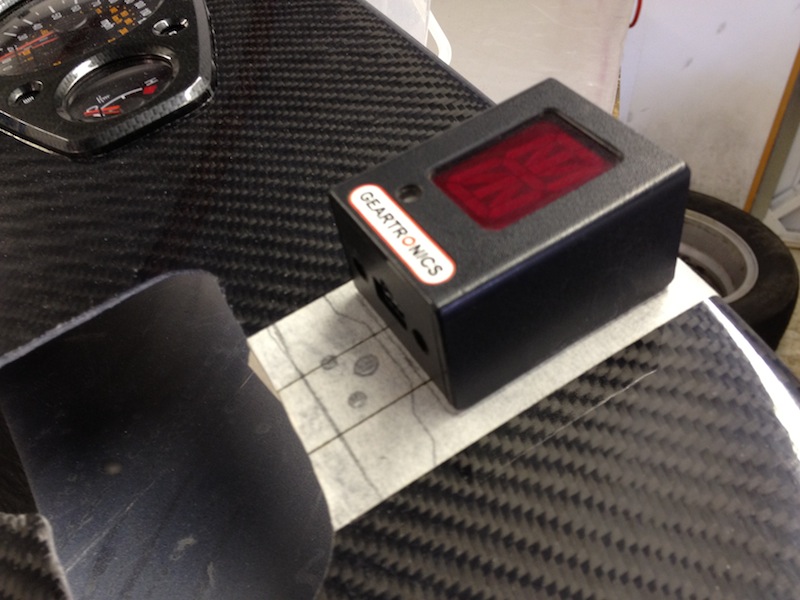
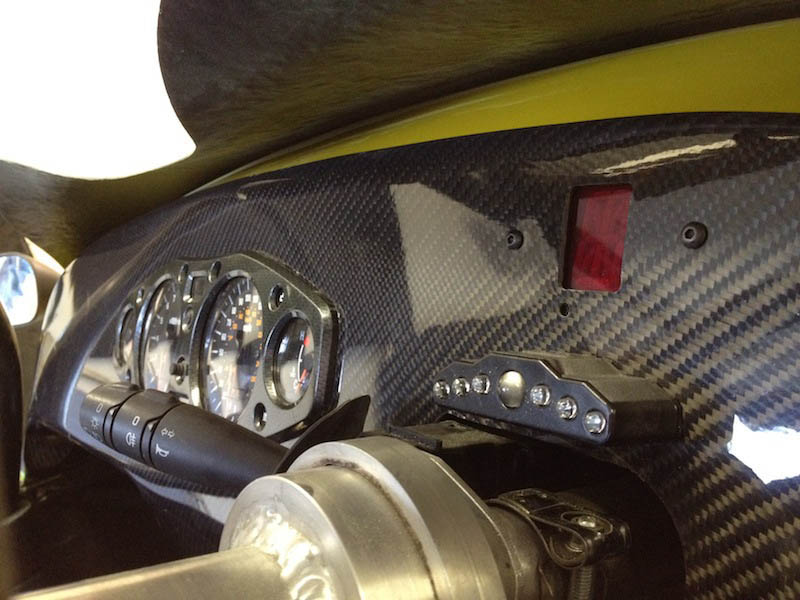
Next up is where to place sequential shift-lights, new geartronics gear indicator and hazard switch which is accessible and visible from the drivers
seat (with steering wheel on)
Most I've seen have just done it the way you would on a bike, and plonk it ontop of the dash itself like so, but I don't like the
aesthetics of doing so
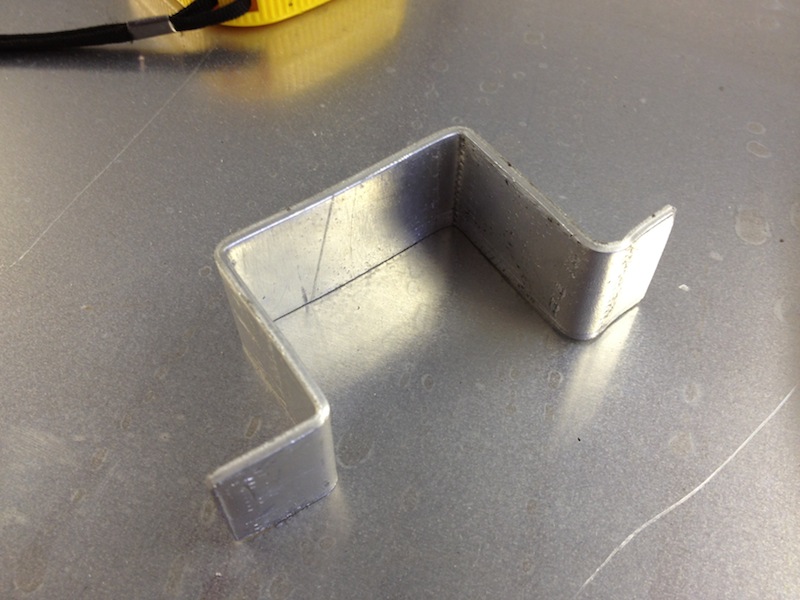
Made a bracket out of ally, rivnut it, drill two small hole either side (i was contemplating tiger seal so nothing was visible, but I wanted to be
able to remove it, so had to compromise (dagnabbit))
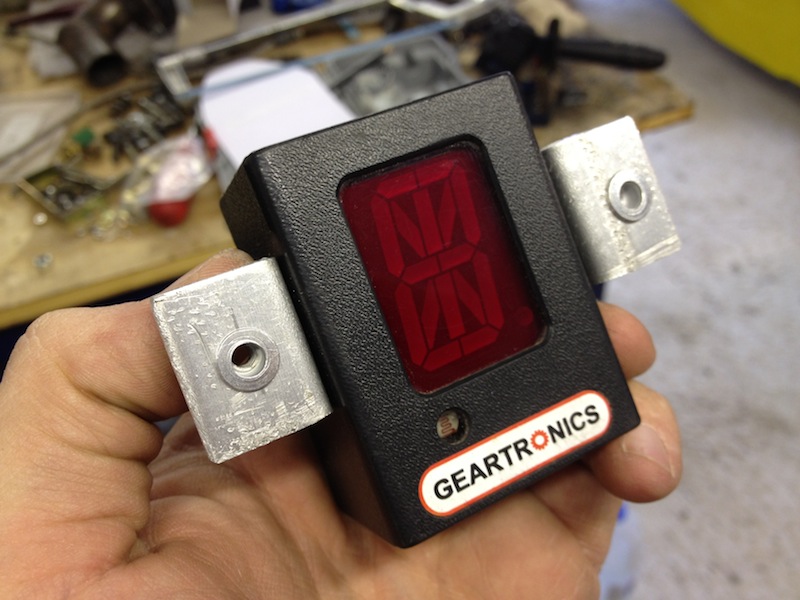
Mark out window that needs removing, along with light sensor (as the display dims as the light fades)

Job jobbed... very happy with result, time consuming but well worth it, you can't quite see the light sensor light on this photo
This is my view from the drivers seat, can see the shift lights & gauge easily, the hazard switch is in sight incase of any emergencies, the only
smaller gauge I can't see without physically moving my head is the water temperature gauge which is hidden by the edge of the steering wheel,
nothing major... you can see the light sensor hole in this photo
A better/ closer photo
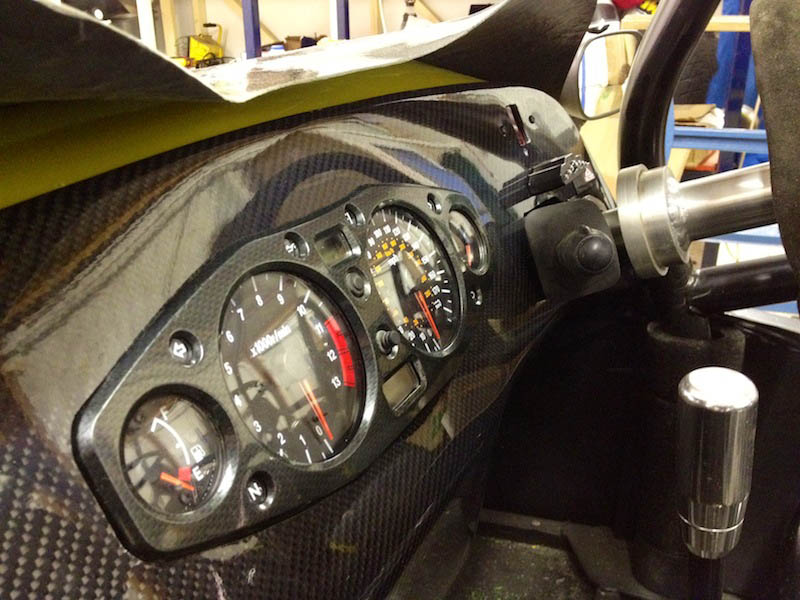
By the looks of this angle, I don't think the Go-Pro will be able to see the gear indicator, but thats not important lol
|
|
|
cosmick
|
| posted on 15/4/13 at 06:33 PM |
|
|
But you will be able to see the speedo and rev counter so it will look superb. The dash looks excellent just like a bought one.
If it can't be fixed with a hammer then its probably an electrical problem.
|
|
|
yellowcab
|
| posted on 16/4/13 at 02:43 PM |
|
|
Just ordered braided brake lines from our very own RussBost, so expecting to get them in a couple of days... its nearing the time to drive it
again!
The rear double rosejointed arms, have given me the ability to set the static camber to -1degree by pulling out the bottom of the rear wheels, rather
than pushing the tops in... also for the first time, my rear wheels are now parallel pointing forward, the adjustability on the rosejoints is
phenomenal, any incredibly easy to adjust!
|
|
|
maccmike
|
| posted on 16/4/13 at 05:42 PM |
|
|
looking great
|
|
|
yellowcab
|
| posted on 23/4/13 at 06:16 PM |
|
|
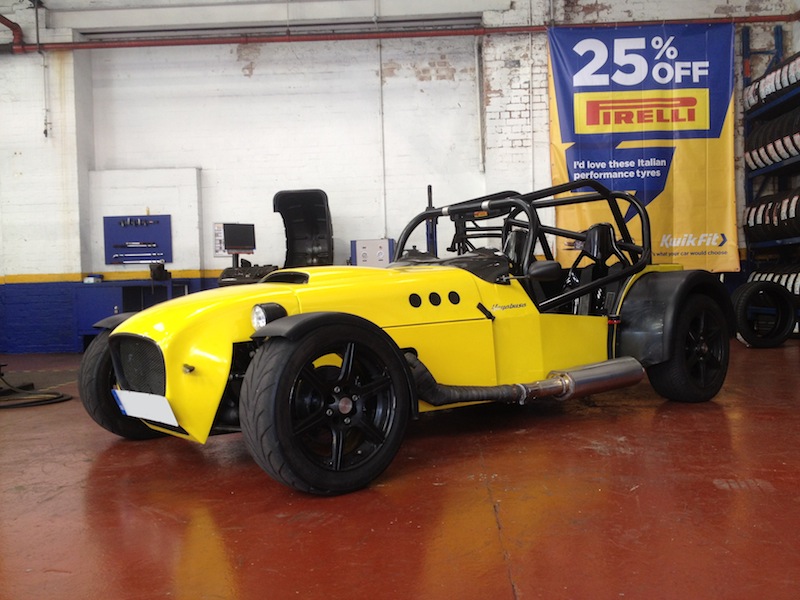
So, had the MOT today, after finishing the car on Friday - and it passed with no advisories.
Very happy bunny considering the car has been built pretty much from the ground up again, and vastly improved.
Big big thanks to cosmick, mikE, ReMan, Ben_Copeland for all your help and constant support/ advice getting me back on the road.
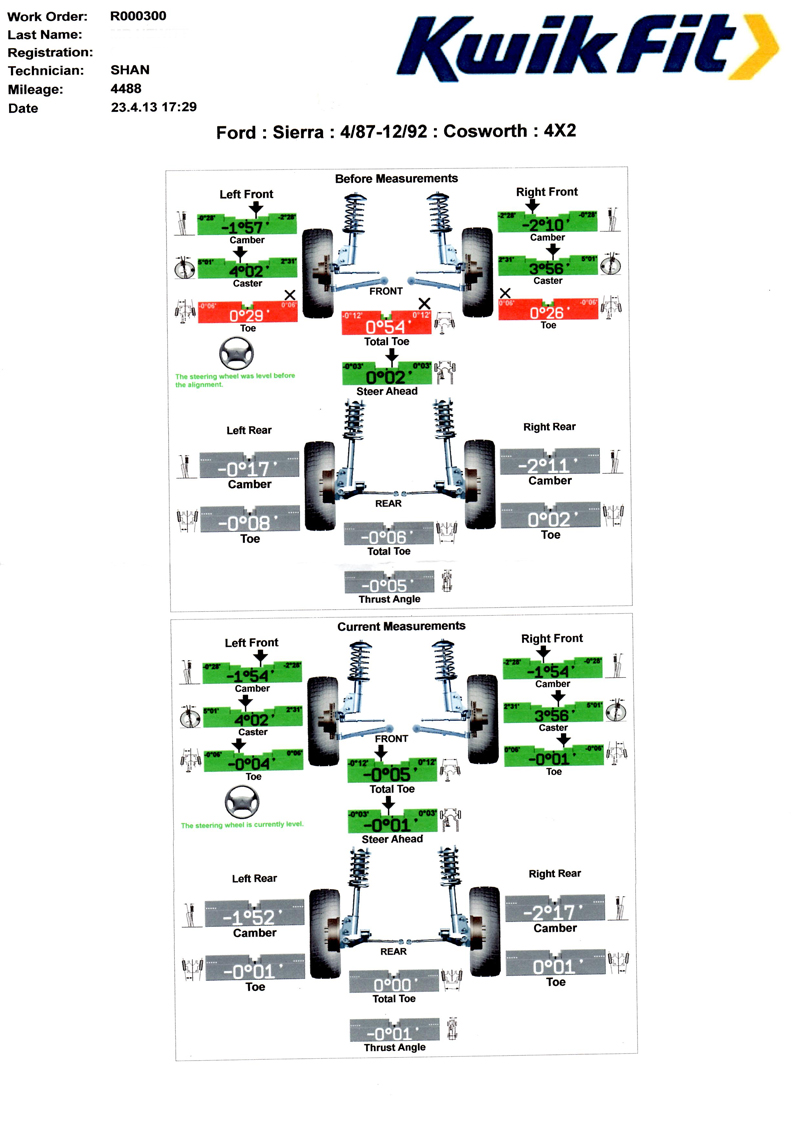
Also, whilst I was down there they let me spend some time on their laser alignment machine so I could set up my static geometry, which we had only
done by eye... the before and afters are below... if anyone could see where else I could improve these static figures, please say - and I'll go
back down and adjust again lol
All ready for her test... everyone loves a front number plate cable tied on


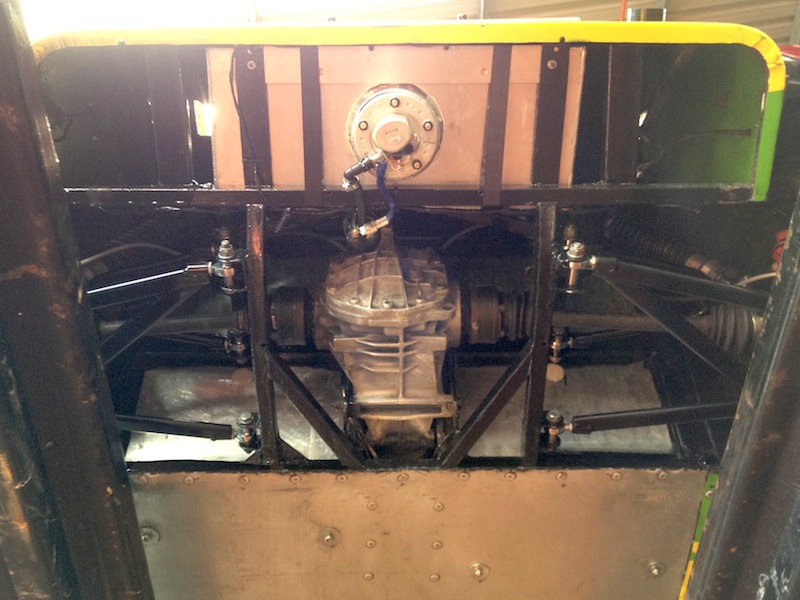
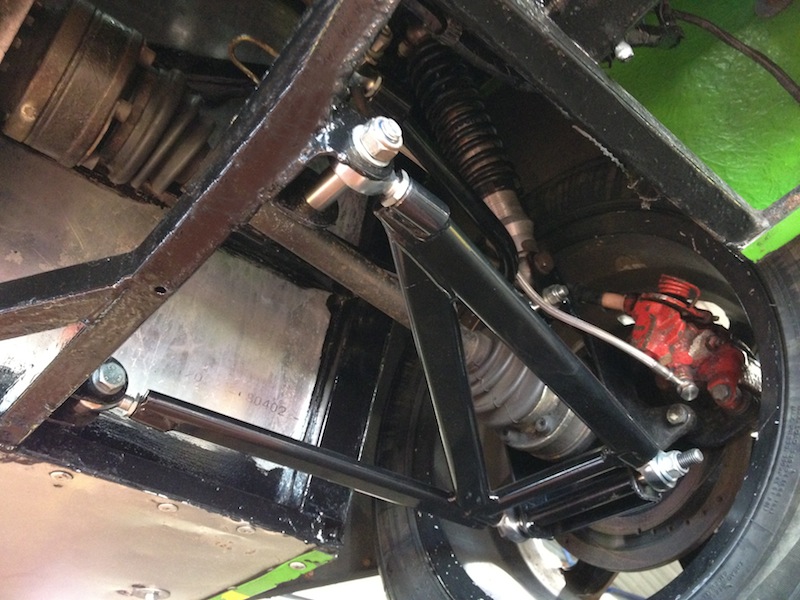
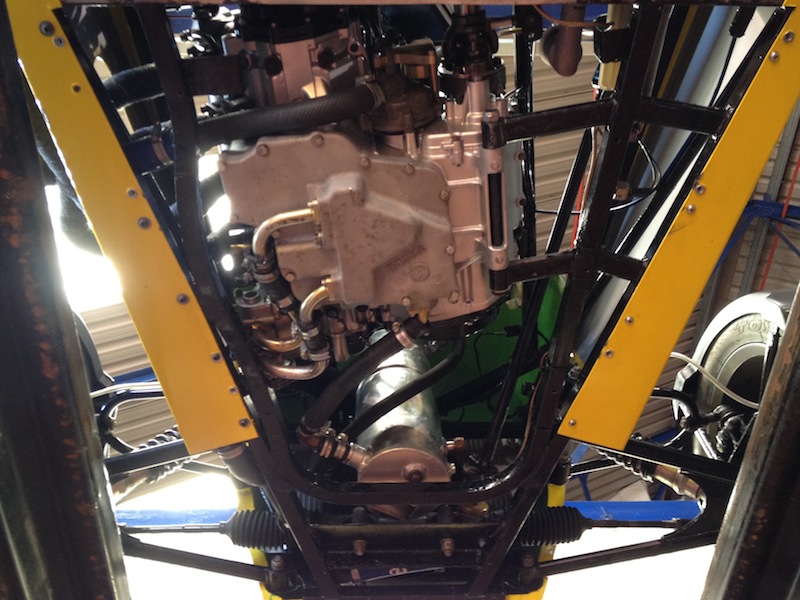
Whilst it was up on the ramps, I took advantage of being able to see it as a whole...
Rose jointed rear arms came useful
Underside of bay
And finally here is the before and after geo setup, I know its not exactly right, but I ran out of time...
[Edited on 23/4/13 by yellowcab]
|
|
|
cosmick
|
| posted on 23/4/13 at 07:55 PM |
|
|
Thank you for the compliment. It has been a real pleasure to help someone like you and the car looks so much much better for all the hard work put
into it. There has been blood, sweat and tears but it has been all worth it in the long run. When you take a step back and realise just what has been
achieved in 8 months it is truly amazing. It took me 3 years to get my car to the same standard.
Really looking forwards to Stoneleigh and a trouble free summer.
If it can't be fixed with a hammer then its probably an electrical problem.
|
|
|
ReMan
|
| posted on 23/4/13 at 09:12 PM |
|
|
Yes well done Ol, all I did was lend the MIG welder,.
Shame you didnt manage to get before geo measurements before you took it to bits
It might be just the pics but is one lower wishbone set further back in the pivot bracket that the other on purpose?
Good work
www.plusnine.co.uk
|
|
|
yellowcab
|
| posted on 23/4/13 at 09:33 PM |
|
|
Help is help is help Col, you did more than lend me a welder, your constant advice and popping around never went unnoticed 
Well done hawk eye, yes the drivers lower is set further back, rather than us dictating to the car that each rosejointed needed the provided 14mm
spacers either side, we did up the outer rosejoints on the back of the rear upright, as then measured to see what spacers we needed to make up for the
inboard so that they were all fitted in a relaxed state, an no pressure or twists was being put on the chassis, prior to doing them up.
With us doing the above, making adjustments is now very easy as the bolts just slide in and out by hand/ fingers without the need for hammers and pry
bars.
Don't get me wrong, initially we fitted the provided 14mm spacers inboard and on the outer, but it just became nigh impossible to get the bolts
through as everything was under so much stress... Also, the driveshaft didn't exit the diff at 90degrees either, as we'd have been forcing
a little castor on the wheel by moving it forward.
PS: still on look out for some 15" Pro Race 1.2s in black ;-)
|
|
|
ReMan
|
| posted on 23/4/13 at 09:38 PM |
|
|
Relaxed uprights, got it, good plan
www.plusnine.co.uk
|
|
|
yellowcab
|
| posted on 27/4/13 at 05:49 AM |
|
|
Since having insured and MOTd it's just a case of waiting until 1st May before I tax it.
Ordered a pair of 195 15 15 Toyo R1Rs, to replace my rear Kuhmo Ecstas... It unlike me to sway away from 888s but I wanted to at least give them a
go... Especially as keeping 15s is only a temporary thing, so didn't want to be spending too much if I hope to pick up some 13s at Stoneleigh
I went for 195s for the rear aswell as front so I could chop and change, as my rears are 888s so I will be ale to make a direct comparison between the
two sets
Next up is just to tart it up a little more aesthetically, want to move my wing mirrors up mounted from the rollcage, as currently they're on
the side of the scuttle, and can't see anything because of the rear cycle wings.
Want to make a new boot panel, and boot space now the fuel tank has been moved down, should have some storage for bits and bobs...
|
|
|
Ben_Copeland
|
| posted on 27/4/13 at 06:15 AM |
|
|
I mounted my mirrors directly to the cage. Much better aesthetically and you can see a lot more. Had to weld a small plate to the cage so the mirror
had something flat to sit against. Then drilled and tapped through so the mirrors are screwed straight on.
Ben
Locost Map on Google Maps
Z20LET Astra Turbo, into a Haynes
Roadster
Enter Your Details Here
http://www.facebook.com/EquinoxProducts for all your bodywork needs!
|
|
|
yellowcab
|
| posted on 27/4/13 at 06:21 AM |
|
|
Nice one Ben... I'll be sure to do exactly that, only thing that concerns me is that the cage is powder coated, so unsure how it'll look
once I've patched it up?
|
|
|
Ben_Copeland
|
| posted on 27/4/13 at 07:41 AM |
|
|
Simoniz tough black spray paint. Perfect for touching up powder coat, once rubbed down flat etc
Ben
Locost Map on Google Maps
Z20LET Astra Turbo, into a Haynes
Roadster
Enter Your Details Here
http://www.facebook.com/EquinoxProducts for all your bodywork needs!
|
|
|
yellowcab
|
| posted on 27/4/13 at 08:04 AM |
|
|
Sweet, I'll have a look at that then...
|
|
|
daniel mason
|
| posted on 27/4/13 at 08:52 AM |
|
|
i rounded off the inside face of the mirror mounts so it sta flush with the curved cage,and simply drilled,tapped,loctite and fixed back! looked fine!
suzuki gsxr mirrors from mk were perfect for the job
|
|
|
yellowcab
|
| posted on 29/4/13 at 06:49 AM |
|
|
Daniel- cheers for the tip, sounds very way to do, I'll have a good look later when I'm with the car :-)
|
|
|
Ben_Copeland
|
| posted on 29/4/13 at 08:01 AM |
|
|
Little bit of caution with tapped the roll cage directly. You won't get many threads in just the rollbar ! So if you tighten a little too much
it could rip it straight out.
Ben
Locost Map on Google Maps
Z20LET Astra Turbo, into a Haynes
Roadster
Enter Your Details Here
http://www.facebook.com/EquinoxProducts for all your bodywork needs!
|
|
|
yellowcab
|
| posted on 29/4/13 at 11:03 AM |
|
|
Trackday booked Sat 15th June @ Mallory Park
|
|
|
yellowcab
|
| posted on 1/5/13 at 12:33 PM |
|
|

|
|
|
yellowcab
|
| posted on 1/5/13 at 12:47 PM |
|
|
Been out in the car today, have no confidence in it at high speed, seems very light and wavey.
Had it tracked up so not sure what's causing the 'looseness'... it might be that I'm just not used to how quick it is, but I
seem to always remember it feeling very planted at high speed...
|
|
|
yellowcab
|
| posted on 1/5/13 at 12:48 PM |
|
|
I've just been out for a spirited drive around the back roads of Mallory Park, and on corners it feels fine, very predictable.
However I've noticed I have around 7-8 degreees of play in my rack, so I can move my steering wheel from 11 oclock, through to 1 oclock without
my actual wheels moving at all, which is giving me the impression that I'm waving over the road, when I'm actually probably not...
When I wobble the steering wheel, as the sierra item bolts to the column just inside the engine bay, that moves also, the column bar also moves down
to the track, but as it enters the rack, there is no movement in the wheels
|
|
|