jason187781
|
| posted on 9/6/08 at 07:02 PM |

|
|
Flat pack Locost chassis kits
Hi all, Just to let anyone who might be interested, or is new to building a Locost KIt car that i am supplying full chassis packs, or individual
lengths to order.
I have started with the McSorley standard book chassis drawing dimentions pdf, and the tunnel section is a narrower to give the driver and passenger
more room.
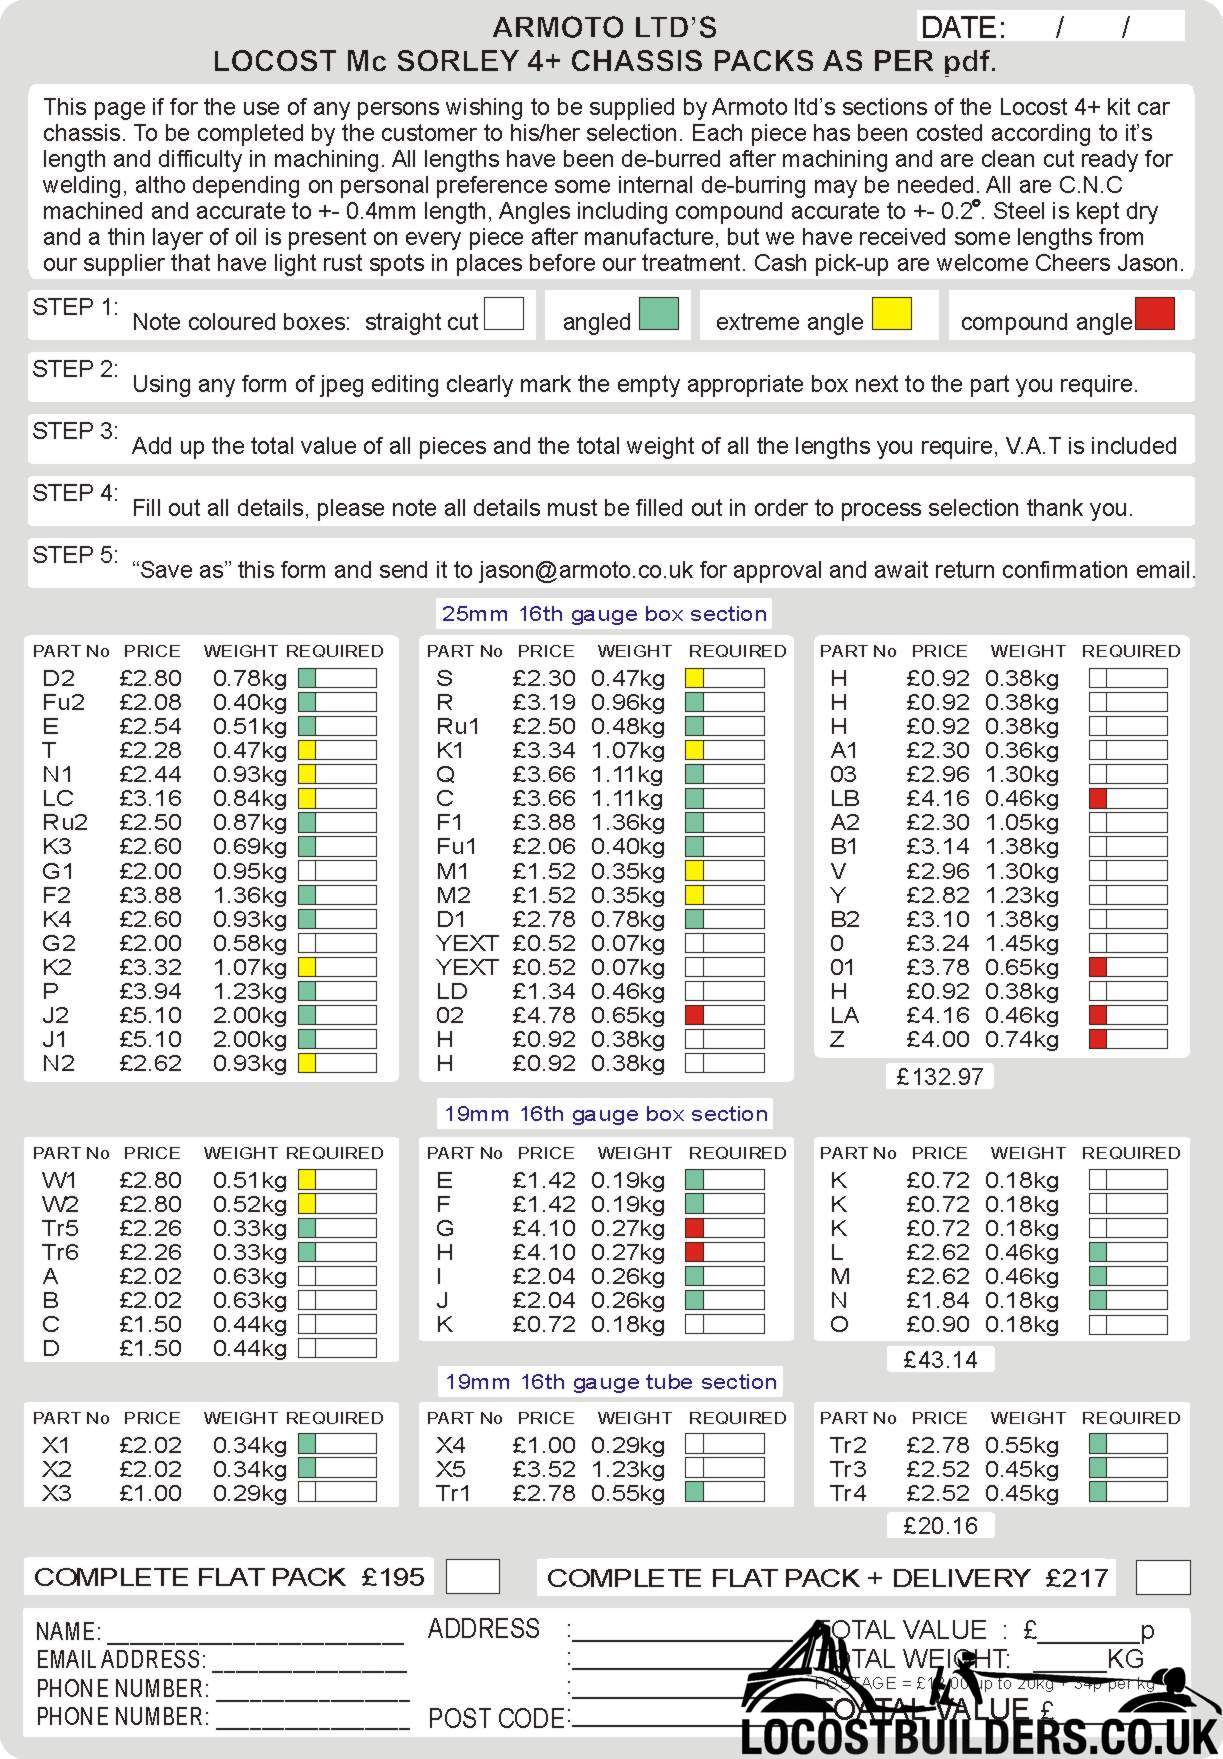
I sell a ful pack delivered for £212.oo V.A.T included or if you prefer to buy in sections, staggered, for repairs or spare parts then the order form
i have drawn up caters for this also.
I have Attached the jpeg order form so if your interested just email it back to me. I can also cut lengths to your specifications if you prefer to
send me you own cutting list.
I am currently selling on ebay and keep getting positive feedback for these items so if you want to take a look you should find me there. Thanks for
hearing me out and welcome any suggestions or comments to make my service more helpfull.
Cheers Jason
ps: I am also producing the Haynes Roadster Chassis also.
 
Rescued attachment LOCOSTHIGHRESADD.jpg
|
NOTE:This user is registered as a LocostBuilders trader and may offer commercial services to other users
|
|
|
joolsmi16
|
| posted on 9/6/08 at 08:08 PM |

|
|
roadster flat pack
I've just ordered from Jason very easy and straight forward with the above form.
Haven't received yet but very good so far.
Julian
|
|
|
gabbes
|
| posted on 10/6/08 at 04:36 AM |

|
|
Are you also doing the McSorley +4 model?
|
|
|
jason187781
|
 posted on 10/6/08 at 10:44 AM posted on 10/6/08 at 10:44 AM |

|
|
McSorley +4 Chassis
Hi Gabbes,
Yes I hope to be doing this version very very soon, I have sent him an email just for the moral permision and advise but have not recieved anything
back yet. I would be posting it here and on ebay. Is there a greater demand for this version? if so i would get cracking straight away. Cheers Jason.
ps: hey Julian how's It going? Your Pack will be with you before the weekend, this I can say for sure. 
|
NOTE:This user is registered as a LocostBuilders trader and may offer commercial services to other users
|
Mix
|
| posted on 10/6/08 at 04:06 PM |

|
|
Hi
As I'm sure you are aware FU1 and FU2 require compound mitres do you provide them cut 'over length' to accomodate this?
Regards Mick
|
|
|
gabbes
|
| posted on 10/6/08 at 04:53 PM |

|
|
I am not sure about UK, but here it would make more sence to make it some wider because it is mor space and it is also easier to find suitable seats
for it..
Do you have any homesite?
|
|
|
jason187781
|
 posted on 10/6/08 at 08:03 PM posted on 10/6/08 at 08:03 PM |

|
|
Compound angles + McSORLEY version
Hi I can do the compound angles, I just 3d model them useing One C.N.C programme. then send the G code programme to the C.N.C miller. This gives me
perfect Machined Compound angles every time. I am useing the Mcsorley pdf file as my cutting list for the by the book standard, and am working on the
4+ version now. so I will be a case of take your pick again like the add above. Cheers Jason.
ps: The only compound angles i can find on the cutting list are 01, 02, LA, LB, Z and the 3/4" Tunnel sections. What do you mean by FU1 and FU2
Mix, you have me worried 
|
NOTE:This user is registered as a LocostBuilders trader and may offer commercial services to other users
|
scotty g
|
| posted on 11/6/08 at 06:56 AM |

|
|
Well my FU1 & FU2 lengths were Not compound and I've just looked in the book and thay don't seem to be compound in there either!
|
|
|
Mix
|
| posted on 11/6/08 at 03:16 PM |

|
|
Hi
Trust me.......in order for the wishbone mounting brackets to be alligned correctly FU1 and 2 need compound angles. They are not very large but they
are there hence the question about cutting oversize.
FU 1 and 2 need to be mounted with their outside faces parallel to the chassis centre line unless you want to fill the gaps with weld.
Regards Mick
|
|
|
wilkingj
|
| posted on 11/6/08 at 03:36 PM |

|
|
Mc Sorley +4 with a IRS Back End would be the Dogs Danglies.
As said, gives a better choice of seats, plus us Phat B'Stards can get into and out of them.
Just my 2d worth.

1. The point of a journey is not to arrive.
2. Never take life seriously. Nobody gets out alive anyway.
Best Regards
Geoff
http://www.v8viento.co.uk
|
|
|
jason187781
|
 posted on 11/6/08 at 05:11 PM posted on 11/6/08 at 05:11 PM |

|
|
Chassis sections and designs
Cheers for the heads up Mick I will look into it and update the pack as required. (every bit of info helps) as for the I.R.S McSORLEY special is such
a thing feasable? I have Drawings for both but wouldn't like to supply chassis that can't be turned into a Kit Car. I think I will go back
to the 3d drawing board and take a look. Cheers Jason.
|
NOTE:This user is registered as a LocostBuilders trader and may offer commercial services to other users
|
Taz Surfleet
|
| posted on 11/6/08 at 06:33 PM |

|
|
believe Jason is also doing a Haynes kit !! why bother with the Mc sorley
also talking about the compound mitres I just substituted the upper and lower square tube with 1" round added 1/4" top and bottom to the
uprights and birdmouthed them this is far easier than messing about with compound mitres !!
|
|
|
Mix
|
| posted on 11/6/08 at 10:16 PM |

|
|
Hi Taz
Be aware that the method you have used means that the outer and inner sides of the two uprights are no longer parallel to the chassis centre line, you
will need to use a jig to mount the wishbone brackets and fill the slight gaps using weld fillet, (no big deal as long as are prepared).
Regards Mick
|
|
|
jason187781
|
 posted on 12/6/08 at 09:15 AM posted on 12/6/08 at 09:15 AM |

|
|
McSORLEY Chassis packs available
Hi all thanks for the interest, I have drawn up the McSORLEY 4+ contents list. I had to re-model a few of the compound angles and some lengths were
obviously longer but it was a relativley easy addition. I have put a few quid on for the extra steel but not much else has changed. All the advice and
info you guys are giving me is a big help Cheers Jason.
ps: I am going to work on a I.R.S Mc SORLEY pack next...
|
NOTE:This user is registered as a LocostBuilders trader and may offer commercial services to other users
|
Taz Surfleet
|
| posted on 12/6/08 at 12:18 PM |

|
|
quote:
Originally posted by Mix
Hi Taz
Be aware that the method you have used means that the outer and inner sides of the two uprights are no longer parallel to the chassis centre line, you
will need to use a jig to mount the wishbone brackets and fill the slight gaps using weld fillet, (no big deal as long as are prepared).
Regards Mick
Hi Mick
the uprights are in exactly the same place!! so run as book build and are parallel with the centre line the only difference is that you dont have to
mess about with the offset jig you weld on a flat surface ill see if i canget some pics posted !!
|
|
|
Mix
|
| posted on 12/6/08 at 04:16 PM |

|
|
Hi Taz
That's the point.......once you lean the assembly towards the back the wishbone brackets, (which are still mounted parallel to the base line),
will point towards the centre of the chassis unless compensated for when welded on.
The best way I can explain it is if you were to lay the front assembly flat and attach the brackets I think you would agree they would point inwards.
If you have the front assembly at 90 degrees to the base then the brakets would be parallel to the centre line, as the front assembly is tilted
towards the rear then the inward inclination will be somewhere between the two extremes.
As said before it's not a big issue as long as you use a jig to fix your brackets and don't just clamp and weld to the front uprights.
Regards Mick
[Edited on 12/6/08 by Mix]
|
|
|


