David Jenkins
|
| posted on 11/4/09 at 02:57 PM |

|
|
Looking for manufacturing ideas...
I've got this little project that has been lurking in my mind all Winter - and now I've decided to get on with it! (I'll tell you what
it is if it works...  ) )
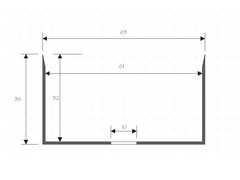
One key component is the round cup shown below. The most significant bits are:
- It needs to be made from a rigid material, preferably something that won't corrode too easily (stainless steel, aluminium, plastic).
- The critical dimensions are the diameter (63) and the hole (10mm).
- The base must be at 90 degrees to the side (as square as you can get in a lathe, anyway).
- The base will have to resist the force produced when tightening up a 10mm bolt through the hole.
- The thickness of the material is negotiable, as long as it remains rigid and it's not too thick at the very top (hence the slight taper).
I can see a few ways of dealing with this, including:
- Getting a lump of material and machining it in the lathe - this means buying a piece and wasting 98% as swarf.
- Spinning some aluminium in the lathe, making the shape over a former - never done that before, and I don't know how accurate the result wound
be.
- Finding a piece of pipe, forming a step inside the lower rim, and fixing a base inside - not sure if I can make that strong enough to take the pull
of the bolt.
Any other bright ideas?
David
 
Rescued attachment support-cup.jpg
|
|
|
|
|
aerosam
|
| posted on 11/4/09 at 03:05 PM |

|
|
you could make 2 steel formers by turning in a lathe, then press an aluminium disc between them in a workshop hydraulic press.
In fact the hole could be pre-drilled in the disc and could be used to locate on a lug in the formers.
manufacturing investment levels depend on how many you want to make really.
Had enough of this dictatorship known as LCB. Gone elsewhere, not coming back. Kiss my ass ChrisW.
|
|
|
David Jenkins
|
| posted on 11/4/09 at 03:08 PM |

|
|
quote:
Originally posted by aerosam
manufacturing investment levels depend on how many you want to make really.
Two!
So it has to be a 'home workshop' solution really.
|
|
|
Richard Quinn
|
| posted on 11/4/09 at 03:10 PM |

|
|
Turn it from a solid piece. Anything with "billet" in the description always sells for 100x the price!!
|
|
|
Richard Quinn
|
| posted on 11/4/09 at 03:11 PM |

|
|
Ahhh, with the numbers I guess it's for home use. You will have saved 100x the price though!
|
|
|
mr henderson
|
| posted on 11/4/09 at 03:28 PM |

|
|
I know what it is! The sharpened edge at the top makes it obvious! The 10mm hole is not for a bolt, it's to let the air out as each cookie is
cut.
Simple. Try us with something harder next time. 
John
|
|
|
iank
|
| posted on 11/4/09 at 03:34 PM |

|
|
Not sure if it would work well enough for your application, but what about building a wooden mould and making it from grp?
p.s. I keep thinking "Chronicles of Riddick" when I look at that knife edge. You'll know the scene if you've seen it 
[Edited on 11/4/09 by iank]
--
Never argue with an idiot. They drag you down to their level, then beat you with experience.
Anonymous
|
|
|
YQUSTA
|
| posted on 11/4/09 at 03:48 PM |

|
|
your all wrong its an ash tray for his 7 the hole at the bottom is to suck the ash away 
|
|
|
Phil.J
|
| posted on 11/4/09 at 05:44 PM |

|
|
Just turn them from some aluminium bar, takes about 1/2 hour each at the most.
|
|
|
Simon
|
| posted on 11/4/09 at 05:54 PM |

|
|
I made something almost exactly the same to punch small velcro sanding discs from large velcro sanding discs.
It's made from 63mm stainless tube, with one end sharpened.
I didn't bother filling the middle bit, just hit it around the edge
ATB
Simon
|
|
|
David Jenkins
|
| posted on 11/4/09 at 06:24 PM |

|
|
Some good guesses there - but all wrong! 
Hint: It's something to do with this thread.
|
|
|
roadrunner
|
| posted on 11/4/09 at 07:57 PM |

|
|
I think it has more to do with telecommunications, the hole is obviously there to get plenty of string through it.
|
|
|
ste w
|
| posted on 12/4/09 at 12:14 AM |

|
|
I guess a hub centre cap and the hole is to mount a bearing?
And you need two, one for either side.
thought about tube with the end welded on? could be ally or stainless!
If it's got tyres or tits, it's trouble.
|
|
|
rusty nuts
|
| posted on 12/4/09 at 08:08 AM |

|
|
Still think replacing the hub nut with an extension would be better IMHO of course
|
|
|
David Jenkins
|
| posted on 12/4/09 at 08:16 AM |

|
|
I agree that an extended nut would be the best option (I've even bought the hex steel to make one!) but it's keeping the water out of the
front bearing that still bothers me - I've looked at all sorts of seals but I still haven't found one that will do the job (IMHO).
|
|
|
rusty nuts
|
| posted on 12/4/09 at 08:35 AM |

|
|
How about using a piece of round steel instead of hexagon ? then find an oil seal to match the diameter of the extension piece and if needed machine
up a hub center cap to take the seal?
|
|
|
Peteff
|
| posted on 12/4/09 at 09:40 AM |

|
|
It looks over elaborate to me. Why not drill a hole in a wheel centre cap and put a bolt in it to the correct length, use a sealed bearing to fit the
bolt, fasten your support to the bearing outer race or make a small housing for the bearing to sit in and fasten the stays to that.
yours, Pete
I went into the RSPCA office the other day. It was so small you could hardly swing a cat in there.
|
|
|
David Jenkins
|
| posted on 12/4/09 at 09:47 AM |

|
|
quote:
Originally posted by Peteff
It looks over elaborate to me. Why not drill a hole in a wheel centre cap and put a bolt in it to the correct length, use a sealed bearing to fit the
bolt, fasten your support to the bearing outer race or make a small housing for the bearing to sit in and fasten the stays to that.
That is what I was planning to do - but tidied up a bit! 
|
|
|
David Jenkins
|
| posted on 12/4/09 at 02:04 PM |

|
|
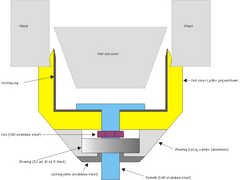
More info (see piccy below)
I remembered why I went off the idea of an extended hub nut, in favour of a bearing on the wheel - I was worried about what would happen if I happened
to clip the stays while parking, etc. With the hub nut idea there's a real chance of damaging the stub axle (which would be a real PITA to fix),
but with this idea the only casualty is likely to be the spindle or plastic hub cover.
The original posting was regarding making of the 'locking cup' as it's called in the diagram - the hub cover has fingers that click
into place into the wheel, and I was concerned about whether it would stay in place. Putting the cup inside would stop the fingers from coming out of
the wheel groove... this may be over-kill!
 
Rescued attachment wing-support.jpg
|
|
|
rusty nuts
|
| posted on 12/4/09 at 05:08 PM |

|
|
You could machine the nut extension so it reduced the overall thickness at on point so that in the event of an accident it would shear?.. Bit like a
steering column shear bolt.
|
|
|


