
Bodywork for CANAMSA
Fred W B - 18/4/06 at 02:30 PM
You guys may have noticed that I have not posted any progress updates on my project for a while. That is because, on top of some domestic projects
getting in the way, significant progress has been made on a desk and in a computer, and not in the garage.
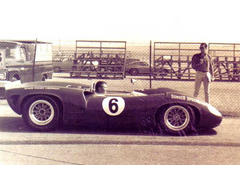
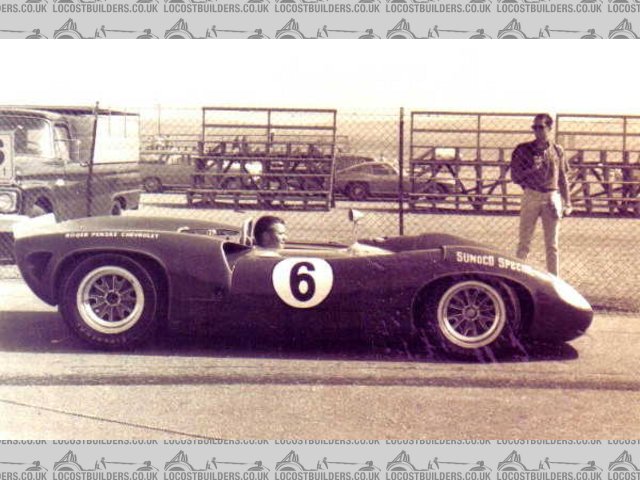
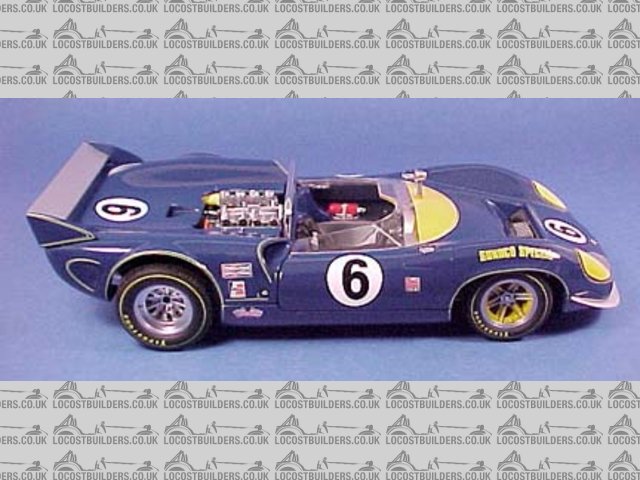
I posted previously (a long time ago) that I had purchased a 1:18 scale model of a Lola T70 Spyder, and that someone had undertook to measure it up
for me on a 3 axis digital machine, "when he gets a chance". Problem is that he never did, so after over a year of waiting I went and got
the model back.
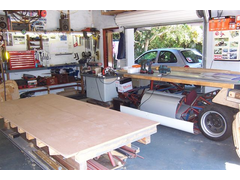
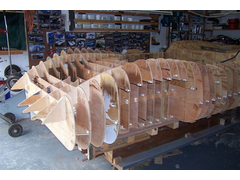
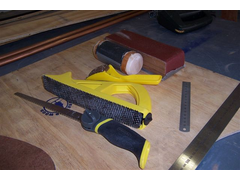
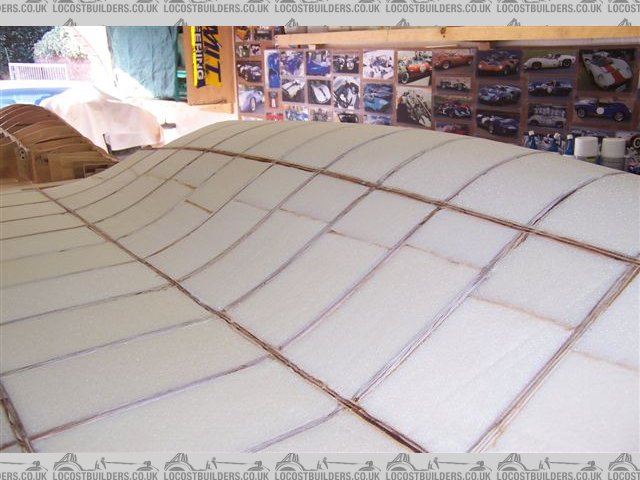
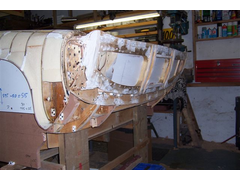
In order to measure it myself, I made up a simple 3 axis measuring jig from alloy channel section and flat, steel rules, a straight edge and a digital
vernier. Then with the aid of a colleague Andrew, I measured the offset of the body surface from the datum base at every point on a 5 mm x 5 mm grid,
and recorded the measurements on a large piece of paper
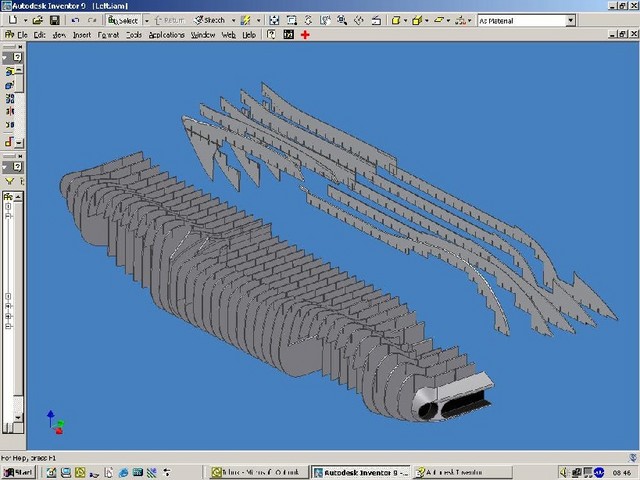
Andrew then used this data and many reference photo's to draw the body surface in Inventor - One sentence that describes many hours of work.
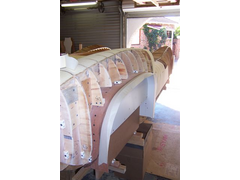
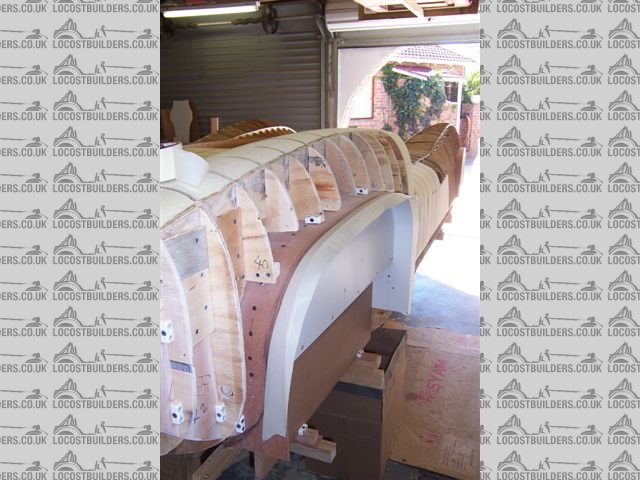
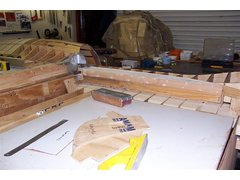
Now we are using that data to produce drawings of many flat body sections (stations every 100 mm in the length) and some longitudinal stringers to
position them, in DXF file format.
These will then be cut out on a CNC router from 8 mm plywood sheet, in order to start building the body plug. The router can handle 8' x 4'
sheets.
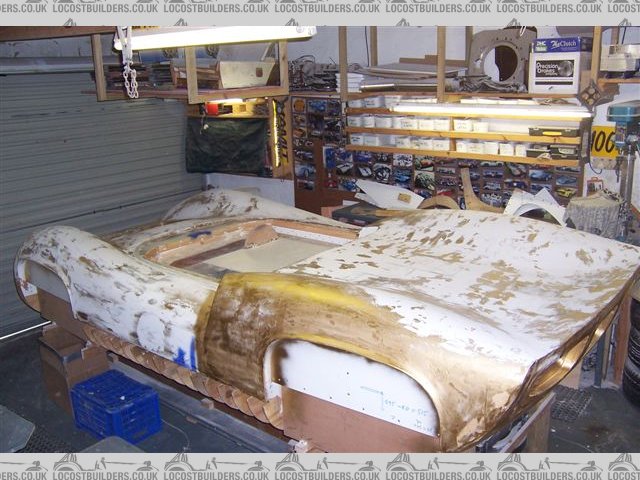
I had promised myself that I would wait until I had pictures of the buck in construction before posting on my body progress, but I wanted something
auspicious to be my 500th post.
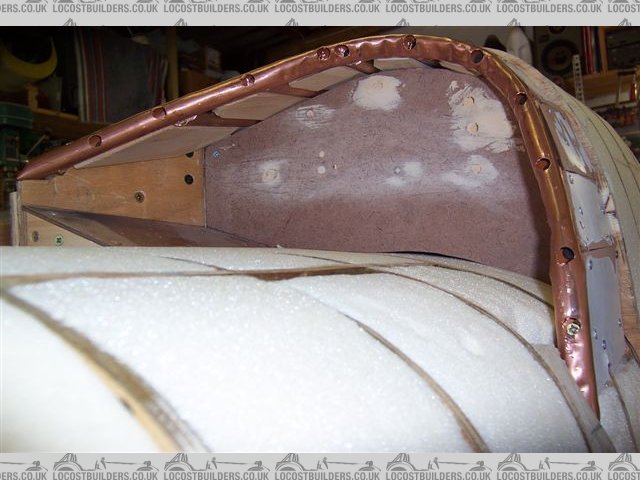
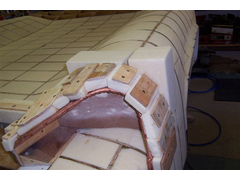
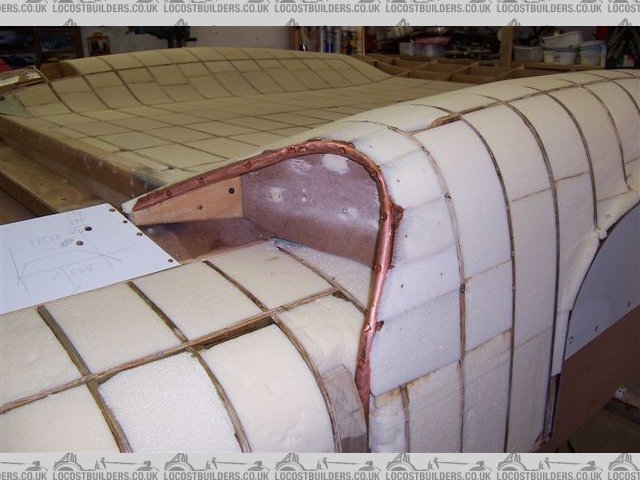
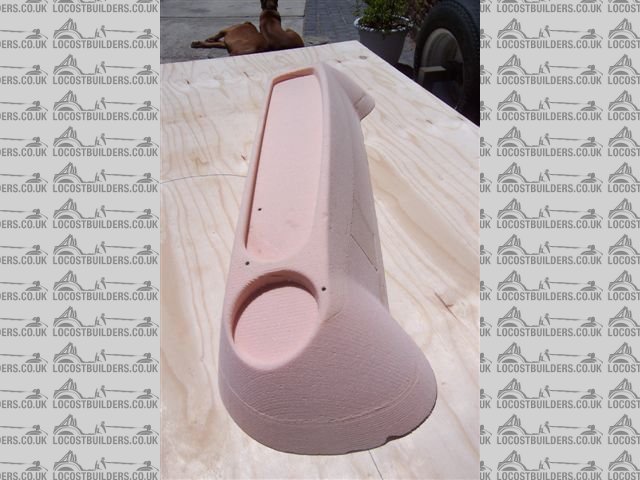
Please see photo and screen shots below. The ribs screenshot I show is not yet complete.
Cheers
Fred W B
donahue 70
[Edited on 18/4/06 by Fred W B]
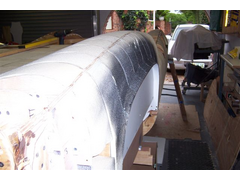
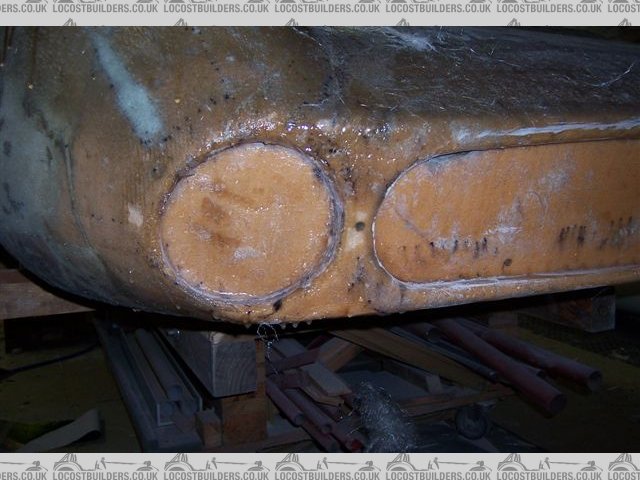
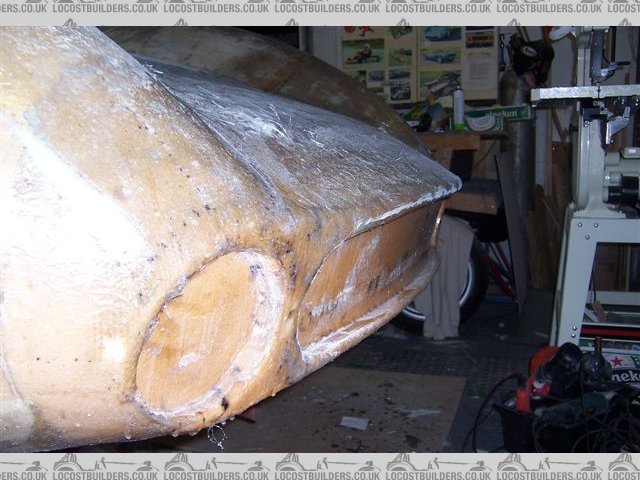
Fred W B - 18/4/06 at 02:32 PM
[img][/img]
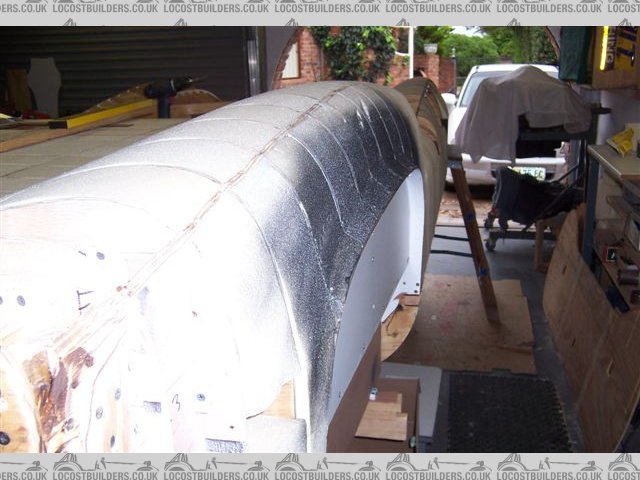
Fred W B - 18/4/06 at 02:33 PM


body2
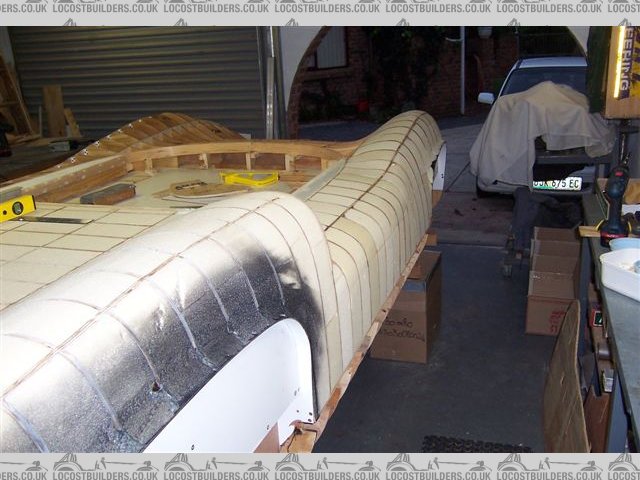
Fred W B - 18/4/06 at 02:35 PM
[img][/img]
emsfactory - 18/4/06 at 02:55 PM
That is very cool.
RazMan - 18/4/06 at 03:58 PM
Huge respect to you Fred - the collation of all those measurements must have taken loads of time to do.
Judging from the ribs pic you have been very thorough too

Krismc - 18/4/06 at 06:19 PM
wow good luck with rest of project!
liam.mccaffrey - 18/4/06 at 07:05 PM
muchos repect
jimmyjoebob - 18/4/06 at 08:05 PM
Looks awesome - You have way more patience than me!
As a complete aside, Gardner Douglas are now selling a Lola T70 spyder kit in the UK.
When you have made your own moulds, are you planning to make a few more to sell?
C10CoryM - 18/4/06 at 10:18 PM
Looking good. Ive played with 3D programs so I know how much work that is. When I went to the monterey historics last year I met up with a guy from
another forum who races a 1965 T70. (Yes I sat in it and made vroom vroom noises  )
)
Anyhow, he may be willing to help you on some points. He is pretty busy though so may not be able to.
His website is here:
http://www.pozziracing.com/
Cheers.
Fred W B - 19/4/06 at 11:04 AM
Hi guys, thanks for responses, and in particular C10CoryM for the very useful Link.
At this stage I am not planning to build more than one car, but you never know?
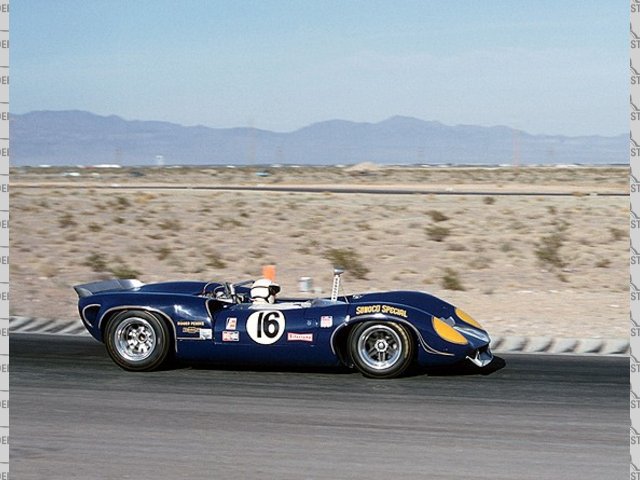
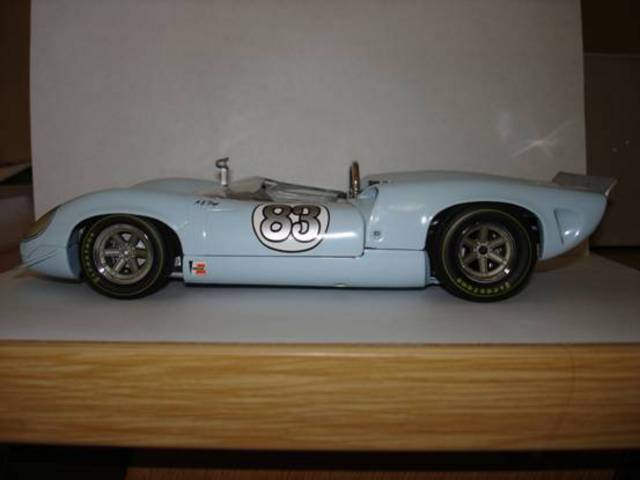
The link has helped explain something that has puzzled us, that being what should the rad exit duct (on top of the nose) and the body shape surronding
the front brake air duct/driving light openings look like. Turns out there were mark 1 and mark 2 versions. The mark 1 has a small square rad exit
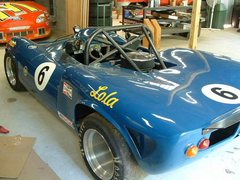
duct- see scale model above, with "flat" round brake air duct/driving light openings - see light blue car, while mark 2 had a wider tapered
rad duct, with brake air duct/driving light openings that seem to be more oval, and follow a smoother nose shape than the mark 1 - see mono picture .
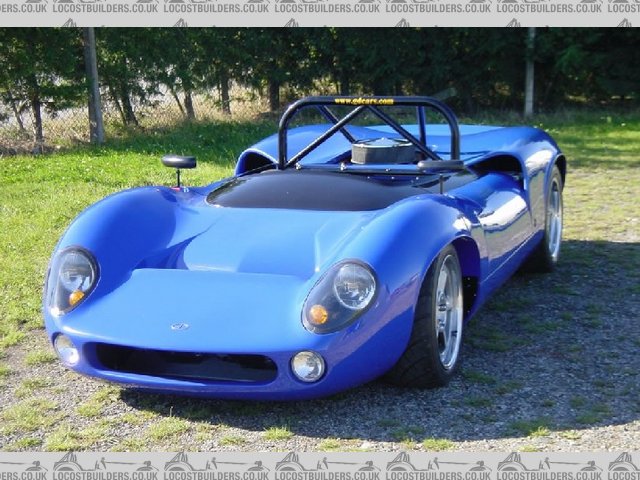
The GD replica 70 seems to use a mark 2 style rad duct, with mark 1 style driving light openings - see dark blue car.
Originally I had not intended to attemp an exact replica, to stop any pedantic's telling me I have this and that detail wrong but now that I am
going to all this trouble, it seems a pity not to get it as right as I can.
So which one do I follow? I prefer the mark 1 rad exit duct, and the mark 2 brake air duct/driving light openings. I suppose I could do it that way,
and call the car shape a tribute to a T70 spyder. Then again, presumably the nose was modified because of cooling problems. Currently our model is a
mark 1.
How did people do this sort of thing before the internet??
Regards
Fred W B
[img][/img]
Fred W B - 19/4/06 at 11:08 AM
[img][/img]
Fred W B - 19/4/06 at 11:10 AM

gd 70
jimmyjoebob - 21/4/06 at 07:55 AM
Lola T70 has to be one of my favourite racing cars. What weight will yours be? Power to weight?
Fred W B - 21/4/06 at 11:26 AM
The targets would be 750kg (or less?) and 250 HP (eventually)
Cheers
Fred W B
Browser - 24/4/06 at 10:45 AM
Awestruck at your dedication and cleverness
When ya gonna build a Porsche 917/30 rep?
Or maybe a Chaparral 2E?
sgraber - 25/4/06 at 07:29 PM
Hi Fred, Glad to see someone else taking up the task! Your work looks awesome!
I'm sure you have the process well in hand and therefore my suggestions may seem redundant. I'll post them for the benefit of others just
casually looking in on your project.
If you recall I did the same cross-section thing with my 3D model (except it's my own original design) and then went to cad drawings which were
taped to the wood sheets and cut with a jigsaw. I used 22 ribs along the length and interpolated the curvature. I don't know if you will need as
many ribs as you have shown?
You will want to have as solid a substructure as possible. I have found my 2x4 structure woefully inadequate. And whatever you do, don't use
styrofoam and drywall plaster!  When you get out to the plug surfacing stage and are at a mirror finish, if your substructure is not rock solid,
the mirror surface may appear to 'crawl' and move from day to day depending on humidity and temperature. So try to keep it in a temperature
controlled environment. Specifically at these final stages.
When you get out to the plug surfacing stage and are at a mirror finish, if your substructure is not rock solid,
the mirror surface may appear to 'crawl' and move from day to day depending on humidity and temperature. So try to keep it in a temperature
controlled environment. Specifically at these final stages.
Once again, Incredible progress you have made and I am now even more proud of you!
Graber
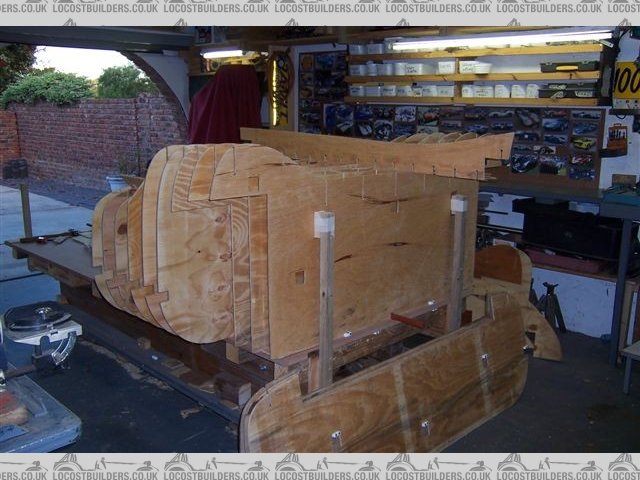
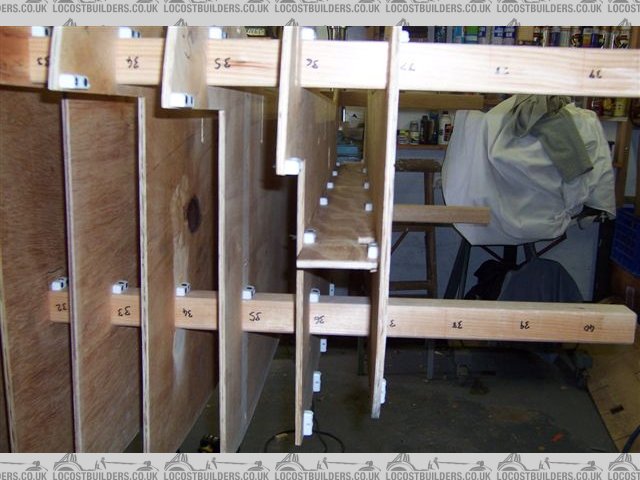
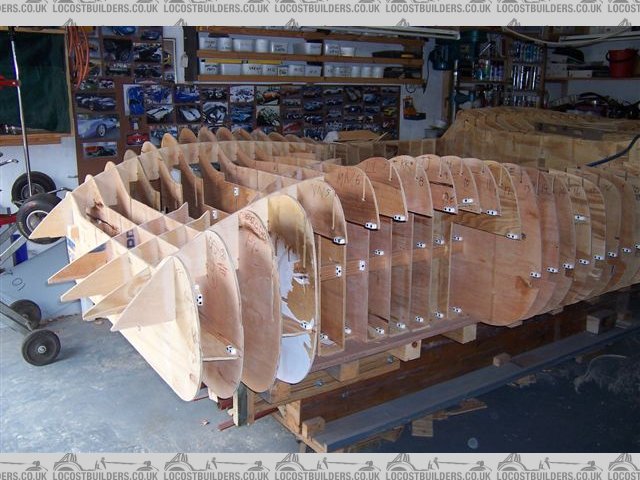
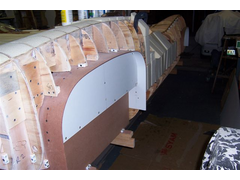
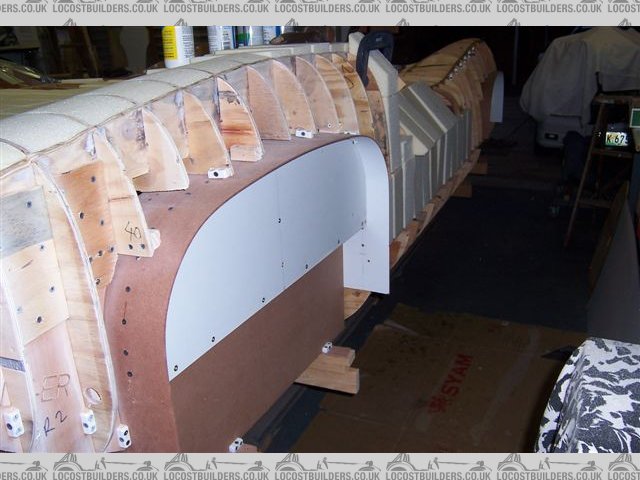
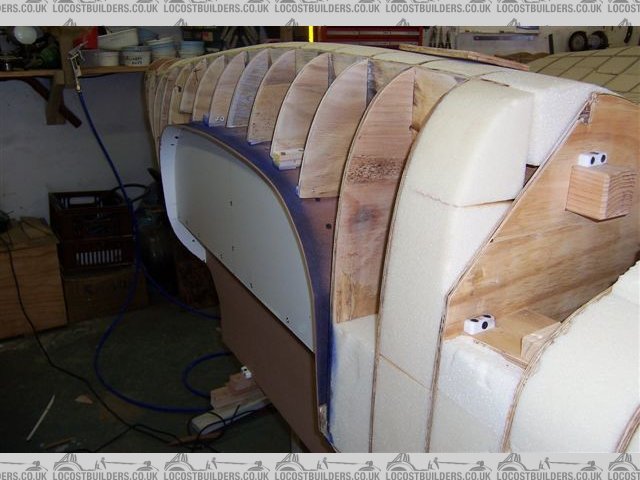
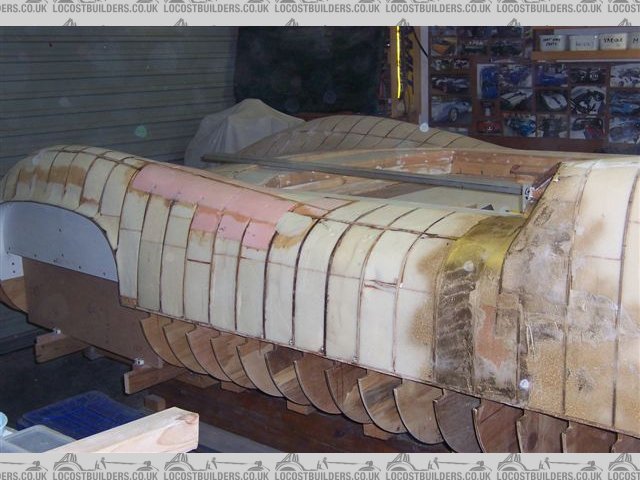
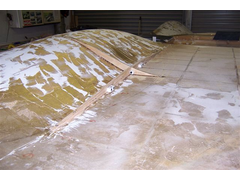
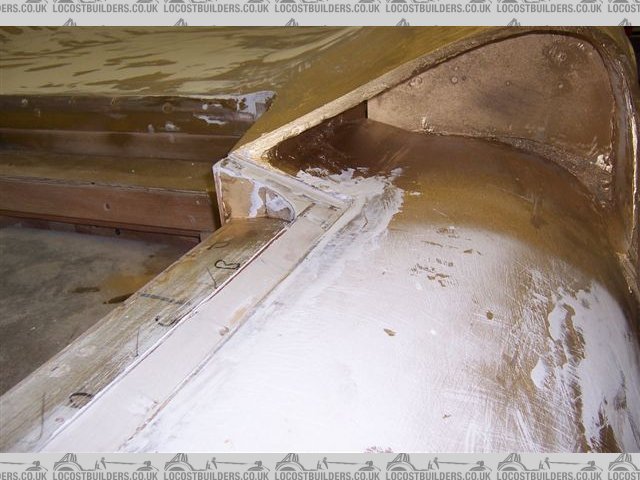
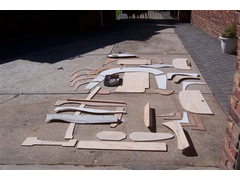
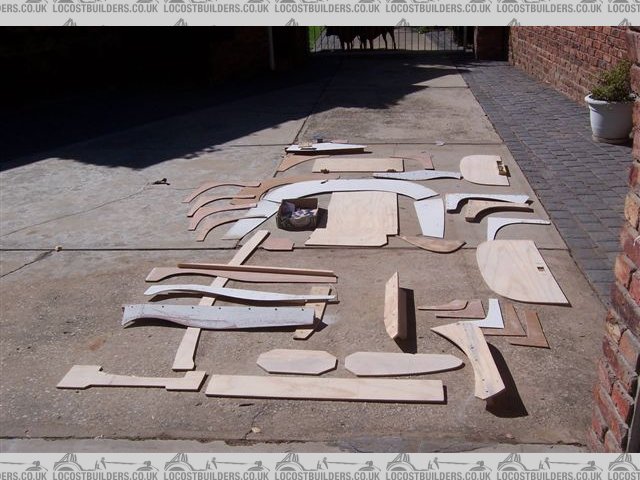
Fred W B - 4/5/06 at 11:19 AM
Hay Steve.
Thanks for the kind words. I have learnt a lot from following your progress.
I have had a conversation with the boss of one of my companies GRP suppliers, and he also reccommends gluing and screwing the buck framework together
in order to make it as rigid as possible. As we cut the 8 mm plywood stations and ribs we will include matching groves so they will hopefully slot
together jigsaw fashion. Below is half of the more or less complete set. It does look like a hell of a lot of wood, but I am hoping that going to all
this trouble to produce a good framework with profiles that are exactly what I want will reduce the surfacing pain somewhat. We won't cut all the
wood shown in the cockpit area.
Cheers
Fred W B

GG
[Edited on 4/5/06 by Fred W B]
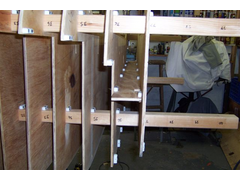
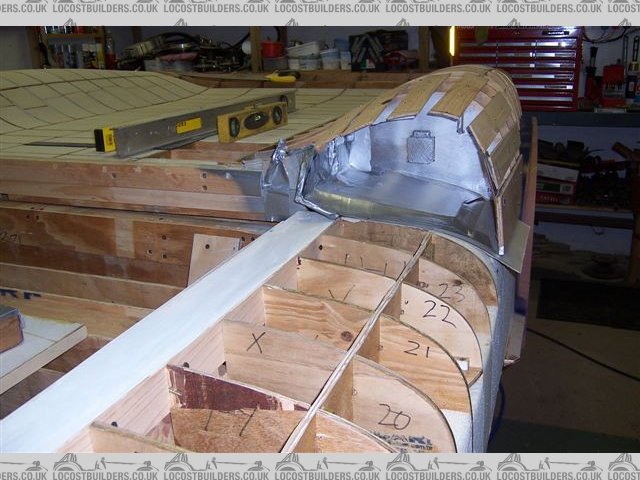
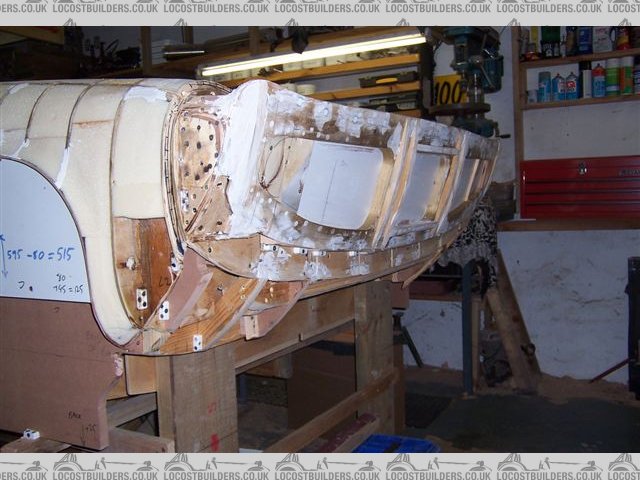
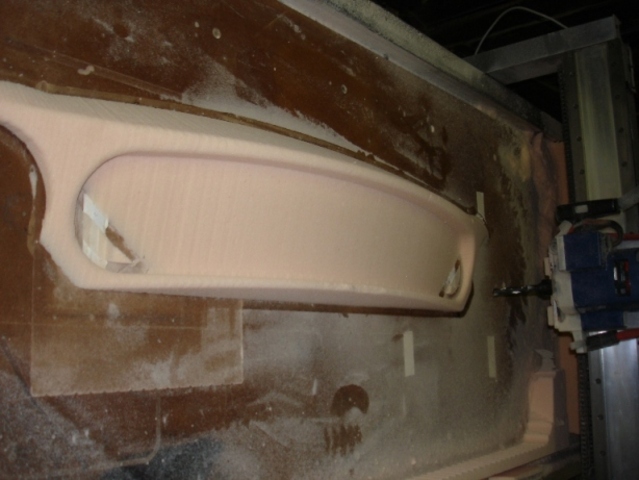
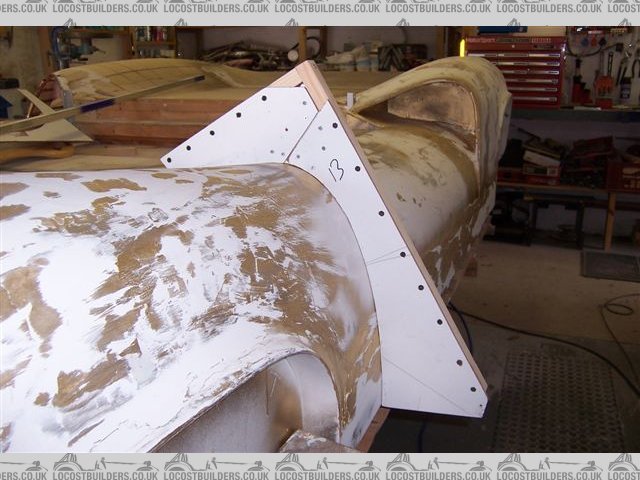
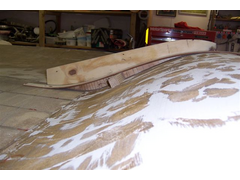
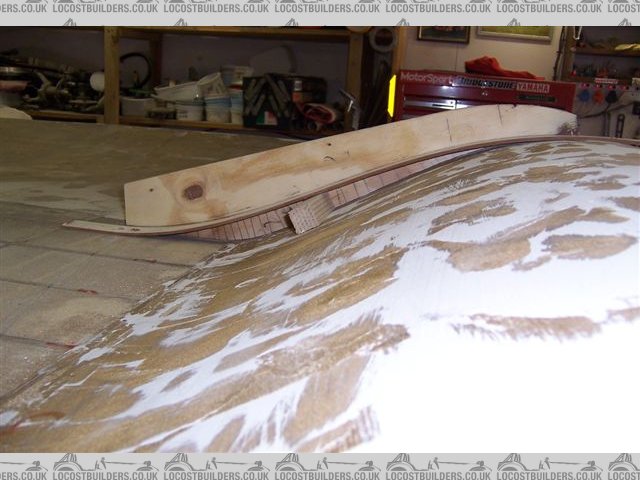
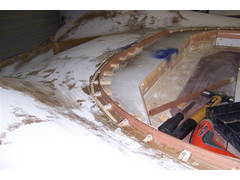
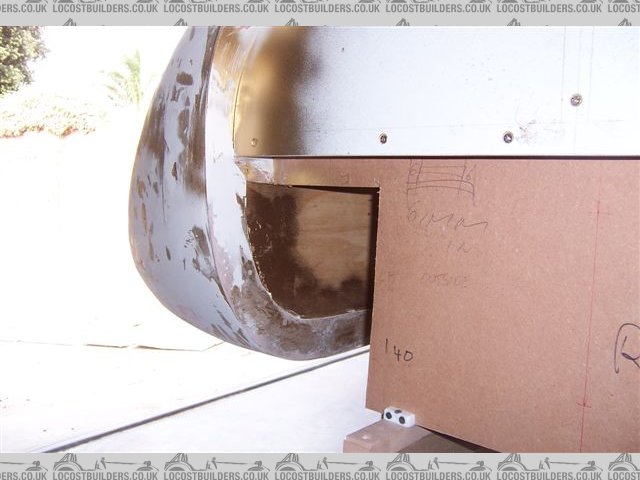
Fred W B - 12/5/06 at 06:07 AM
Just had the first trial station panel cut, to see if the CAD program talks to the CNC router okay. Came out pretty much perfect, just got to add a
centre line reference. This is a transverse station on the front axle line, through the front wheel arches and rad duct.
Looks like I'm off to buy a pile of plywood.
Cheers
Fred W B
[img][/img]
Dutchman - 12/5/06 at 11:03 AM
I found a guy in my country that is doing anythig from plexiglass/lexan so if U could not find the headlight covers know that it can be made.
the pics of what is he dooing are here
Fred W B - 30/5/06 at 07:05 PM
90 square meters of 8 mm plywood loaded for delivery to the router guy.
The plywood is recycled from packing crates used to send stuff from GM Brazil to a GM plant here in Port Elizabeth.
Cheers
Fred W B
[img][/img]
Trev D - 30/5/06 at 09:08 PM
Hi Fred I could make you an all aluminium body on the buck you are making. I think the car you have chosen is wonderful it is right up my street.
The best of luck with your build keep us all posted on your progress.
Regards
Trev
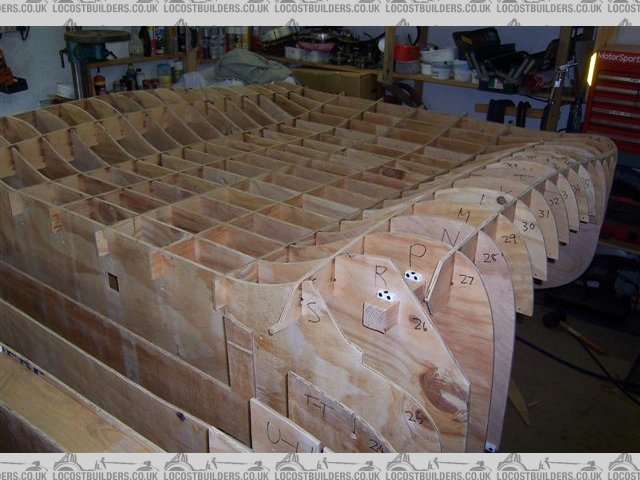
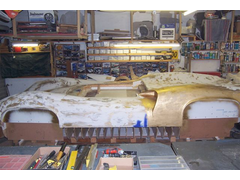
Fred W B - 11/2/07 at 11:44 AM
Believe it or not, some progress to report.
I cleared the decks in the workshop and
screwed a length of tube to the new base board for the centre reference.
buck start

buck table
[Edited on 11/2/07 by Fred W B]
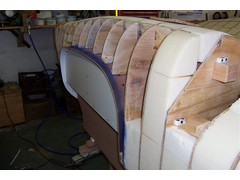
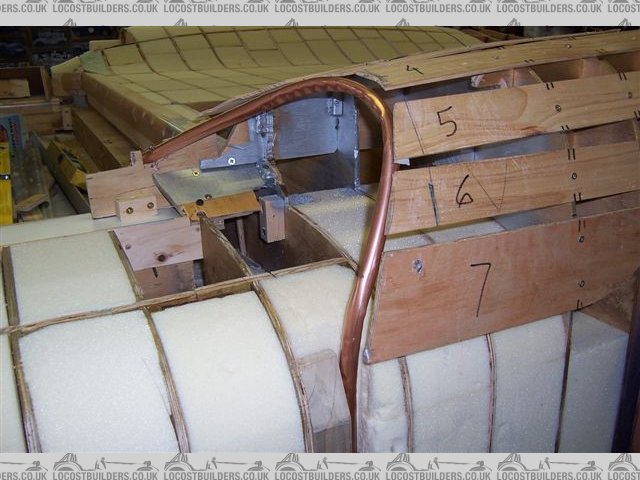
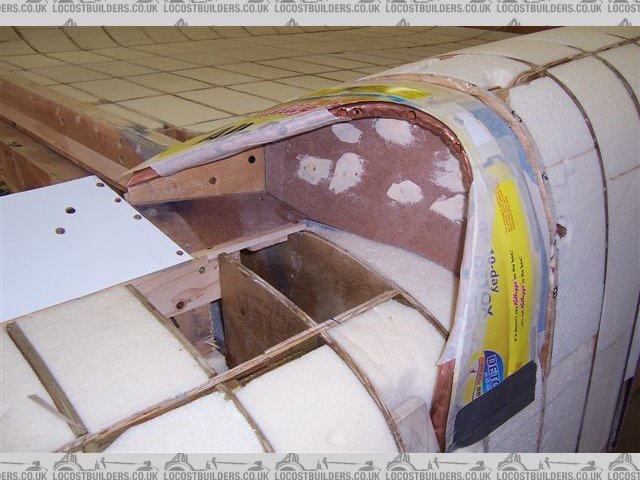
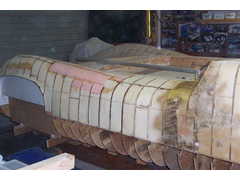
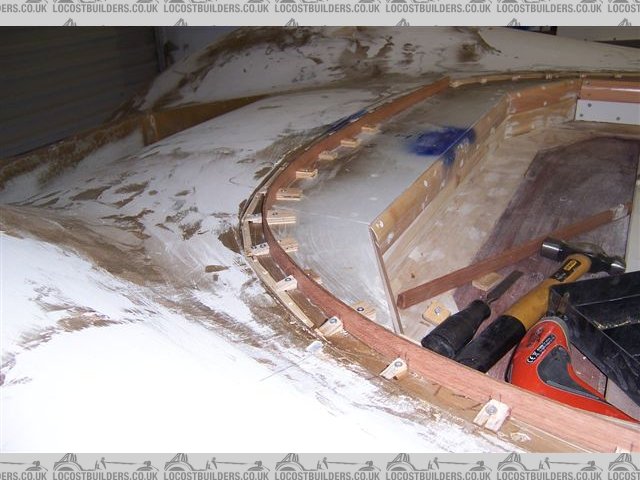
Fred W B - 11/2/07 at 11:53 AM
Set a station that coincided with the end of the table vertical, then contined to position stations at 100 mm centres.
Logitudinal "skewers" planned straight and to size to fit holes cut into stations
Every 5 opening gets a transverse stiffener

buck step 1
[img][/img]
stiffener
[Edited on 11/2/07 by Fred W B]
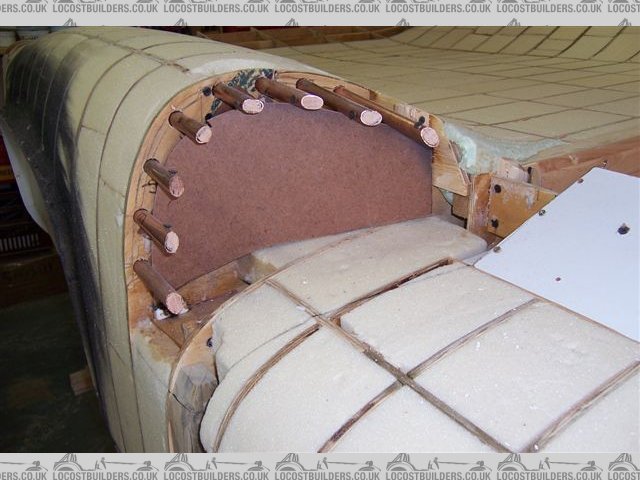
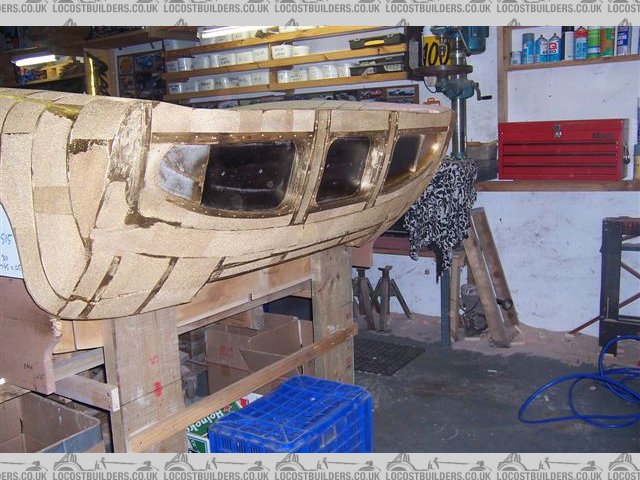
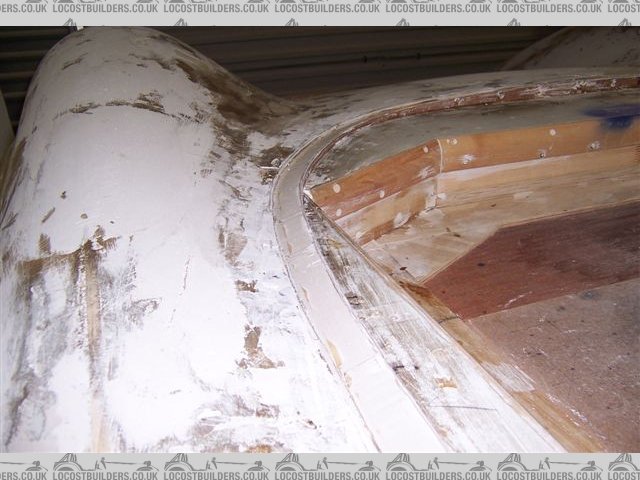
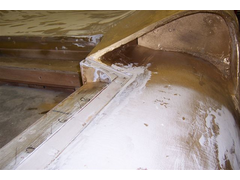
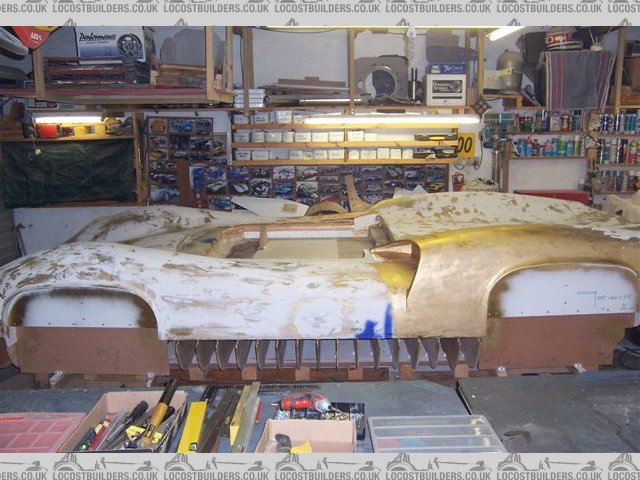
Fred W B - 11/2/07 at 12:17 PM
Rear section of buck framework almost complete

buck feb 2

buck feb
[Edited on 11/2/07 by Fred W B]
DIY Si - 11/2/07 at 12:18 PM
Bloody hell that looks a bit complex! Good news on the progress front though, I was beginning to wonder if you'd had some major drawback or
problem! How are you planning on doing the first layer of the moulds? Or are you filling all the gaps with something like polystyrene and then going
over that?
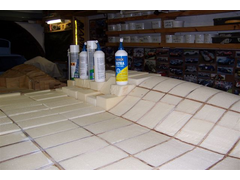
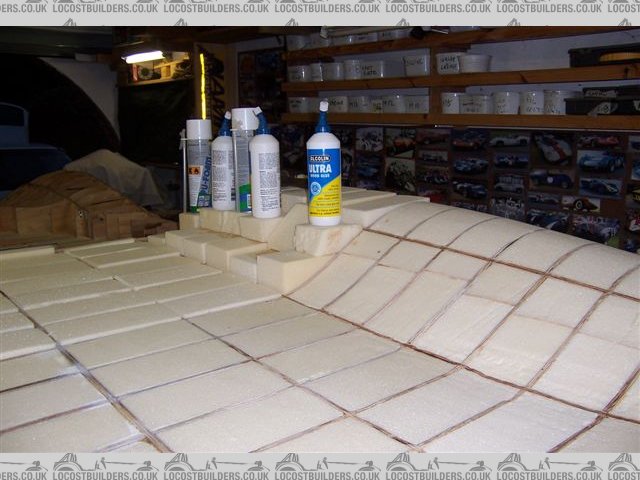
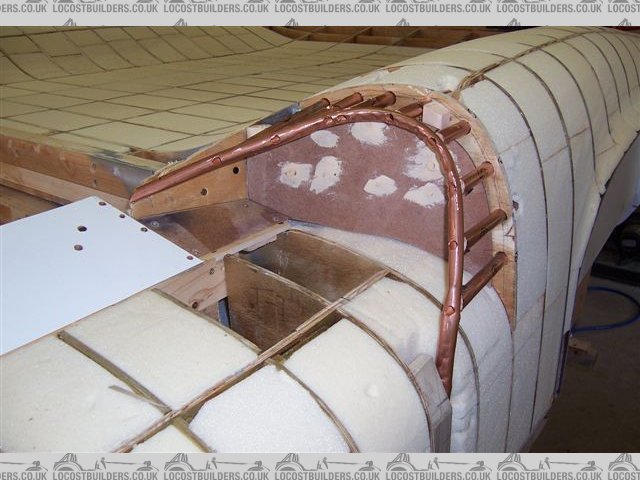
Fred W B - 11/2/07 at 12:23 PM
Hi DIY
The hold up was this
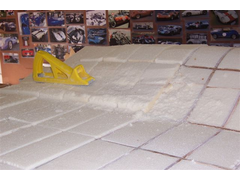
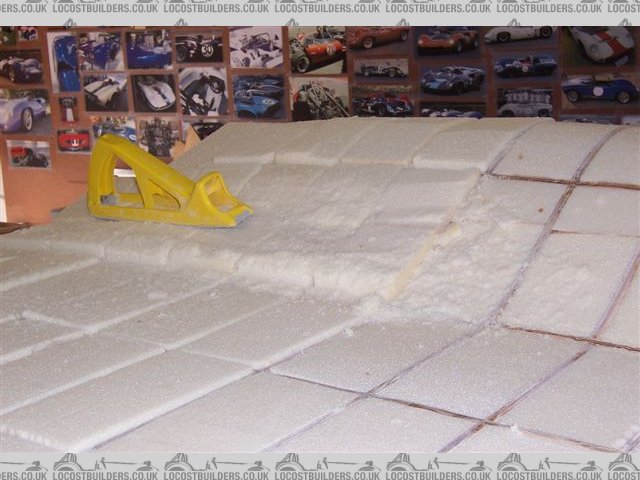
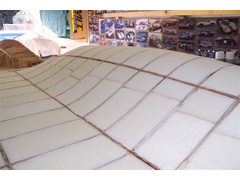
WRT skinning the plug, I have had 350 polyurethane foam blocks cut, to glue into the "egg box" spaces to form the surface. These will be
finished to shape and then the whole thing skinned with GRP and filler.
Cheers
Fred W B
[Edited on 11/2/07 by Fred W B]
DIY Si - 11/2/07 at 12:58 PM
Ah, I'd forgotten about that. Fair enough, I would gladly take time out to make such a nice garage/build space. Any guesses as to when the
buck'll be ready? I imagine that'll be a fair sight all on it's own.
RazMan - 11/2/07 at 02:30 PM
I'm following your project with growing interest Fred.
When covering the 'egg box' with GRP are you going to anchor it to the surface with load spreader plates or similar? I was just thinking
that it might need to be bonded in some way to avoid separation when it comes to removing the buck from the mould. Or is it going to be a sacrificial
buck?
sgraber - 11/2/07 at 02:46 PM
Great progress Fred, and forgive me as I take the podium to say that you are doing the right thing by making sure you have a good base to start from.
If I can give any advice to people seeing Fred's complex structure who are considering their own buck/plug/mold construct - Do not skimp on the
understructure. I did, and paid for it over the years of struggle to prevent shifting and cracking.
Now, we could have a whole conversation about CNC milling the plug vs hand shaping.... But this is not the time or the place. Just LOOK at that
amazing wood work! Lovely!
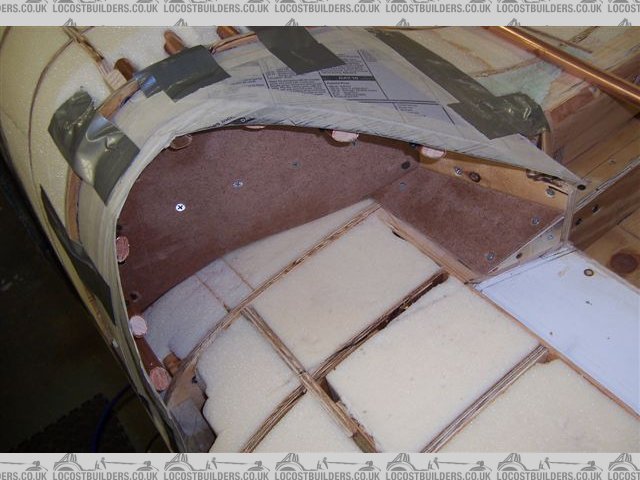
Fred W B - 12/2/07 at 02:56 PM
Hi Guys
Raz, I am hoping that the "skin" of GRP/filler will stay on the plug when I pull the moulds. I hadn't planned on doing anything more
then just relying on the resin to stick the skin to the wood and foam base
Cheers
Fred W B
[Edited on 12/2/07 by Fred W B]
thomas4age - 12/2/07 at 11:22 PM
HolySh*T that is indeed very nice,
makes me kindoff ashamed that I'm being a wuss, saving up for the GD t70 chassis and body.......
if I only had the time and skills to pull that off.
grtz Thomas
DIY Si - 12/2/07 at 11:24 PM
Just do what I might do, and buy a shell off him!
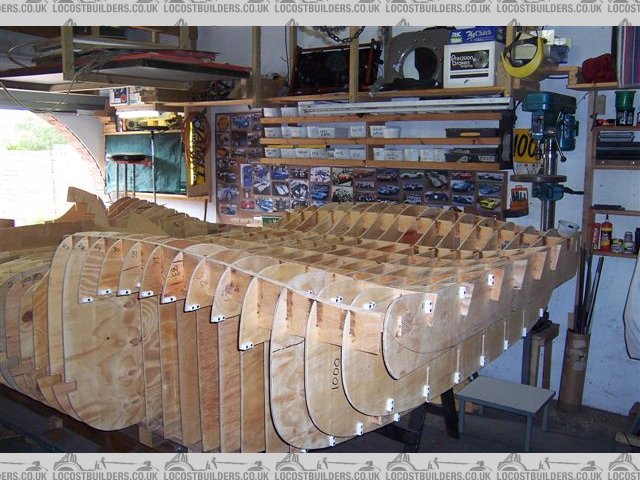
Fred W B - 18/2/07 at 04:10 PM
Made some progress on the front section this weekend.
WRT diy si's comment, would you believe that since I've been posting details of my project on here and on GT40s.com, I've had 5
different guys contact me wanting bodyshells. I tell them I'm not quite ready yet........
Cheers
Fred W B
buck16feb
RazMan - 18/2/07 at 06:13 PM
Hey Fred, it's starting to look like a car now!
Gaz 1977 - 19/2/07 at 09:17 AM
looking good, christ you have put some work into that
gttman - 19/2/07 at 03:05 PM
quote:
Originally posted by Fred W B
Made some progress on the front section this weekend.
WRT diy si's comment, would you believe that since I've been posting details of my project on here and on GT40s.com, I've had 5
different guys contact me wanting bodyshells. I tell them I'm not quite ready yet........
Cheers
Fred W B
I can well beleive it.... I've had people pressure me to provide them a body and I hadn't even designed the rear end at the time.....
nothing stranger than folk.
keep up the good work.
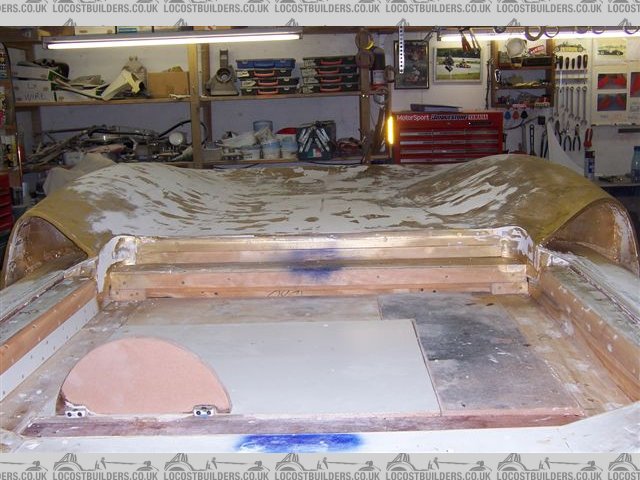
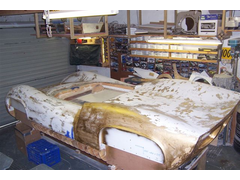
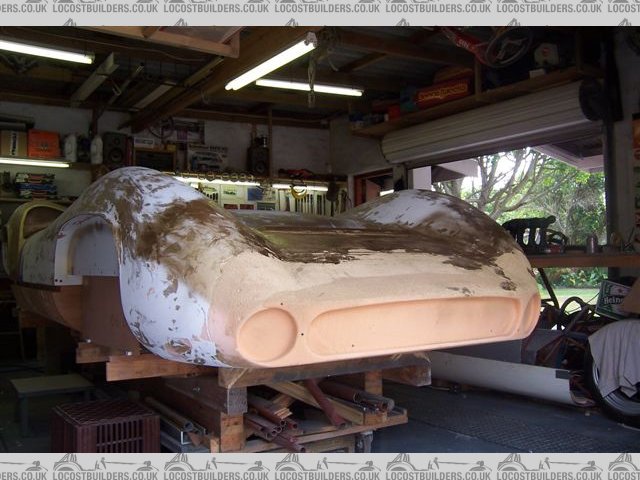
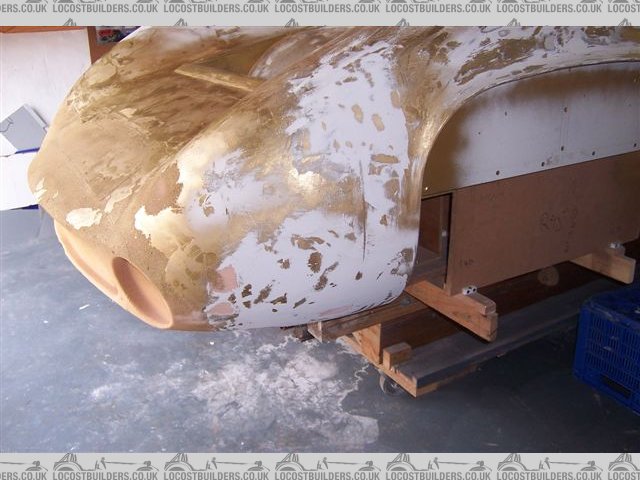
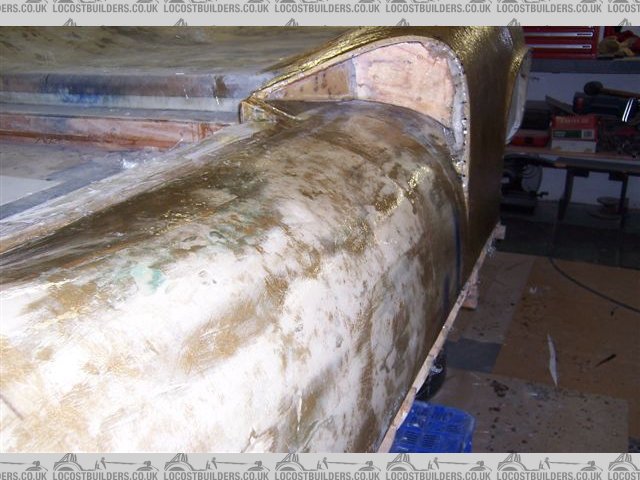
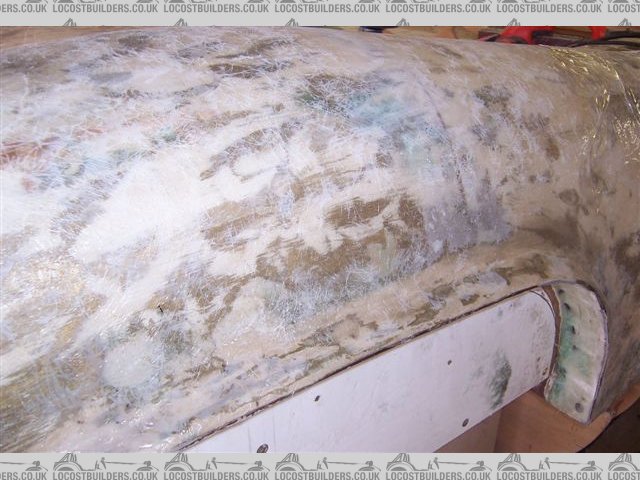
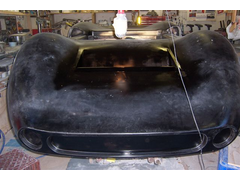
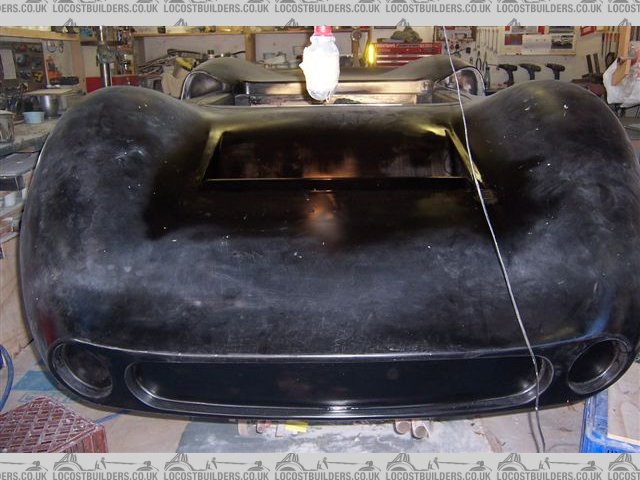
Fred W B - 30/4/07 at 08:22 AM
some process photos
body22
Fred W B - 30/4/07 at 08:24 AM
foam shaping tools

body23
Fred W B - 30/4/07 at 08:27 AM
body 23.5
Fred W B - 30/4/07 at 08:28 AM
body 25
Doug68 - 30/4/07 at 09:25 AM
Awesome work Fred!
How long did it take the router guy to turn that lot out?
iank - 30/4/07 at 10:13 AM
quote:
Originally posted by gttman
quote:
Originally posted by Fred W B
Made some progress on the front section this weekend.
WRT diy si's comment, would you believe that since I've been posting details of my project on here and on GT40s.com, I've had 5
different guys contact me wanting bodyshells. I tell them I'm not quite ready yet........
Cheers
Fred W B
I can well beleive it.... I've had people pressure me to provide them a body and I hadn't even designed the rear end at the time.....
nothing stranger than folk.
keep up the good work.
Most will melt away when the issue of getting paid to make one is raised.
Some things about folk are rather predictable unfortunately.
Looking very good (both of you) wish I had the time, space, money and talent* to make exactly what I want.
* Not necessarily in that order
Fred W B - 30/4/07 at 10:52 AM
Thanks Doug and iank
WRT the routing, the handling time was much more of a factor that the cutting time. The job was done in between real paying jobs, and took 3 or 4
weeks to complete, I think - It was a while ago!
Things I would do different next time would include putting 0.5 mm clearance in the interlocking slots (I made them dead 8 mm wide, to fit over the 8
mm ply and had to hammer the longitudinals in) and I would add some stations at the extreme rear, but fitted perpendicular to the body surface, not
vertical. I would also make the longitudinal ribs thickness stick into the body shape from the actual longitudinal line, and not out as I have done. I
still have to finish off all these edges flush with the eventual body surface.
Best thing I did was have lots of 92 mm wide planks cut, I've used them a lot to get spacing correct at various places, particularly on the base
board. (my stations are at 100 centres, ply is 8 mm)
As for supplying others with bodies, I am under no illusions as to how many people will actually stump up money. Out here we have an expression which
comes to mind whever anyone asks me if I can make them something - "Talk is cheap, money buys the whiskey!"
I want the wheel arches to look like this car. Over the years the wheel arch lips on original 70's seem to have varied quite a bit.

wa 2
[Edited on 30/4/07 by Fred W B]
[Edited on 30/4/07 by Fred W B]
Fred W B - 30/4/07 at 10:54 AM
body 30
Fred W B - 30/4/07 at 10:55 AM
body 32
Fred W B - 30/4/07 at 10:57 AM
body 36
Fred W B - 30/4/07 at 10:59 AM
I think I have to start getting the hard skin on before I can get this any better.
body 38
Fred W B - 30/4/07 at 11:01 AM

body 40
Fred W B - 30/4/07 at 11:04 AM
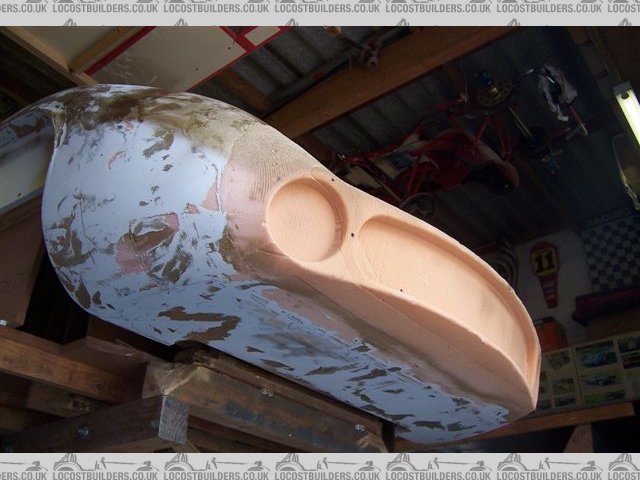
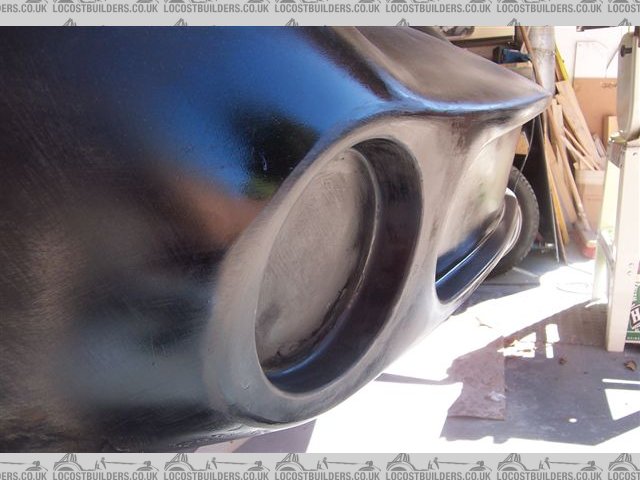
I am now trying to get to grips with the air intake "nostrils" and complete the cockpit edges.
Cheers
Fred W B

body 42
Fred W B - 30/4/07 at 11:05 AM

body 44
violentblue - 30/4/07 at 02:27 PM
My next project is going to be a 4'x8" cnc router table.
Nice job so far. I've built lots of plugs in my day (boats) and a solid understructure makes a huge difference in the quality of your final
mould, I've seen many try and cut corners to get done quicker or cheaper, and it either cost them more in the end, or quality was lacking.
But you are on the right track for a blug you's be able to pull miltiple moulds off of, if you were planning to go into production.
Schrodinger - 14/5/07 at 09:30 AM
I've been watching this progress and am very impressed with the project.
Any progress Fred?
Fred W B - 14/5/07 at 11:18 AM
Hi Keith - Thanks for your interest.
Progress seems very slow, but I do feel that I am steadily getting somewhere.
I have now got the radiator exit duct and the cockpit edges finished (except at the nostrils), and am fitting foam blocks to the nose and LHS of the
car.
I will post some more photos soon. I prefer to post several pictures when I feel that I have made some significant progress, rather then one picture
every week, as then it looks like I'm just bringing the post to the top again and again.
Cheers
Fred W B
[Edited on 14/5/07 by Fred W B]
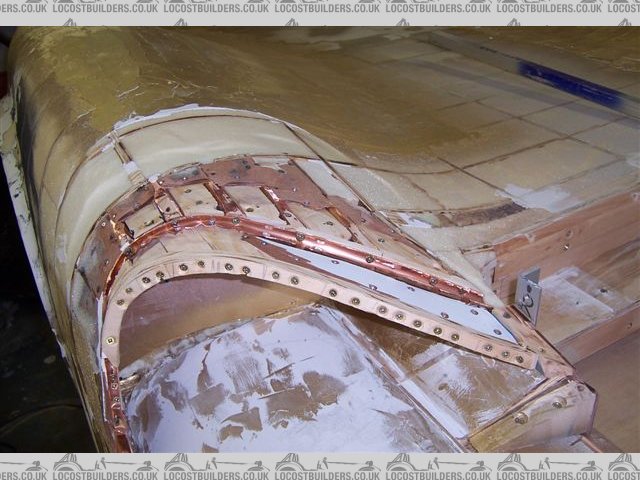
Fred W B - 8/7/07 at 04:13 PM
Still plugging along, and have finally managed to wrestle the shape of the rear air intake ducts into submission. This has been the worst bit to get
right so far, and one I have been working on a bit, leaving to do something else, and then going back to. We didn't get this area right in our
computer model, so I had to go back to old fashioned first principles, shaping by eye from the model and photo references, and using wood and
cardboard templates to get the left and right sides to match. It's still not quite finished, still pending the application of the hard skin.
Trust you will find the attached photos self explanatory. I bent the conduit to shape by hand in a vice and with lots of trial and error.
Cheers
Fred W B

nos1
Fred W B - 8/7/07 at 04:16 PM
nos2
Fred W B - 8/7/07 at 04:17 PM

nos3
Fred W B - 8/7/07 at 04:18 PM
nos 4
Fred W B - 8/7/07 at 04:18 PM

nos5
Fred W B - 8/7/07 at 04:19 PM


nos6
Fred W B - 8/7/07 at 04:20 PM

nos7
Fred W B - 8/7/07 at 04:21 PM

nos8
Fred W B - 8/7/07 at 04:22 PM

nos 9
sgraber - 8/7/07 at 05:02 PM
I trust you will have room to save this 'intermediate' work of art once you have used it to create your mould! It's beautifully
crafted.
Taking your time and spending the money/effort to make this phase as good as possible will save you so much money/time/hassle later on. (Said as
someone with painful experience behind me. )
I can't wait to get started on my next one.
not.
gttman - 10/7/07 at 07:29 PM
quote:
Originally posted by sgraber
I trust you will have room to save this 'intermediate' work of art once you have used it to create your mould! It's beautifully
crafted.
Taking your time and spending the money/effort to make this phase as good as possible will save you so much money/time/hassle later on. (Said as
someone with painful experience behind me. )
I can't wait to get started on my next one.
not.
Ahhh the words of pure wisdom.... shame I'm making all the mistakes you did lol.
What rates do you charge for consultancy? I think I need some!
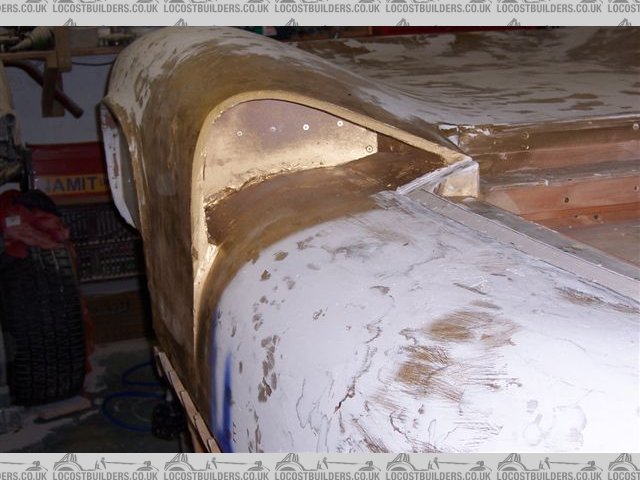
Fred W B - 18/8/07 at 06:05 PM
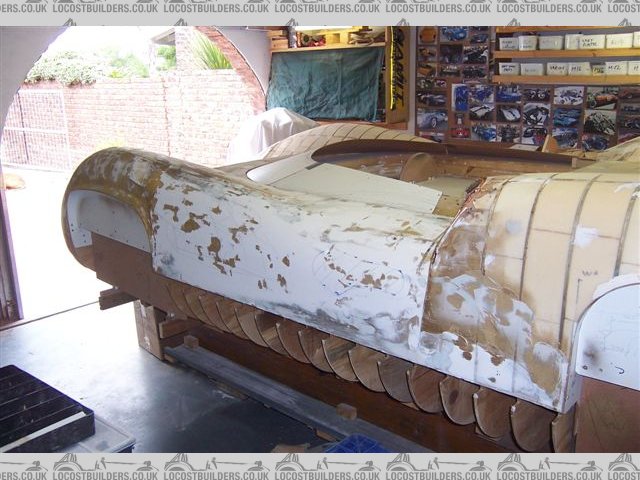
So back to the business at hand....
I have now got pretty much the whole of the body pattern framework covered in foam, and the hard edges such as the cockpit edges etc made up.
Won't be starting with the hard skinning for a while yet though, as I am currently working on the extreme rear of the body and the front 250mm of
the nose still has to be done. I am also not happy with the contours we did along the top of the doors, into the top of the front wheel arches, so I
have some reworking to do there.
I want to get rid of most of the foam dust before I get the sticky stuff into the workshop.
Cheers
Fred W B
[img][/img]
Fred W B - 18/8/07 at 06:08 PM
[img][/img]
Fred W B - 18/8/07 at 06:14 PM
[img][/img]
Peteff - 18/8/07 at 06:30 PM
That next to last picture looks like a flight deck.
[Edited on 18/8/07 by Peteff]
thomas4age - 19/8/07 at 05:26 AM
@ peteff, that's because it kinda is, suprized me how long the tail is when I was in a GD t70 first, the rear is longer that my strikers
bonnet....
@ Fred
Once again BIG THUMBS UP!!!
permission to speak freely, SIR?
the problem with the doors to nosesection is that it looks like the door is a section and the wheelarch is a section beause of the angle of the
upwards curve at the section where the wheelarch begins, the flat piece of the door suddenly takes of as you move your eyes towards the arch.
maybe it would be an idea to make the doors and arch look like one piece
I can imagine that when you take a picture of the side of the car it looks like the car has three sections
front to arch, arch to rollbar, rollbar to rear.
you can try to make that 2 sections nose to rollbar, rollbar to rear.
more like this, I don't know about originality but it looks good

disclaimer: I may very well be that I talking a pile of poo that didn't even come from where it should.....
grtz Thomas
[Edited on 19/8/07 by thomas4age]
Fred W B - 19/8/07 at 08:16 AM
You are quite right thomas, that area does have to be reworked. Not difficult, but everthing takes ages.
Thanks for the support
Cheers
Fred W B
Fred W B - 31/8/07 at 11:26 AM
Whoa � Minor setback.
Spot the difference between this model photo (similar to the one we measured for the computer model) and the real car?
I mean beside the modified rear wheelarch on the model.
Some reworking to start this weekend!
Cheers
Fred W B
bymodel

byreal
donahue 70
[Edited on 31/8/07 by Fred W B]
neilj37 - 31/8/07 at 11:49 AM
Only things I can spot different is the rear wing and the shape of the rear wheel arch.
Fred W B - 31/8/07 at 11:49 AM
Beside the wheel arch and the wing?
Once you see it you can't imagine how you missed it, and I have been looking at T70 pictures for literally years

bmodel
[img][/img]


7070
[Edited on 31/8/07 by Fred W B]
[Edited on 31/8/07 by Fred W B]
[Edited on 31/8/07 by Fred W B]
RazMan - 31/8/07 at 12:13 PM
Got me stumped
Delinquent - 31/8/07 at 12:57 PM
front splitter differs on most of the pics?
Dale - 31/8/07 at 01:11 PM
Gentle curve downward on the door?
Dale
sgraber - 31/8/07 at 01:42 PM
c'mon - tell us already !
Fred W B - 31/8/07 at 02:13 PM
All right - look at the length of the tail of the body aft of the rear wheel arch. It's most apparent if you look backwards along in line with
the top of the rear tyre.
I could not understand that no matter what I did with the blend of the rear lower section into the rear panel with the holes I could not get it to
look right.
As far as I can tell from scaling photo's I have to shorten my plug behind the rear arch by about 160 to 170 mm
Cheers
Fred W B
[Edited on 31/8/07 by Fred W B]
RazMan - 31/8/07 at 02:36 PM
Ahhh I see it now - the tail section is noticeably shorter now that you mention it.
A bit of cut'n'shut needed then Fred?
sgraber - 31/8/07 at 03:31 PM
yes, I see it now too. Very subtle indeed.
adithorp - 31/8/07 at 08:10 PM
So why would the models be wrong?
There wasn't a special body work for some events was there? Not sure about now but endurence race cars ran different bodywork for Le-Mans due to
the sustained high speeds down the strieght, back in the '80s when I used to follow it.
adrian
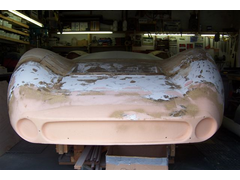
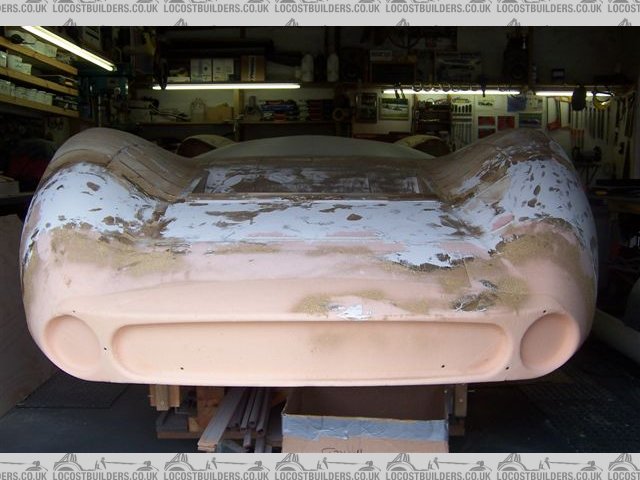
Fred W B - 9/10/07 at 06:46 PM
So the tail used to look like this
[img][/img]
Fred W B - 9/10/07 at 06:48 PM
Now it looks like this
[img][/img]
Fred W B - 9/10/07 at 06:57 PM
The rear transom panel turned into a real mission
buck 47
sgraber - 9/10/07 at 06:59 PM
WOW. again - WOW.
Lovin it.
Fred W B - 9/10/07 at 07:00 PM
But it's now pretty much done, just a few holes to fill and edges to straighten
Note the foam dust lying like snow on the floor along the wall. I blow it away with an airline, it's easier than sweeping up all the time.
Cheers
Fred W B

buck 48 003
[Edited on 9/10/07 by Fred W B]
Fred W B - 9/10/07 at 07:01 PM
Thanks Steve, you got in just as I was posting the last picture
Cheers
Fred W B
Delinquent - 9/10/07 at 09:47 PM
Have to say Fred, Hats off to you, really no way I could cope with all that manual input, would drive me barmy!
gttman - 10/10/07 at 12:57 PM
quote:
Originally posted by Delinquent
Have to say Fred, Hats off to you, really no way I could cope with all that manual input, would drive me barmy!
But doing it in CAD would drive me barmy.
Delinquent - 10/10/07 at 01:01 PM
quote:
Originally posted by gttman
quote:
Originally posted by Delinquent
Have to say Fred, Hats off to you, really no way I could cope with all that manual input, would drive me barmy!
But doing it in CAD would drive me barmy.
well yes, that's true as well - with CAD though, a mistake means usually tweaking a few spline co-ordinates and examining the difference,
it's the fact Fred's taken the entire back end off again and re-sculpted it - would be heartbreaking having put so much effort in the first
time!
gttman - 10/10/07 at 07:00 PM
quote:
Originally posted by Delinquent
quote:
Originally posted by gttman
quote:
Originally posted by Delinquent
Have to say Fred, Hats off to you, really no way I could cope with all that manual input, would drive me barmy!
But doing it in CAD would drive me barmy.
well yes, that's true as well - with CAD though, a mistake means usually tweaking a few spline co-ordinates and examining the difference,
it's the fact Fred's taken the entire back end off again and re-sculpted it - would be heartbreaking having put so much effort in the first
time!
yep pretty much what I do..... but by doing it in the flesh we can also see the change in the flesh.
Also the satisfaction when you have put it right is quite nice.... I almost forget the pain of doing it for the 4th time.
BTW Fred, top job... keep up the good work.
Fred W B - 17/11/07 at 05:45 PM
Thanks for the comments guys.
Some more progress to report. I am now happy the rear panel is ready for skinning. All the openings have 1 degree slope returns and the edges are all
radiused.
[img][/img]
Fred W B - 17/11/07 at 05:47 PM
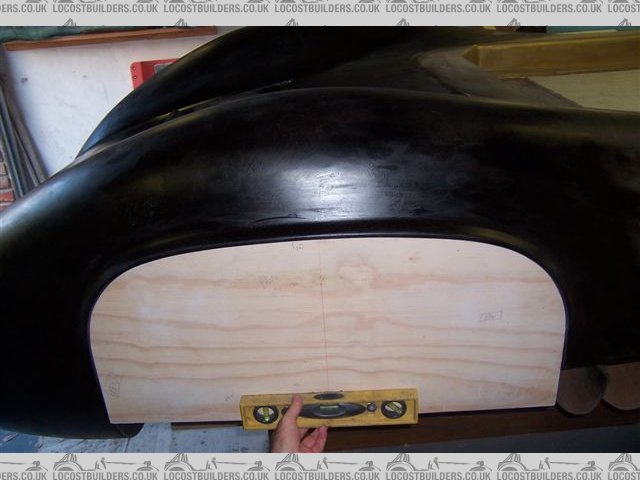
Moving to the mid section, I have mocked up a windscreen template in hardboard in order to establish the angle of the windscreen recess.


screen
Fred W B - 17/11/07 at 05:49 PM
Having reworked the LHS, I am now much happier with the blend into the top of the front wheel arch and the profile of the top of the door. Still have
to finish off and do the RHS.
side rework


door mod

sideeeeeeeee
[Edited on 17/11/07 by Fred W B]
Fred W B - 17/11/07 at 06:02 PM
We have been discussing the merits of CAD verses old fashioned trial and error following the rework I did to shorten the tail. Here we see the other
approach.
Andrew volunteered to do some more work on the nose of the car. This is the refined front view drawing, which was used to generate a tool path to cut
the front 250 mm of the nose on his home made 3 axis CNC router. The part was cut in 3 sections which were glued together.

model fv

nose cut
nose cut 2
[Edited on 17/11/07 by Fred W B]
[Edited on 17/11/07 by Fred W B]
Fred W B - 17/11/07 at 06:08 PM
And today I glued the nose on. I am now looking forward to adding the remaining foam and blending it in once the glue dries.
Cheers
Fred WB
[img][/img]
RazMan - 17/11/07 at 06:10 PM
That 3D router certainly does a nice job Fred - what material is it working with?
Fred W B - 17/11/07 at 06:49 PM
Hi Raz.
The material you see there is polyurethane foam, with a density of about 32 kg/m2. That density is not ideal, heavier would be better.
Cheers
Fred W B
[Edited on 17/11/07 by Fred W B]
jrevillug - 17/11/07 at 11:52 PM
Stunning work there. Lots of effort- and it shows.
The modified door looks spot on to me.
James
sgraber - 18/11/07 at 01:48 AM
I'm not going to say wow again...
.
.
.
.
.
WOW
DAMMIT!!! That just blurted right out!
Love the fact that you are blending old world techniques with new world ones.
Delinquent - 19/11/07 at 12:40 PM
excellent combo of the disciplines there Fred! Really is coming on beautifully.
Fred W B - 2/12/07 at 04:13 PM
This weekends work......
nose 02 dec 2
[Edited on 2/12/07 by Fred W B]
Fred W B - 2/12/07 at 04:16 PM
[img][/img]
Fred W B - 2/12/07 at 04:17 PM

side 02 dec
Cheers
Fred W B
violentblue - 4/12/07 at 06:36 PM
so when are we going to see it in primer?
Fred W B - 5/12/07 at 06:03 AM
Still quite a bit of work to do before I get to the surfacing stage. Still need to complete the reworks on the RHS. and touch up a few other areas
I am now happy with most the shape, just want to do a bit more work on the rear air intakes, I now think they need to be a bit smaller and lean back
less. I think I have cut them too far back into the rear wings, so they are much bigger than they should be. I also want to add a bit more
"bulge" to the inside side of the front wheel arch bulges, above the tops of the front wheels
I have still not yet personally seen a real (or replica) T70 spyder in the flesh and trying to get the proportions and some of the details more or
less right from photographs has been driving me crazy, not helped by the fact that the model I started with, the original 60's built cars in
period (and now), the Lola Heritage continuation series cars, the GD / RCR narrow shell replicas etc are all slightly different in certain areas to
each other.
I have had a lot of help from some of the Lola owning guys on gt40s.com who have sent me photographs and measured dimensions from original cars and
bodywork that they own.
www.gt40s.com
Cheers
Fred W B
[Edited on 5/12/07 by Fred W B]
Ivan - 8/12/07 at 06:32 AM
Fred - I am extremely impressed with the quality of work and effort you are putting into this project.
Seeing the nose done on the 3D router gives rise to the question:
If one where contemplating a similar project on some other car would it be worthwhile getting the shape cut on a 3D router using high density foam or
doing it in frames as you did?
One advantage would be that re-designs would be a lot easier to implement.
thomas4age - 8/12/07 at 03:34 PM
Hey Fred
home made portal type CNC router, that sound very tasty!
@Ivan, that's a way of doing it,
but acces to a big cnc portal type milling machine isnt very easy, I know at least one who did it like that, the body plug was milled at a shipping
yard on a 3d portal CNC mill, that normaly is used to make plug's for hulls of 100K+ costing sailing yachts, the total cost for tooling the
bodyplug was somewhere in the region of 15.000euro's
so unless your neighbour has something like that standing in the workshop and likes lots of beer tokens.... it wouldn't be very locost.
grtz Thomas
Fred W B - 8/12/07 at 03:34 PM
HI Ivan
If you have access to CAD and CNC machinery at the right price, it will be MUCH easier to get the shell drawn completely in CAD, and then CNC cut in
one piece (or sections) in foam. Nowadays, they cut the foam a few mill undersize, then apply the surfacing filler and recut the plug final size, so
then just have to wax and take moulds.
If the CNC you have access to is a router with limited Z height I would suggest rather than cut thin ribs and fill between than manually, have foam
sections cut in say 30 mm slices, glue then together and then blend the contours together.
With any task that is new to you, you only really know how to do it properly once you are finished! If I was doing this again, I would spend more time
getting the CAD model to be exactly what I want, by comparing it at all angles with photos of actual cars. If you are doing an original body that will
not be a problem.
Cheers
Fred W B
Delinquent - 8/12/07 at 08:34 PM
quote:
Originally posted by thomas4age
Hey Fred
home made portal type CNC router, that sound very tasty!
@Ivan, that's a way of doing it,
but acces to a big cnc portal type milling machine isnt very easy, I know at least one who did it like that, the body plug was milled at a shipping
yard on a 3d portal CNC mill, that normaly is used to make plug's for hulls of 100K+ costing sailing yachts, the total cost for tooling the
bodyplug was somewhere in the region of 15.000euro's
so unless your neighbour has something like that standing in the workshop and likes lots of beer tokens.... it wouldn't be very locost.
grtz Thomas
My plans at the moment are for a home made CNC mill roughly the same size as the workshop (the workshop is having parts built in specifically for the
CNC machine)
Chances of success - 50/50 I reckon, it'll either work or it won't 
Ivan - 9/12/07 at 05:34 AM
quote:
Originally posted by thomas4age
Hey Fred
home made portal type CNC router, that sound very tasty!
@Ivan, that's a way of doing it,
but acces to a big cnc portal type milling machine isnt very easy, I know at least one who did it like that, the body plug was milled at a shipping
yard on a 3d portal CNC mill, that normaly is used to make plug's for hulls of 100K+ costing sailing yachts, the total cost for tooling the
bodyplug was somewhere in the region of 15.000euro's
so unless your neighbour has something like that standing in the workshop and likes lots of beer tokens.... it wouldn't be very locost.
grtz Thomas
To pay or do it yourself raises an interesting conundrum when you're retired. the conundrum being whether to work as consultant or at something
that you're realy good at and pays well for a fraction of the time that it would take you to do the job and employ an expert to do the building
- the alternative being to do it yourself that could be a real shlep and take years instead of months to do.
One of our local glass fibre firms for example makes some of the most beautiful car bodies for the racing and advertising industry from scratch at a
cost for buck and moulds for what would take me around 4 months of Consulting to earn.
Bodies he has made recently include a Porsche 917, Audi LMP, Mustang, Formula 1 Clone etc.
Why I'm interested is I would love to do a Porsche 904 or 906 or Renault Alpine a110 replica and am puzzling out the best way to go about it.
Fred W B - 9/12/07 at 06:45 AM
quote:
One of our local glass fibre firms for example makes some of the most beautiful car bodies for the racing and advertising industry from scratch at a
cost for buck and moulds for what would take me around 4 months of Consulting to earn.
No brainer then Ivan, by the time I have a set of moulds I recon I will have spent at least R15 000 on materials, and that includes getting the CAD,
Router, and CNC time and the foam material for FREE, not to mention the maybe 500 hours I have spent on the pattern already.
Some sources quote 1000 hours for a car body pattern done the old fashioned way, and I can believe it
Cheers
Fred W B
Ivan - 9/12/07 at 07:38 AM
^^^ Thats what I thought Fred - although doing it yourself has a lot of appeal.
Next time I'm in PE I would love to see what you are doing.
Fred W B - 9/12/07 at 12:48 PM
quote:
Next time I'm in PE I would love to see what you are doing.
Sure thing Ivan, be glad to show you.
Cheers
Fred W B
Fred W B - 23/12/07 at 06:17 PM
Meanwhile, back in the garage...
I am now much happier with the "hip nostril" shape and size
[img][/img]
Fred W B - 23/12/07 at 06:19 PM
[img][/img]
Fred W B - 23/12/07 at 06:21 PM
And I'm making some progress with the rework to the inside of the front wheel arch contours
[img][/img]
Fred W B - 23/12/07 at 06:23 PM
[img][/img]
Fred W B - 23/12/07 at 06:26 PM
[img][/img]
Fred W B - 23/12/07 at 06:27 PM
[img][/img]
Fred W B - 7/1/08 at 06:20 PM
I have taken advantage of some leave over the holiday season to get some quality time in the garage, between family commitments and eating!
[img][/img]
Fred W B - 7/1/08 at 06:21 PM
I have been working on the RHS, to get it the same as the reworked LHS. Where I have deviated from the original routed stations, I have to make
templates to check symmetry of the profile on the LH and RH sides.

bb 0200
[img][/img]
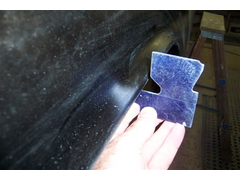
Fred W B - 7/1/08 at 06:22 PM
You have to be sure to keep the template vertical when checking, particularly where the body slope is steep, hence the spirit level attached to this
template.
[img][/img]
Fred W B - 7/1/08 at 06:23 PM
In order to keep the body as symmetrical and "square" as possible, I check everything back to a horizontal reference plane I have across the
back of the cockpit. Have to be careful you don't loose the centerline on the pattern!
[img][/img]
Fred W B - 7/1/08 at 06:23 PM
Here you can see that at this point I determined that I had had to bring the highest point of the RHS front wheel arch hump up another 3 mm.
[img][/img]
Fred W B - 7/1/08 at 06:24 PM
Have now started adding a bit more "fat" to the rear wheel arch humps towards the center of the rear deck.
Finally starting to feel I have now broken the back of most the body shaping.
Cheers
Fred W B
bb 0290

bb 0300
[Edited on 7/1/08 by Fred W B]
Ivan - 7/1/08 at 08:54 PM
Fred - watching your progress amazes me - you are certainly going for perfection and getting there.
It reminds me of an old work colleage (a surveyor believe it or not) who's favourite expression was "we are not grinding crankshafts
here" as an excuse for mediocre quality work or taking shortcuts, and in many cases it was valid. However that definitely doesn't apply to
what you are doing and I am sure that your "grinding of the crankshaft" will show in the end result.
Keep up the good work - you are an insperation to many of us.
Fred W B - 9/1/08 at 07:17 PM
thanks Ivan
I use the expression "this is not a space shuttle" quite a bit
Cheers
Fred W B
violentblue - 10/1/08 at 03:38 AM
WOW, i check for updates on your project every time i visit these forums. I'm always impressed.
sgraber - 10/1/08 at 05:22 AM
That is cracking me up! I use the phrase "we aren't sending a man to the moon" all the time!
But seriously Fred, you are really going the extra mile. And I just know you are having a great time doing it! Fun! Hard, but fun.
quote:
Originally posted by Fred W B
thanks Ivan
I use the expression "this is not a space shuttle" quite a bit
Cheers
Fred W B
Dom9 - 10/1/08 at 09:53 AM
Hi Fred, I have hovered on this forum for quite a while but have spent the last few years working away from home. So I never signed up here or indeed
had the space to work on my own project.
I was offered a Group C Jaguar XJR-9 body in GRP a few years back, but I had to move house and so couldn't commit to the project and I also
remember in one of the UK kit car mags a few years ago, another Group C/ Le Mans style body in GRP being sold for only �600 if memory serves
correct...
I haven't seen anything (except maybe the Ultima) like that for a long time and so I have been thinking a lot about getting a nice, authentic
die-cast model in say 1/10th scale and having it drawn up in AutoCAD (my missus, Lou, is a CAD draughy) and make the plug exactly as you have done in
the garage.
I would really love to design the whole car, from spaceframe and suspension through to bodywork and own my own Group C/ Le Mans/ IMSA GTP replica!
This thread is a real inspiration as is Andygtt's work, which I have followed (quietly) on Pistonheads since he first posted there. The only
thing that scares me is the cost and the time involved... Despite being an engineer in the oil and gas industry, having previously worked for Lotus
and Ferrari, I would still be worried about trying to build a body from scratch.
If we are ever in town, and I have promised Lou we will go to SA soon as my grandparents were from Cape Town, I would love to come and see the work
you have done.
Hopefully I will have the time and passion to do what you and Andy have done, over the next few years.
Fred W B - 10/1/08 at 06:27 PM
HI Dom
Thanks for your post. I would be very pleased to show you what I am doing, if you ever end up in Port Elizabeth. If you are planning a trip to SA,
driving by road from PE to Cape Town (or visa versa), via Kynsna is reccomended.
Anything is possible, if you persevere. As an engineer you already have the problem solving skills required. Before I started this, I had no practical
experience in any car designing or composite building skills.
As I said in another post a while ago, once I've decided what I want to do I:
Find out how to do it - books, internet, speak to people.
Get what I need to do it - tools, materials.
Start doing it!
Solve one problem at a time.
If you get stuck do something else for a while, then go back to it.
So just go for it
Cheers
Fred W B
[Edited on 10/1/08 by Fred W B]
Fred W B - 10/1/08 at 06:34 PM
[img][/img]
TheGecko - 11/1/08 at 03:31 AM
quote:
Originally posted by Fred W B
Anything is possible, if you persevere. As an engineer you already have the problem solving skills required.
This brings to mind the quote attributed to Nevil Shute who, as well as being a notable author,
was firstly an aeronautical engineer. He said:
"An engineer is a man who can make something for five bob that any bloody fool can make for a quid!"
I agree wholeheartedly with Fred's thoughts here. Knowledge of the technical details of building a car are less important than the mindset
necessary to enable you to acquire that knowledge.
I suspect that some people enjoy the problem solving aspect as much as (or maybe even more than) driving the finished product.
Dominic
Peteff - 11/1/08 at 11:17 AM
I like Monty Burns' saying in the Simpsons " Good grief man,this is brain surgery, it's not rocket science " You'll see the
shape more when it's all one colour but it looks good so far.
Fred W B - 10/2/08 at 11:08 AM
So now we have bigger hips...........

feb 006

feb 008
[Edited on 10/2/08 by Fred W B]
Fred W B - 10/2/08 at 11:14 AM
Here you can see how much material I added when reworking the nostrils.

feb 001
Now just need the edge radii formed

feb 022
[Edited on 10/2/08 by Fred W B]
Fred W B - 10/2/08 at 11:17 AM
As always the devil is in the detail and the smallest things always seem to take forever. Here I am forming the windscreen recess
feb 108

feb 024
feb 025
[Edited on 10/2/08 by Fred W B]
Fred W B - 10/2/08 at 11:23 AM
Looking back up the thread I see I have been reworking for 7 months now. But finally I am happy with the major details of the shape
Cheers
Fred W B
feb 012
feb 013
[Edited on 10/2/08 by Fred W B]
RK - 10/2/08 at 03:01 PM
How much is 5 bob?
Kaspa - 10/2/08 at 06:44 PM
1 quid = 1 pound. or 20 shillings in old pre decimal curreny
5 bob = 5 shillings
not a lot
Kaspa
Fred W B - 14/3/08 at 11:30 AM
Struggling with my motivation a bit at the moment, and have had a few other things to do. Haven't touched the car in a month.......
Cheers
Fred W B
Delinquent - 14/3/08 at 11:46 AM
quote:
Originally posted by Fred W B
Struggling with my motivation a bit at the moment, and have had a few other things to do. Haven't touched the car in a month.......
Cheers
Fred W B
Think there must be a bug going around - virtually everyone I know that has a project running at the moment seems to be down on enthusiasm!
Fred W B - 13/4/08 at 09:30 AM
Enough! Foam and preskinning filler work finally finished. Just completed shaping the front lower edges of the front wheel arches and the surface
under the nose. Working overhead while lying on your back is not fun!
Now just radiusing a last few edges and then I can start with laying on the grp skin and the real surfacing.
Cheers
Fred W B
nose 55

nose 049

nose 50

nose 51
[Edited on 13/4/08 by Fred W B]
Delinquent - 13/4/08 at 12:17 PM
Congrats Fred, a milestone reached - and a bloody good looking one at that
autohausdolby - 14/4/08 at 08:19 PM
Awesome thread
ghetto_eddie - 16/4/08 at 03:28 PM
Fred,
I am building a body in a very similar way to you... even down to the little KD (modesty/whatever you call them) blocks holding the ply together..
But one big question... how the hell did you secure yours together? i started to assemble my buck the other day and realised my drill is too big and
hence doesnt fit in enough for me to sink the final screw (of the 3) in the blocks!
My only solution so far is a 90degree drill adapter... but would be interested to see how you got on with this!
Regards
Edd
Fred W B - 16/4/08 at 03:42 PM
Hi Eddie
I made sure that I worked from the first station outwards, so you were always working away from the previous panel. Secure that panel, then move onto
the next. You have to think the assembly process through to ensure you can get in where necessary. Put all the joiners on a panel before you add it to
the buck where possible for example.
Where I sometimes had to go back in, I had to cut away the second panel back enough to get a short battery operated pistol grip style screwdriver in.
Or some times I could use a very long adaptor made up from 1/4" drive socket set bits, through access holes drilled in the stations etc etc.
Use a large "spade" drill
All the best with your project
Cheers
Fred W B
[Edited on 16/4/08 by Fred W B]
[Edited on 16/4/08 by Fred W B]
ghetto_eddie - 16/4/08 at 04:11 PM
Thankyou Fred for the quick and helpful reply!
I shall see tonight if my 90 degree adaptor idea will fit in... if not i shall procede with the method you outlined above!
All the consideration i put into this build... and i overlook the smallest of things!
Edd
Fred W B - 16/4/08 at 04:52 PM
I left out my "trick" , which was to put the longitudinal stringers 200 mm, far enough apart to fit in the pistol grip driver.
I put the connector blocks (with the two screws) on the transverse stations first, as I build up the framework longitudinally, then when the stringers
went in I just had to put the third screw into the stringers
I am sure the right angle drill will work too, though just mayby a bit difficult to "muscle" . I stopped counting once I went past 1000
blocks x 3 screws each!
Cheers
Fred W B
[Edited on 16/4/08 by Fred W B]
ghetto_eddie - 17/4/08 at 08:00 AM
Fred,
I developed a similar method to what you mentioned, assembling the blocks on the "stiffeners" first, and now just to assemble... but
unfortunately my sections are 175mm apart! shot myself in the foot there!
ime currently on 400 blocks pre-assembled onto my stiffeners! FUN
I bought my right angle drill adapter last night... shoddy piece of Cr*p but it may just work!
Sorry for clogging up your thread!
Edd
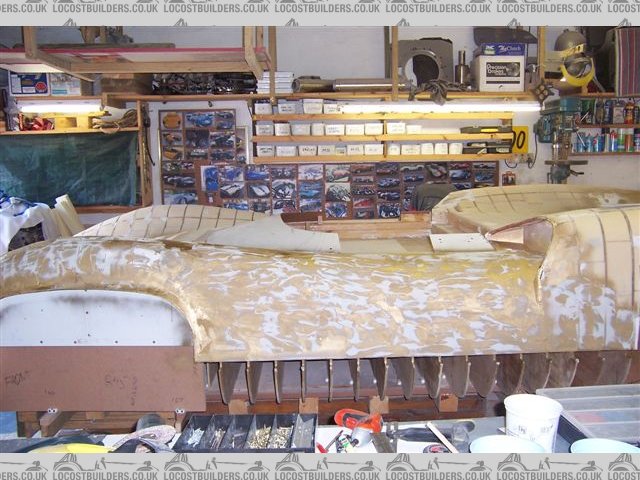
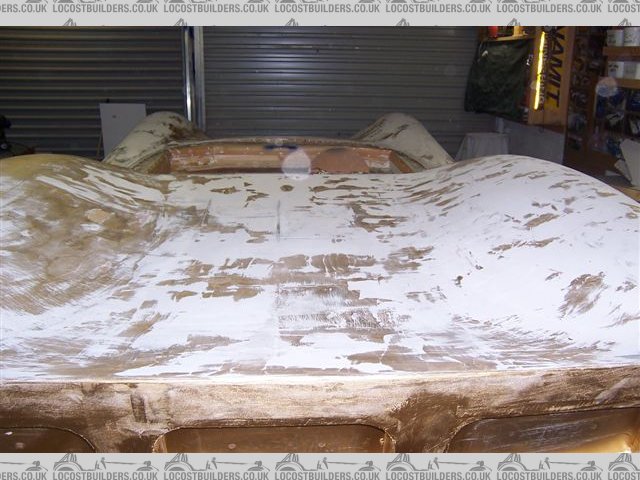
Fred W B - 25/5/08 at 05:51 PM
It's been a while, but I have very busy climbing up the learning curve of laying up and working off fiberglass. Having now consumed the majority
of a 25 kg drum of resin, I have about 80 percent of the pattern covered in a generous layer of resin and CSM.
As I was warned, this is messy, tedious and unpleasant work that definitely requires a "knack" to be acquired. It is the most difficult task
psychologically so far on my project. I am definitely very glad I spent as much time as I did getting the shape to my satisfaction before I started
with the resin.
I attach some detail photos. As always the edges and returns take a lot of time. As you can see the pattern looks a lot worse for a while, before it
starts to look better again. At the moment I am grinding back obvious high spots and overlap joints with a flexback wheel in an angle grinder, and
reworking occasional "soft" spots in the surface, where I caught an airbubble in the layup. I'm looking forward to getting this stage
finished so I can get onto the final smoothing of the surface with a long board etc etc etc
Cheers
Fred W B

skin 1
Fred W B - 25/5/08 at 05:53 PM

skin 2
The surface of the return is not complete yet in this shot
[Edited on 25/5/08 by Fred W B]
Fred W B - 25/5/08 at 05:54 PM

skin 3
[Edited on 25/5/08 by Fred W B]
Fred W B - 25/5/08 at 05:57 PM

skin 4
Ivan - 26/5/08 at 12:58 PM
Always interested to see your progress Fred
Fred W B - 8/6/08 at 07:57 PM
For the last three weekends, and also some weekday evenings, I have pretty much done nothing else than graft in the garage, in order to get the damn
fiberglass skin finished. Now every square centimeter (except under the nose) is covered, some of it worked off fair, and I have actually started
applying some filler - Yay.
I couldn't resist working off the first section of filler I applied and I'm very happy with the way the surface came up. This is after just
one application of filler.
Cheers
Fred W B
[img][/img]
Fred W B - 8/6/08 at 08:04 PM
In this shot the camera maybe makes it look like the lower line of the side pod/door is bowing inwards a bit in the centre, but checking with a
straight edge it is dead flat in the longitudinal direction, except for where you see the guide coat.
Cheers
Fred W B


filler 2
[Edited on 8/6/08 by Fred W B]
02GF74 - 9/6/08 at 07:26 AM
excellent.
has it been asked before - but with all that sanding going on, how do you manage to keep the garage so tidy?
Fred W B - 9/6/08 at 08:07 AM
Thanks 02. I keep an airline handy and blow the dust away periodically. It piles up on the floor against the walls like snow
And of course it goes everywhere. Across the yard, on the cars, on the dogs etc etc. I'm surprised the neighbours haven't complained.
Cheers
Fred W B
[Edited on 9/6/08 by Fred W B]
violentblue - 15/7/08 at 04:44 AM
so whats the status?
looking forward to seeing it in one color
(primer?)
Fred W B - 15/7/08 at 06:11 AM
HI Blue
Have now got a layer of filler worked off over almost the entire pattern. Not much to see though, just how many pictures of sanded filler can you all
stand?
I haven't been able to devote much time to the project over the last few weeks, but I hope to get the first layer of surfacer primer on in a
month or two.
Cheers
Fred W B
[Edited on 15/7/08 by Fred W B]
Delinquent - 16/7/08 at 11:14 AM
quote:
Originally posted by Fred W B
just how many pictures of sanded filler can you all stand?
Probably more than you'd imagine
mistergrumpy - 17/7/08 at 10:43 PM
Wow! Don't know how I missed this thread previously. Been thinking about it today whilst trudging around at work. Am I right in thinking that
after all those measurements that you took you knocked a few mm off them overall to take into account the depth of the filler etc.?
Great project
Fred W B - 18/7/08 at 05:37 AM
thanks Grumpy
quote:
Am I right in thinking that after all those measurements that you took you knocked a few mm off them overall to take into account the depth of the
filler etc.?
That would have been the right thing to do, but we didn't bother. Who knows how close we actually are to the real thing anyway?
Cheers
Fred W B
Fred W B - 20/7/08 at 04:21 PM
A couple more photos. Have now worked off the second go round with filler on the rear clip top surface and the whole left hand side.
[img][/img]
Fred W B - 20/7/08 at 04:28 PM
Although it doesn't look like it here, due to the camera angle, I made a template so I could match the top curve of the LH and RH side rear
arches.
Cheers
Fred W B
[img][/img]
:{THC}:YosamiteSam - 20/7/08 at 08:04 PM
dont you just love seeing someone building a car like this? to put so much heart and soul into their *baby* and seeing it starting to look like a car
too.
i think there are 2 types of kit car builders - those who make bits for the car and those that buy bits - personally i prefer the making bits type -
because it stimulates the mind the make better things- after all if you can make something like this - you could make just about anything given the
time and patience
Fred W B - 6/8/08 at 11:20 AM
Random Thoughts while shaping
I haven�t posted much progress detail lately. The work I�m doing now doesn�t show well in photos, but the shape and surface is getting better and
better. I prefer to post details of what I�ve done, not talk too much about what I�m still going to do. I saw on another car building forum a guy
posted nice renderings of a car body he was going to build. He gave himself a month to build the plug. After two weeks he had a lump of hacked about
foam, and he gave up. Sorry mate � It doesn�t work like that.
All this sanding means you have a lot of time to think while toiling away in the garage. Making a body pattern single handed is a silly amount of
work. To do this I think you do have to be determined, some would say bloody minded. It reminds me of when I was cycling competitively, and later
racing karts. Sometimes while doing the activity (cycling � while feeling bad and just just hanging on the back of a bunch, karting � being nerfed off
the track, or having other issues during a race day) I would think to myself � �this is madness, I�m not enjoying myself, I�m going to give up�. But
then at the end of the day you see you have finished a bit higher up than last time, and you feel better, and so you give it yet another go. Having
like minded mates to chat/drink beer with after also helps a lot.
I have seen a couple of references that state doing a body pattern the old fashioned way takes maybe 1000 Hours. I reckon I am averaging at most about
10 hours a week on the project, so that would be two years. Currently just starting the 20th month of work on the pattern and I hope to finish this
year still, so that 1000 hours seems about right in my case. I read in USA magazine �Hot Rod�'s paint and body issue that rod or muscle car high
end professional paint jobs may have 200 to 300 hours of block sanding alone in them � and that�s on an existing car!
I try to concentrate on just the area I am working on, without thinking about the all the work yet to do. When I get despondent I look back through
this thread and see how far I�ve come, and that improves my resolve to keep going, as does the positive responses from you guys here.
Experienced builders might smile at the notes below, but I put this down for others who may be considering a similar project. Maybe they are just
notes to myself:
There is no �easy way�
Don�t agonize over how to approach or do something. Just start, and move on from there. You may find that eventually the first thing you did has been
changed/replaced, but at least you started.
Get each stage as good as you can before you move onto the next. It�s easy to shape wood/foam, less easy to shape GRP, a pain to correct stuff at the
body filler stage. Getting it absolutely correct at the drawing stage would be first prize.
Don�t expect to get every section 100 percent the first time. Get it good, do another section, work round the car, when you get back to it you can get
it better.
Even when you don�t feel like it, or just have a little bit of time, get in the garage. Things don�t get built if you aren�t in the garage. Even if
you just tidy up a bit, you will do something.
Do everything to the standard you want. If it bothers you every time you look at something, rework it.
If you get tired, or find yourself rushing to finish something at the end of a day, stop. Do it next time. You will make mistakes and have to redo it
if you don�t.
When you think you are just about finished, you aren�t - The last 10 percent takes 90 percent of the time.
Anything can be fixed / reworked.
Cheers
Fred W B
adithorp - 6/8/08 at 12:41 PM
"...(cycling – while feeling bad and just just hanging on the back of a bunch,..."
I know that feeling! It's looking good.
adrian
Benonymous - 6/8/08 at 01:05 PM
Hi Fred, I'm not only impressed with what you have achieved but also with your work philosophy. The car you are building comes from an era where
design was functional but also aesthetically pleasing. Your ideas about carrying out the work also come from that era of patient craftsmanship.
I know for a fact that one day I'll see a gleaming Lola twinkling in the sunlight on this thread. I don't care how long it takes.
Power to your sanding arm mate!
sgraber - 6/8/08 at 02:53 PM
Thanks for that philosophical musing Fred. You've dredged up a rush of memories on my part! I would like to just stand beside you in agreement on
all of your above mentioned points.
That part about just doing a small thing every day even when you don't feel like it, that is a core value that will see you finish this project
and it's the one trait lacking in so many people. Dedication. You've got it in spades! Congratulations.
G.
Fred W B - 22/12/08 at 05:42 PM
So, an update!
I have not been making progress as fast as I'd like, getting a consistent uniform shape and radius on the edges around all the openings has been
taking ages. I have got through over 50 kg of body filler so far. I am now working with 120 grit paper and trying to get up to a dark ABF guide coat
that will be the last iteration before the primer surfacer can go on.
Currently I am pretty happy with all the top, side and rear panel surfaces, as well as the cockpit edges. The rear wheel arch edges are pretty much
done, as are the edges of the "hip" ducts. The internal surfaces of these still need some more work, as does the front wheel arches and the
edges of the openings in the front of the nose. After that the only major job left is finishing the inner faces and edges of the radiator exit duct.
I attach some photos
Cheers
Fred W B


buck dec 018
[Edited on 22/12/08 by Fred W B]
Fred W B - 22/12/08 at 05:43 PM
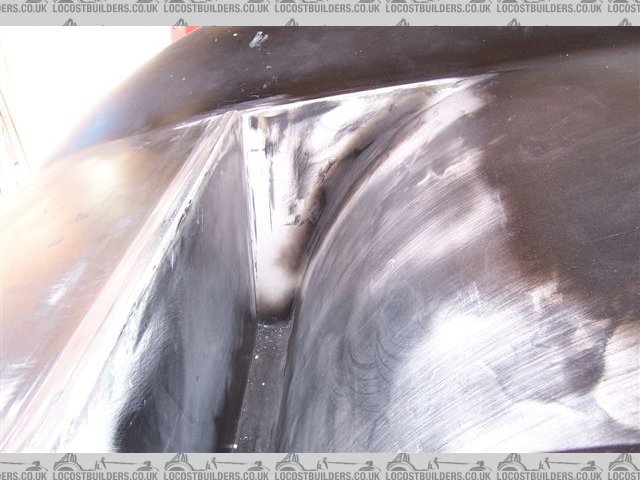
[img][/img]
Fred W B - 22/12/08 at 05:44 PM
[img][/img]
Fred W B - 22/12/08 at 05:45 PM
[img][/img]
Fred W B - 22/12/08 at 05:46 PM
[img][/img]
Fred W B - 22/12/08 at 05:47 PM
[img][/img]
Fred W B - 22/12/08 at 05:48 PM
[img][/img]
Fred W B - 22/12/08 at 05:49 PM
[img][/img]
Ivan - 22/12/08 at 07:39 PM
I remain in awe of what you are achieving - it's something I would love to do but know I don't have the perseverance to ever reach
your standard of workmanship I know I would eventually take a short cut and spoil the job
I'm much better at mechanical things that don't need the endless fettling and repetition to get them right.
smart51 - 22/12/08 at 07:54 PM
I am in awe. Seriously, if mine gets to look as good as yours does now, I'll have finished, not be thinking of finishing.
quote:
Originally posted by Fred W B
Making a body pattern single handed is a silly amount of work. To do this I think you do have to be determined, some would say bloody minded.
You don't say
quinnj3 - 24/12/08 at 12:18 PM
I've been on this site for a couple of years now and have only just stumbled across this post. I've just spent about an hour reading it and
taking in all the work you have done. And all on top of having a job and normal life to go with it. You must be a very stuborn person! I only wish I
had the patience and the drive to build something to half the quality that you are doing. Keep up the good work. No doubt when you are finished
I'll still be reading and wishing!
Fred W B - 24/12/08 at 05:48 PM
Thanks for the kind comments guys, helps to keep the motivation up
Cheers
Fred W B
Echidna - 28/12/08 at 10:28 AM
You've done a magnificent job! Keep on with the updates!
chrsgrain - 29/12/08 at 09:22 AM
Wow - that is going to be awesome when its done....
Chris
Fred W B - 4/1/09 at 06:44 PM
Being on leave at the moment, I have been able to make quite a bit more progress.
The front wheel arch edges are almost finished. Here you see the arch opening shape template (the spirit level is screwed to it) and the lip profile
checking plate.
In this first shot you can see that the blend of the lip to the fender still needs a bit more work, although the flash does seem to exaggerate the
effect.

jan 09 arch temp
jan 09 arch edge
[Edited on 4/1/09 by Fred W B]
Fred W B - 4/1/09 at 06:46 PM
Nose now looks much better, shown here with a guide coat on.
[img][/img]
Fred W B - 4/1/09 at 06:47 PM
Although the pattern is solid enough that I can sit on it, it is difficult to reach down far enough to work in the bottom of the rad exit duct. I had
to make this platform to kneel on. Its hard work sanding at the full stretch of your arms!
Cheers
Fred W B
[img][/img]
Hugh Paterson - 4/1/09 at 07:40 PM
Hey Fred, what paint are u using for the guide coat? something off the shelf, or a brew up from all your old tins!!
Shug
Fred W B - 4/1/09 at 07:53 PM
Hi Hugh
It's just rattle cans, I hate to think how many I have got through
When I finally finish this, all the local to me hardware stores are going to wonder why their stocks of rattle cans has just stopped turning over.
Cheers
Fred W B
chrsgrain - 5/1/09 at 12:45 PM
OMG - that's awesome....
How far do you reckon to go until you can mould it? Have you got to scratch build the chassis to go with it as well?
Chris
Fred W B - 5/1/09 at 05:33 PM
Thanks for the interest Chris
quote:
How far do you reckon to go until you can mould it?
Will be a good few months yet, the better the surface gets the worse it looks.
quote:
Have you got to scratch build the chassis to go with it as well?
So far I have built a prototype chassis, You can see some detail re the chassis in THIS
THREAD
If you want to see some more about the project, search on this site for "CANAMSA". I put that name in the title of posts I make about
various aspects of the car.
Cheers
Fred W B
[Edited on 5/1/09 by Fred W B]
seansverige - 9/2/09 at 05:53 PM
Hi Fred
stumbled across this whilst doing some online research. First off I would like to congratulate you on what you've achieved - truly, truly
amazing: you seem to have taken the hardest road possible from your 3 axis measuring jig onwards, and look close to completion - many others would
have fallen by the wayside.
I'd like to offer a couple of observations that are too late for you but might prove useful to anyone reading this thread and is inspired to copy
your example - I think these approaches could be applied to any subject.
When I read that you were working from a model my heart sank - models can vary significantly from the reality. This can be unintentional, such as the
case with the rear overhang that caught you out - but I have to say that other than that you've really pulled it off. I don't know whether
the different rear wheelarch on the other model is based on an actual variant or simply a liberty taken. It also use to be the case that a fair bit of
plagiarism went on in the mainstream industry so the first guy to model it makes the tail a little too long, and this get copied in subsequent
variations.
Variances can also be deliberate: smaller features can look out of scale when modelled accurately and in fact need to be exaggerated slightly to look
right - and this effect increases as scale decreases. This is less of an issue with the more organic shapes like the Lola, but a problem with more
complex forms such as the Audi TT's wheelarches (in this case complex means surface breaks and detail.)
The modelmaking scene has really taken off so if possible it's worth investing in a slightly more expensive but hopefully more accurate model. At
the extreme end, I don't know how amenable they might be to sharing information but, on the assumption that actually purchasing one of their
models is out of the question, contacting a high-end modelmaker such as John Shinton (www.johnshintonmodels.co.uk - who in fact makes a 1:8 T70 Mk3B
coupe) might yield some useful info or tips.
I would also look at other modelmaking sites - there are some useful sites and forums out there. There are an increasing number of websites that
collect blueprints (such as www.the-blueprints.com) - these are generally for guys building computer models, but there maybe some useful info there,
especially for the more recent stuff.
I think you mentioned that you've never seen a T70 in the flesh - or at least hadn't when you started the project - making what you've
achieved quite frankly jaw dropping. Historic racing is the fastest growing motorsport segment of late, and a quick search turned up the Zwartkops 9
hour revival race at Kyalami (don't know how much of a trek that is for you) - and the entry list DID feature a T70, although I don't know
what variant. Even at the biggest events such as a Goodwood, paddock access is excellent compared to conventional motorsport meeting.
Having found this thread, I've registered and will be checking back on your progress - keep up the excellent work. Good luck!
/sean
Fred W B - 9/2/09 at 07:02 PM
Hi Sean
Thanks for your comments and kind compliments.
As you say, it seems to have been a long hard road, and I certainly have a much better understanding of the T70 shape now than when I started. As for
working from a model, it was the only reference I had. I don't know where I would have started from without it. As for how accurate the shape is,
I will really only know if my shell ever stands next to a real one. But which real one? The GD/RCR replica is based on the 3 continuation cars that
Lola licensed in the early 80's, and that was quite a bit different to the original 60's cars in some areas. I understand that the GD/RCR
replica shell is 4" narrower than an original.
Also, as I have stated before, I have deliberately done some details differently to the originals. I've got to the stage now when I have to put
the pictures away and just get the damn thing finished and looking good to me. If I was trying to do an absolutely accurate, indistinguishable from
the originals, copy I would have been a gibbering wreck in a nut hose by now.
That said, I'm not sure if I am really looking forward to when I will be able to get it onto wheels and push it out into the sun for the first
real look, in case I am disappointed. I have read that the guy who did the pattern and moulds for the really accurate Kraftwerk 917 replica went
through everything I have done, and then when the first body was out the mould and built up, it did not look right to him, and he went though the
whole thing again, modifying the first set of panels and making new moulds.
But then, looking at various website's where guys discuss the various "high end" expensive replicas of some classic sports racers that
are available, there's always someone who recons this or that is "wrong", and most people are happy to accept.
As you suggest, last year a real T70 spyder did make the trip out here with the David Piper circus to do the Zwartkops (Pretoria, 1100km trip for me)
and Killarny (Cape Town, 800 km trip) races, but I was not able to schedule a trip to see it.
Their are 2 or 3 T70 Coupe replicas/mould sets in SA (I think originally based on a Maurader shell) but no spyders, at least to my knowledge.
Another point, in the now going on 6 years since I started this thing the amount of info and pictures available on T70 spyders on the web seems to
have increased dramatically, unless it has just become more visable to me as I became more aware?
P.S - I dont intend to put "Lola" badges on the car, when people ask what it is, I say its "inspired by" a Lola T70 Spyder.
Cheers
Fred W B
[Edited on 9/2/09 by Fred W B]
seansverige - 10/2/09 at 05:16 PM
Hi Fred - thanks for the swift response.
I was just throwing out ideas that might be of use to others following your example and (just to be clear) not in any way challenging your approach or
wanting to imply that none of the suggestions mentioned hadn't occurred to you - I'm sure you have plenty of hard won knowledge to impart.
Starting with a model was the best way, but I guess the basic principles are to question everything � as you did with the rear overhang (it was this
that prompted me to write) � and cross-reference data from as many sources as possible to get a levelling effect.
You do yourself a disservice stating you're not being absolutely accurate � the attention to detail and quality of workmanship belies that and I
personally applaud your willingness to tweak things to your own satisfaction, which is surely why you're doing it in the first place?
As well as all your other challenges, there are some inherent in your choice of subject matter � with low volume race-bred stuff like this I'm
sure very few were completely alike. These guys were concerned with winning, not historical record, and in a pre-digital era only documented as much
as they needed to to get the job done, so reconstructing the picture decades later is open to interpretation - and that's before we consider any
changes made in that period between them being cutting edge and classic, when they were simply old cars; finally, as you say, there's the issue
of 'continuation' models...
I would say you're correct - in the broadband age more stuff is out there, and Lola's 50th anniversary stimulated that further, but there
were a few good books about. The point about the modelmakers was that with someone like Pierre Scerri (the guy who did the 312 B) � his chosen subject
matter is now probably more comprehensively documented than it was when first designed and built; how willing they'd be to share that info is
another matter (if not already done, surely books could be written from the research material generated?)
In terms of actual replicas, I think this term covers a multiude of sins: many of replicas should be called lookalikes, but then categorising your
project with some of these is frankly an insult to you, but that's a whole other discussion. It's not just the internet that's changed
things � Goodwood FoS is only 15 years old and the Revival considerably younger; a quick trawl through Flickr the following Monday can yield useful
data.
Look forward to seeing photos of the rolling chassis in the bright SA sun and hopefully the fact that this is your interpretation of a T70 means
you're less likely to be disappointed.
Fred W B - 10/2/09 at 06:32 PM
Thanks Sean, and no, I wasn't taking any offence at all, enjoyed your input.
quote:
in a pre-digital era only documented as much as they needed to to get the job done,
Interestingly enough, one of the most useful references I found was a scan of a scale 3 view line drawing published with a article about the car in a
car magazine when the car was new. The look of the drawings suggests that the author might have had access to the original lola drawings.
It was very kindly sent to me by a guy in Belgium who saw my project on here.
Cheers
Fred W B
[Edited on 10/2/09 by Fred W B]
Fred W B - 21/3/09 at 04:00 PM
Some good news out of the commercial crisis!
I haven't been able to get any time on the car for several weeks now, due to some other things keeping me busy, but this weekend managed to get
back in the garage.
You know how retail establishments only know how to put their prices UP, while those of us in engineering / manufacturing / construction have to
instantly adjust selling prices due to raw material price changes when commodities and petrochemical prices soften?
Today I went to buy some more paint rattle cans, to find the price is now two thirds of what I have been paying in the past. I nearly fell over. As we
know all economic activity has softened but its nice to see a price reduction on the retail shelf when you are taking money out of your own pocket.
Cheers
Fred W B
ceebmoj - 23/4/09 at 07:12 AM
hi,
is there an update / any more pictures?
blake
Badger_McLetcher - 23/4/09 at 11:43 AM
I've just finished reading this thread mate and it's just jaw dropping, absolutely stunning.
Fred W B - 24/4/09 at 03:52 PM
Thanks for posts guys, I'm still making slow progress on finishing off some last details before I go out and buy the surfacer primer.
Haven't had the use of a camera for the last few weeks, but should be able to put up a bit more in a couple of weeks.
Cheers
Fred W B
Fred W B - 2/5/09 at 04:45 PM
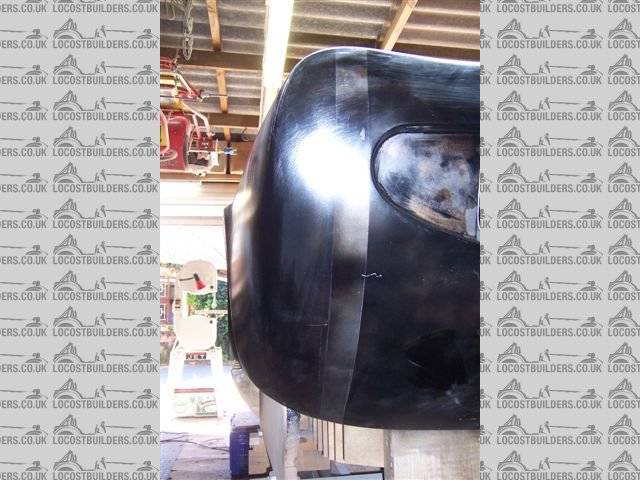
I finally have the edges of the openings in the nose and the radiator exit duct pretty much finished.
may 09 top front

may 09 brake duct

may 09 nose duct
[Edited on 2/5/09 by Fred W B]
Fred W B - 2/5/09 at 04:51 PM
I did some housekeeping in the garage and discovered I've made quite a few templates
may 09 templates
[Edited on 2/5/09 by Fred W B]
Fred W B - 2/5/09 at 04:57 PM
As an example, it took some masking tape stripes, a lazer level, 5 templates and quite a bit of work to get the two rear quarters to match.

may 09 rear quarter
[Edited on 2/5/09 by Fred W B]
Fred W B - 2/5/09 at 05:01 PM
I'm now working round the cockpit edges for the final (pre surfacing primer) time
Cheers
Fred W B
[img][/img]
Ivan - 2/5/09 at 05:54 PM
As usual
seansverige - 3/5/09 at 10:45 AM
Excellent stuff - quality of workmanship shines through in the photos, nose and side intakes look nice and crisp.
Can't wait to see it rolled out into the sun...
ceebmoj - 4/5/09 at 10:56 PM
as many others have said the quality of you're work is truly amassing
MakeEverything - 5/5/09 at 07:20 PM
Holy poo Fred. Youre one clever guy, with a garage load of patience!
Well done my friend. Id love to spend some time in SA to learn some of your knowledge.
Thanks for sharing the experience and good luck.
andygtt - 15/5/09 at 07:49 AM
Hi Fred
Long time no speak, great to see your getting to the final stages of making your Buck.... looking really good, cant wait to see it rolled out into the
sun.
keep up the great work
andygtt - 15/5/09 at 09:21 AM
quote:
Originally posted by Fred W B
Random Thoughts while shaping
I haven�t posted much progress detail lately. The work I�m doing now doesn�t show well in photos, but the shape and surface is getting better and
better. I prefer to post details of what I�ve done, not talk too much about what I�m still going to do. I saw on another car building forum a guy
posted nice renderings of a car body he was going to build. He gave himself a month to build the plug. After two weeks he had a lump of hacked about
foam, and he gave up. Sorry mate � It doesn�t work like that.
All this sanding means you have a lot of time to think while toiling away in the garage. Making a body pattern single handed is a silly amount of
work. To do this I think you do have to be determined, some would say bloody minded. It reminds me of when I was cycling competitively, and later
racing karts. Sometimes while doing the activity (cycling � while feeling bad and just just hanging on the back of a bunch, karting � being nerfed off
the track, or having other issues during a race day) I would think to myself � �this is madness, I�m not enjoying myself, I�m going to give up�. But
then at the end of the day you see you have finished a bit higher up than last time, and you feel better, and so you give it yet another go. Having
like minded mates to chat/drink beer with after also helps a lot.
I have seen a couple of references that state doing a body pattern the old fashioned way takes maybe 1000 Hours. I reckon I am averaging at most about
10 hours a week on the project, so that would be two years. Currently just starting the 20th month of work on the pattern and I hope to finish this
year still, so that 1000 hours seems about right in my case. I read in USA magazine �Hot Rod�'s paint and body issue that rod or muscle car high
end professional paint jobs may have 200 to 300 hours of block sanding alone in them � and that�s on an existing car!
I try to concentrate on just the area I am working on, without thinking about the all the work yet to do. When I get despondent I look back through
this thread and see how far I�ve come, and that improves my resolve to keep going, as does the positive responses from you guys here.
Experienced builders might smile at the notes below, but I put this down for others who may be considering a similar project. Maybe they are just
notes to myself:
There is no �easy way�
Don�t agonize over how to approach or do something. Just start, and move on from there. You may find that eventually the first thing you did has been
changed/replaced, but at least you started.
Get each stage as good as you can before you move onto the next. It�s easy to shape wood/foam, less easy to shape GRP, a pain to correct stuff at the
body filler stage. Getting it absolutely correct at the drawing stage would be first prize.
Don�t expect to get every section 100 percent the first time. Get it good, do another section, work round the car, when you get back to it you can get
it better.
Even when you don�t feel like it, or just have a little bit of time, get in the garage. Things don�t get built if you aren�t in the garage. Even if
you just tidy up a bit, you will do something.
Do everything to the standard you want. If it bothers you every time you look at something, rework it.
If you get tired, or find yourself rushing to finish something at the end of a day, stop. Do it next time. You will make mistakes and have to redo it
if you don�t.
When you think you are just about finished, you aren�t - The last 10 percent takes 90 percent of the time.
Anything can be fixed / reworked.
Cheers
Fred W B
these thought exactly match my own.....
[Edited on 15/5/09 by andygtt]
violentblue - 11/6/09 at 03:42 PM
coming along nicely, looks good in a solid color.
whats the final color going to be? silver?
Fred W B - 11/6/09 at 05:23 PM
Hi Blue
The plan is a deep blood red and silver, just like the single seater below. Sills will be the silver below the beltline as well, running into a gulf
GT40 style "moustach" . Stripe will be a broad centre stripe with two smaller stripes each side, like the second picture below, but with
wider side stripes, more like the third pic, but here maybe too wide. Also here the red is too maroon for my taste.
Maybe now you are sorry you asked, but I have been thinking about this a lot......
Cheers
Fred
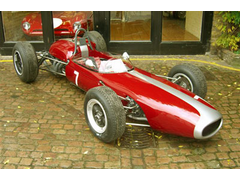

red/silver


Inspiration - Crossle 9s
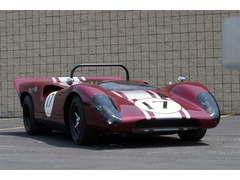

maroon
[Edited on 11/6/09 by Fred W B]
chrsgrain - 11/6/09 at 07:35 PM
That will look awesome..... how close are you to the next 'big' stage Fred?
Chris
Fred W B - 14/6/09 at 05:42 PM
Hi Chris
Don't know if your would call it a "big" step, but next is spraying the surfacer primer. Currently I have sanded the last guide coat
off a good three quarters of the body, while it looks lousy I am happy that I am finally getting the surface good enough to start with the primer
surfacer.
A few people who have seen what I am doing have commented that they would have gone with the primer surfacer long ago, but I wanted to get the surface
good while still in filler, rather than turn lots of the expensive primer surfacer into dust
Cheers
Fred W B

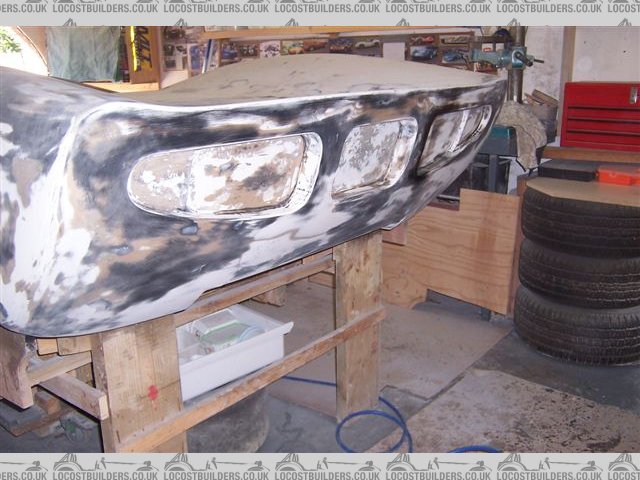
plug june 09

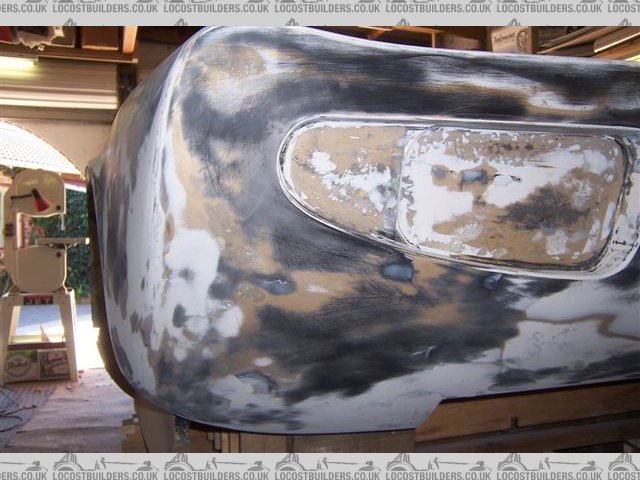
plug june 09 o7
[Edited on 14/6/09 by Fred W B]
Benonymous - 16/6/09 at 09:51 AM
No doubt about it Fred, you're a stayer! What was your best profile as a cyclist? I'm betting a mile-eater or a climber rather than a
sprinter
I think that body will look superb whatever colour you paint it (except fawn) but I'm a +1 on the proposed red and silver theme.
Fred W B - 16/6/09 at 06:30 PM
Thanks Ben
Good call on the cyclist type, being of small build I was never a "power" cyclist, so not a sprinter. If I could stay with a bunch on the
flat I was always able to easily stay with on the uphills, so guess I would be a climber then
Cheers
Fred W B
Benonymous - 18/6/09 at 09:25 AM
Small fit blokes always make the best climbers
My Uncle conforms to this type and he's still cycling daily at the age of 76 !
Dan. - 22/6/09 at 12:51 AM
Fantastic work, I have really enjoyed reading the thread upto this point.... added to my favourites!
Fred W B - 27/6/09 at 04:00 PM
So I've got the entire pattern flatted with 120 grit and the mission for this weekend is to start getting the primer surfacer on. I've been
able to clear the weekend of all other commitments. I'm finally looking forward to some concrete progress!
I've collected together the materials, spray gun, lots of wet and dry paper. I have my measuring scale. I've taken advice on mixing ratios.
The primer surfacer requires a catalyst, some thinner and I have been advised to also add some pigment to the primer in aid in seeing the shape when
polishing it back.
By 9.00 am Saturday the pattern is wiped down and I am ready to start mixing the first batch. I reach for the catalyst, only to find I haven't
got it!. Apparently I must have left it on the supplier's counter when I picked up all the materials, or lost it on the way home. In spite of
searching my car, tidying the entire garage and searching under every bench in case it fell and rolled out if sight I fail to turn it up. And no way
to get any more until next week. I am now not very happy!
Cheers
Fred W B
Ivan - 27/6/09 at 05:26 PM
Oh no Fred that sucks - at least the rugby result was a small consolation.
Fred W B - 5/7/09 at 05:52 PM
Finally got the first coat of the Durabuild surfacer primer on.
Made a few mistakes, I thinned it with about 25 percent MEK and sprayed it with an syphon gun with a 1.5 mm tip. Battled a bit to get an even build,
particularly on the top flat surfaces, but otherwise it went very well, apart from me dragging the air line over the wet surface on one of the door
panels and also getting some dust on the surface in a few places. I really should have started from the center and worked out, but in my enthusiasm I
did it the other way round and found it difficult to get to the center of the front and rear clip surfaces.
The pictures are with no flatting at all yet. Some mates have been round and have made encouraging noises, and I must admit to be feeling pretty happy
with the results. I may just be having a beer or two at the moment!
Now to flat it back and put another coat on. I have now bought a gravity feed gun and will try a 2.2 mm tip, which apparently is much more suited to
this work
Cheers
Fred W B

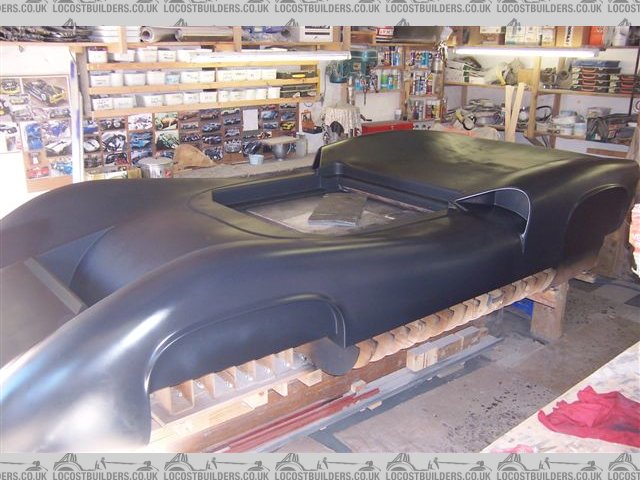
plug 07 01

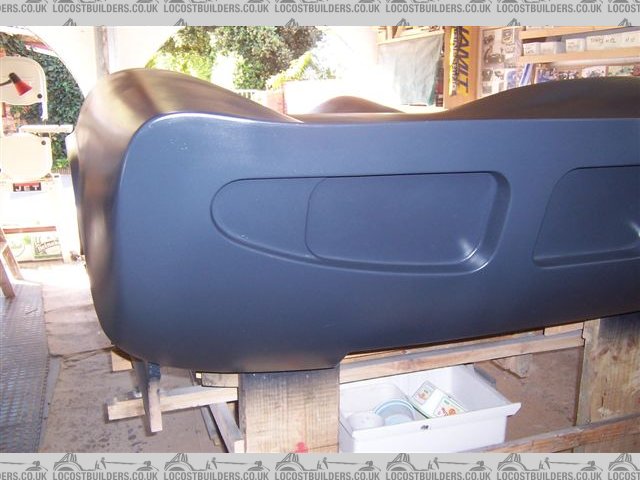
plug 07 02

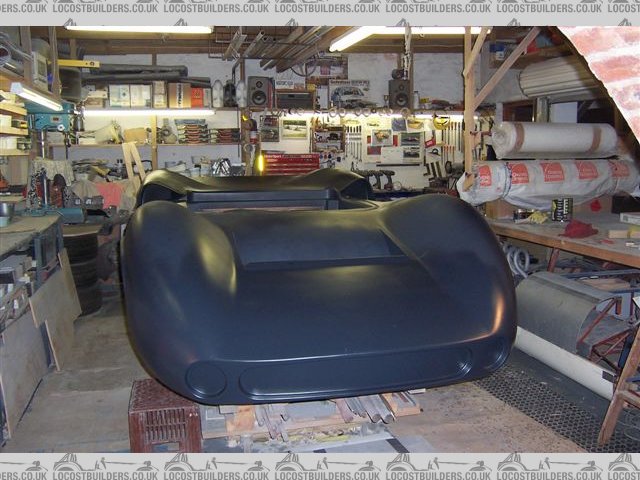
plug 07 03

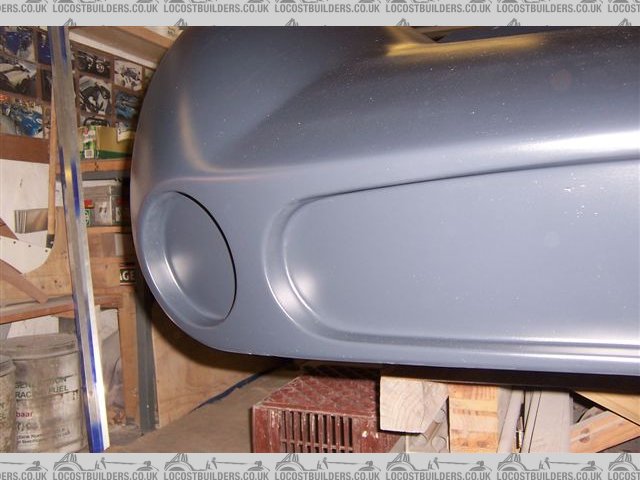
plug 07 04

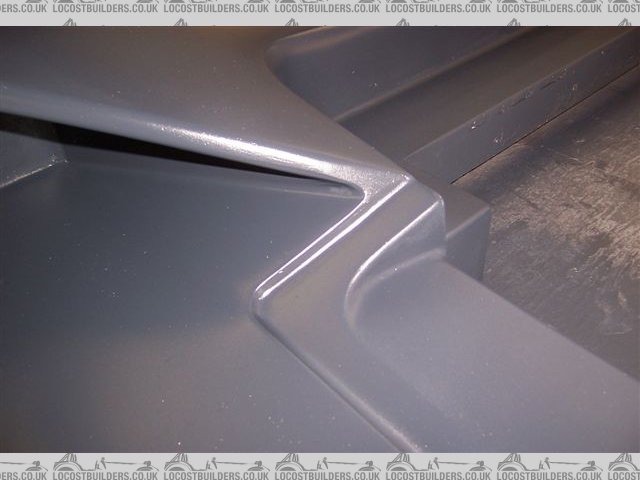
plug 07 05
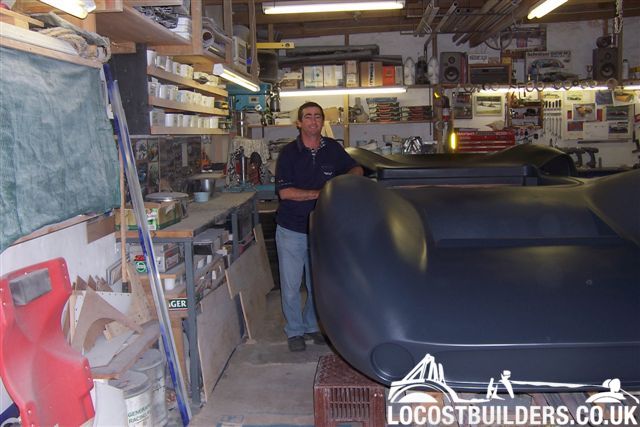
[Edited on 5/7/09 by Fred W B]
eccsmk - 5/7/09 at 06:05 PM
simply stunning
i wish i had the ability to create such a work of art!!
well done
chrsgrain - 6/7/09 at 08:21 AM
OMG that is AWESOME.... the amount of work that has gone into it is staggering, but its really great to see it all come together....
Chris
spdpug98 - 6/7/09 at 08:35 AM
I have only just stumbled across this thread and all I can say is that this is AWESOME, I praise your patience and craftsmanship just truly
Brilliant!
ceebmoj - 10/10/09 at 10:52 PM
hi there,
any updates cant weight to see how you are getting on
Fred W B - 11/10/09 at 05:35 PM
Hi Cee
I'm still sanding, working now on a third (and final!) coat of surfacer primer.
The photo below is of 240 grit surface wiped over with a wet cloth to see the surface.
Just starting to move from 240 to 380/400 grit. Have given 600 a go on a small area and the results are most encouraging
Havn't been putting pics up because you can't see much progress, was thinking to wait until I have got the pattern up to polish stage but as
usual some areas needed touch up and reapplication and this holds up progress on the big picture
Something else I have learnt - It would have helped (me, at least, I'm sure the pros have it sussed) a lot to stripe coat the edges and internal
surfaces of recesses with the surfacer primer on a brush before spraying the bulk of the pattern
Cheers
Fred W B

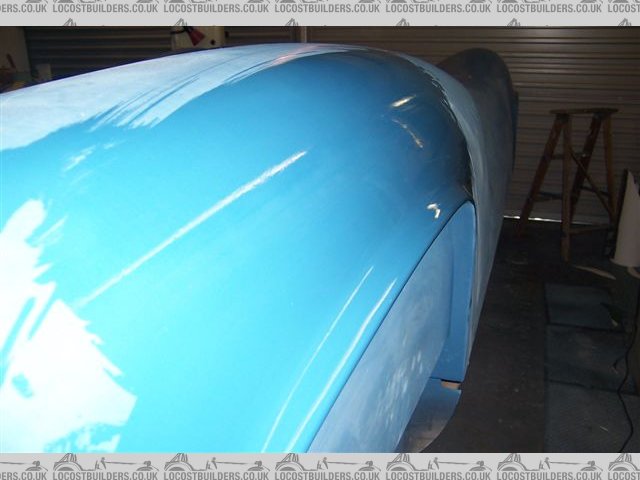
surface
[Edited on 11/10/09 by Fred W B]
Fred W B - 11/10/09 at 06:03 PM
In this photo (of my nephew checking to see if I've got that wheel arch lip blend exactly right....) you can see what the pattern looked like
with the second coat flatted back.
Went through in a couple of places, and as the overspray goes everywhere I ended up giving the whole thing a third coat. The "tide" marks
are because each pot mix is a slightly different colour depending on how much pigment I put in.
Cheers
Fred W B

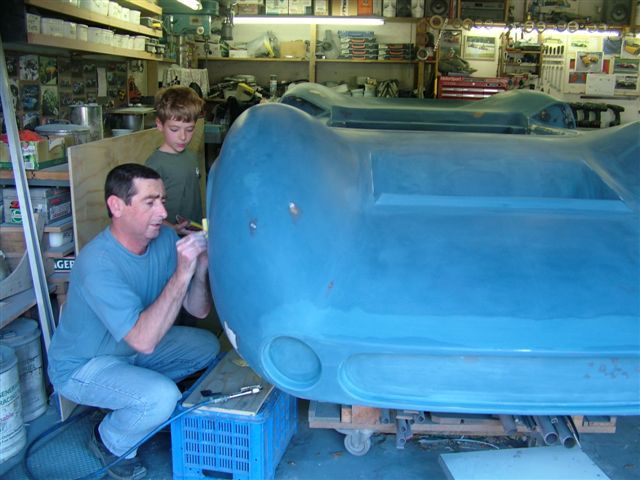
fred and cv pattern
[Edited on 11/10/09 by Fred W B]
ceebmoj - 12/10/09 at 07:31 PM
as always your work is an inspiration thanks for the update.
cjtheman - 23/11/09 at 07:24 AM
stunning mate keep us upto date with the project
cheers
colin
violentblue - 23/1/10 at 11:50 PM
I'd Imagine you had the mold laid up already, whats the status?
Fred W B - 24/1/10 at 12:26 PM
quote:
I'd Imagine you had the mold laid up already, whats the status?
You would think so, wouldn't you?
Since the last post the whole pattern has been:
sanded with 360 grit
sanded with 600 grit
sanded with 800 grit
sanded with 1200 grit
and just this weekend I have started with the rubbing compounds. I have been trying to wait till I get the whole thing up to wax level before I post
again but here is a teaser pic
Cheers
Fred W B

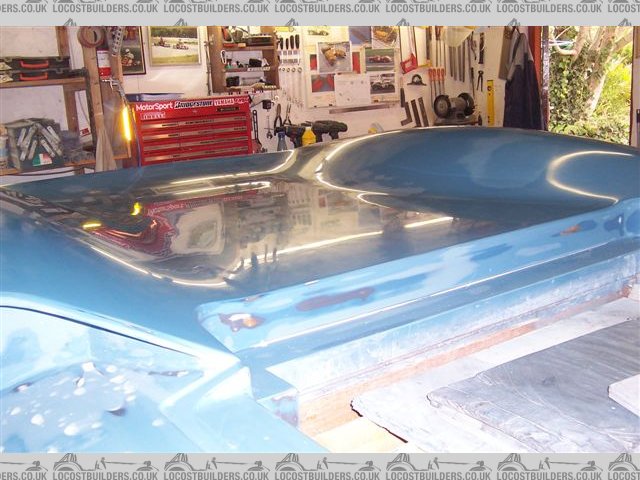
pattern jan 10 033
[Edited on 24/1/10 by Fred W B]
chrsgrain - 25/1/10 at 10:17 AM
That is looking great Fred.. how long until waxing??
The only problem with updating the long running thread is that some people won't see it as they mainly click through from the front page, and I
know most guys on here are really interested in how you are getting on....
Chris
Ivan - 25/1/10 at 10:32 AM
One of my favourite threads - am subscribed. Fred shows the sort of dedication that I wish I could emulate.
I would love a body out of his mould.
Dick Bear - 3/2/10 at 11:08 AM
Fred,
I haven't been around for a while but just spent the night reading and re-reading the thread. Simply unbelievable! To borrow Steve G's
very appropriate word ...
WOW!
Dick Bear
TextTextTextText
[Edited on 2/3/1010 by Dick Bear]
Fred W B - 3/2/10 at 07:37 PM
Thanks guys, still chasing sanding scratches in the surface........
Cheers
Fred W B
Fred W B - 7/2/10 at 05:23 PM
Believe it or not, I have finally put down the sanding blocks, put the cap back on the polishing compounds, and stepped away from the car.
The whole surface of the pattern, including in the recesses and returns has been polished with coarse and then fine cutting paste. As the gloss comes
up as you polish you see some areas where the 1200 has not taken previous grit scratches out so I go back to 1200 grit and then polish again etc, etc,
but finally, finally, I reckon the pattern is FINISHED!
Next time I work on the car, which will be in a couple of weeks time, I will start with the marking out for and making the parting fences for the
moulds.
I include some gratuitous photos. It looks a bit tatty with the three different colours showing but in hindsight it was very helpfull that I pigmented
the first coat of surfacer primer black, the second dark blue and the third light blue. As you sand back you can see where you are, when you get to
the black layer you stop! This was a pure fluke, due only to the pigments my supplier had in stock at the time and not some clever pre planning on my
part.
Cheers
Fred W B
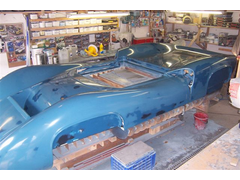
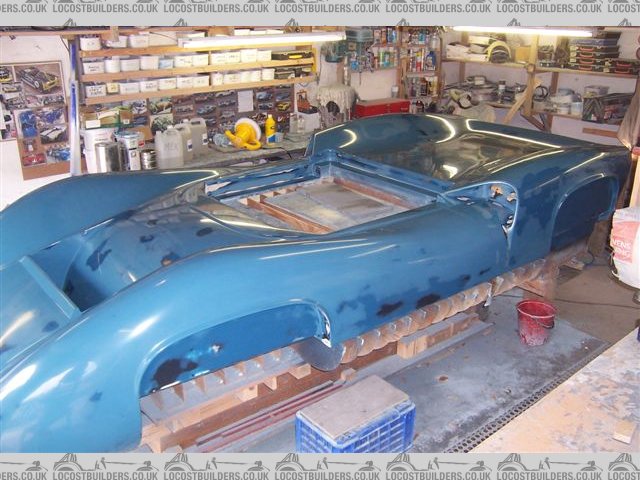
pattern feb 10 - 01

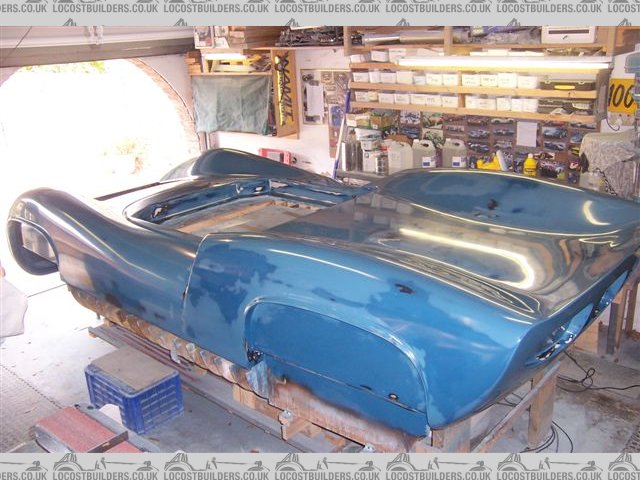
pattern feb 10 - 02
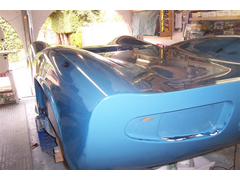
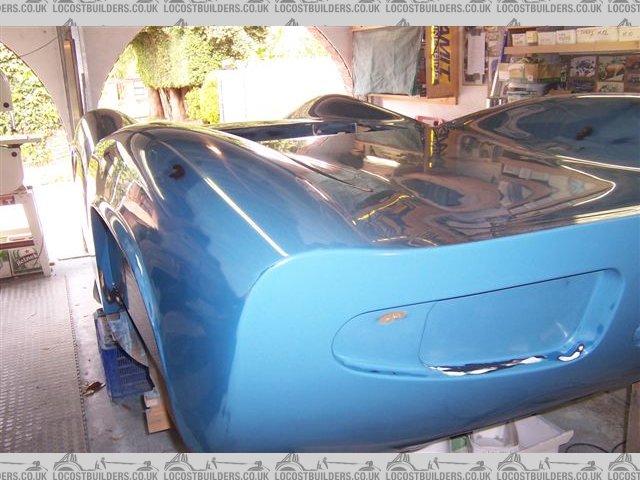
pattern feb 10 - 03

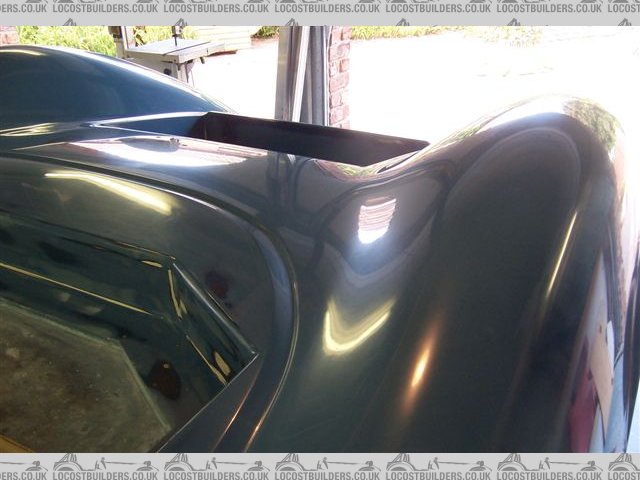
pattern feb 10 - 04

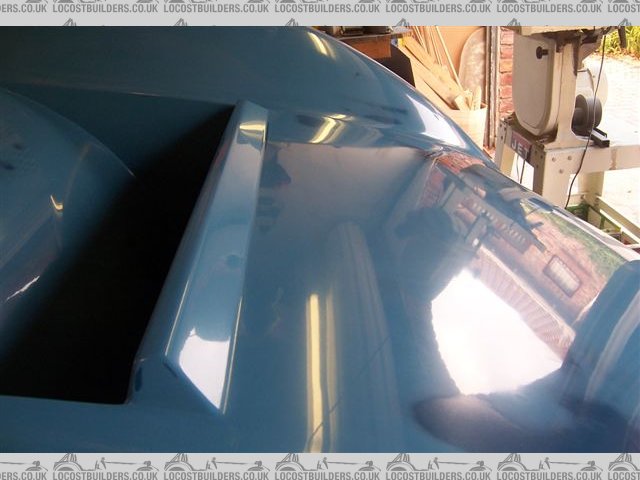
pattern feb 10 - 05
b%2010%20046.jpg
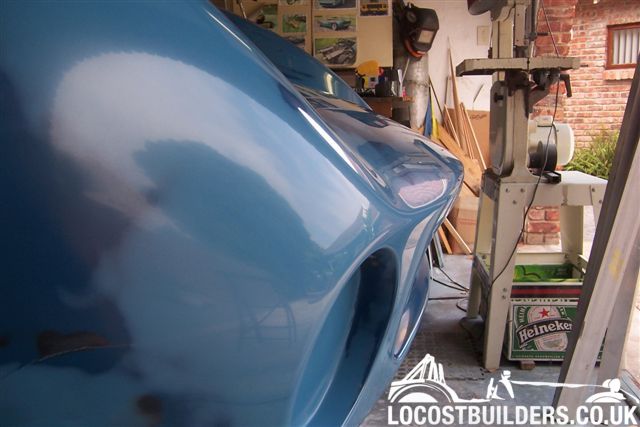
[Edited on 7/2/10 by Fred W B]
[Edited on 7/2/10 by Fred W B]
prawnabie - 7/2/10 at 06:12 PM
Much respect that looks good enough for the finished article to me!
smart51 - 7/2/10 at 06:19 PM
It is beautiful. That looks like the sum of a whole lot of hard work to me.
jimmyjoebob - 7/2/10 at 06:39 PM
Awesome job, Sir!
Richard Quinn - 7/2/10 at 07:34 PM
Stunning! Absolutely stunning! I wish I had half your ability and patience!
iank - 7/2/10 at 09:12 PM
Brilliant, can't wait to see the final car on the road.
Wonder if fingerprints grow back after a while
violentblue - 8/2/10 at 03:32 AM
in my younger years I built a lot of plugs for Boats. they were a lot of work, but not nearly as complicated as yours. Much respect from someone who
knows what kind of work you've put into it.
[Edited on 8/2/10 by violentblue]
Ivan - 8/2/10 at 07:25 AM
Hi Fred
Congratulations in passing a huge milestone in your project.
I have massive respect for what you are doing.
ceebmoj - 8/2/10 at 08:27 AM
that is truly inspiring.
chrsgrain - 8/2/10 at 09:47 PM
That is amazing, such dedication, time, energy and attention to detail.... stunning...
Chris
sgraber - 8/2/10 at 10:06 PM
Fred, as someone who has been there and hopes to never be 'there' again I can only say congratulations on getting to this milestone. Your
dedication and perseverance are exemplary and the photos of your work say everything else about your skills.
Now, take a short break and get on with the moulds! But that's another day. Relish this one as I guarantee that as you look back upon your lifes
accomplishments, this is going to rank up there with the best of them.
alistairolsen - 22/2/10 at 02:23 PM
I've just read this whole thread and I can only say its truly amazing. Ive build things using this technique in the past which while the shapes
were similarly complex, the items were tiny. I am in awe of the dedication and the time spent on this and I hope you enjoy your car for a very long
time.
Neville Jones - 23/2/10 at 05:31 PM
Paint/surface that plug with black, then polish it. Put it under fluoro lights parallel to the c/line, look at the reflections.
If you're happy with what you see, THEN make the moulds.
From someone who has done it far too many times.
Fred W B - 23/2/10 at 06:23 PM
Hi Nev/Syd
Thought I recognized the posting style on the other recent Neville posts.
I have spent a lot of time looking at light reflections in the surface, and thanks again for the original post of yours that got me started on all
this, a long time ago.
Cheers
Fred W B
Neville Jones - 24/2/10 at 12:09 PM
quote:
Originally posted by Fred W B
Hi Nev/Syd
I have spent a lot of time looking at light reflections in the surface, and thanks again for the original post of yours that got me
started on all this, a long time ago.
Cheers
Fred W B
But you haven't looked at it in polished black, have you? Black will magnify the wobbles many fold.
Take the time to do this step, you won't regret it, and it's time well spent, and insignificant compared to the whole project length, but
the most important.
Cheers,
Nev.
Who's Syd?
Browser - 10/3/10 at 10:03 AM
Consider my gob well and truly smacked
Awesome job sir, you must have the patience of several saints.
Fred W B - 24/5/10 at 04:55 PM
So the next steps were to get the parting lines and fences done for the door perimeters . These were laid out with the aid of dimensions and pictures
supplied by the very helpful owner of an original T70 in America.
Then 10 repeats with wax on both doors.
Small gaps between the fences and the pattern were filled with kids plasticine
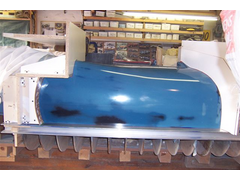
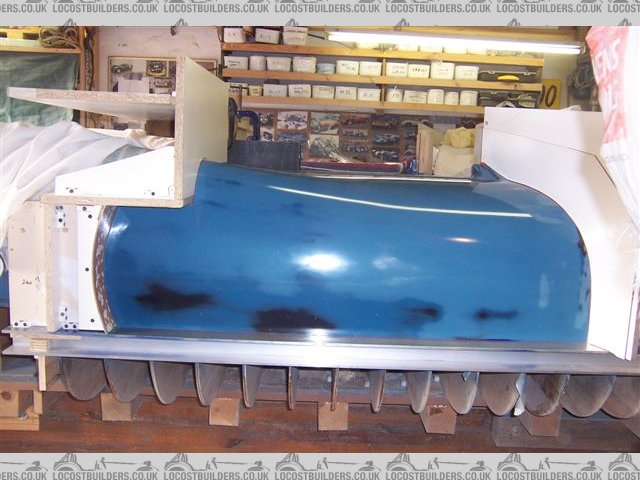
door fences 2
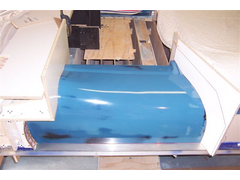
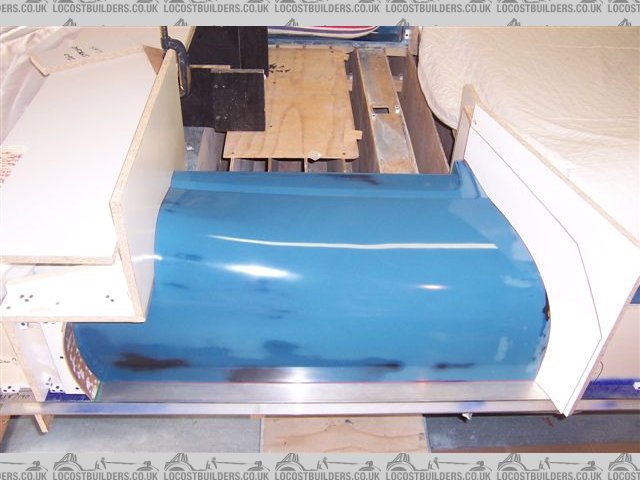
door fences 3
[Edited on 24/5/10 by Fred W B]
Fred W B - 24/5/10 at 05:03 PM
Then on with the first door mould. I put on two coats of tooling gel and laid up 1 x surface tissue, 1 x 300 gram and 5 x 600 gram layers. Double
thickness on the flanges.
Took me a while to get the "knack" of laying up. I put on two layers at a time. I let it rest for a good few days or a week between each
session. The trick is to get all the bits of mat tailored exactly to fit prior to catalyzing the resin. I also prepared two or three small mixes, to
use in one session, rather than mixing all the resin at once and rushing to get the whole thing done before it went off. The surface area of the door
is 0.8m2. The flat bits are easy to do, its the fiddly bits on the returns that take time.
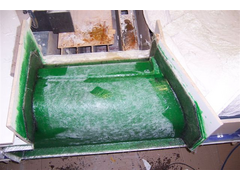
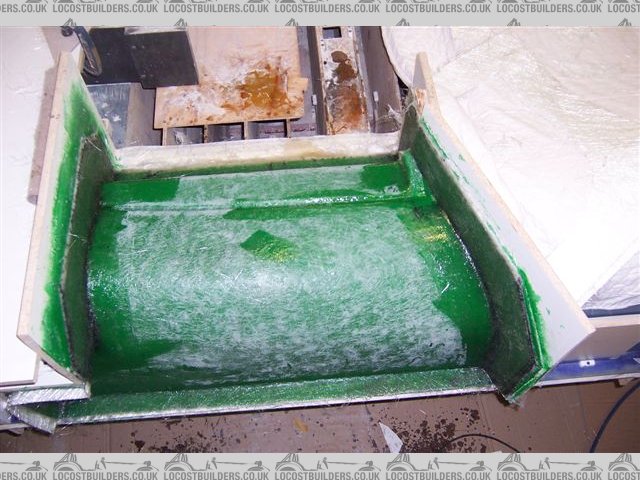
door lay up 2


door layup 3
[Edited on 24/5/10 by Fred W B]
Fred W B - 24/5/10 at 05:04 PM
I then added some plywood bracing. I bonded only the longitudinal pieces to the mould, the transverse pieces were secured together and to the
longitudinals with screws to hopefully eliminate "print through" of the transverse ribs.
[img][/img]
Fred W B - 24/5/10 at 05:07 PM
And now this past weekend I released the first door mould. Took some determined pulling with the aid of some friends but it eventually released
cleanly, with no damage to the gel coat.The mould surface looks good enough to make parts (that will be painted) straight away with no further
finishing. Lines are true and it appears "print through " is not a problem. The rough looking edges in the pic is just where some
plasticine is still adhering.
Now to make up the wooden flanges for the door inner returns and the insert box that makes the return where the hinges are and I can then actually
make a part!
I have removed this mould now as I want to cut the door sections out of the pattern once the doors are made to permit easier access to the top
sections of the front and rear clips as I make those moulds. The forward facing sections of the rear section will have wood inserted to enable me to
make the mould section for the return on the rear clip that is "in the door gap".
Cheers
Fred W B

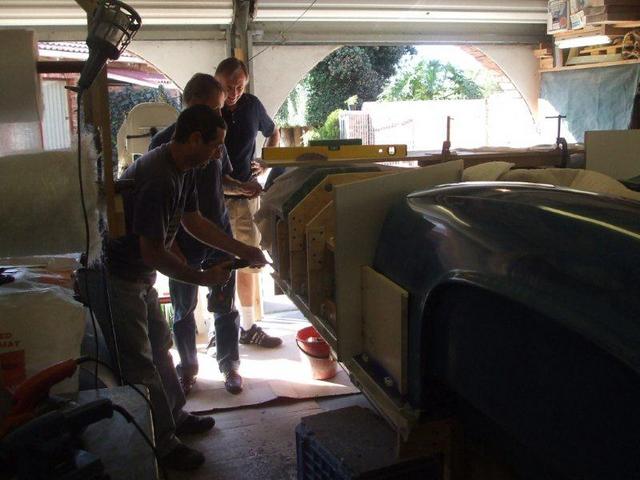
door mold 1
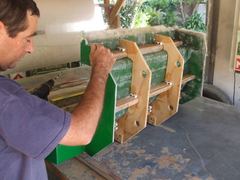

door mold 2
[img][/img]
smart51 - 24/5/10 at 05:35 PM
now that's a glossy mould. First class work as always Fred.
sgraber - 24/5/10 at 10:41 PM
Well done, well done indeed Fred! Wow seeing you go through this step does bring back some great memories for me. I've always told people that
the hardest part of a scratch build is the bodywork. But it can also be the most rewarding when it turns out well.
chrsgrain - 25/5/10 at 08:38 AM
Wow - cool.... must really feel like you're getting somewhere now. The mould looks awesome.
If you're going to chop the plug about, would it be worth taking a spare mould (or two) from it before you start the dismantling... never know
when it would come in handy, or who might be prepared to pay for it?
Chris
seansverige - 25/5/10 at 10:11 AM
Fred - just caught up on the latest, and continue to be amazed by your diligence and craftsmanship.
I'm sure the sanding phase seemed to go on forever but looking at photos of the polished buck, it seems to have been worth it - and I think I may
have to check back a little more frequently as it looks like the next stages will fly by in comparison.
all the best, sean
Fred W B - 26/5/10 at 05:01 PM
Thanks for the kind responses guys.
quote:
worth taking a spare mould (or two)?
As for making spare moulds, while they would be nice to have, extra sets would be a considerable investment in materials (the moulds are 3 or so times
thicker than an actual body would be), not to mention time. Also moulds are extremely bulky to store. Another consideration is that once the first car
is built up and standing out in the open on wheels, some aspect of the shape might look completely wrong, and will require rework/mods to a mould.
Provided you have a panel, you could always make another mould from that panel, if it should be necessary.
As for selling moulds, the hope would be that I might be able to sell a few shells, and if I was to sell a set of moulds I would be cutting down any
potential market.
I've already had an enquiry to buy a shell from a concern that makes other fiberglass cars, so do I sell one to them, knowing they might splash
their own set of moulds off the parts?
With half a mind to that, my body does have some distinguishing features that although I did them that way because I preferred the way they looked, I
also liked the idea that I would be able to recognize one of �my� shells from a mile off. Two obvious ones are that the radiator outlet duct in the
nose is a blend of styles between the coupe and spyder, and I have done the centre "window� in the rear a little different to an original.
Cheers
Fred W B
[Edited on 26/5/10 by Fred W B]
chrsgrain - 27/5/10 at 11:19 PM
Fair enough, thought I'd mention it - though to be honest, you've given everything on this project far more thought than I ever could!
Keep us up to date!
Chris
violentblue - 15/6/10 at 12:13 AM
quote:
Originally posted by Fred W B
I've already had an enquiry to buy a shell from a concern that makes other fiberglass cars, so do I sell one to them, knowing they might splash
their own set of moulds off the parts?
just make sure you get it in writing, if they do pull moulds off it that you're due a royalty, or any work derrived from the shell you sell them,
you also retain ownership of.
Fred W B - 20/7/10 at 03:15 PM
Small update, but not much progress to report, have been otherwise occupied quite a bit over the last few weeks.
I attach some pictures of the left door mold buttoned up with all the return flanges (including hinge recess) and edges radiused.
I then had a bit of a set back, when I went to make the first part I flat lost my Mojo. I had spent hours getting the return flanges and plastacine
radiuses to the edges sorted and matt cut for the first door part. I applied the gell coat and then rushed starting the lay up (something to do with
getting to a social function to watch some soccer match). Didn't let the gell coat go off enough, it started to move around under the first
layers of matt so no gell coat on some edges was the result.
So scrapped that attempt and pulled it all out once the surface tissue and first matt layer had gone off. Chalk it up to experience, and at least I
proved that my edge radius prep worked well. I then found that my clumsy effort had left a slight texture on some areas of the the mold, so I have had
to refinish the mould by sanding with 1200, and then bring the finish back with rubbing compound. Now I have to rewax, reradius and make a start on
another attempt on the door.
Cheers
Fred W B
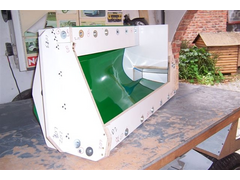
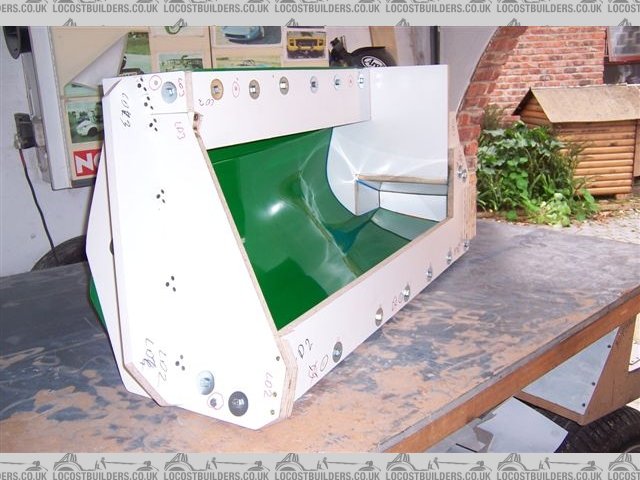
lh door mold 1
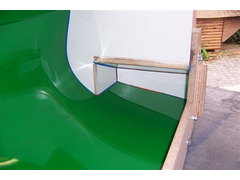
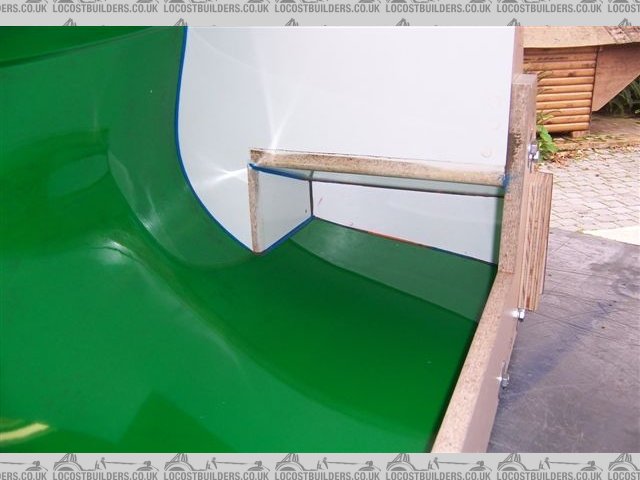
lh door mold 2

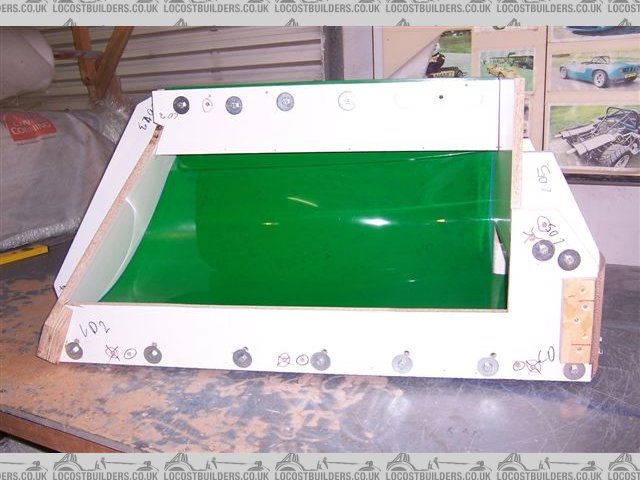
lh door mold 3

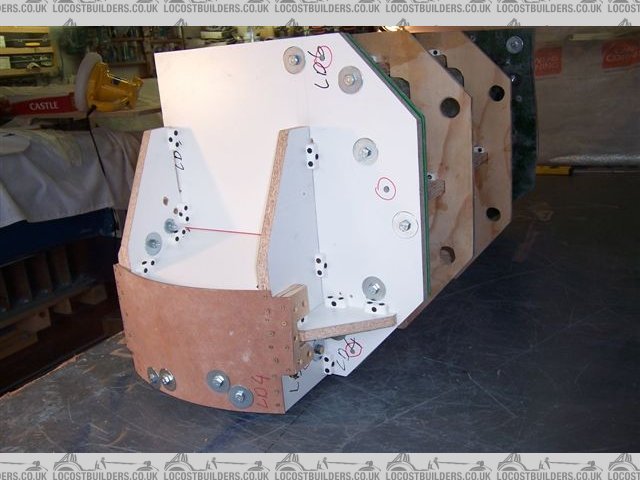
lh door mold 4
[Edited on 20/7/10 by Fred W B]
smart51 - 20/7/10 at 03:20 PM
That is a beautiful piece of work. Hearty congratulations.
scootz - 20/7/10 at 04:01 PM
Good work fella!

Neville Jones - 20/7/10 at 04:45 PM
You can't hope to short cut the system Fred, and get away with it.
You need to make proper patterns and moulds for the door inners. The melamine surfaced chipboard is ok for one offs, but not for the high quality
stuff you're doing.
Just my 2p worth.
Cheers,
Nev.
Fred W B - 20/7/10 at 07:25 PM
Hi Guys
Thanks for responses, and kind compliments.
Nev - To to be honest, I am not sure how well the hinge point surfaces etc I have assumed (from pictures) will work. I hope to get the doors working
in the scuttle openings to sort this once that outer mold is made and I can develop the inner detail required in the scuttle. So these inner return
provisions are probably really protoypes at this stage.
Although the originals had what looks to be a double sided molding to make the doors, I am currently planning to finish the open piece of my door
inners with an ally panel.
Cheers
Fred W B
andygtt - 21/7/10 at 08:12 PM
wow Fred you really have been motoring on, cant wait to see some finished panels coming from all your hard work
suparuss - 24/7/10 at 04:53 AM
freds moulds look better than my finihsed panels anyway! my panels usually take a bit of elbow grease to pop out of the mould but looking at the shine
on that door mould yours are gonna fall out onto the floor when unbolt the side bits!
Fred W B - 25/7/10 at 06:01 PM
Thanks Russ
I have had a question about the tools I used to make the plastacine radiuses.
Taking advice, I made my own not so professional tools, by welding balls (from ball bearings) to a bar.
The smaller tools in the pic are made from stainless steel welding rods with the ends rounded by a power file applied while the rod was rotated in a
drill chuck.
Cheers
Fred W B

rad tools
[Edited on 25/7/10 by Fred W B]
iank - 25/7/10 at 07:26 PM
Not a million miles away from the ones you can buy, and certainly will work just as well - since they're all just a ball bearing
on'a'stick.

http://www.cfsnet.co.uk/acatalog/CFS_Catalogue__Filleting_Tools_471.html
Fred W B - 18/9/10 at 05:00 PM
Behold, a door!
Finally finished making up the first real part. I left it in the mold for two weeks. The lay-up I used is:
Gel coat (I first stripe coated all the corners/edges, then two more applications).
1 layer 300 gram CSM.
2 layers 600 gram CSM.
This gave me a final thickness of between 3 and 3.5 mm.
I added extra thickness on the edges, and in the forward part of the door and hinge recess.
The final part weighs 5.5 KG.
The pics are as the part came out the mould, with just the edges cleaned up a bit.
My skills with applying the gel coat and laying up are improving, but still some way to go. I have to keep telling myself "Don't Panic"
as I try to get it all done neatly before the resin goes off.
Cheers
Fred W B


door 1
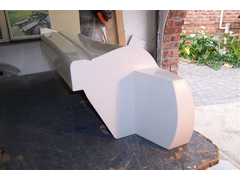
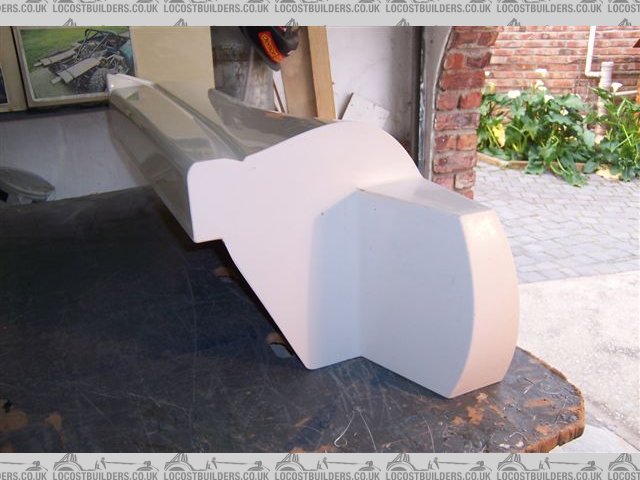
door 2

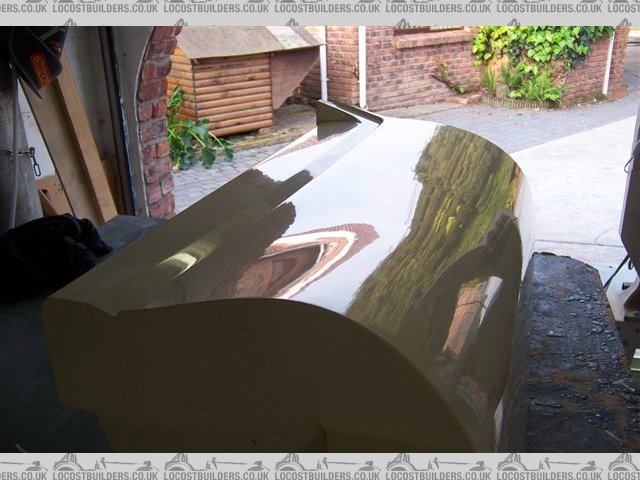
door 3

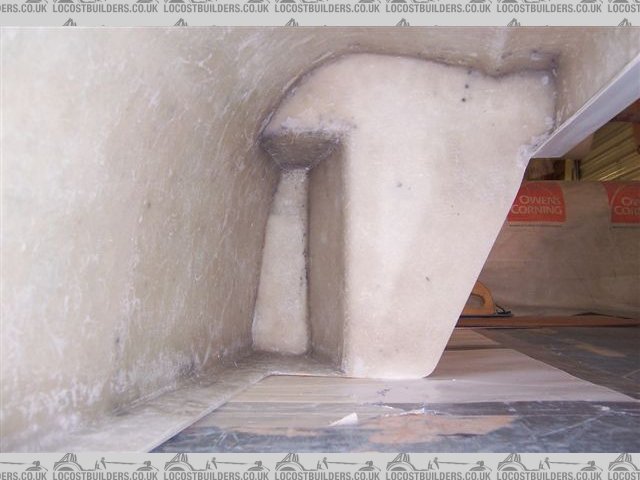
door 4
[Edited on 18/9/10 by Fred W B]
scootz - 18/9/10 at 05:08 PM
Fabulous! You must be really pleased with that... I would!
adithorp - 19/9/10 at 01:39 PM
That looks fantastic!... but I'm not surpised given the attention to detail so far.
adrian
Dave Ashurst - 20/9/10 at 12:49 AM
Looks gorgeous, Fred.
Are you working to a target weight for the finished car?
best
Dave
irvined - 20/9/10 at 02:35 PM
Looks fantastic!!!
chrsgrain - 20/9/10 at 04:45 PM
Wow! Are you planning on painting the car, rather than having a gel finish - I'm sure you are with the work that has gone into it.... looks like
that could go straight to paint now...
Awesome work
Chris
PS - when you come to more complex bits that will take longer, have you thought of UV activated resin, it means you can take your time to get
everything right, then open the garage door / wheel the thing outside, and it goes off.... makes things much easier!
[Edited on 20/9/10 by chrsgrain]
Fred W B - 20/9/10 at 07:54 PM
Thanks for all the encouraging replies guys
quote:
Are you working to a target weight for the finished car?
Dave - the original cars weighed about 725 kg. That is with an ally mono chassis, but a larger heaver engine than the RV8 I am using. I am hoping
that I might end up at say 850 kg or less?
I am weighing the parts as am trying to get a handle on the optimum amount of resin to mix for each layup. I can now calculate I am getting a resin to
matt mix ratio of about 2.3.
As an example, to put two layers of 600 matt on 1 square meter, which the door + flanges is, I prepare 5 cut open plastic milk 2 L containers, the
contents will be resin:
800 gram
800 gram
800 gram
500 gram
to give me a bit of excess,
plus another 300 gram standing by, in case!
Then I make up the first mix and start, adding hardener to the second mix only when the first one is used up, and so on.
I use a 10 cc syringe to measure out the hardener, works well. The resin is weighed on a cling wrap covered digital kitchen scale ( did you know cut
open plastic milk 2 L containers weight 45 grams?)
I use a roller thoroughly between each layer.
I just did this layup tonight on the next door mold, and it took me two hours start to finish, just the actual layup, not including the prep and
cleanup. That includes 4 layers on all the flanges.
quote:
Are you planning on painting the car,
Chris - Yes, eventually, but I can see myself running it for in the gel coat finish for quite a while as I debug it (and save up for the red
paint.....)
quote:
when you come to more complex bits
In fact, considering all the returns and recesses on the door, seems I chose the most complex bits to start with! - It can only get easier?
Cheers
Fred W B
[Edited on 20/9/10 by Fred W B]
suparuss - 21/9/10 at 06:47 PM
That looks stunning that does! i bet that deep recess was a right PITA to lay up!
Im wondering why you are not using woven cloth though? it gives much higher strength to weight than chopped strand.
ive found if i slightly over wet 300gram chopped strand and then overlay this with twill weave cloth it will soak up all the excess resin giving about
as good a result as possible with hand layup. if you do a single 300 gram csm onto the gelcoat as usual to make sure you dont get any airpockets
against the gel, and then on the next layup do a 300gram csm/ twillweave cloth combo, and then the same again it should come out much stronger than
what you have with a bit of weight saving.
Fred W B - 21/9/10 at 07:26 PM
Thanks Russ, I found the worst bit was the long top and bottom returns, as it was difficult to see in around the corners.
As for different materails, I went this way to keep it simple and cheap for a first attempt, but as you say maybe I should have been a bit more
ambitious.
Is woven cloth more difficult to lay up?
Cheers
Fred W B
[Edited on 21/9/10 by Fred W B]
suparuss - 21/9/10 at 08:38 PM
it can be a bit difficult sometimes but wets out really easy. main concern is that it wont conform as easily as csm and you need to be carefull not to
fold it over, and anywhere this needs to happen you need to cut it and let it over lap other wise the fold may lift up during curing and forn an air
pocket.
other problem is getting long strands tangled up in your roller!
worth the extra effort thoguh by a long way. but i agree if you havent done much fibreglassing it is best to keep it simple to start with.
Fred W B - 1/11/10 at 07:31 PM
Now almost ready to start laying up the "scuttle" section mold. The parting fences are installed (with 3mm hardboard spacers against the
door molds to create the panel gaps) and the surface waxed. Just need to plastacine the remaining small edge gaps and finish cutting all the matt
pieces and I can then get on with it.
I decided to do this mold in two parts, hence the locating "bumps" at the centre split line. These were made by casting resin around bolts
stood upright in the sections of a plastic tray from a box of chocolates, and then finishing them smooth.
Cheers
Fred W B
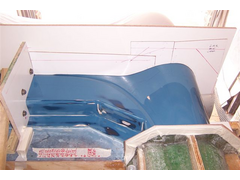
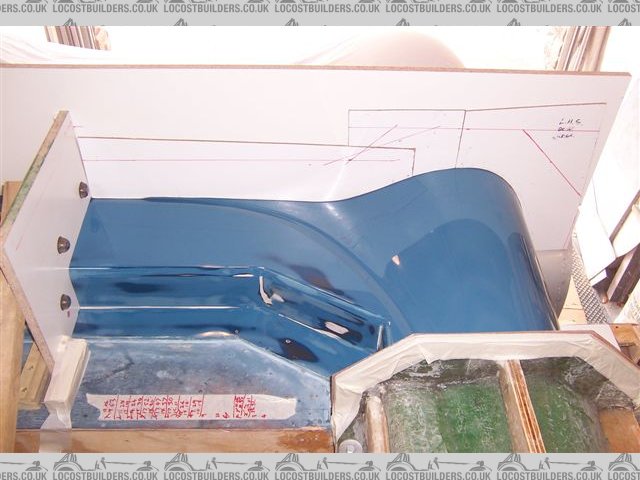
scuttle mold prep 001

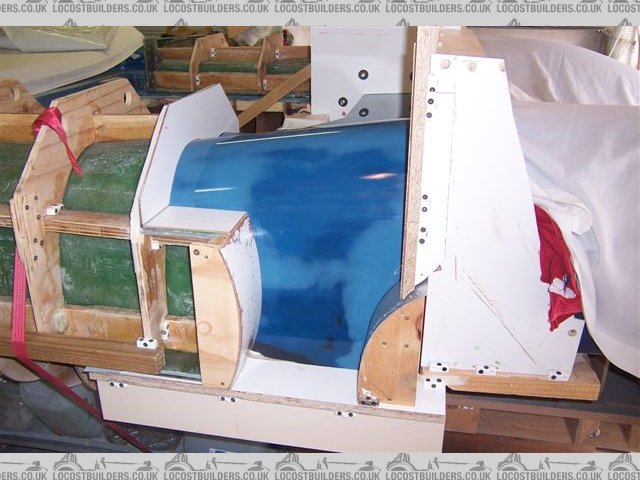
scuttle mold prep 004

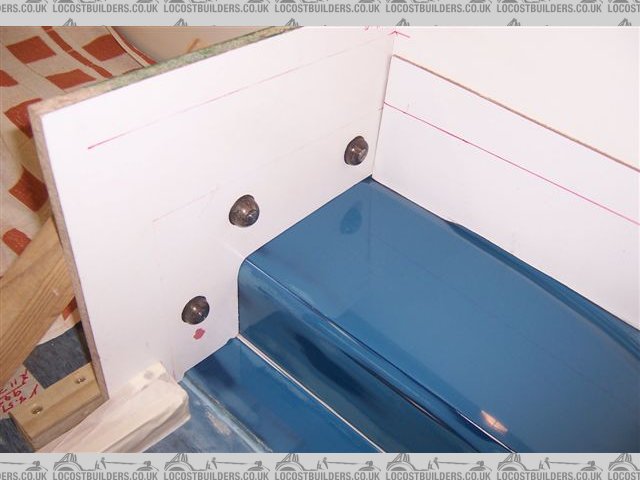
scuttle mold prep 003
[Edited on 1/11/10 by Fred W B]
[Edited on 1/11/10 by Fred W B]
ceebmoj - 4/11/10 at 01:41 PM
one again amassing work. I love looking at the reflection of the line in the plug
scootz - 4/11/10 at 01:44 PM
Fantastic! I wish I had 1/10th of your skill and dedication to the task!
Fred W B - 31/12/10 at 11:10 AM
Some pics of the finished two part scuttle mold.
Cheers
Fred W B
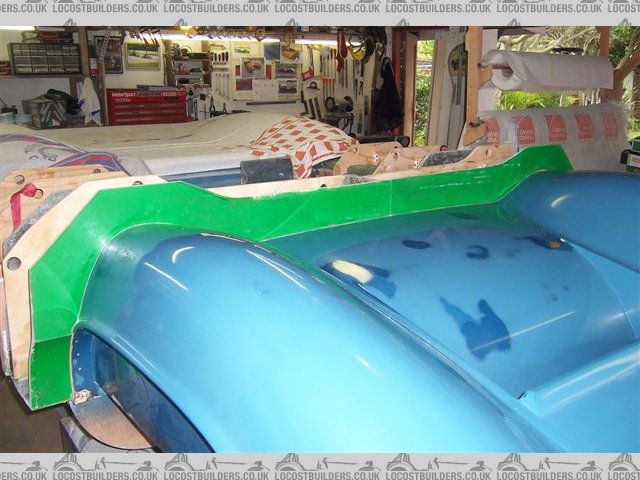
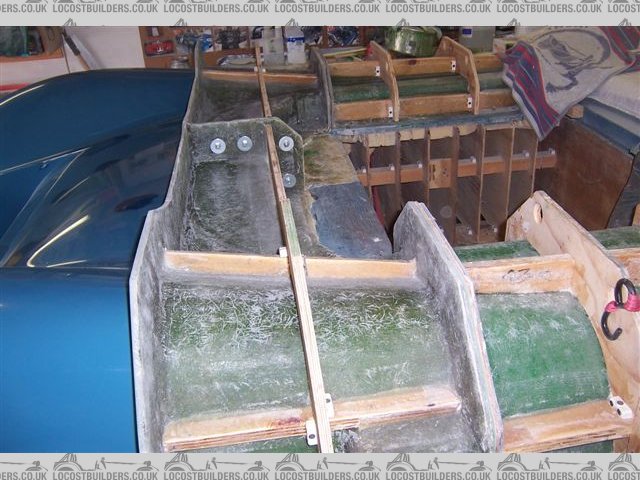
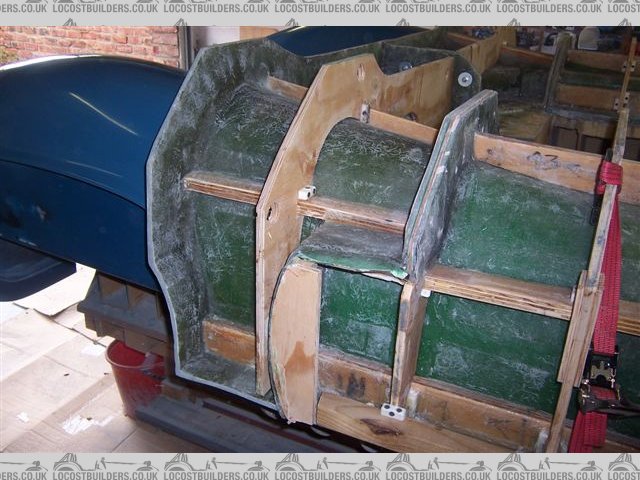
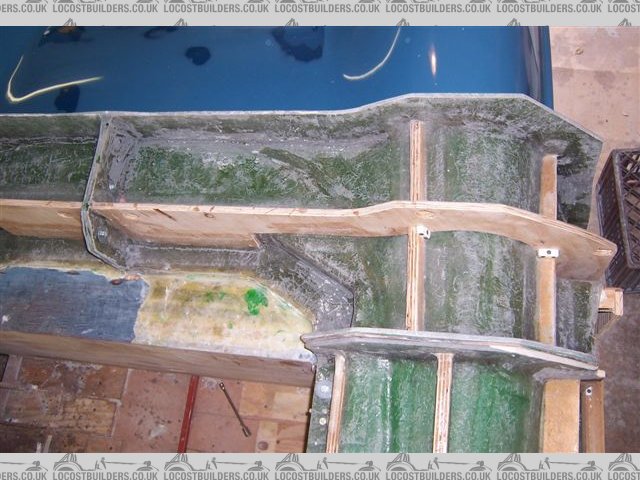
ceebmoj - 4/1/11 at 01:43 PM
great update as always and I find it very interesting watching the whole project move forwards.
ceebmoj - 4/1/11 at 01:43 PM
great update as always and I find it very interesting watching the whole project move forwards.
Fred W B - 12/1/11 at 08:23 PM
Just finished constructing the parting fences to make the first sections of the nose mould.
Now to take them off again, so I can get on with the favourite job - Waxing!
Cheers
Fred W B
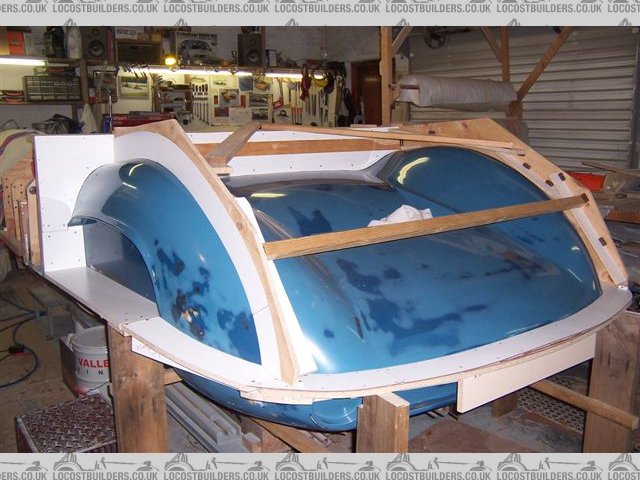
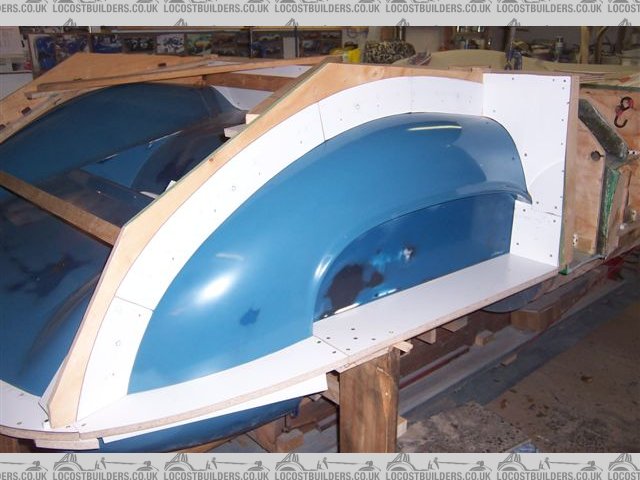
[Edited on 12/1/11 by Fred W B]
speedy123 - 12/1/11 at 09:00 PM
coming on great mate really admire the attention to detail, and your ability absolutely brilliant
an inspiration to us all
keep the postings
ceebmoj - 17/1/11 at 10:23 PM
What are your plans for lights?
Fred W B - 18/1/11 at 07:08 PM
Plan for lights..
Rear
Use generic 1960's landrover style lucas assemblies, as on the original T70's. I have the actual part number somewhere.
Front
I haven't yet got up the nerve to mark out the cutouts in the nose , so I plan to make the nose mold without them, make the nose, assemble the
car and then position the lights in the real nose, using mounting rings to mount 7" lenses.
Once the holes are cut in the nose, put it back into the mold and scribe witness marks of the cutouts in the mold that will then appear on future
parts.
Then finish up the internal surfaces of the light recesses, make moulds of the recesses, to then make parts to eventually bond to the nose.
Meantime, save the front corners of the plug, and send them to a friend who does vacuum forming professionally to use them as the basis to make vacuum
forming molds for the light covers.
Whew!
Cheers
Fred W B
ceebmoj - 19/1/11 at 01:49 PM
Thanks for the info. sounds like a good way of getting everything to look right.
Fred W B - 1/4/11 at 04:53 AM
It's been a while. I've been battling on with the outside sections of the front nose mold.
Hassles included:
I took a chance with some old tooling gel coat, and had to scrap two weeks work when it became apparent the stuff would not harden properly.
Finding a local supplier who would sell less than 20kg of tooling gell took a while.
Removing the parting fences was problematic.
I managed to put some dings in the pattern.
Turns out my parting fence placing is less than optimal in some areas.
to the extent that I have finally had enough of this, so I've given up. This has taken far too much time and money to be sensible and I
don't have the strength to carry on.
I have not yet decided if I am going to sell all the running gear bits and pieces I have collected/made or put them into something else. I'll let
you know in due course. Must just get over scrapping and disposing of the pattern first.
Thanks all for all the support in the past.
Cheers
Fred W B
TheGecko - 1/4/11 at 06:14 AM
Errr - please tell me this is a date related post ?!
Ivan - 1/4/11 at 07:40 AM
Oh no - for a moment there you totally shocked me
I do hope this isn't true
Mr Whippy - 1/4/11 at 08:16 AM
I think you need a break, you may have just exhausted yourself with the sheer scale of this project.
From what I have seen you are very very skilled and I have no doubt that with some more cunning you can get over these hurdles. Your only human mind
and pace yourself, if this project takes 5 more years so what?! I have spent 6 on just one little car and I'm still enjoying working on it but do
need to leave it sometimes and come back refreshed.
If you've really had all you can take just now, wrap it up and put it away for a while, don't do anything rash and wait till you feel like
working on it again. I find going to car shows always helps and gives me bursts of enthusiasm.
You owe it to yourself for all the hard dedicated work you have put in so far, you will finish it and you'll be all the more proud of what you
have achieved knowing what a struggle it has been.
Fred W B - 1/4/11 at 06:56 PM
Thanks for the responses and enthusiastic support. As suspected, the last part of my post was a leg pull, I am still very determined to finish this
damn thing.
Cheers
Fred W B
Fred W B - 3/4/11 at 05:35 PM
Current status.
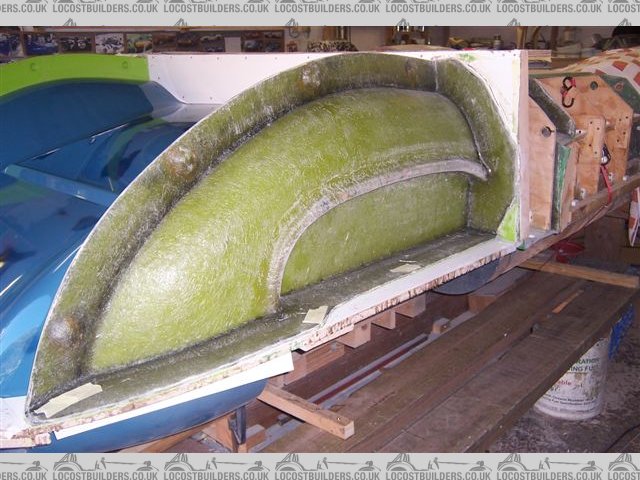
Here you can see the difficult acute angle I've given myself at the front edges of the parting detail, and 2 small scars I've put into
pattern. Wil just plastacine these up and poiish the marks out the mold. They might even be in the headlight cutout.
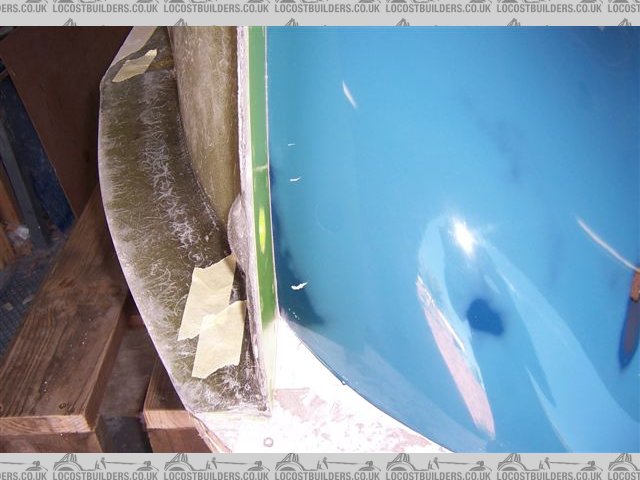
Ive built some benches to stand on to ease access to the upper surface, and down into the nose duct.
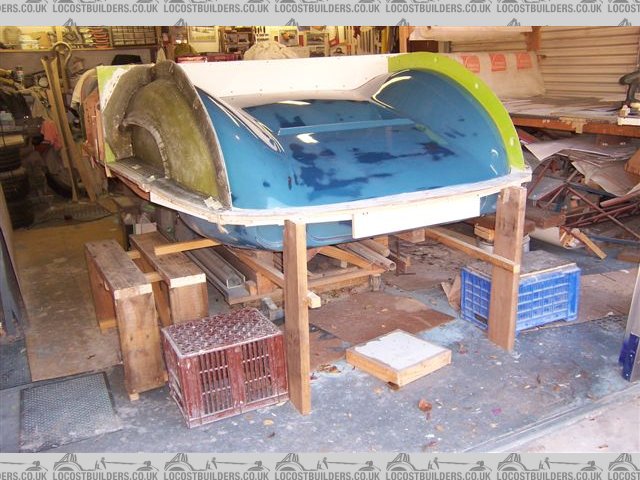
Trying to decide that I CAN lay this up in one hit.
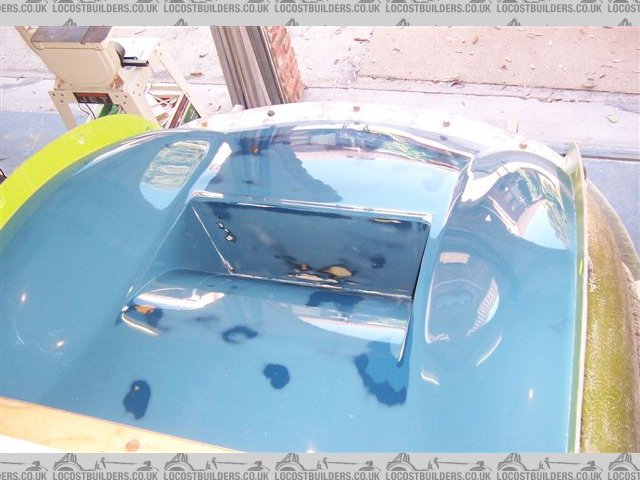
Cheers
Fred W B
[Edited on 3/4/11 by Fred W B]
Ivan - 3/4/11 at 06:45 PM
To my untrained eye looking at it in 2D it looks OK for one part moulding - would think that the air vent shape is the critical factor. But if
something about it is causing you uncertainty go with your gut.
Steve Hignett - 28/4/11 at 09:34 AM
Apart from it being a large area, I also think it looks perfectly fine for a one piece centre. The only worry from my point of view would be the time
it takes Vesus the resin pot-life you use.
With the stuff we have at work, that would take a LOT of prep work and two guys just to make sure we got it down before it exothermed as it goes off
so darn quick
Still looking great Fred, top notch work...
I can't say that I would have done the front wing flange at that angle, I would have come off the body at an angle to give a slanted plane to
work both moulds into, but some of the world superbike stuff that we mould is tighter than that, so it shouldn't be too big a deal!!!
Fred W B - 28/4/11 at 05:18 PM
Thanks Ivan and Steve for your comments, and opportune Steve as I have just finished the first layer (tissue + 300 gram mat) of the centre piece.
I had been putting it off, waxing, rewaxing, making matt templates, cutting the various bits of mat (including the multiple corner fillets) etc etc,
and doubting If I could do it okay single handed. I laid out all the matt pieces in order, and even did a "dress rehearsal" of laying the
bits in. At this stage I cut the surface matt to butt into the flange corners, with separate pieces to fit on the flanges, and fillet corner pieces
then laid into the corner joints. Also did some detail pieces around/in the location bumps. The surface only was 9 separate pieces of matt.
I finally screwed up my courage, started at 9.00 Saturday morning and by 2.30 it was done, with the exception of the corner fillets down into the nose
duct, which I finished yesterday, after sanding the applicable areas. The complete area with flanges is 3.6 m2. I put the 1.8 kg of gell on in three
stages (corners/edges + coat 1 + coat 2) and made up 700 gram batches of resin which I catalysed as I went along, working nonstop.
Thier are a few very small areas where I have chased back into small air bubbles and repaired, deep in the front recess particularly was a pain, but I
thought I did pretty well overall.
Now to finish sanding the surface and cut the 600 matt for the next layers.
Re the front wing flange, I consider that a lesson learned
Cheers
Fred W B


[Edited on 28/4/11 by Fred W B]
ceebmoj - 29/4/11 at 06:59 PM
Great to see the progress.
are you gong to bond any wood or a core to the center section of the mold?
clairetoo - 29/4/11 at 07:56 PM
Frad - I have been following this thread for a long time , and I have to say I am relieved to see you are continuing your work - when I read you were
ready to chuck it all in a skip and give up I was gutted
I have made moldings of at least as large an area , but with a lot less complex detail - I just mix up 4 or 5 KG's of resin , with a bit less
than the recommended 1% catalyst , and go for it
Mr Whippy - 29/4/11 at 08:22 PM
keep going
This is such a learning experience for everyone following this build just can�t wait to see the finished moulding and it�s soooo amazingly shiny!
Ivan - 30/4/11 at 06:52 AM
I continue to be amazed but there is a downside - I always had a dream of making a Porsche 904 or renault Alpine from scratch as Fred has done here
and now realise that there is no way I would ever have the patience and determination to achieve the sort of results he has.
iank - 30/4/11 at 07:09 AM
quote:
Originally posted by clairetoo
Frad - I have been following this thread for a long time , and I have to say I am relieved to see you are continuing your work - when I read you were
ready to chuck it all in a skip and give up I was gutted
You might want to check the date of the 'giving up' post
Fred W B - 1/5/11 at 03:00 PM
Thanks for the responses Folks.
Ceeb - I do plan to bond some wood reforcing ribs on once the mold thickness is built up.
Claire - I use 0.75 percent catalyst. As our autumn has started our ambient temps have started to drop (to under 25 deg C)which also helps.
Cheers
Fred W B
[Edited on 1/5/11 by Fred W B]
Fred W B - 25/6/11 at 04:23 PM
So full thickness is laid up, wood bracing is on, edges are trimmed, and the top surface of the nose mold is finished!

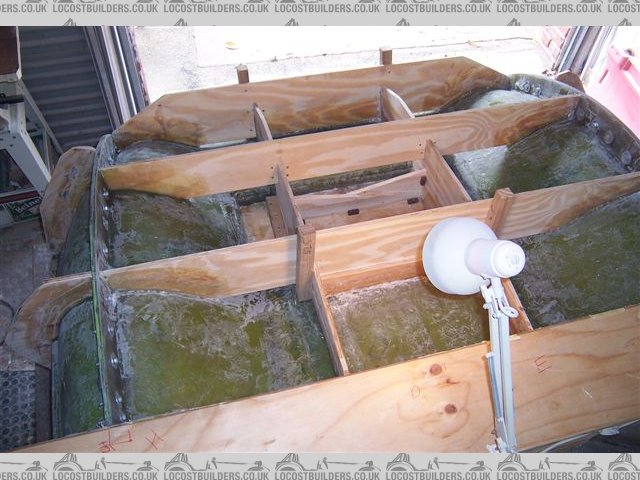
[Edited on 25/6/11 by Fred W B]
scootz - 25/6/11 at 04:26 PM
I wish I had a tenth of your skills and dedication!
Good work fella!
Fred W B - 25/6/11 at 04:27 PM
Thanks Scootz
And I've started to remove the nose mold from the pattern
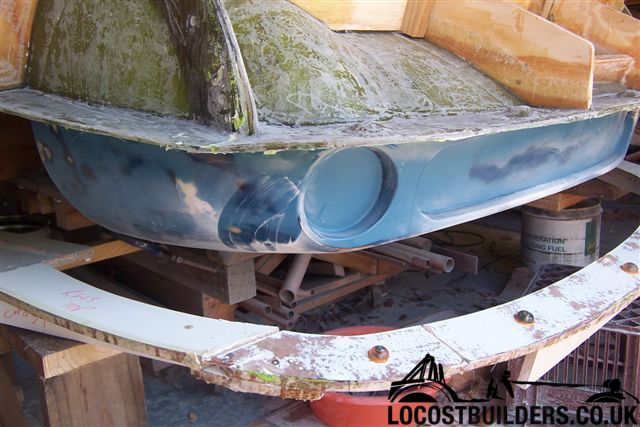
Just tapped some soft wood wedges between the flanges and this popped off nicely!
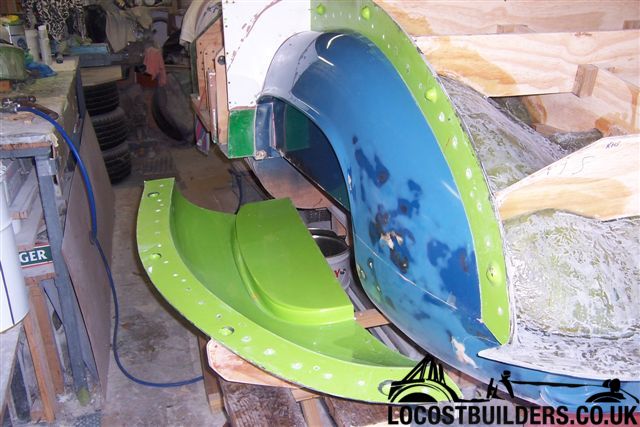
Very encouraged as I feel that I have got a major step finished
Cheers
Fred W B
[Edited on 25/6/11 by Fred W B]
chrsgrain - 25/6/11 at 07:51 PM
Go on - take the bit one off, you know you want to !! (and take some pictures so we call all be jealous!)
Chris
Fred W B - 26/6/11 at 03:59 PM
And today I rounded up some mates to help lift off the bigger bits. The scuttle mould came off easily
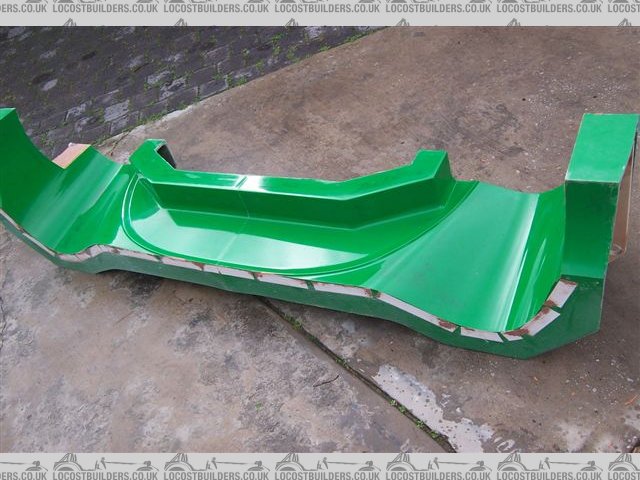
but the nose upper section put up more of a fight. Judicious use of levers, wedges, ratchet straps, roof rafters, hammers and mallets was necessary to
"crack" it loose. It's a damn big heavy piece but it is off now.
Amazingly all the surface of the pattern stayed behind.

Cheers
Fred W B
[Edited on 26/6/11 by Fred W B]
Ivan - 26/6/11 at 04:48 PM
Looking good - bet you will sleep well tonight!
smart51 - 26/6/11 at 05:21 PM
That's fantastic. I always look forward to seeing new pictures of this. The end result is going to be superb.
jabbahutt - 27/6/11 at 06:47 AM
truly stunning, I'm off of cry at my complete lack of car skills
HowardB - 27/6/11 at 07:05 AM
this thread, it's photographs and all the comments should be made into a
"How to do it properly!" book, and published to great acclaim,..
It is a source of endless awe what skill and patience can achieve,....
Fred W B - 27/6/11 at 06:54 PM
Thanks for the kind responses Folks
Cheers
Fred W B
[Edited on 27/6/11 by Fred W B]
Fred W B - 29/6/11 at 07:48 PM
First step of next stage done
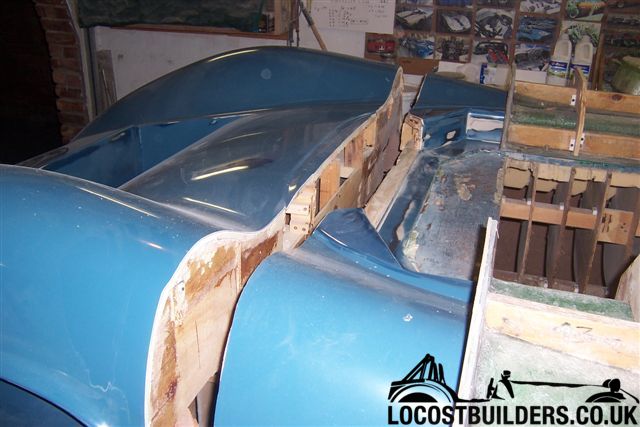
and yes, their was a chain saw involved at one point.....
Cheers
Fred W B
[Edited on 29/6/11 by Fred W B]
smart51 - 30/6/11 at 07:34 AM
Did it not feel bad after putting so much work into making it?
Fred W B - 30/6/11 at 11:14 AM
Not really actually, it's what I have to do to move on and I'm really focussed on trying to make progress at the moment.
Added motivation is that their is not enough room in the garage for the pattern and the moulds and still be able to work.
Cheers
Fred W B
Fred W B - 2/7/11 at 12:01 PM
Nose removed
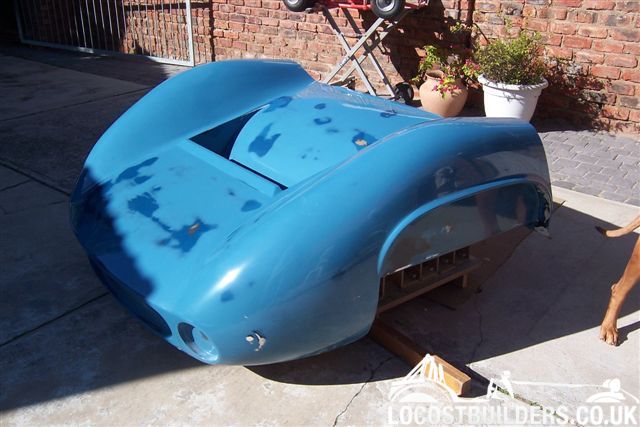
and turned over and replaced in mold. Took 6 of us to do this.

Cheers
Fred W B
Alan B - 2/7/11 at 12:33 PM
Fred, awesome work...I can't believe I've not seen this thread earlier (unless I did and forgot...which seems unlikely.....)
From someone who has been there and done that a few times (and not anywhere close to your standard....) I can really appreciate what you have
done..
Again...FANTASTIC JOB
Alan
Fred W B - 3/7/11 at 07:07 AM
Thanks Alan, when I first started casting about the internet to do with this building a car yourself lark your Meerkat site was one of the first build
sites I found, and I followed it with interest.
So you are partly responsable for getting me started on all this madness, so thanks for that too.
Cheers
Fred W B
[Edited on 3/7/11 by Fred W B]
Steve Hignett - 4/7/11 at 09:33 PM
Hi Fred,
Your post above (on 29th I think), you make a comment about how difficult it was to remove off the pattern, and I'm not surprised!
Did you ever consider making the rad-outlet dip in the bonnet as a seperate part of the bonnet mould? A flange round the edge and dropped in and then
obv through from above?
Obviously, you're not going to do it now, and I don't know whether it would be better or impossible from the Pics, but I just wondered
whether it had crossed your mind or not?
Rgards,
Steve
And keep up the fabulous progress!!!
Fred W B - 5/7/11 at 08:12 AM
Hi Steve
I think I can see on the mold some small areas in the depth of the nose duct where it "hung up" . Possibly this is because that is where it
was physically much more difficult to apply and rub out the wax, so maybe my preparation was not as through in that area.
I did consider (in fact agonized over) making the duct section a separate section, and I suspect I will still regret not doing so. This as the return
section under the nose goes back a long way, such that now I will probably have to work though a gap between the front side of the duct return and the
rear edge of the under nose piece when laying up some of the detail inside the front of the nose. I think I will have to make my under nose return
shorter than on other T70's to make this possible. This is the section of the pattern I am working on now - see the last pic above. Thanks to
another forum member I know that the GD goes back under the nose (from the bottom of the front opening in the centre) 385 mm. The rough surface you
see on the pattern now is a bit longer than that.
So far I have tried to do all my moulding work "in one", but I have seen it stated that large mouldings can be done in sections, and because
of the above problem might it be more practical to layup the part surface in the majority of each separate mould piece before assembling the mould
pieces together and completing the nose?
How does one do that? Is it a case of stopping the gel coat application say 30 mm short of the join lines, and then tapering out the part layout just
short of the edge of the gel. Then bolting the mould pieces together, applying gel over the joint sections, and then completing the layup? Would the
result be satisfactory, or must I make every effort to do the nose layup 'in one"? I'm starting to think that might be very
difficult.
As you can see I am still learning this stuff as I go along.
Cheers
Fred W B
ceebmoj - 5/7/11 at 08:25 AM
Hi,
I cant comment from experience of having done it my self. However if you look on you tube there are a large number of videos by a guy called "how
to build a b1 bomber" and he sprays the gel cote in to the mold sections then lays up the mold sections timing the edges once they have gone very
tacky and then glues the sections together however this seams to lead to some very long days while he does all the layup.
suparuss - 6/7/11 at 12:54 PM
Hi Fred, looks like you are making lots of progress! looking very nice indeed. ive just finished and mounted the main body shell on my car which
although ive done it in 2 halves it was still 2 fairly large but really complicated pieces to lay up so really needed to be laid up in sections.
i put the gelcoat on the whole thing and then put the first layer of glass over that on the whole thing. once you are at this stage you can sart to
lay up in sections as your resin will be air inhibited meaning that you can leave the section you dont want to do yet and it wont fully cure until you
do lay more glass over it. just needs a quick sand and then prime with some acetone as usual.
id only lay up thin sections at a time so that you are gradually building up the thickness over the whole part, if you go thick in one area before
moving to the next you may get un-predictable warpage.
Cheers,
Russ.
Fred W B - 6/7/11 at 06:23 PM
Thanks Russ
quote:
ive just finished and mounted the main body shell on my car
Well done, so where are the pics then?
Cheers
Fred W B
Fred W B - 18/9/11 at 08:59 AM
Slow progress.
Worked up the surface on the nose underface, made the formers for the flanges and now waxing.....
Cheers
Fred W B
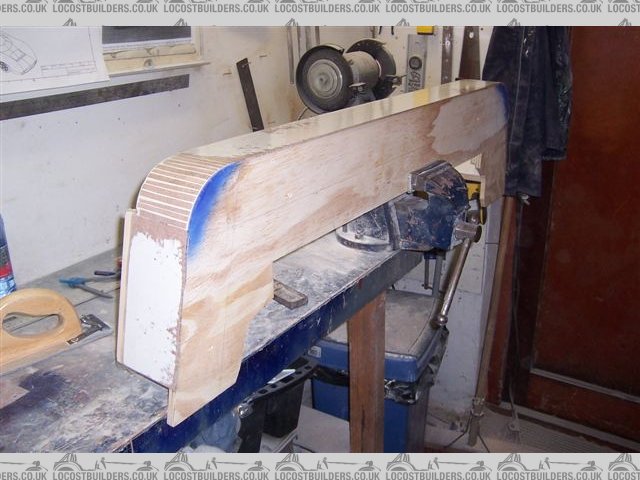
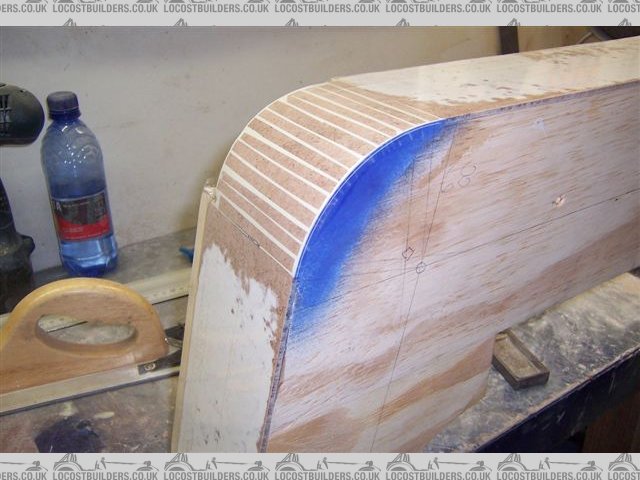
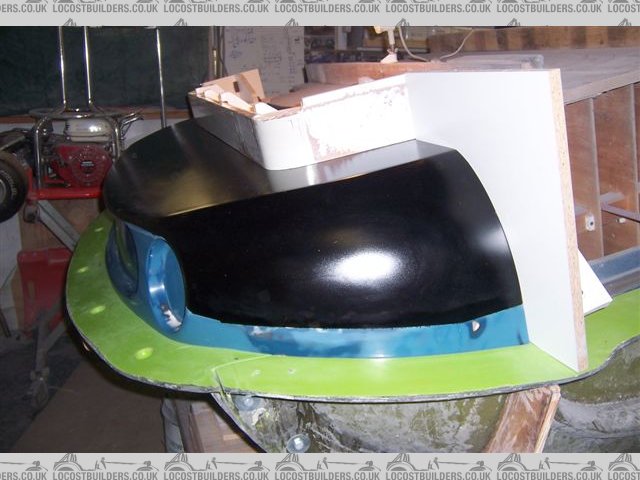
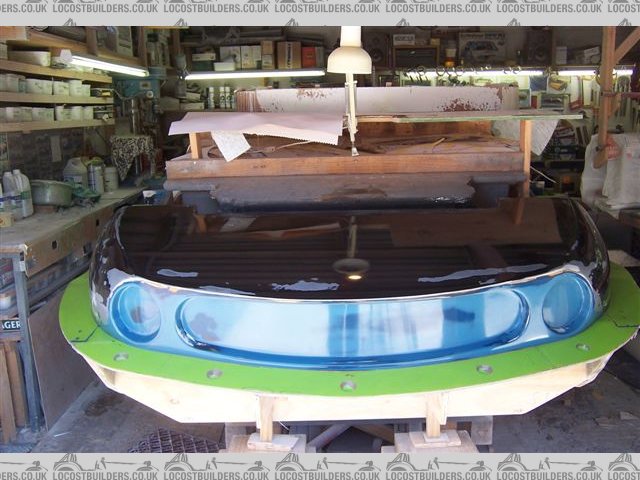
[Edited on 18/9/11 by Fred W B]
chrsgrain - 18/9/11 at 06:12 PM
Great reflections - must be like glass.....
Chris
scootz - 18/9/11 at 06:16 PM
I love these updates!
Fred W B - 19/9/11 at 04:17 PM
Thanks for the kind responses Guys
Cheers
Fred W B
Steve Hignett - 25/10/11 at 01:36 AM
Managed to get anymore done recently, Fred?
Fred W B - 25/10/11 at 05:48 PM
Not actually thanks Steve, circumstances have dictated that I have not had any Garage Time at all over the last 6 weeks.
I am hoping to get on with starting the layup of the last bit of the nose mould this weekend though.
Cheers
Fred W B
Fred W B - 30/10/11 at 04:42 PM
Got the first 2 layers onto the last part of the nose mold. Now need to tidy up the edges around the nose openings.
Cheers
Fred W B
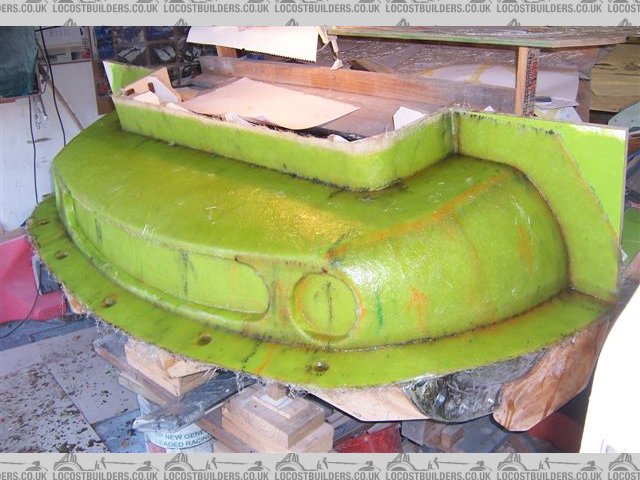
Fred W B - 30/11/11 at 04:54 PM
Tiny update. Last section of nose mould completed
Cheers
Fred W B
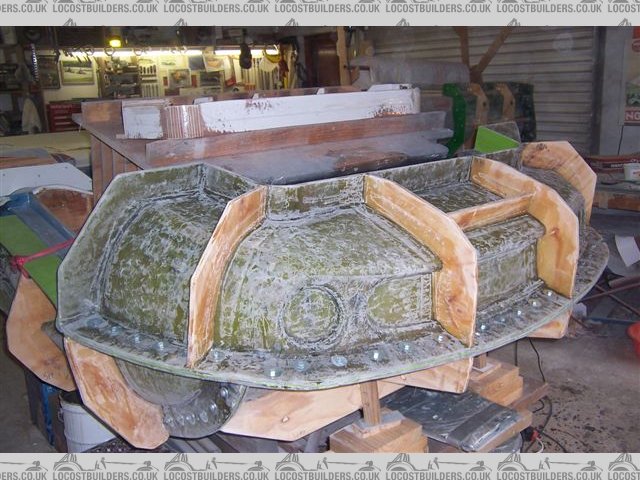
ceebmoj - 30/11/11 at 08:02 PM
Missed the last update. looks like you are making good progress.
violentblue - 5/12/11 at 01:45 AM
get on it already, I want to see this thing complete
obr_technology - 9/12/11 at 08:07 PM
This is absolutely amazing.
I teach CAD here in the UK and am now going to show this thread during my next lecture as I think its amazing, the range of skills you have used and
an attention to detail that I could only dream of.
Please keep us updated and again, absolutely amazing.
Fred W B - 11/12/11 at 06:23 PM
Hi Guys, Thanks for the encouragement.
So one night this week I invited some mates over to help lift the nose pattern, and we demoulded the nose again. Then moved the nose mould sections to
storage. I assembled the complete nose mould and finally I can see inside it.
The dark specs you see in the detail pics are bit of plastacine
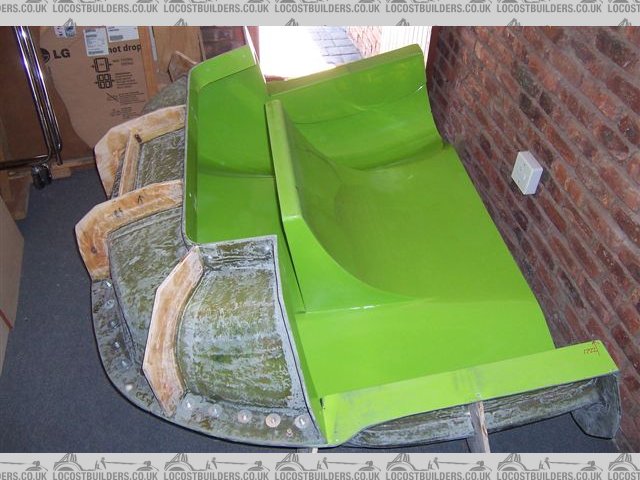
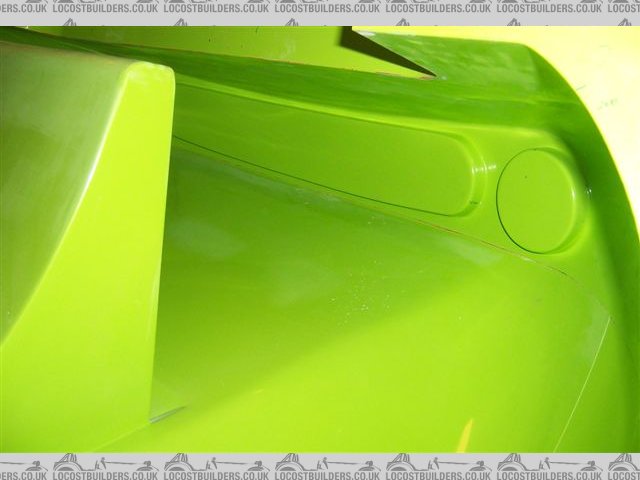
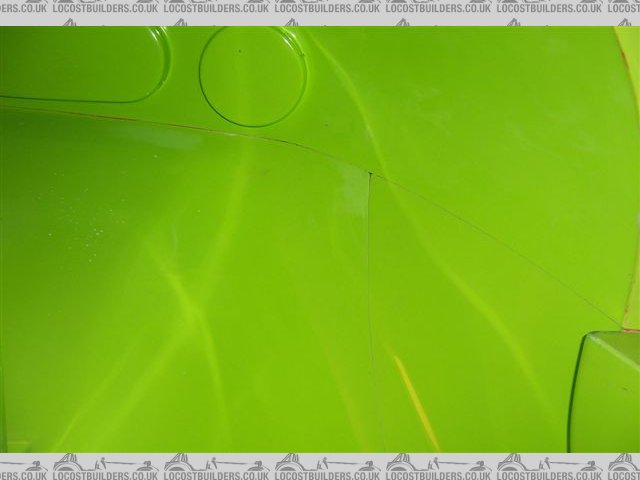
[Edited on 11/12/11 by Fred W B]
scootz - 11/12/11 at 06:28 PM
Fred W B - 11/12/11 at 06:32 PM
This weekend I cut the front off the nose, to keep to one side to use later to sort the headlight recess/covers detail, and scrapped the rest of the
nose pattern.
I have retained the scuttle section of the pattern as I still have to do something about the returns and internal details in the scuttle.
Now I can get on with the tail mould. The door moulds are still on the pattern so I can mark the forward edges of the tail section.
Cheers
Fred W B
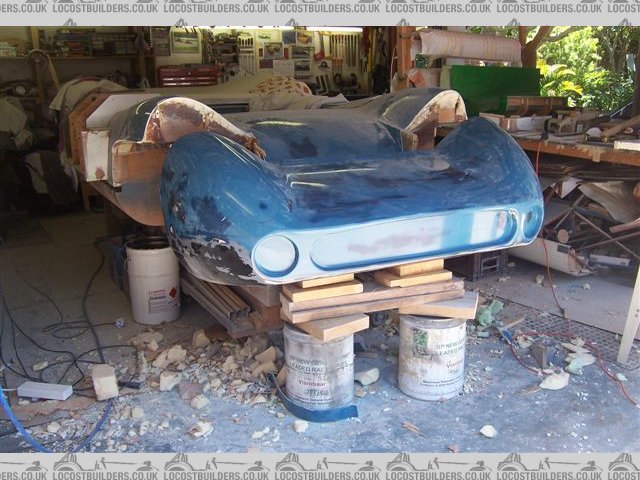

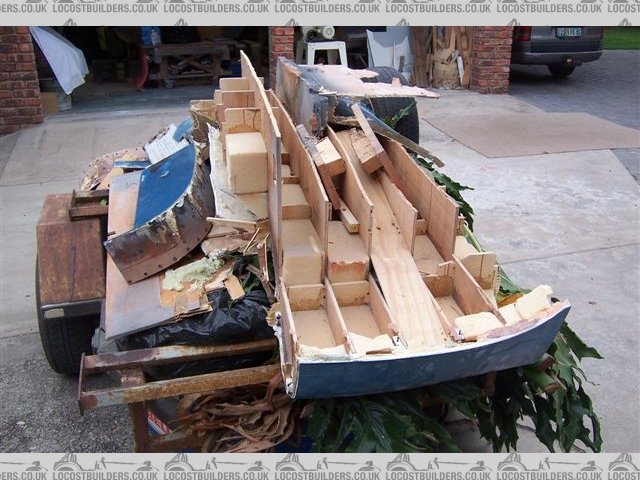
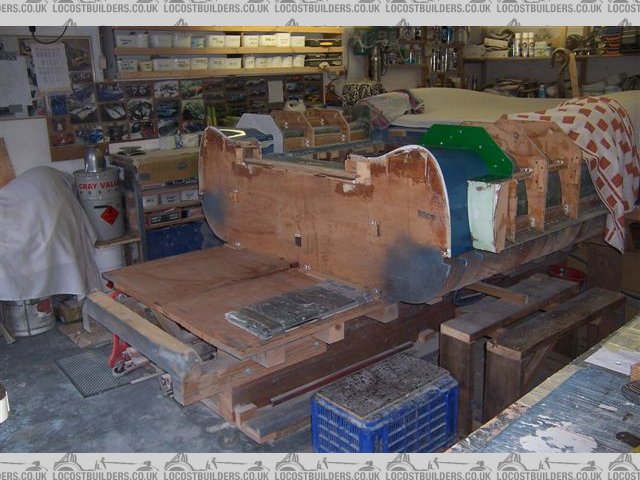
iank - 11/12/11 at 07:37 PM
No going back now, though the moulds are looking fantastic quality.
chrsgrain - 12/12/11 at 04:31 PM
Awesome! Moulds look great.
I'm sure you weren't sentimental about it, but that's still a lot of work to be scrapping...
Chris
scootz - 12/12/11 at 04:46 PM

smart51 - 14/12/11 at 05:09 PM
Was cutting up the buck hard given all the hard work put into making it?
Looks like a first rate job. Keep up the good work.
bertie_bas205 - 15/12/11 at 01:39 AM
You have some skills Sir......
Bertie.
jabbahutt - 15/12/11 at 08:05 AM
I'm not sure I'd of been able to scrap all that hard work as easily as that. Top draw workmanship, wish I had 2% of the skills demonstrated
Fred W B - 15/12/11 at 05:28 PM
Thanks for the kind responses all.
Re scrapping the buck sections, It's what I have to do to move on, so I just got on with it. I did double double check where I was cutting before
I fired up the angle grinders and chain saw though!
It is great to have some more room in the garage now, for years I have been moving around in the narrow alley around the pattern.
Currently making progress on cutting the rear sections of the doors out of the pattern. This so I can then make the forward facing surfaces of the
rear body section that are in the door gap. You can see the 3 mm gap that will become the door gap in the lower pictures
Cheers
Fred W B
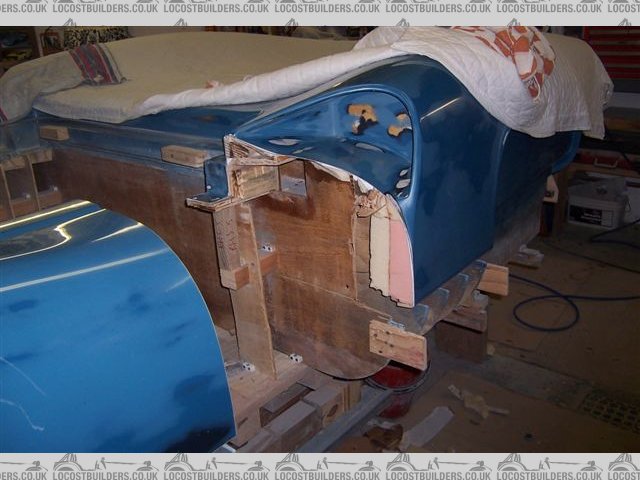

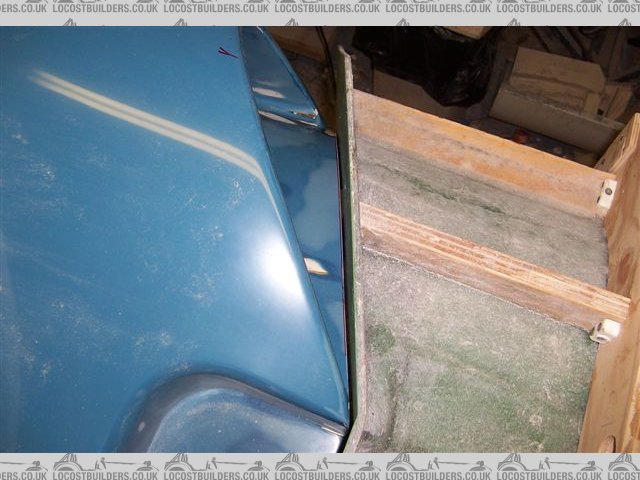
[Edited on 15/12/11 by Fred W B]
Fred W B - 1/1/12 at 09:59 AM
quote:
make the forward facing surfaces of the rear body section that are in the door gap
Like this
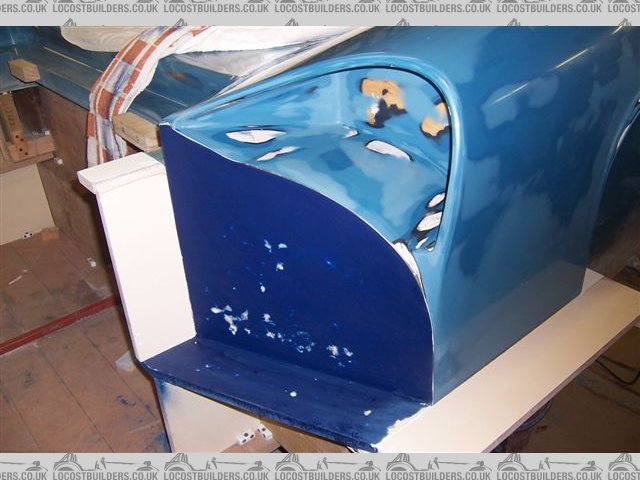
Happy new year all
Fred W B
[Edited on 1/1/12 by Fred W B]
Fred W B - 22/1/12 at 06:46 PM
Ready to start cutting matt for and laying up the first parts of the tail mold, the inserts for the hip ducts
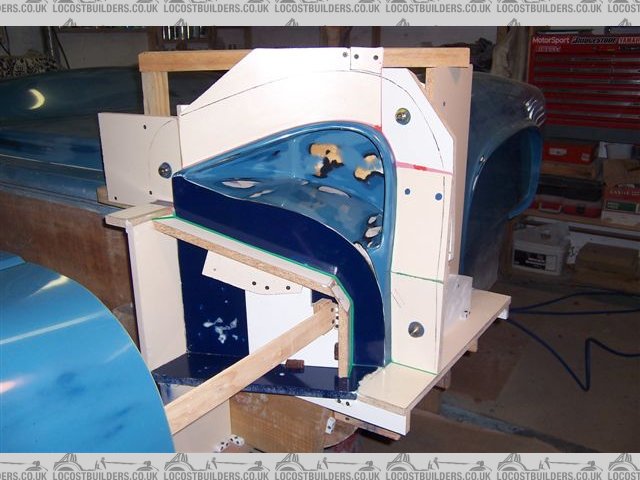
Cheers
Fred W B
Fred W B - 9/2/12 at 06:59 PM
Laying these up to proving to be a bit of a fiddle. Access is difficult, some of it has to be done upside down and you struggle to see what you are
doing.
Cheers
Fred W B
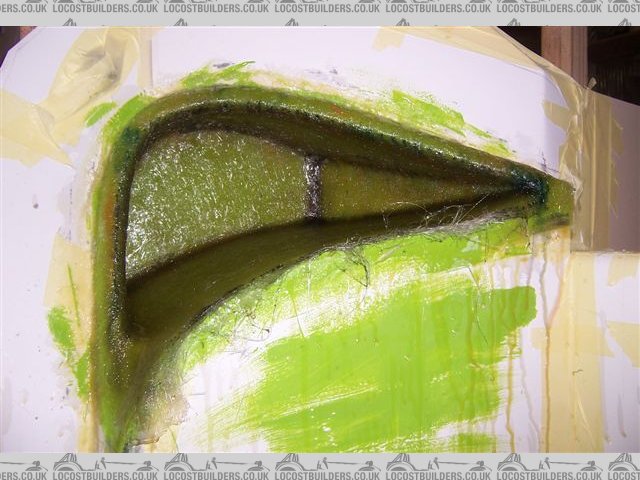
[Edited on 9/2/12 by Fred W B]
[Edited on 9/2/12 by Fred W B]
smart51 - 9/2/12 at 07:22 PM
Looks like its coming along nicely. Can't wait to see the finished item.
mangogrooveworkshop - 11/4/12 at 11:11 PM
Got a trip brewing in a few months ........going to put you on my route for a beer and a gawk
MakeEverything - 12/4/12 at 08:34 AM
quote:
Originally posted by mangogrooveworkshop
Got a trip brewing in a few months ........going to put you on my route for a beer and a gawk
Make sure you get some photos! Oh, and dont forget to take a toy for the dog!!
mangogrooveworkshop - 12/4/12 at 12:31 PM
Will do
Fred W B - 22/4/12 at 06:46 PM
quote:
Got a trip brewing in a few months ........going to put you on my route for a beer and a gawk
Hay Mango, will be pleased to meet you, give us a shout when your planning is confirmed.
Not posted for a while, had some things going on that kept me out of the garage for a while.
I have now finished the first 2 sections of what will be a 6 piece tail mould, these being the outer face sections of the forward facing areas of the
tail, including the inserts that make it possible to form the inner surfaces of the "hip ducts".
After making the insert moulds, these were closed off, and another mould made over them over the full forward facing surfaces. The surface down
towards the belt line may be bigger than necessary, I can cut the parts back if needed later. I incorporated a step out block to give a register
between the insert and face moulds. The insert section moulds are secured to the face moulds with screws.
The idea is that the full tail part is first made with the insert section removed from the face mould. The open area of the duct is then cut out, up
to the join line. The insert mould is than screwed to the removed face mould and a moulding made separately of the insert. The insert part is then
trimmed to the join line, the insert part put back onto the mould and the face mould bolted back into the full part mould, so that it positions the
insert part in the correct place. The insert part is then bonded into the tail part.
Hope that makes sense, the pictures may help explain what I am trying to do. The insert and face moulds happen to be made with different colour green
tooling gel, which make the join line easy to see
Cheers
Fred W B
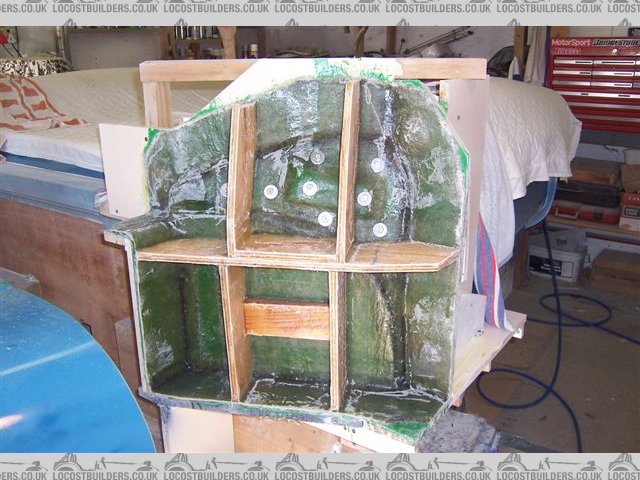
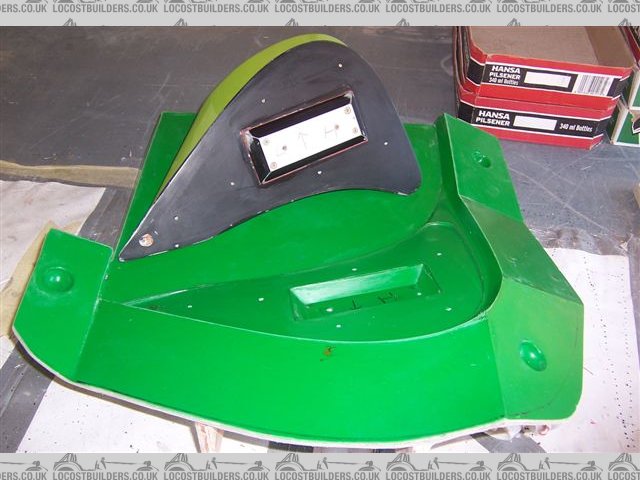
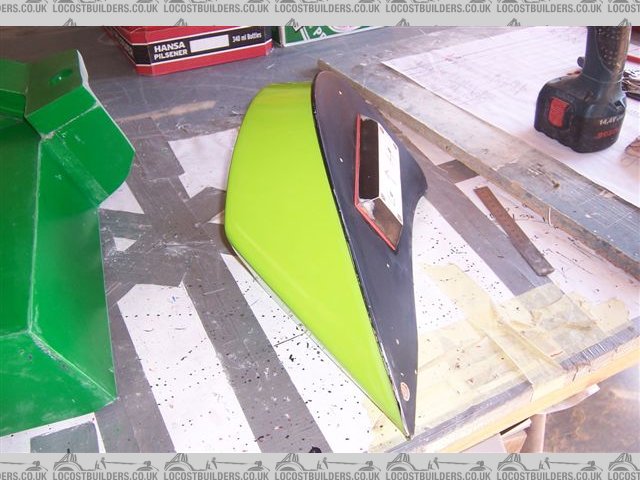
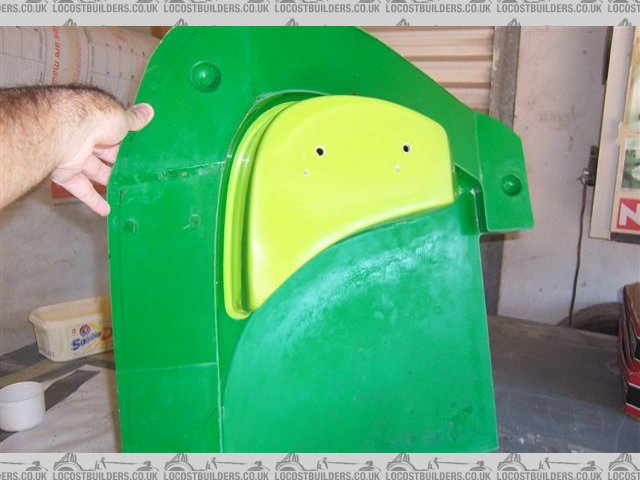
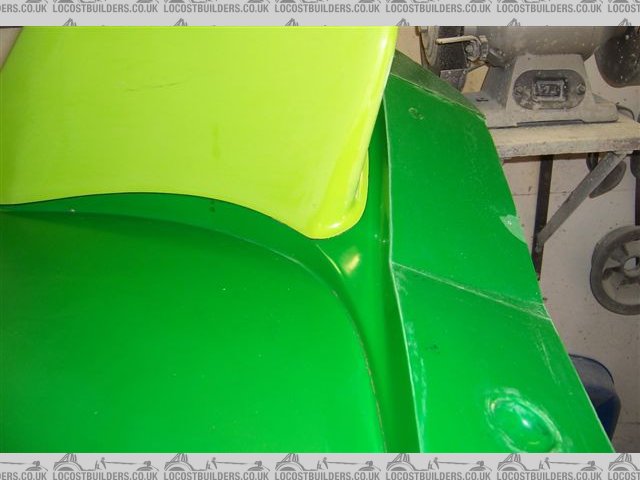
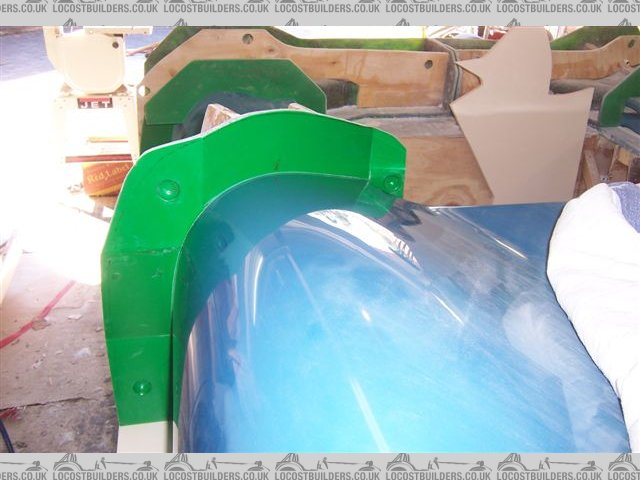
[Edited on 22/4/12 by Fred W B]
smart51 - 22/4/12 at 07:39 PM
Looks like you've put a lot of thought into that. The moulds are looking good. How much work do you think is left before all the moulds are
pulled?
Fred W B - 22/4/12 at 08:56 PM
Thanks Smart. I did agonize over it for ages, but I've also been given some very good advice on how to tackle that bit.
I've given up predicting when things will be finished, but hopefully not many more months before the moulds are finished.
Cheers
Fred W B
[Edited on 22/4/12 by Fred W B]
mangogrooveworkshop - 22/4/12 at 09:31 PM
Fred
On your bigger panel are you sticking some airline PCL connections to use when releasing the parts from the moulds.
I was watching a video making a body shell for the new shelby cobra and they had them installed in the mould.
When the release came it was blow air in and pop out it came.
Will defo make a trip to PE on the garden route in a hertz rental
Fred W B - 23/4/12 at 04:34 PM
Hi Mango
It's not the bigger panels I'm worried about, as my multipart split molds should make it easy to demould. I did use air to help release the
insert "bucket" moulds from the pattern, you can see two holes in the back face of one in a picture above. I didn't bother to add
connections, I just held the air nozzle firmly into the suitably sized hole and it released well enough.
Thanks for the thought.
Cheers
Fred W B
Fred W B - 8/7/12 at 07:15 PM
So lately progress has been slow albeit steady.
The entire tail section has been waxed, and all the parting fences made and installed.
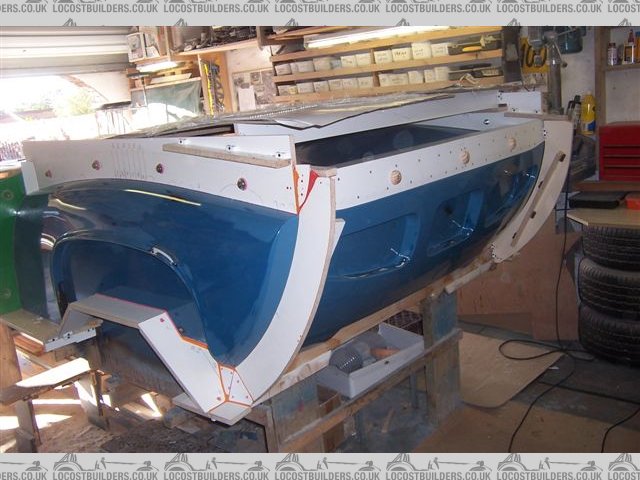
Fred W B - 8/7/12 at 07:16 PM
Working now on the next section of the tail mould, all matt templates have been made, matt cut, and today at 10.30 I started with tooling gel
application, then once it had gone off I applied tissue, then one layer of 300 gram mat on the surface and flanges, + fillets in the corners, then a
layer of 600 and 2 layers of 600 on all the flanges.
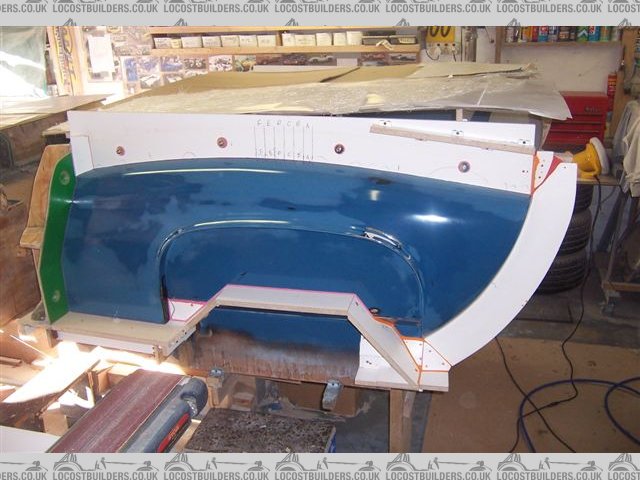
[Edited on 8/7/12 by Fred W B]
Fred W B - 8/7/12 at 07:18 PM
The fiddly pieces around/under the wheel arch return are a pain.
By 5.30 it looked like this.
Needless to say I didn't see any sport on TV today
Cheers
Fred W B
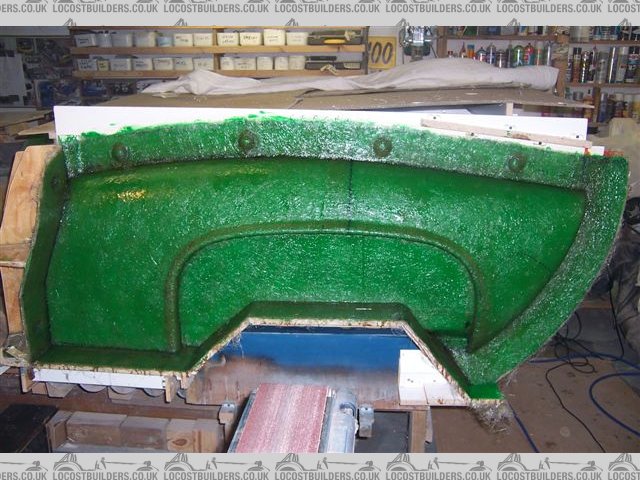
smart51 - 8/7/12 at 07:26 PM
Still in awe Fred. Keep up the good work.
MRLuke - 8/7/12 at 07:31 PM
Wow. How on earth did they make these so quickly in the first place
Fred W B - 8/7/12 at 07:44 PM
Thanks guys
quote:
How on earth did they make these so quickly in the first place
Luke, I guss the difference is that I am one bloke, doing this part time and learning as I go. Lola would have had a team of seasoned experts and
subcontractors working full time? Otherwise I have no idea.
Cheers
Fred W B
[Edited on 8/7/12 by Fred W B]
Fred W B - 20/8/12 at 05:53 PM
So after yet more polishing (the lead light is in order to see wax streaks left on the surface), tailoring of matt pieces and the consumption of yet
another 25 kg bucket of resin the LH and RH sides of the tail mold are up to full thickness, and I can now get on with the transom panel section.
Cheers
Fred W B
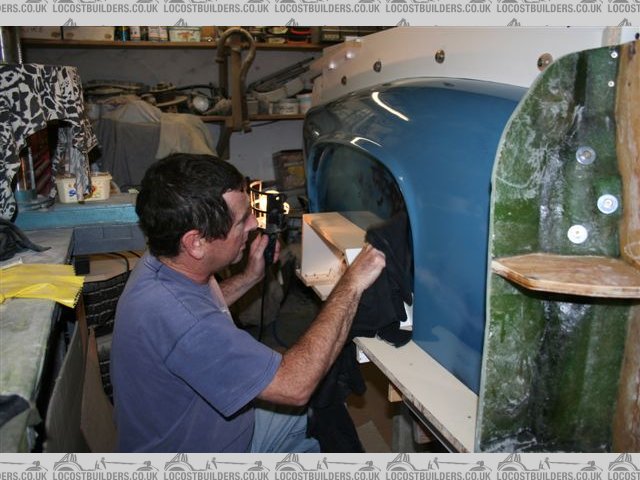
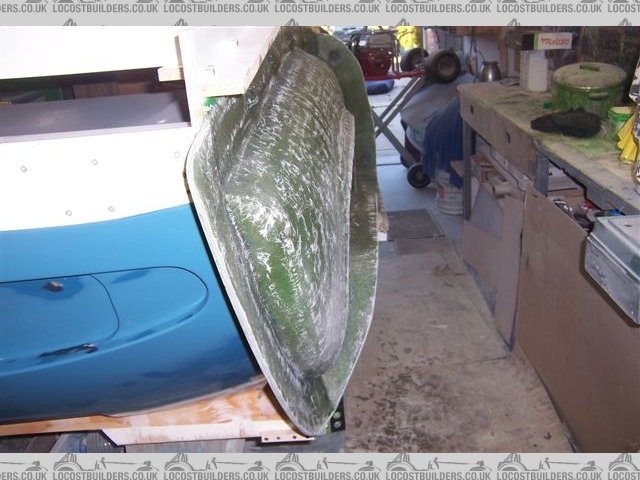
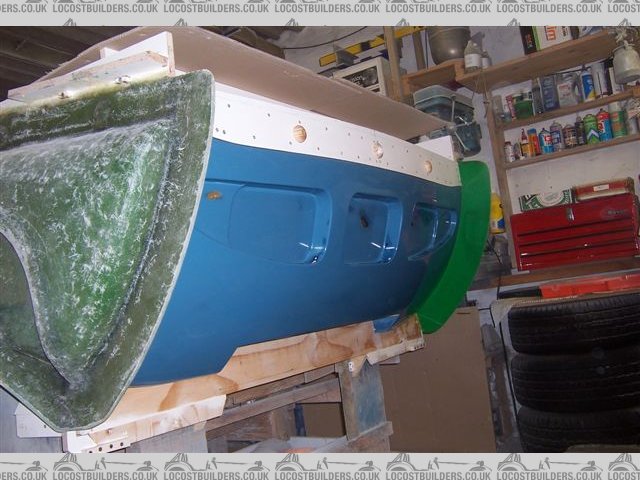
chrsgrain - 20/8/12 at 06:15 PM
Not much left to go - or is that just an optical illusion?
Looks amazing as ever..
Chris
smart51 - 20/8/12 at 07:07 PM
I'm always pleased to see updates on your fine work Fred. Is there just the back panel to go?
Fred W B - 20/8/12 at 07:24 PM
Thanks guys
Still to go is the back panel, the top surface of the tail, and then finally the internal surfaces in the scuttle.
Cheers
Fred W B
alistairolsen - 27/9/12 at 09:04 PM
Simply stunning, a real pleasure to watch this!
andygtt - 11/10/12 at 08:08 AM
Looking good, long process making moulds.
when do you think you will start to pull a body and what materials do you plan?
GonzoRacer - 11/10/12 at 02:05 PM
Good morning from the USA-
Your craftmanship and patience is just amazing. I can't wait to see more, and to see the completed car!
Well done, Sir!
JD Kemp
Fred W B - 11/10/12 at 05:07 PM
Thanks for the kind comments Guys
Andy, I've pretty much given up predicting when things will be finished, but I'm hoping that I should be into making parts by the turn of
the year.
For the parts i'm planning on using ordinary Poly resin and glass matt (tissue, 1 x 300 + 2 x 600). Might add some foam between skins at some
points, not decided yet
Cheers
Fred W B
[Edited on 11/10/12 by Fred W B]
Fred W B - 14/10/12 at 04:07 PM
Have now completed the transom panel mould section. Also added bracing to it and to the side sections.
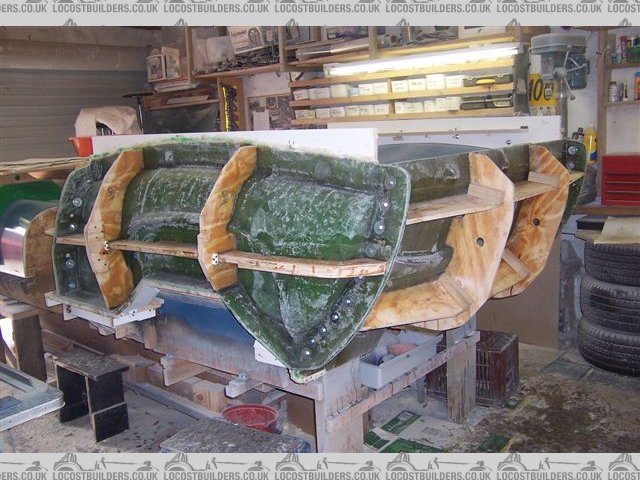
[Edited on 14/10/12 by Fred W B]
Fred W B - 14/10/12 at 04:11 PM
and released the first side section. It came off easily enough.
I have to take these off now to get the parting fences off, before I put them back on and can carry on with the final piece of the tail mould, the top
section.
Cheers
Fred W B
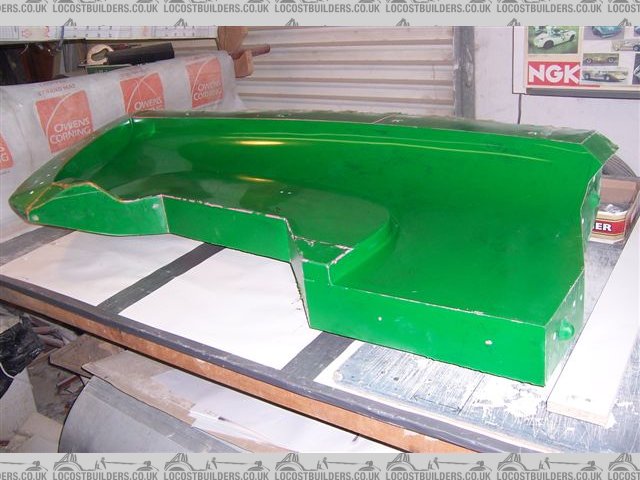
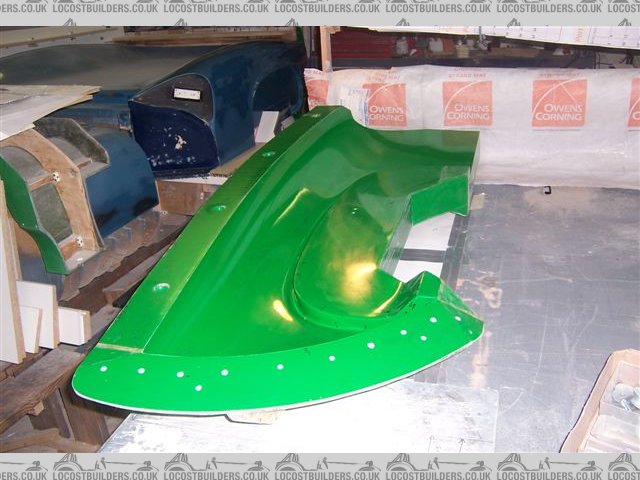
[Edited on 14/10/12 by Fred W B]
Fred W B - 19/10/12 at 07:07 PM
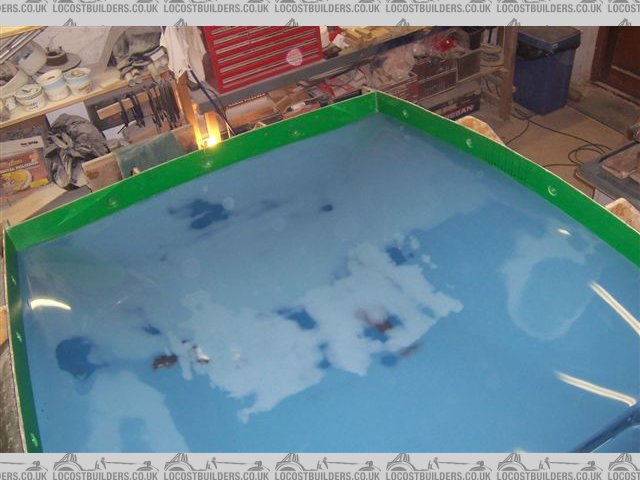
smart51 - 19/10/12 at 08:47 PM
So you're ready for the final part of the mould. It's getting exciting now.
Fred W B - 21/10/12 at 04:43 PM
Yes, getting there.
Knocked up an elevated walkway around the tail to make it easier to work on the upper surface
Cheers
Fred W B
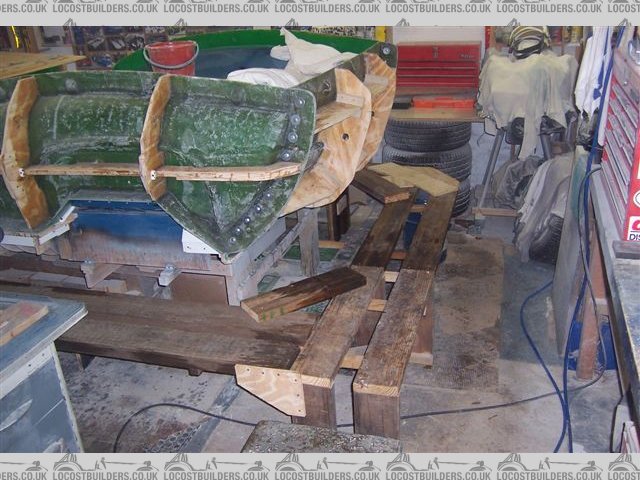
ceebmoj - 14/12/12 at 11:43 AM
hi there,
Have you made any progress?
HowardB - 14/12/12 at 12:01 PM
I am seriously thinking that we should run trips to see Fred's work on this,... I am really looking forward to seeing the pictures.
smart51 - 14/12/12 at 12:20 PM
Yeah, very much looking forward to the next installment. Have you done the rear deck yet Fred?
Fred W B - 15/12/12 at 04:09 PM
Thanks for the interest guys. Over the last few weeks it has been difficult to find much garage time but I am now just about finished with the top of
the tail mould. In fact today I finished making up the wood bracing, and should get it bonded on tomorrow.
A few pictures of the braces in position but not yet bonded on. You can see that I am experimenting with putting a strip of closed cell foam between
the braces and the surface of the mould. This is to hopefully prevent "print through" from the braces on the large flat expanse of the tail
top surface
Cheers
Fred W B
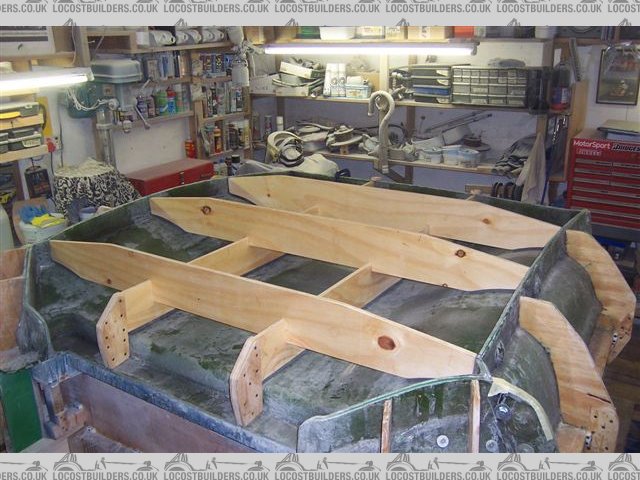
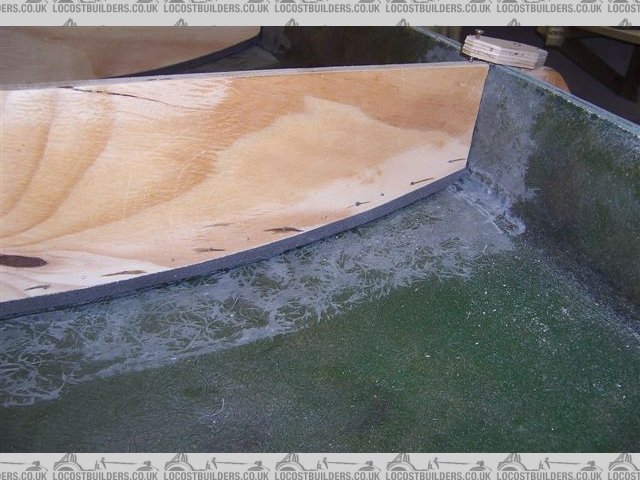
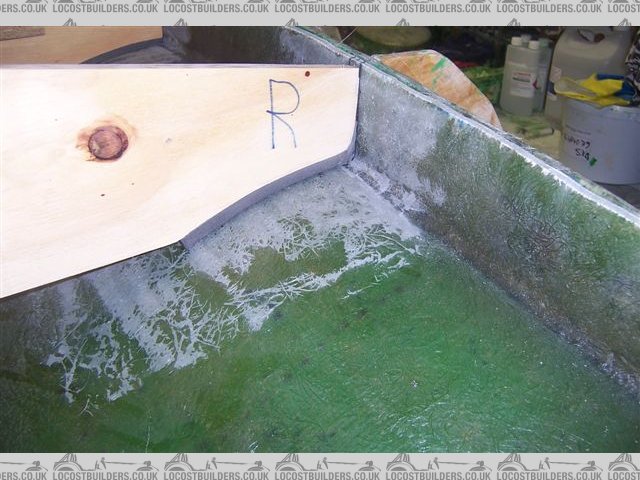
Fred W B - 15/12/12 at 04:20 PM
This was a big area, over 3 M2, and each session of two layers of mat needed about 10 kg of Resin.
ceebmoj - 15/12/12 at 04:37 PM
Looks great as all ways. Is this the last pice of the mould? If so what is next?
smart51 - 15/12/12 at 04:40 PM
I'd never considered print through from wooden braces. I like attention to detail like this.
sylva_phoenix - 20/12/12 at 08:50 PM
That's a fantastic project. I planned to do something similar, but Time and money won't allow it....
Fred W B - 21/12/12 at 05:02 PM
Thanks for the comments guys
quote:
Is this the last pice of the mould?
Yes, thank the pope!
quote:
If so what is next?
Real body Parts!
Cheers
Fred W B
Fred W B - 24/12/12 at 02:11 PM
And now the tail mold bracing is bonded on, all the fastening bolts through the flanges are fitted and finally I can say the body molds are finished!!
Only took 1 week short of 6 years since starting to build the pattern.
Have a good Christmas and New Year All!
Cheers
Fred W B
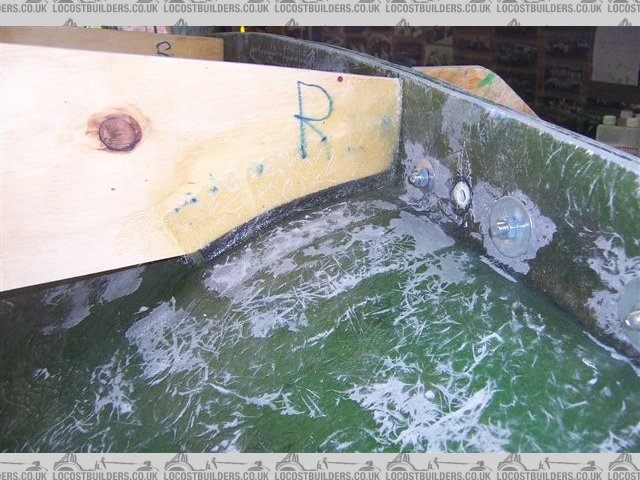
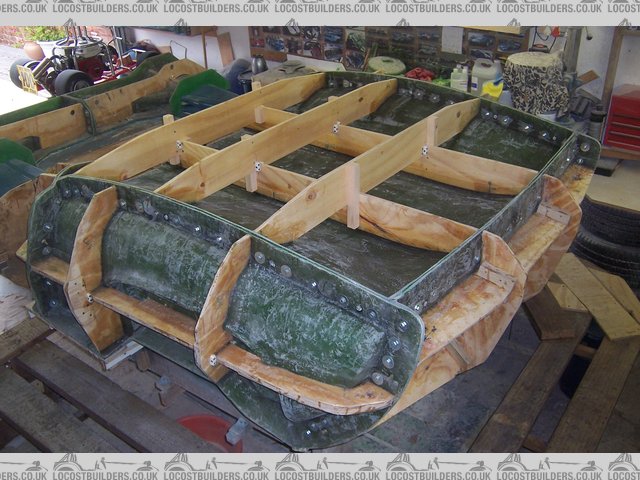
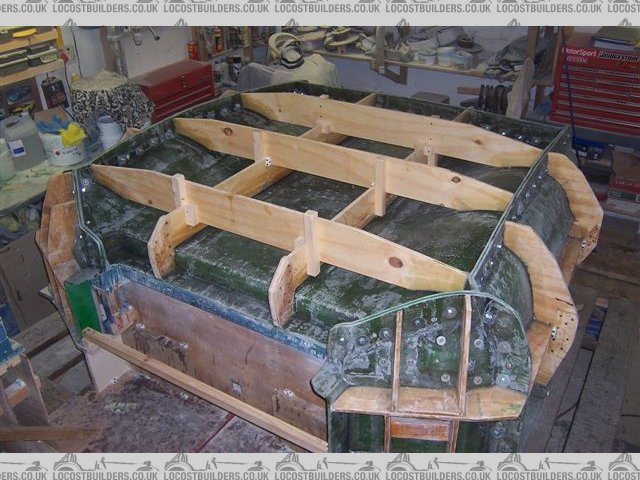
[Edited on 24/12/12 by Fred W B]
rdodger - 24/12/12 at 02:27 PM
Awesome work Fed!
I hope it doesn't take you another 6 years to complete a car! I can't wait that long to see it!!!!
TimC - 24/12/12 at 02:49 PM
Merry Christmas Fred. Absolutely awesome work.
ceebmoj - 24/12/12 at 02:49 PM
congratulations on reaching this mile stone. I look forward to seeing bits of body work.
GonzoRacer - 24/12/12 at 04:37 PM
Your work continually amazes me. Great designs, great attention to detail, all around world-class workmanship. I'm looking forward to seeing
more.
Merry Christmas to you and yours, and good wishes for 2013.
Regards-
JD Kemp
chrsgrain - 27/12/12 at 06:34 PM
Awesome, awesome, awesome.....
Bring on the body parts! Decided on a colour yet?
Chris
Fred W B - 28/12/12 at 12:04 PM
Thanks Chris
As for the colour, I will initially get the car running and debugged in the white gell coat, but eventually the plan is to paint it a deep blood red
and silver, just like the single seater below (the current favourite is Honda's "Milano Red" as seen on a Jazz or other model near
you).
Sills will be the silver below the beltline as well, running into a gulf GT40 style "moustach". Stripe will be a broad centre stripe with
two smaller stripes each side, like the second picture below, but with wider side stripes, more like the third pic, but here maybe too wide. Also here
the red is too maroon for my taste.
Maybe now you are sorry you asked, but I have been thinking about this a lot......
Cheers
Fred W B
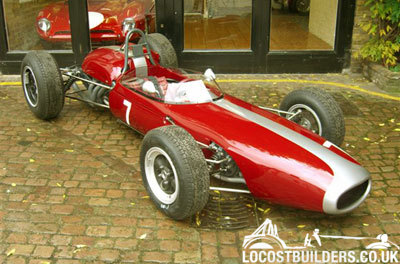

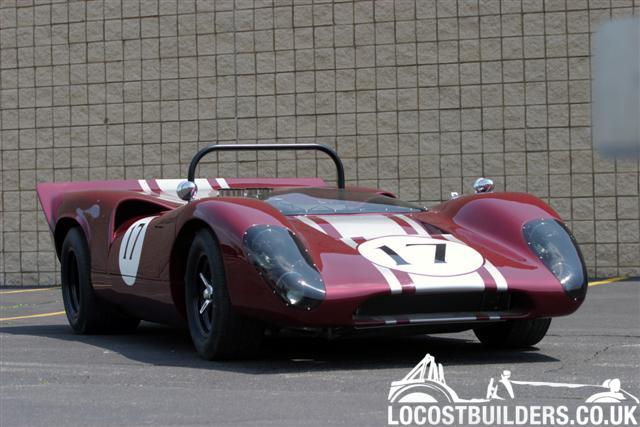
[Edited on 28/12/12 by Fred W B]
ceebmoj - 19/3/13 at 07:13 PM
hi, Hows the project going?
Fred W B - 20/3/13 at 08:17 PM
Hi Ceeb, Thanks for the interest
The short answer is that I now have both doors made
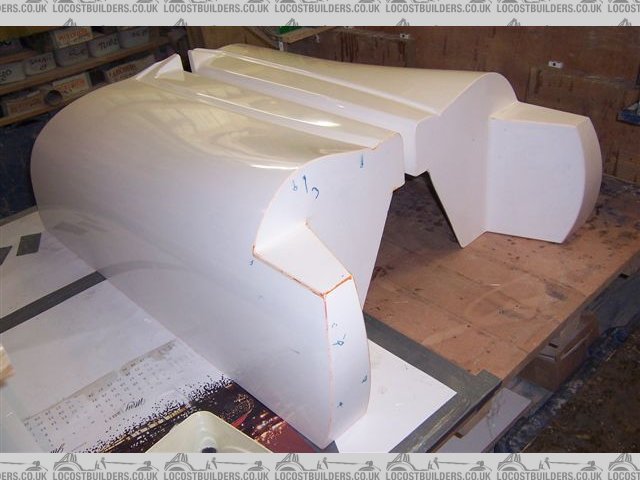
and the scuttle is laid up, I just want to leave it in the mold a few more days before I pull it.
As I wanted to have returns on most of the scuttle edges making the part turned out to be a bit of a nightmare.
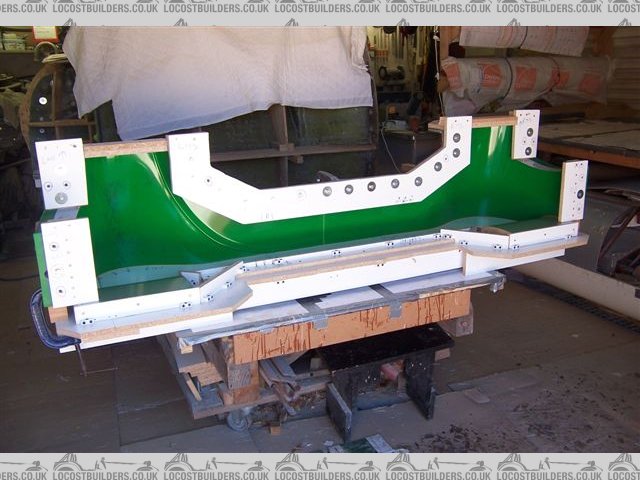
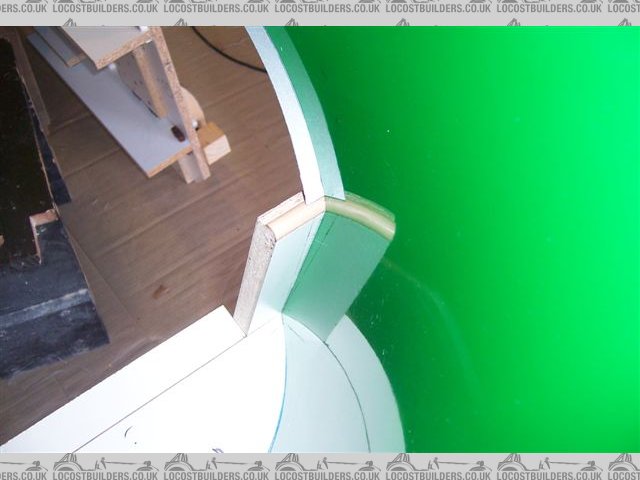
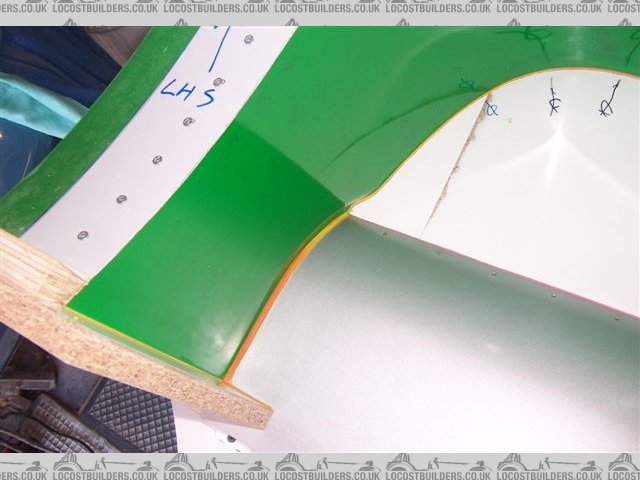
In the below two pictures the camera is held where it is not possible to get your head, so some of the detail on the return flanges had to be laid up
blind (and some upside down!).
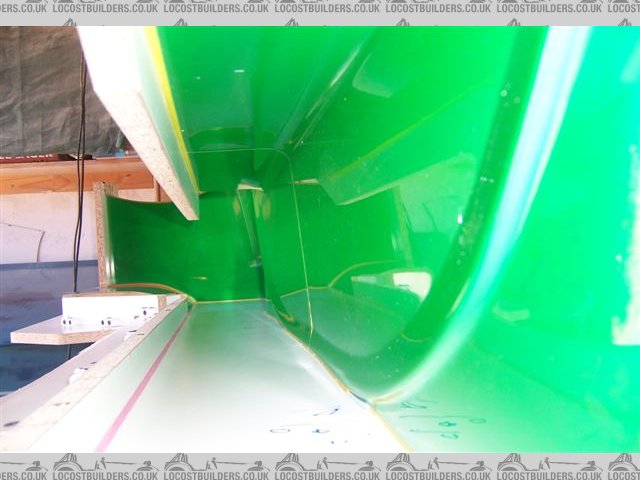
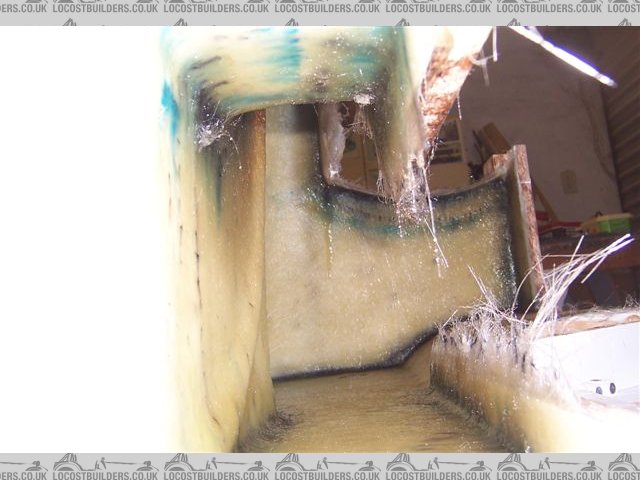
Because of this complexity I decided to lay-up the scuttle in three sections. The left hand and right hand pieces were done first. The above and below
picture is of the side I did first, I got the flanges neater on the next one.
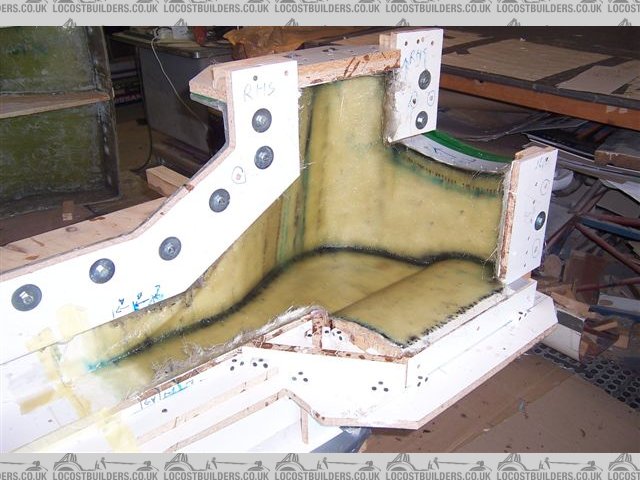
These were then connected by doing the centre section later.
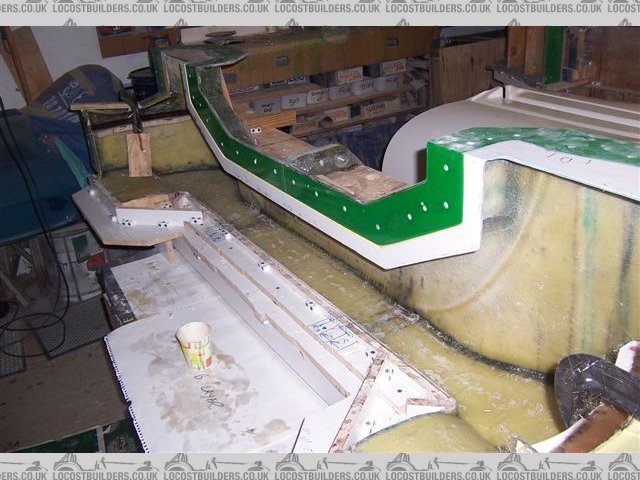
The layers in the lay-up in the join area are tapered to try keep the thickness even across the joint. I did make a bit of a mess of the gell side of
the joint, but I think it can be saved by sanding and it's experience that will stand me in good stead on the larger parts still to be made. The
picture below is of one side of this joint.

And just tonight I've added internal flanges to support the body shape where the perimeter flange has to be omitted to permit the door to
open.
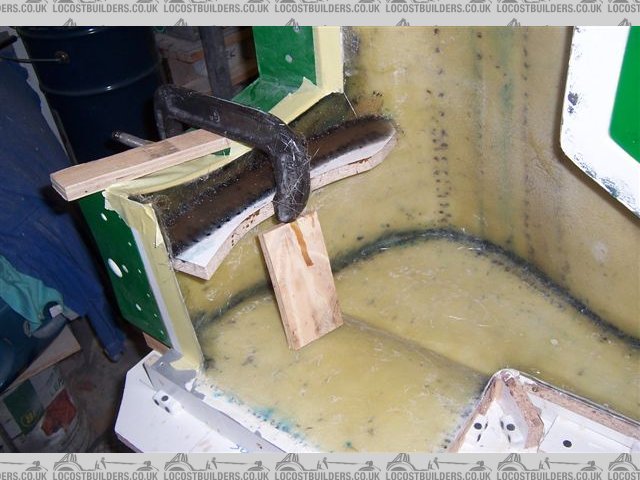
So I feel that some good progress has been made as 3 body sections are now finished. Just the small detail that the nose and tail which are still to
be done each have a larger area than all 3 parts made so far.
Cheers
Fred W B
[Edited on 20/3/13 by Fred W B]
[Edited on 20/3/13 by Fred W B]
ceebmoj - 20/3/13 at 09:52 PM
Thanks for the update, it looks great. I love following your project.
smart51 - 20/3/13 at 10:28 PM
Looking good Fred. I admire your patience. I'd be itching to pull it from the mould.
Fred W B - 23/3/13 at 11:42 AM
Thanks for the kind responses Guys.
The scuttle is now out of the mold, and I could not resist mocking it up with the doors. Does it look like part of a car yet?
Cheers
Fred W B
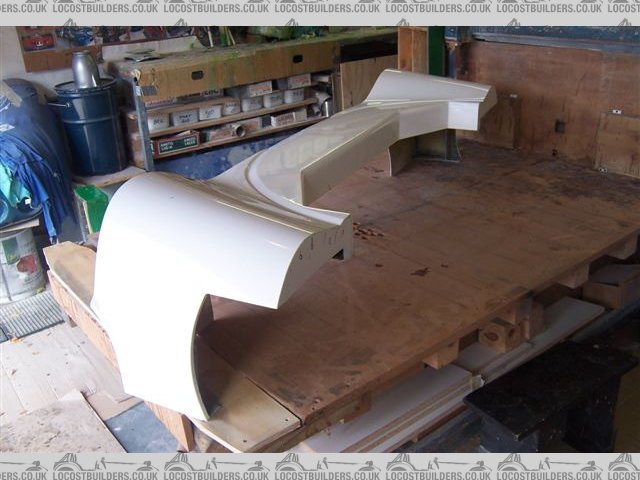
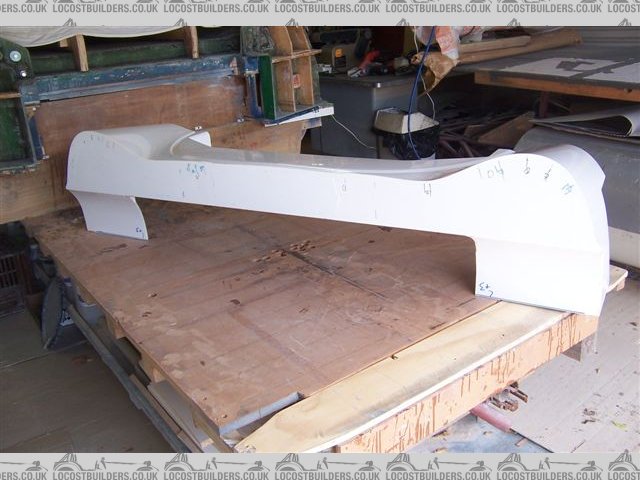
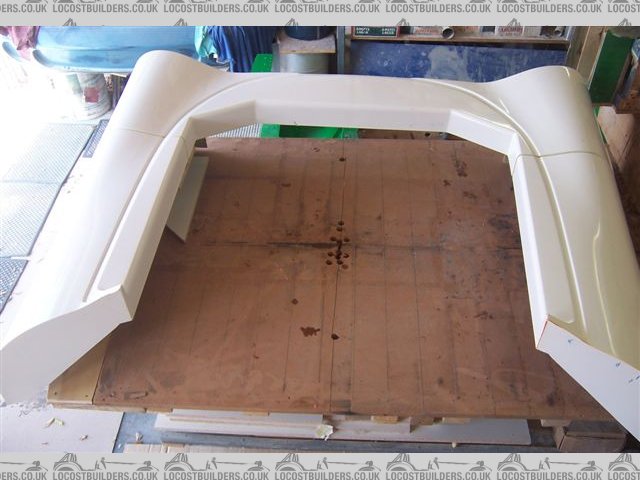
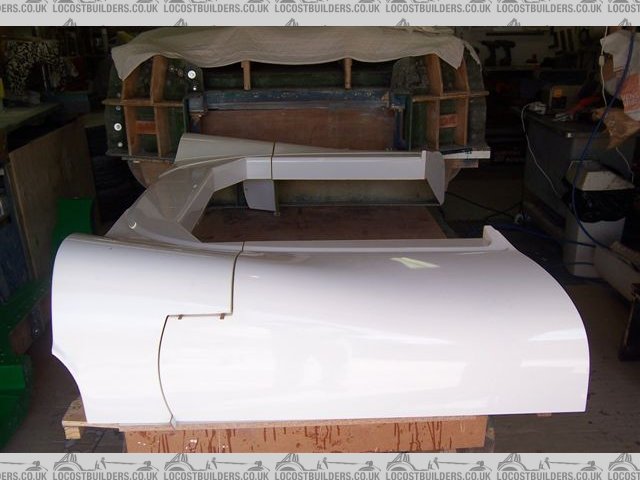
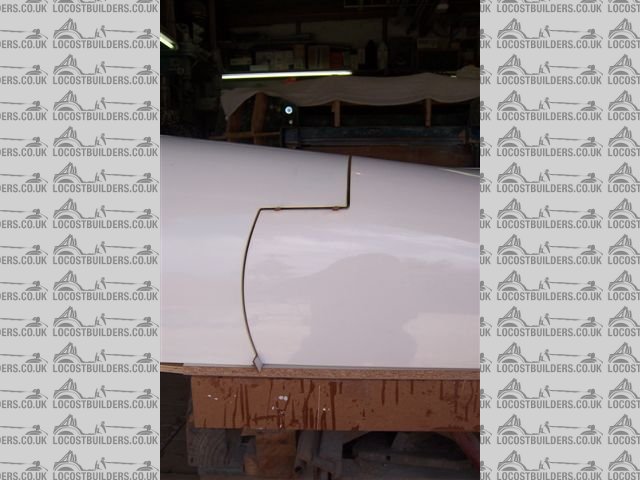
ceebmoj - 23/3/13 at 12:53 PM
wow.
I cant weight to see the rest. I think you may have been asked before, but do you intend to sell bits when you are done?
Fred W B - 24/3/13 at 07:24 AM
Hi Ceeb
Certainly if their is interest I will look at selling bits. Think that I might have to investigate getting a commercial concern to make parts in my
moulds though as it takes me so long.
Cheers
Fred W B
Fred W B - 24/3/13 at 07:34 AM
All this time the mock up chassis has been supporting the cutting table. I pulled the top off, cleaned up the huge accumulation of sanding dust and
glass fibres and tried the scuttle on the mock up chassis. It doesn't fit badly considering that when I made the mock up I did not know what body
I might use.
And yes I tried sitting it and just sat there contemplating the progress for a while. I didn't make motor noises though
Cheers
Fred W B
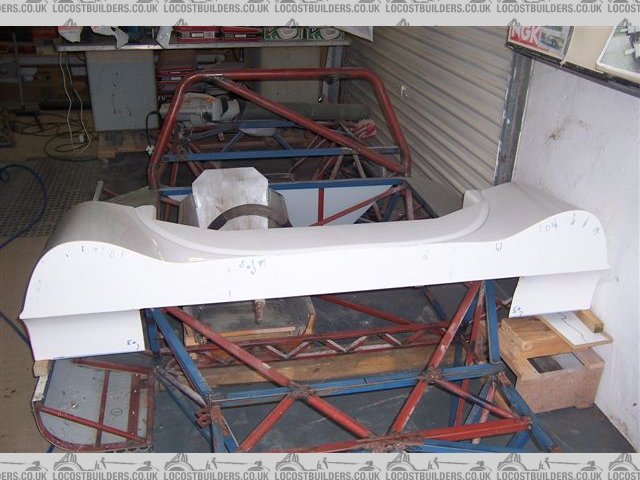
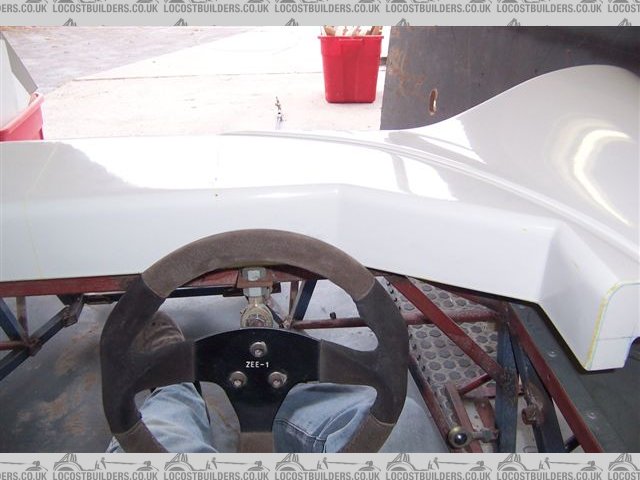
[Edited on 24/3/13 by Fred W B]
andygtt - 26/3/13 at 04:44 PM
quote:
Originally posted by Fred W B
And yes I tried sitting it and just sat there contemplating the progress for a while. I didn't make motor noises though
[Edited on 24/3/13 by Fred W B]
Sorry Fred, but thats a crime... you must go back into the garage right now and make some brum brummm noises while sitting in the driver seat
parts look fantastic, really looking forward to seeing the complete body
chrsgrain - 27/3/13 at 08:51 PM
Wow - its always difficult to tell in photos, but those parts look SMOOTH... lovely work, nice panel gaps... awesome.
I thought I remembered that you've got the chassis all done and dusted, but that last post suggested that you've still got to make it??
Chris
adithorp - 27/3/13 at 09:09 PM
Hasn't anybody ever told you kit cars can't have a finish like that. Panel gaps are supposed to be huge and uneven.
I'm just glad it's taking you so long, Fred... 'Cos when it's done everyone else's car's will look crap by comparison.
Fred W B - 30/3/13 at 02:27 PM
Thanks for the complimentary comments guys
Andy - As for making engine sounds while sat in the chassis, if I did make some it would be how a V8 engine sound was depicted in writing in those
wonderful "CARtoons" 70's comics, like this ..... Duga Duga Duga Duga.... .If you say it right it does sound like a V8 with open
exhausts at idle.
I still have some of the comics
Chris - The chassis so far is a roughly built mock up protoype that I put together to sort the ergonomics and the layout of the running gear. I welded
it almost fully and tested the torsional stiffness. I stopped working on it as I needed to sort out the overall width over the wheels and for that I
need the body confirmed. The idea now is to finish the body, and then hang it over this mock up chassis to finalize things like where the radiator
mounts, suspension etc. Once that is done I will then build a real "final" chassis. Some of the frame parts or subsections used in this
exercise could become part of the final chassis.
Adithorp - I'm sure it wont be that easy to get the panel gaps right once I have to hang the panels and actually make them open and close.
Cheers
Fred W B
[Edited on 30/3/13 by Fred W B]
[Edited on 30/3/13 by Fred W B]
Fred W B - 30/3/13 at 02:36 PM
In further news, now that the scuttle is out of the way, a friend helped me pull the tail mold off what is left of the pattern.
We bolted it tougher roughly to get an idea of the scale of the next step. It's a big part, the surface area is over 6 m2. Now to get on with
preparing this. Some more return fences to make, then more polishing, matt cutting etc etc.
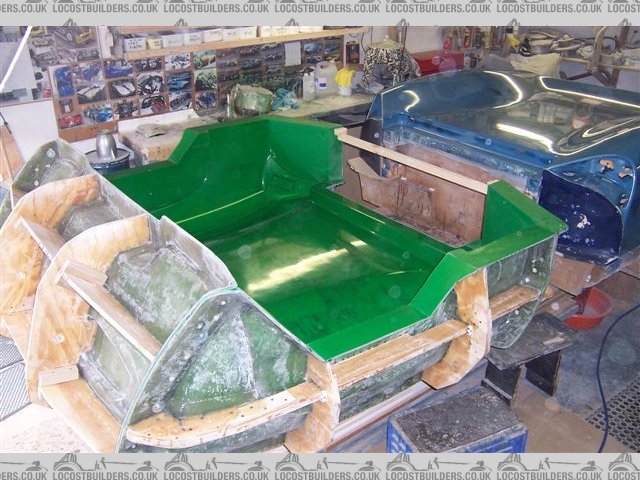
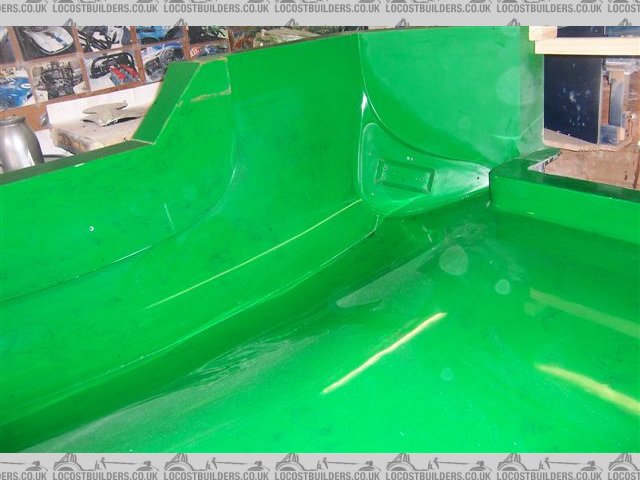
My gell coat application does not look so good when the rear panel is backlit in the open door like that
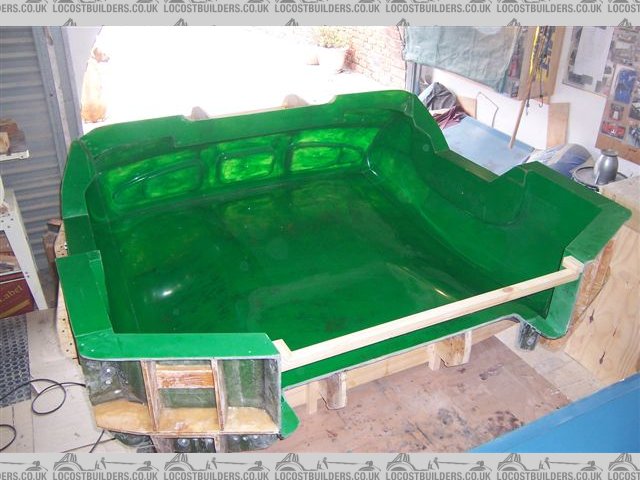
Feels like I've come a long way since I bought the model to copy!
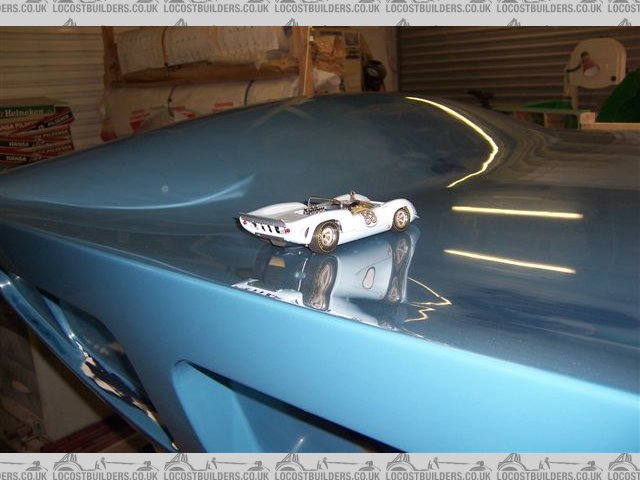
Cheers
Fred W B
[Edited on 30/3/13 by Fred W B]
[Edited on 30/3/13 by Fred W B]
[Edited on 30/3/13 by Fred W B]
[Edited on 30/3/13 by Fred W B]
Ivan - 30/3/13 at 02:53 PM
Fred W B - 5/5/13 at 06:37 PM
Made a bit more progress, scrapped out the rest of the pattern. I saved the rearmost portion of the tail and hung it on the wall.
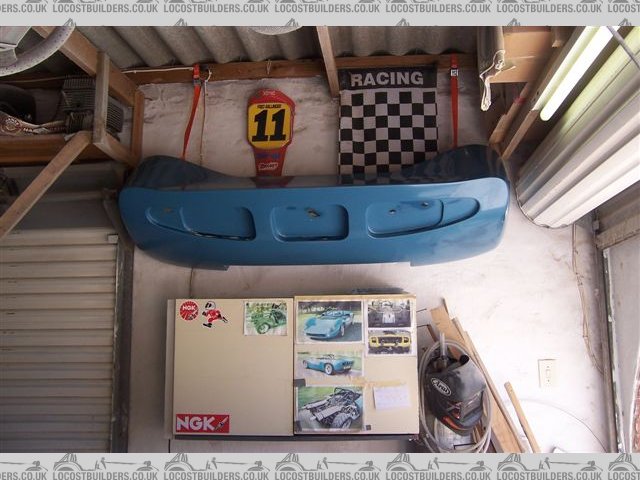
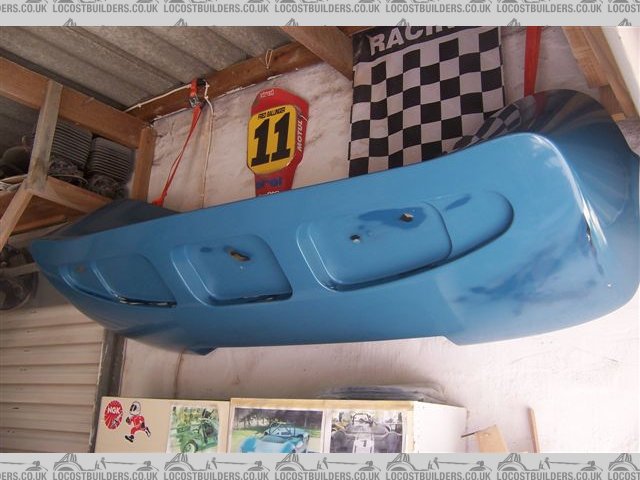
Fred W B - 5/5/13 at 06:41 PM
Finished the returns on the edges of the tail, and made the former for the hole above the engine.
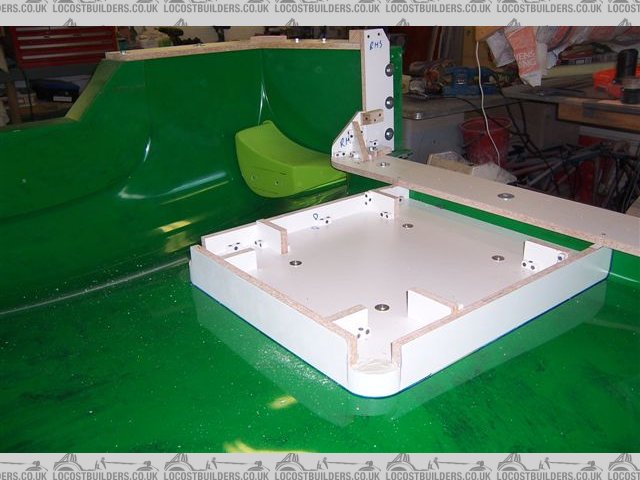
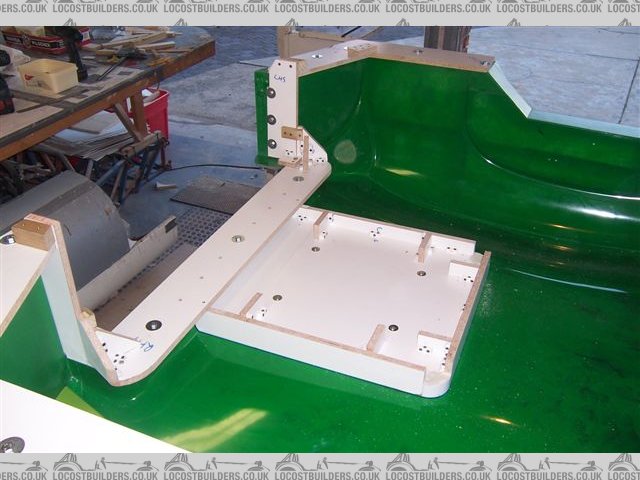
I made this a separate piece so that I can change the size of hole, or omit it altogether on future parts
Cheers
Fred W B
[Edited on 5/5/13 by Fred W B]
smart51 - 5/5/13 at 07:19 PM
You've got a nice shine on that mould Fred. Good work! How are you planning to seal the engine recess to the mould to stop the new gelcoat
seeping underneath?
Fred W B - 6/5/13 at 11:11 AM
quote:
You've got a nice shine on that mould Fred. Good Work!
Thanks Smart, considering that I have not yet even polished the surface
quote:
How are you planning to seal the engine recess to the mould to stop the new gelcoat seeping underneath?
I will run the usual plastacine fillet along the corner, to give me a 4 mm radius. The former actually fits tightly against the surface, what looks
like a gap in the pictures is a thick blue felt tip pen line I drew around the former to mark the position.
Cheers
[Edited on 6/5/13 by Fred W B]
Fred W B - 30/6/13 at 07:25 PM
I've made some progress on the tail section. Because of the size of the part, difficulty of access and as I work mostly on my own I have to make
the part in sections.
I laid up the side sections first
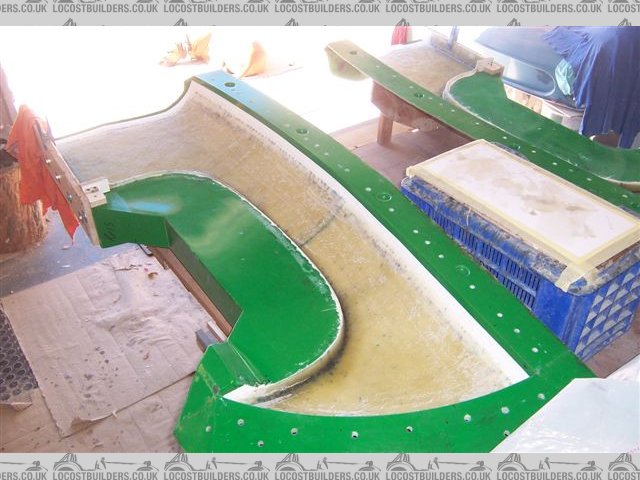
I made this tool to help work the matt into the tight corners of the wheel arch lip
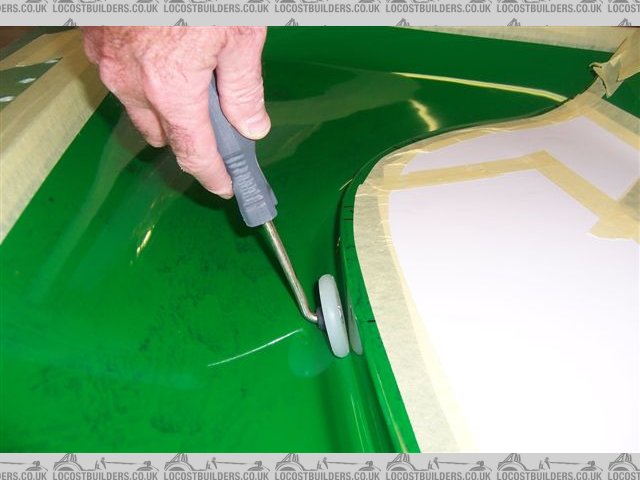
Fred W B - 30/6/13 at 07:27 PM
Then I laid up the rear section
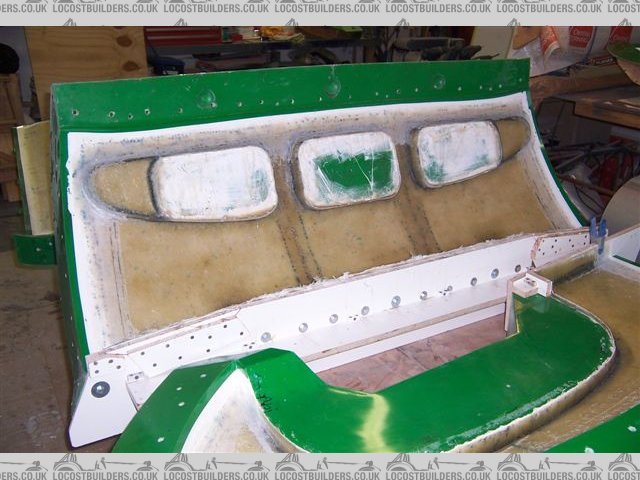
Fred W B - 30/6/13 at 07:31 PM
Then the main top surface
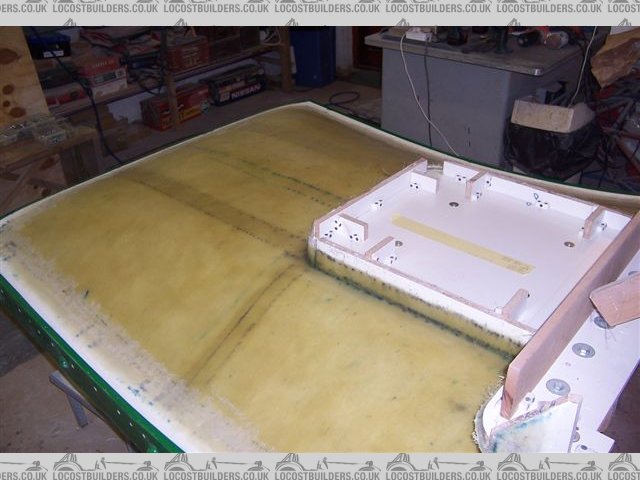
I masked the 2 layers of gell edges and staggered the edges of the 3 layers of matt to enable me to blend in the joining sections
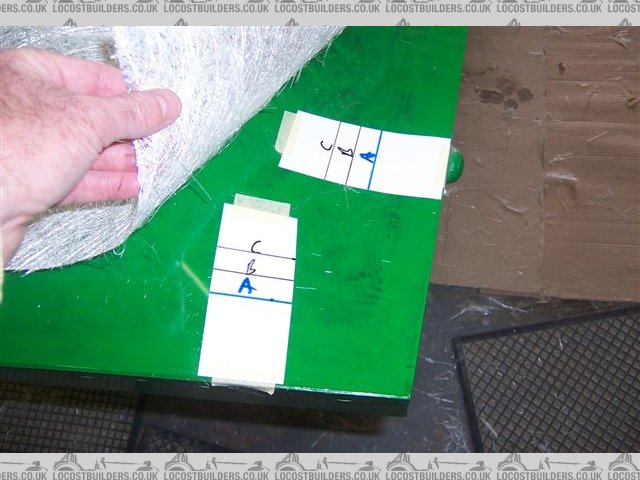
Fred W B - 30/6/13 at 07:38 PM
Then I dressed the edges of the part sections and bolted the 6 outer pieces of the mould together. The next step was to glass over the join between
the sides and the top section. Again the joining pieces of matt were staggered in width to give an even thickness across the join. The dark marks in
the layup are pen marks I use to align the matt pieces
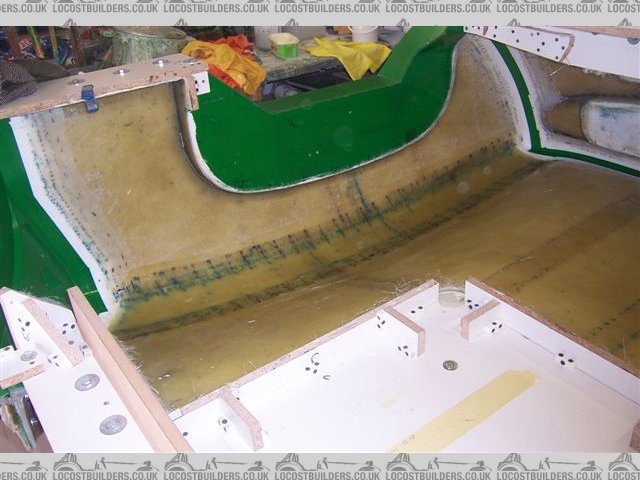
[Edited on 30/6/13 by Fred W B]
[Edited on 30/6/13 by Fred W B]
GonzoRacer - 30/6/13 at 07:42 PM
Very nice work, Fred! And, as you said, a LOT of work for one man with only two hands. (I assume you've got two?)
Well done, Sir!
JDK
smart51 - 30/6/13 at 07:44 PM
Good to see your progress. I can't wait to see the finished result.
Fred W B - 30/6/13 at 07:47 PM
Thanks for the comments guys
This weekend I had to position the mould almost vertically to make it possible to reach all of the top edge of the tail to top section join area.
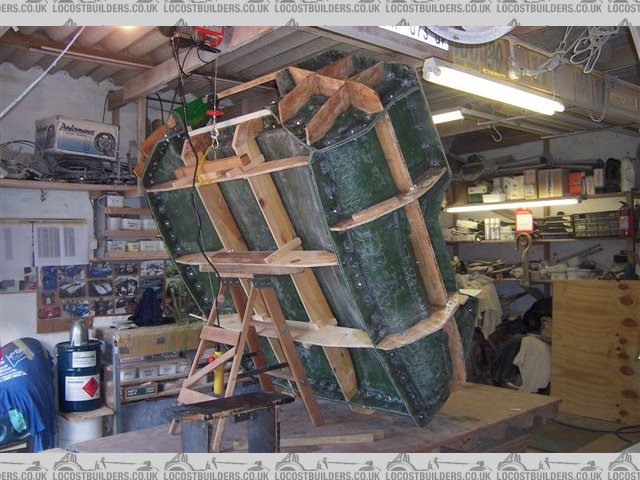

Fred W B - 30/6/13 at 07:48 PM
and here you see the prepared matt to make that top edge join
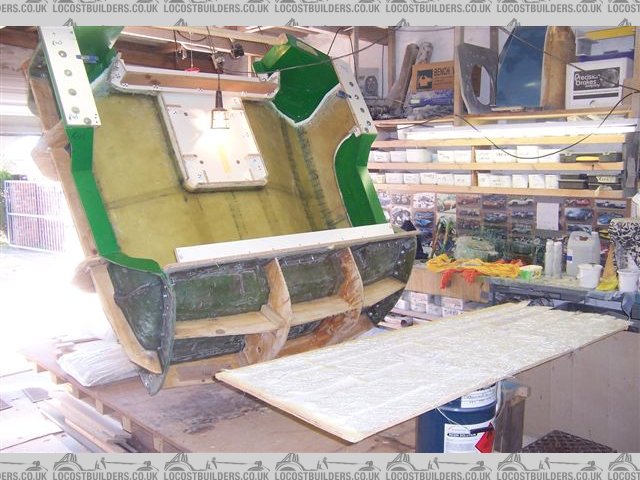
That was laid up today. My hamstrings are going to feel it tomorrow!
Cheers
Fred W B
[Edited on 30/6/13 by Fred W B]
[Edited on 30/6/13 by Fred W B]
ceebmoj - 30/6/13 at 10:05 PM
looks great cant be long till you get the first rear clip
Fred W B - 17/7/13 at 08:25 PM
Thanks Ceeb
Demoulding won't happen for a while yet, although I have since done the front faces of the clip. I am keen to see the finished part but after
all this time I can wait a little longer to make sure it is right and gone off properly.
Currently I'm busy with making the "nostril" inserts.
Cheers
Fred W B
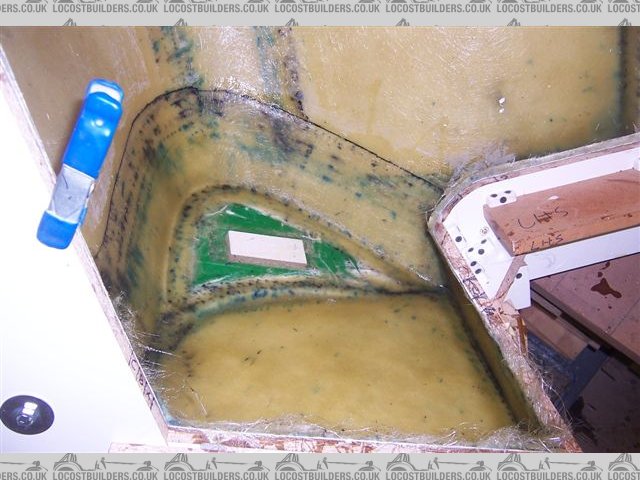
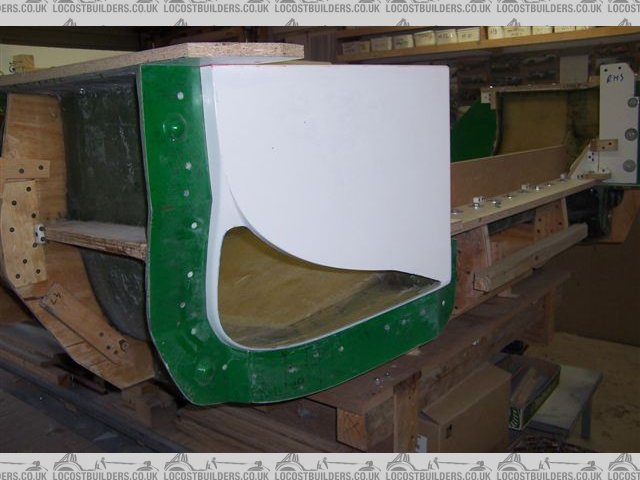
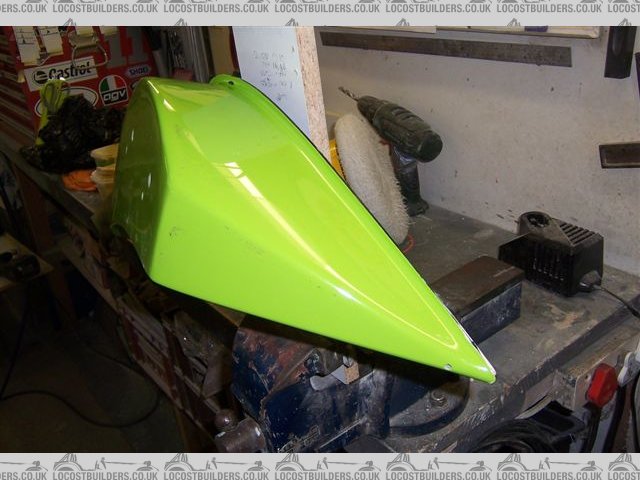
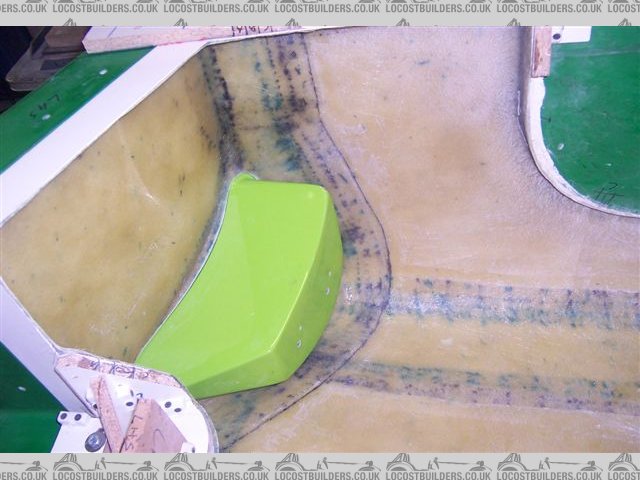
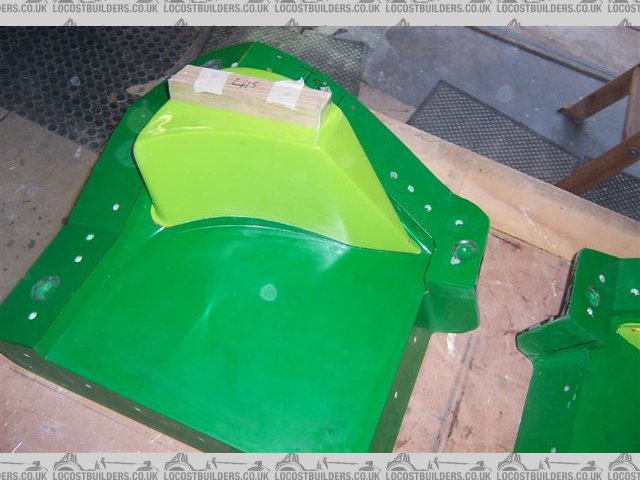
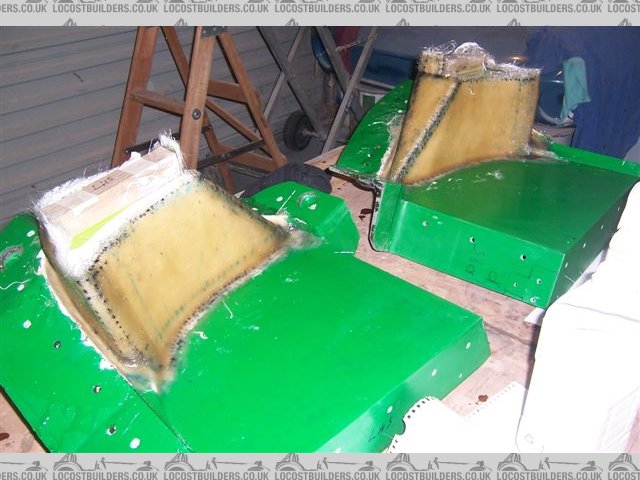
ceebmoj - 17/7/13 at 09:55 PM
Great update. I really look forward to seeing updates to this thread.
AlfaDriver - 21/7/13 at 01:05 PM
Just joined the forum to say...
What a FANTASTIC job you have done there.
I worked with GRP before and we did some big and complex jobs nothing close to yours.
We used to use chipboard, steel frames and body filer for detailing
Can you let us know what materials you used ?
I'm specially interested in the skin over the foam because the experiments I have done with body filer strait into the foam the foam reacted and
shrank/melted leaving a horrible surface.
Looking forward to you next update.
Ric
Fred W B - 22/7/13 at 05:32 PM
Hi Ric
Thanks for your interest and compliment
The pattern was made out of wood and polyurethane foam, some shape added with plaster filler. Then the whole thing was skinned over with a good layer
of 600 gram chopped strand matt and resin. Upol body filler was then applied over this and finally 3 coats of Durabuild spray filler to get the final
finish.
Cheers
Fred W B
[Edited on 22/7/13 by Fred W B]
Mistron - 22/7/13 at 05:57 PM
I get mine from: http://www.ecfibreglasssupplies.co.uk/p-556-2-polyurethane-foam-sheets-50mm.aspx
You are right though - many people have tried to use pink, blue or yellow rigid foam insulation sheets from builders merchants. Yes it's cheap,
but sadly, it's also useless unless you skin it in tinfoil etcto prevent the reactions.
AlfaDriver - 22/7/13 at 08:49 PM
Thanks Fred and Mistron
In the shop I used to work about 98% of the molds/panels we made were made with chipbord/mdf.
The really big stuff like buses rear ends were reinforced with a metal frame after the matting and covered with more mat.
I'm trying to remember the name of the stuff can can't figure it out...
Does any of you know the name of the polyester(?) that is fire retardant ?
We used to use it for places that were subjected to high temperature like the buses rear end and engine covers
All I remember is that is was white/milky type of resin.
Going to do some more investigation for my project.
Ric
Mistron - 22/7/13 at 08:54 PM
Here's how I combined the foam and MDF on an old project, but sadly never got as far as Fred, of whom I am in awe!
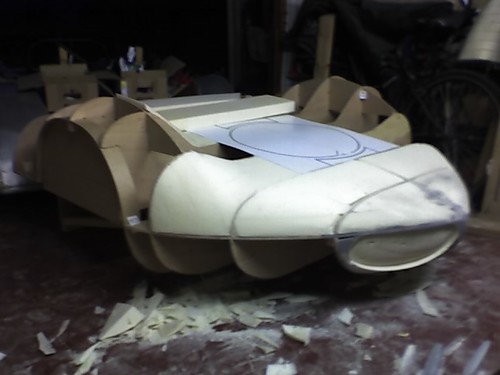
13-05-07_2145 by
alastairbrownuk, on Flickr
Fred W B - 31/7/13 at 08:16 PM
Thanks for the compliment Mistron
Made some more progress, and apologies if I'm going into lengthy detail on this, but I've now got the nostril inserts bonded in.
Parts looked like this once I pulled them off the moulds. The ridge across the upper face of the bottom part in this view is where the join will be on
that surface. On the rest of the perimiter the join will be on the centre of the edge radius.
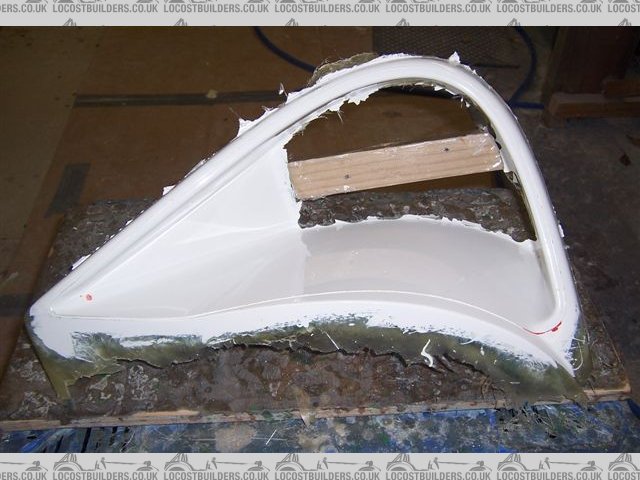
Fettled them so that they fitted into the holes in the tail. The mould was bolted back together to support the inserts in the correct position.

I tried to get a nice even 1 mm or so gap all round, so that I could hopefully get gel right through the joint to the front face.
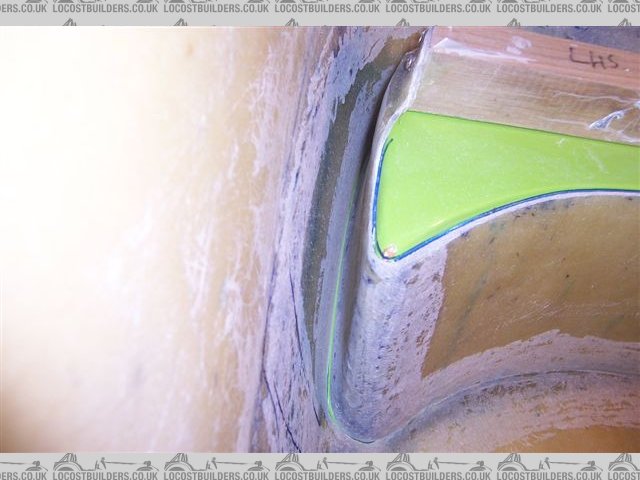
I made up a gel mix with some resin added and applied this with a long thin brush to the back of the join. Then applied matt and resin over the join
where I could, some of the area right of the bottom of the "valley" was difficult to get to so there I just flooded it with resin and
dropped a quantity of loose fibres in down the gap and worked them in with the thin brush.
Once that had gone off I dressed it and then applied expanding foam in the gap.
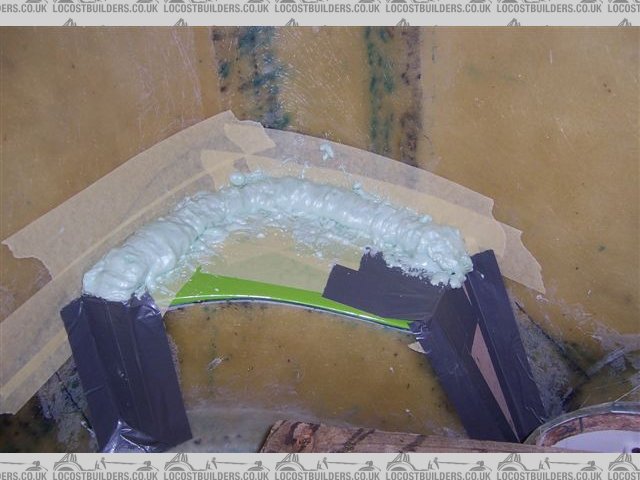
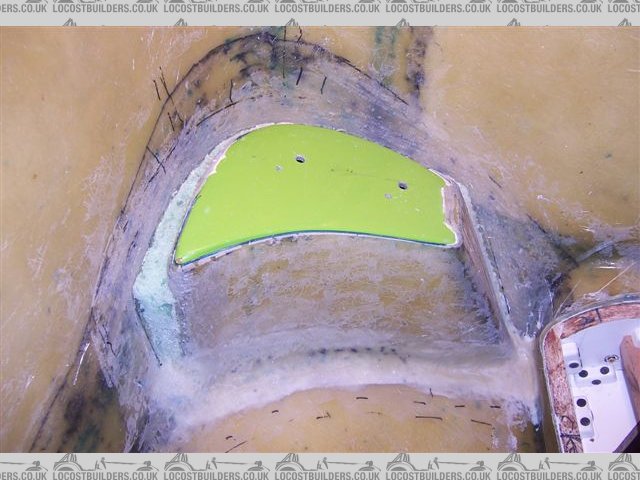
That was also dressed and then glassed over to finally secure the insert.
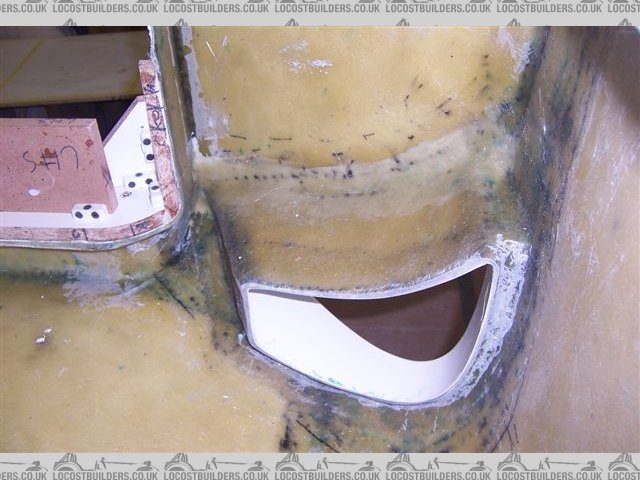
Must admit to being very happy with the result, it looks like just enough gel seeped though the join around most of the perimeter to make it easy to
flat it back to a good surface. The blue marks in this picture are from the marker pen ink that was on the edge of the part, they are not chips in
the gell coat.
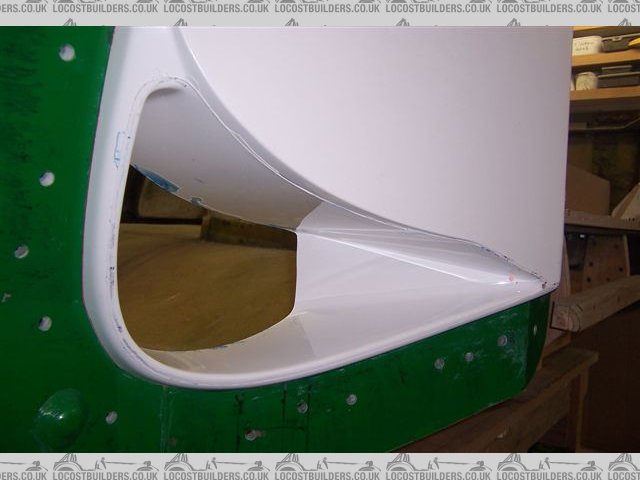
Now just want to trim some edges and I can then get the tail out the mould
Cheers
Fred W B
[Edited on 31/7/13 by Fred W B]
smart51 - 31/7/13 at 09:34 PM
quote:
Originally posted by Fred W B
... I can then get the tail out the mould ...
This I am looking forward to
Fred W B - 3/8/13 at 03:28 PM
So now the tail is almost completely demoulded, I just need to make the panel that fits in this gap in front of the carb trumpets before I can turn it
over
Cheers
Fred W B
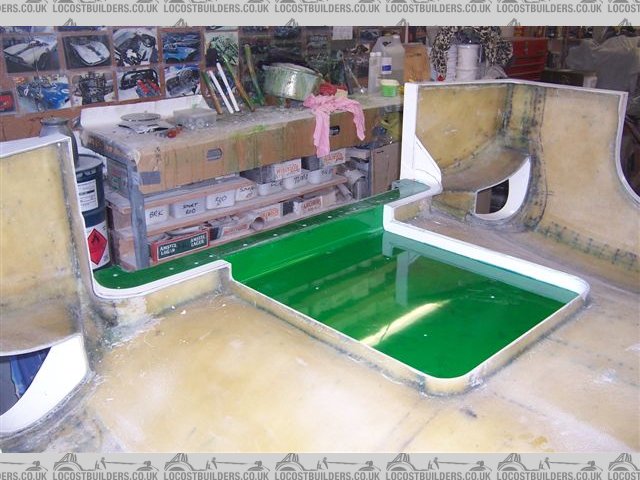
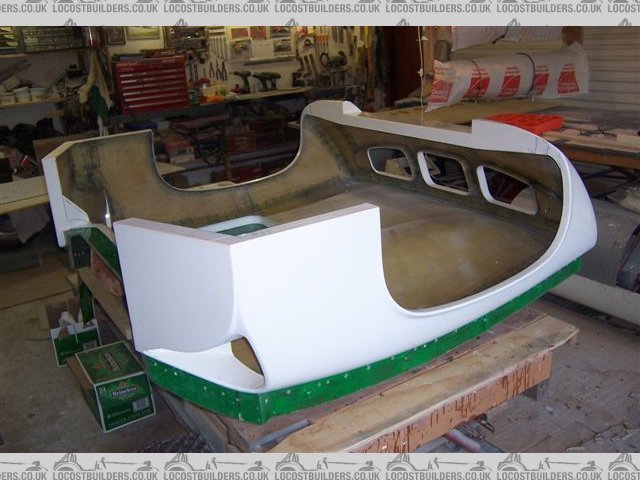
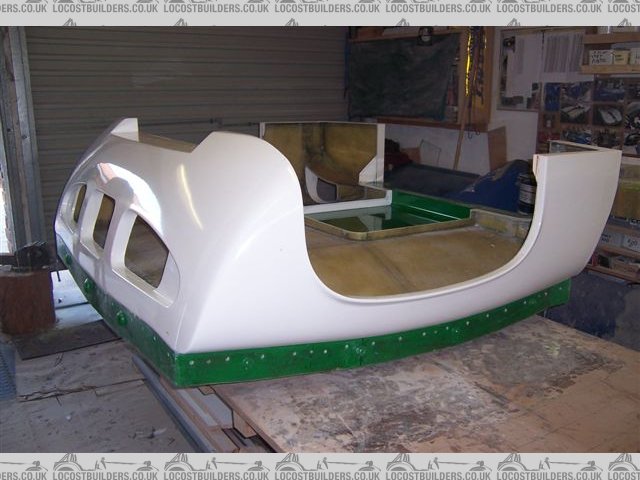
[Edited on 3/8/13 by Fred W B]
Carbonman - 3/8/13 at 03:52 PM
Quality work Fred
Xtreme Kermit - 3/8/13 at 06:30 PM
I love catching up with this thread Fred.
Top work as always!
Fred W B - 9/8/13 at 05:54 PM
Thanks for the comments guys.
I gave myself quite a challenge in making this part as it is a 4 sided section that had to have the 3 layers of mat fed in and laid up through a slot
in one side of the part. It was touch and go far a while as the loose edges of the layup were always in the way but I finally managed to get them to
lay down and it turned out okay.
This had to be a seperate piece to allow the tail to open with fixed backstays fitted to the rollbar.
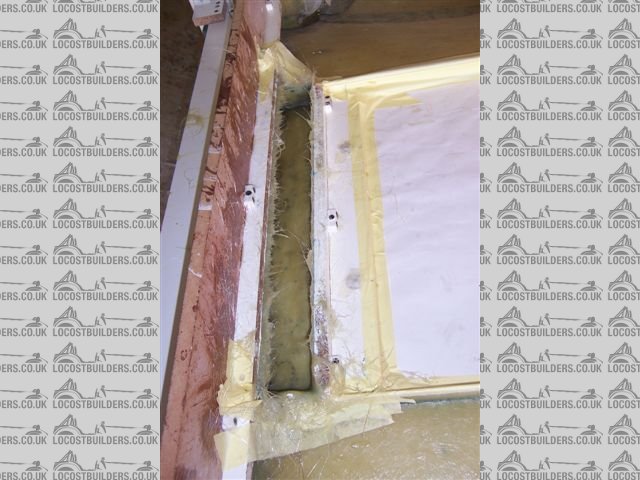
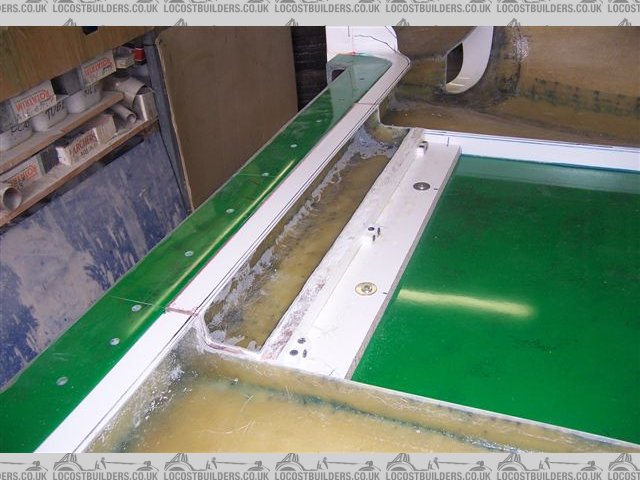
[Edited on 9/8/13 by Fred W B]
Fred W B - 9/8/13 at 05:57 PM
and I reckon the effort was worth it when I see the final result.
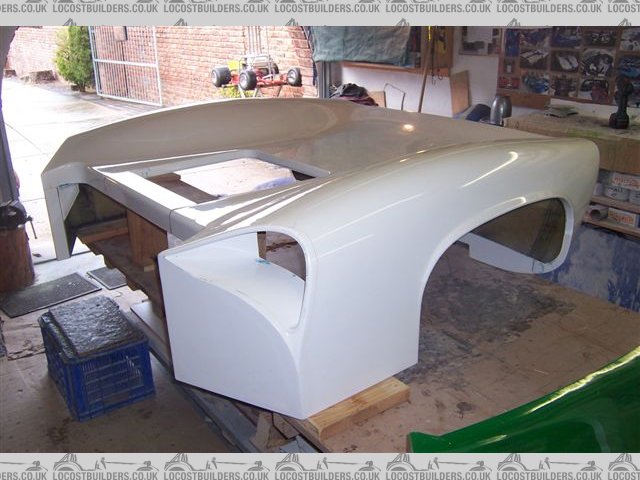
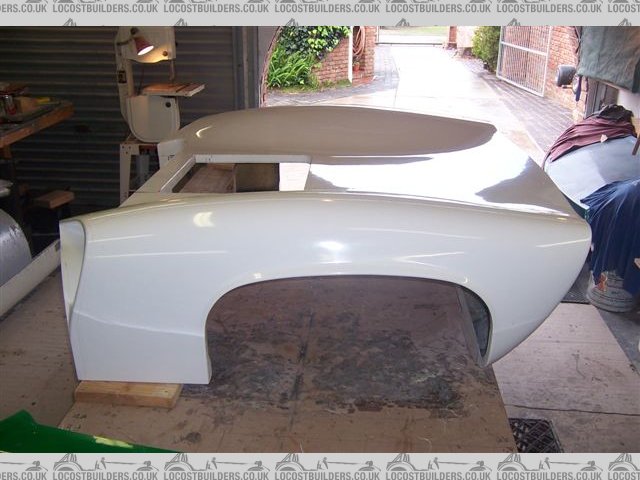
Fred W B - 9/8/13 at 06:06 PM
Positioned the tail at ride height and tried a wheel for fit in the wheelarch
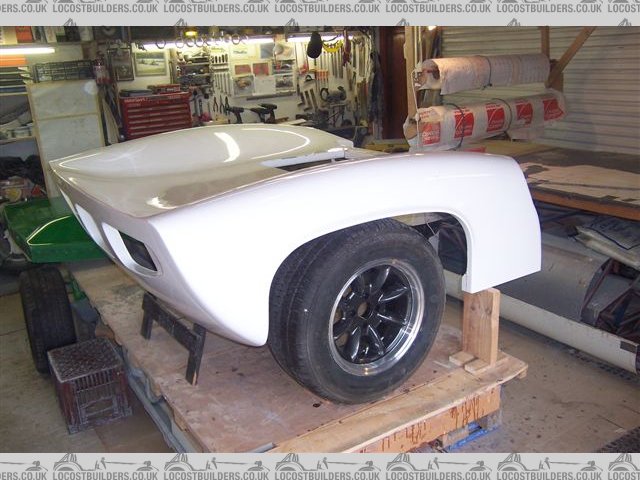
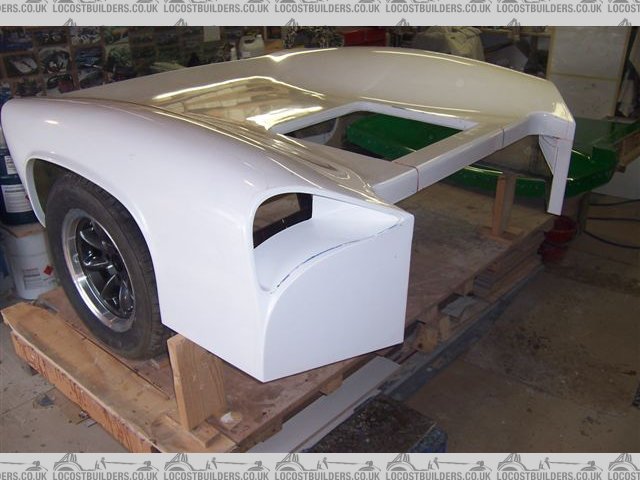
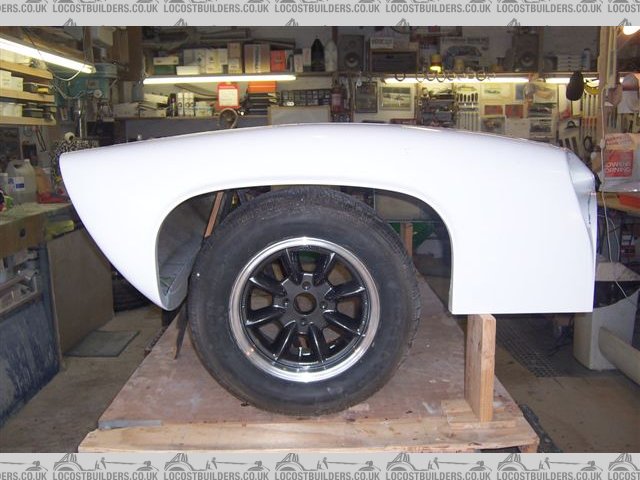
Fred W B - 9/8/13 at 06:09 PM
Looks like it deserves something wider than the 245 section tyre shown here
The edge of the opening in the tail is not yet finally trimmed.
Cheers
Fred W B

[Edited on 9/8/13 by Fred W B]
[Edited on 9/8/13 by Fred W B]
GonzoRacer - 9/8/13 at 06:11 PM
Fred-
Beautiful! Amazing work, as always... I really enjoy your updates, can't wait until it all comes together in one big, gorgeous piece!
Thanks for posting!
JD Kemp
Ivan - 10/8/13 at 03:02 PM
Wow - you must really be inspired to finish the body now Fred.
Fred W B - 12/8/13 at 04:15 PM
Thanks for the comments guys, just the nose to go now
Cheers
Fred W B
Fred W B - 25/9/13 at 05:53 PM
Small update!
Turned out I had some imperfections on some areas of the nose mould (particularly where I tried to get away without using the durabuild surfacing
primer on the buck under the nose) and I got a bit sucked into improving the finish on most of the mould by sanding and compounding. That took some
time, as did the making of return fences and the usual tedious waxing but I'm now finally making progress with the parts sections of the nose.
Cheers
Fred W B

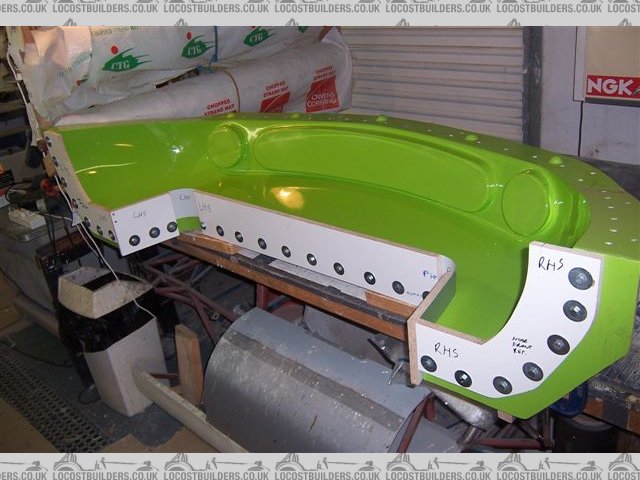
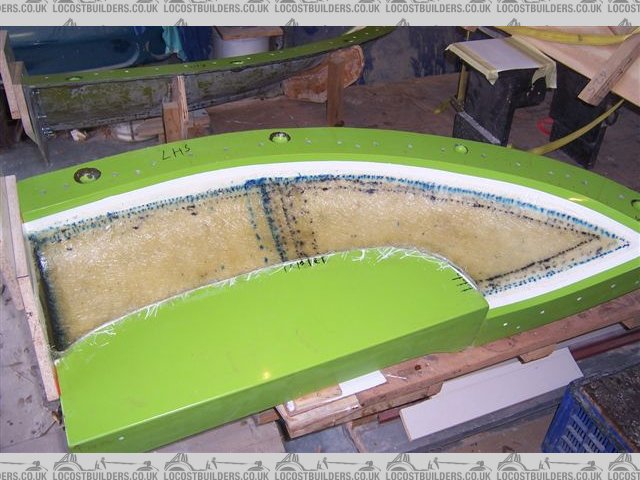
[Edited on 25/9/13 by Fred W B]
ceebmoj - 28/9/13 at 11:35 PM
Looks great. I can't work out what the last piece pictured is.
Fred W B - 29/9/13 at 06:52 AM
Thanks Ceeb. This picture should help you identify the part, its a section of the nose, although the other side to that shown below
Cheers
Fred W B
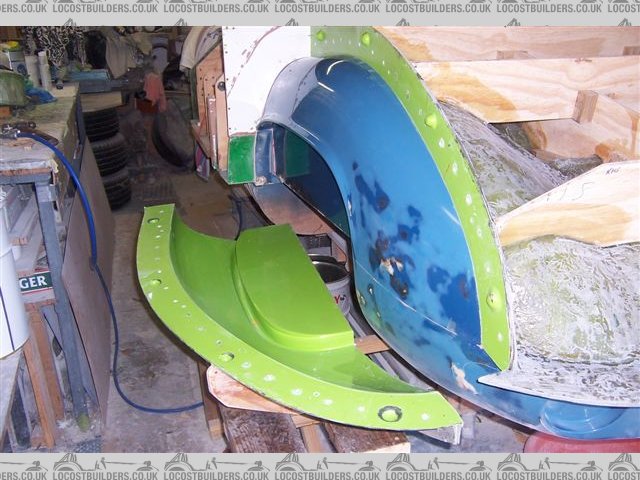
[Edited on 29/9/13 by Fred W B]
Fred W B - 10/11/13 at 03:19 PM
So I completed the nose, stitching the 4 sections together using the same technique I described for the tail
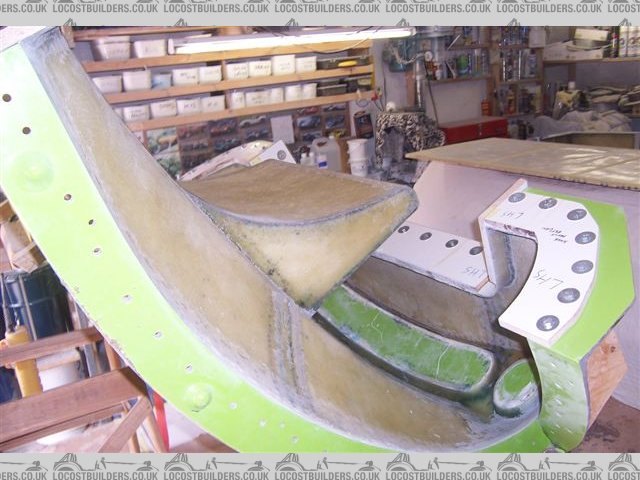

Fred W B - 10/11/13 at 03:22 PM
The nose completed the set of body panels, so finally I can say the body is finished! That is if your don't count the headlight arrangements and
the wheel arch inner panels.
These pictures are with the panels supported on blocks, and with the wheels just placed in the wheel arches.
Plan now is to take some time to spring clean the workshop, and then start to get to grip with the suspension and chassis.
Cheers
Fred W B
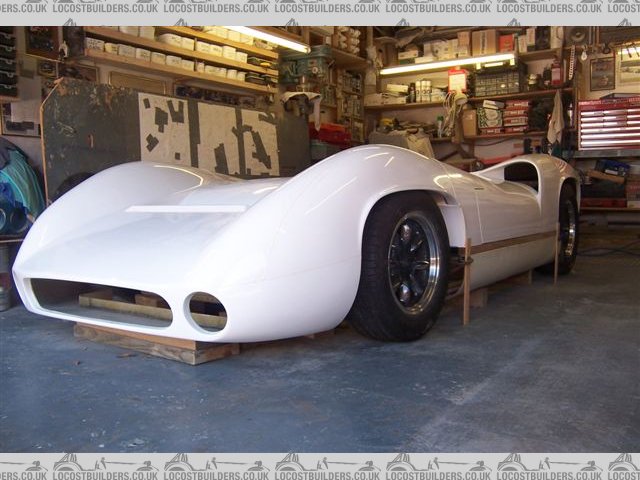
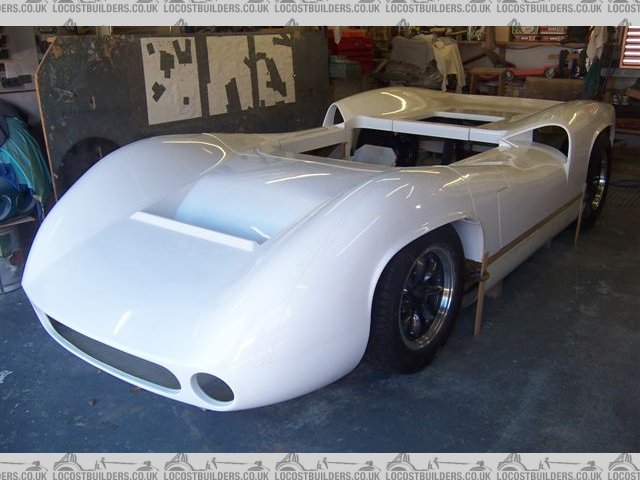
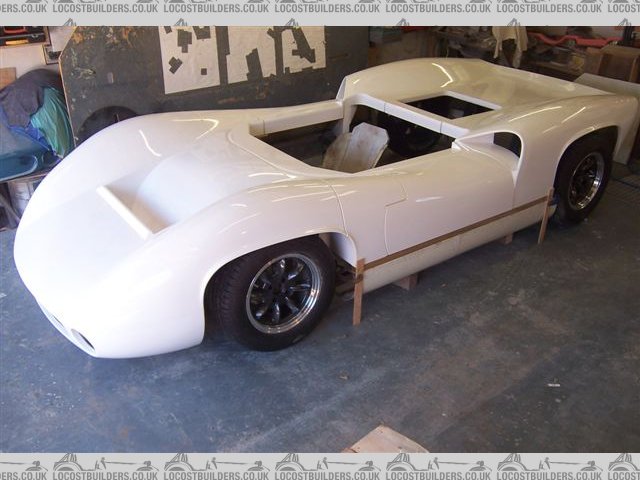
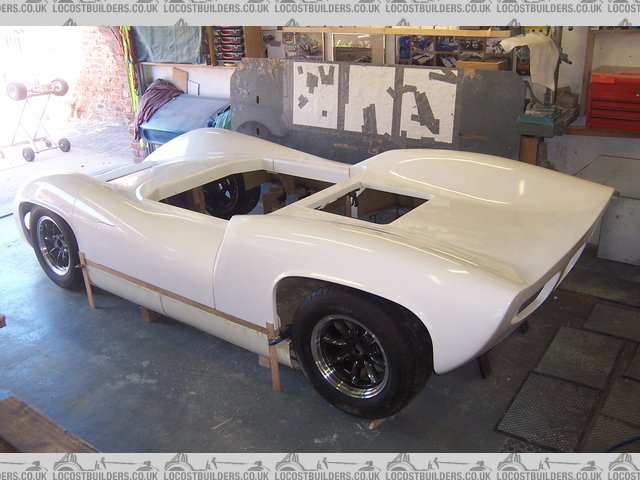
Nickp - 10/11/13 at 03:40 PM
WOW!! That's stunning fella. Brilliant work!!
GonzoRacer - 10/11/13 at 03:56 PM
Fred-
That is just amazing, beautiful work. It's not "construction" as much as "art"... I am truly awestruck...
Congratulations on a huge accomplishment!
Regards-
JD Kemp
Ivan - 10/11/13 at 03:58 PM
That looks stunning Fred - you must be feeling that all the very hard graft is starting to pay off even though it is far from driving.
By the seat I guess there were lots of Vroom Vroom noises in the garage.
alistairolsen - 10/11/13 at 05:05 PM
Wow, amazing to see it all in one piece, looks incredible!
HowardB - 10/11/13 at 06:15 PM
wow,... wow
I would just be stood there in awe,.. amazing, perfection created.
It is clear to see which 2 out of the 3 you picked,...
(You can do it quickly. You can do it cheap. You can do it right. � Pick any two)
ceebmoj - 10/11/13 at 06:31 PM
Well done, looks amazing.
I seam to remember that you have a Chad is that is well on its way.
slingshot2000 - 10/11/13 at 06:55 PM
Fred,
I don't think I have posted on this thread of your before, despite following it intently.
However,;the photographs you have posted today have left me almost speechless !
I cannot commend your workmanship and skill enough !
Kind regards
Jon
sjmatthews - 10/11/13 at 07:46 PM
Fantastic results
Mistron - 10/11/13 at 08:01 PM
Bloody hell Fred! That is ace!
I can almost here the queue forming already!
Yes it's been a lot of work, but you must be feeling justifiably proud of the achievement, and I bet it all seems worth while.
As motivated to tackle the chassis? (that's my problem - body making is fun, mechanicals, less so!)
Al
rdodger - 10/11/13 at 08:15 PM
Amazing work Fred
How on earth are you going to make a chassis good enough for that?
I look forward to finding out!
emsfactory - 10/11/13 at 08:57 PM
Amazing Fred. Well done man.
iank - 10/11/13 at 09:34 PM
Looks fantastic
ashg - 11/11/13 at 08:01 AM
simply stunning
when you making me one?
Lightning - 11/11/13 at 10:05 AM
Oh dear.....I think I have a little accident.
That's stunning!!!!
scootz - 11/11/13 at 10:25 AM
CLICK ME!
Fred W B - 11/11/13 at 05:42 PM
Thanks for the very kind comments guys
As for the chassis, I am pretty motivated to get on with it, I prefer the mechanical stuff to bodywork.
The chassis I've built so far is a rough mock up protoype that I put together to sort the ergonomics and the layout of the running gear. Its a
tube frame with ally skinning to the centre section. I welded it almost fully and tested the torsional stiffness. I stopped working on it as I needed
to sort out the overall width over the wheels and for that I needed the body confirmed. The idea now is to hang the body over this mock up chassis to
finalize things like where the radiator mounts, suspension etc. Once that is done I will then build a real "final" chassis. Some of the
frame parts or subsections used in the mock up exercise could become part of the final chassis.
At this stage I am not intending to attempt a replica pressed style tub chassis, maybe that will be a longer term project.
Reckon I should start a new thread to document progress on the chassis, this one has gone on for long enough now
Cheers
Fred W B
[Edited on 11/11/13 by Fred W B]
me! - 11/11/13 at 07:14 PM
Holy cow, thats stunning!
This is my favourite thread on here by miles- great to see a full set of parts. Well done.
Ivan - 23/11/13 at 08:59 AM
Fred just found your old thread re wheel selection - what did you finally decide to go for - like the ones in your photo of the completed body.
Fred W B - 23/11/13 at 04:18 PM
Hi Ivan
They are 15x7 and 15 x 8 "Superlights", with centres painted "charcoal". I imported them but now they can be supplied by a chap in
Cape Town, I have his details at work. I want to eventually fit 8"s and 10"s
Cheers
Fred W B
Fred W B - 2/2/14 at 02:36 PM
Hi
I said I would start a new thread to documument the suspension / chassis build, but I haven't got much progress to report, at the moment I'm
still busy with tiding the garage and a few other non project things.
We've also recently had a death in the family which threw up some issues that needed my attention and that took some time.
What I have done is got the body positioned over the mock up chassis, and test fitted the motor and transaxle. The build table is back on castors so I
can move it around, and under the cable hoist when I need to lift the motor etc.
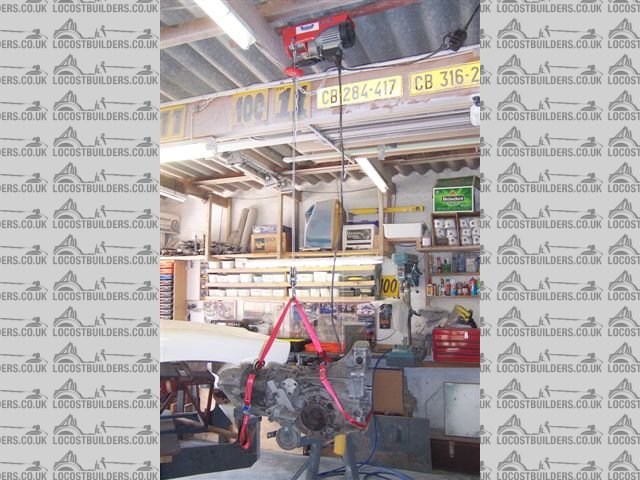
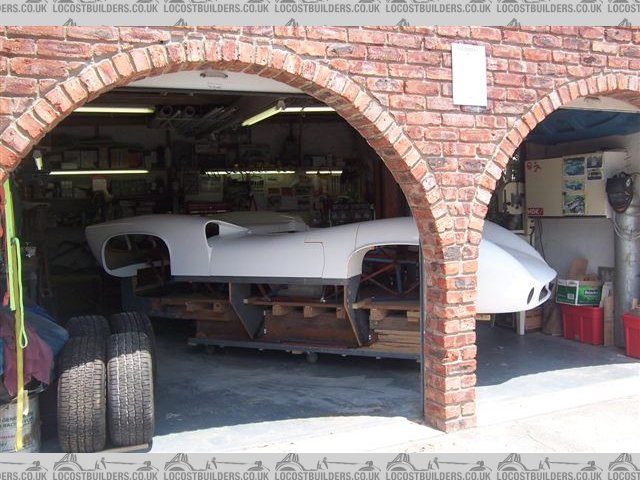
I'll make the cut-out at the distributor a bit bigger when the final build is done.
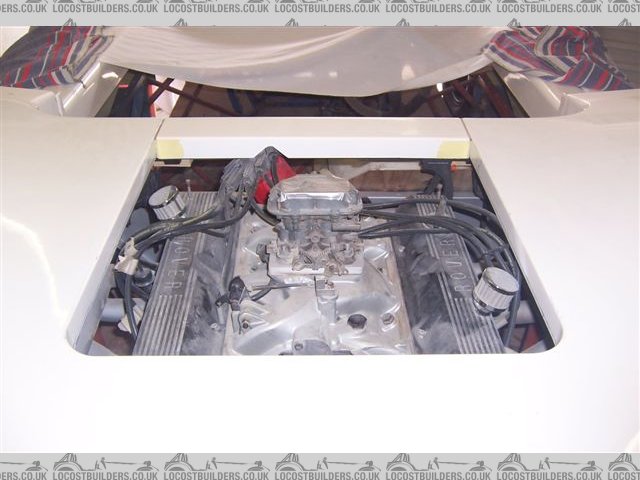
I'm pleased I will only need a small rebate in the tail to clear the rear of the transaxle, and that the cut-out will not interrupt the
horizontal line across the lower part of the tail when seen from the rear. The position of this plain was a guess when I made the pattern but it seems
it will work out well. I'll glass in a recessed closing panel over an enlarged cut-out when the final build is done.
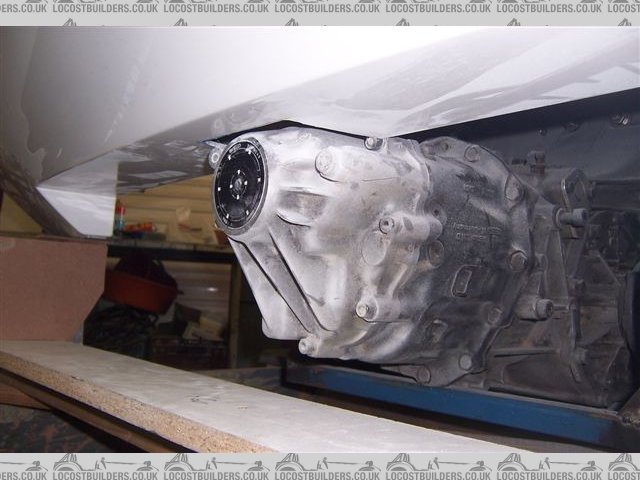
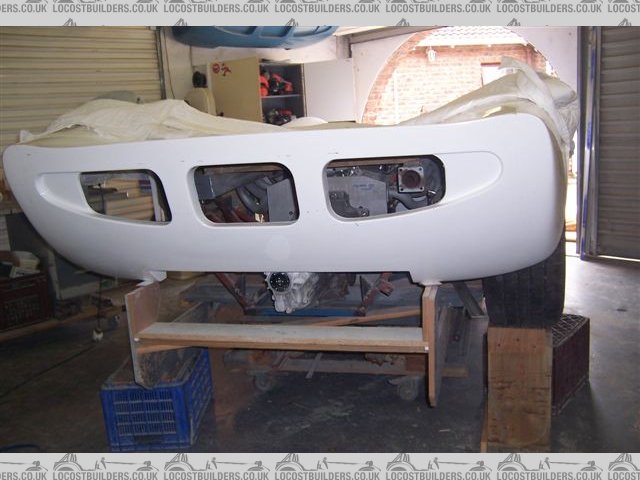
Cheers
Fred W B
smart51 - 2/2/14 at 03:09 PM
That's superb. I can't wait to see it finished.
ceebmoj - 2/2/14 at 09:15 PM
looks amassing, great to see all the hard work paying off. when you start the new thread please can you put a link at the end of this one.
femster87 - 2/2/14 at 09:23 PM
Fred, Can I have your garage please.
Fred W B - 31/8/14 at 06:06 PM
Only thing that has has happened on the body recently is that I have made a stand to support the tail when off the car. The lower piece to shaped to
fit the tail and is padded with a strip of closed cell foam. I fitted castors so I can move it around easily
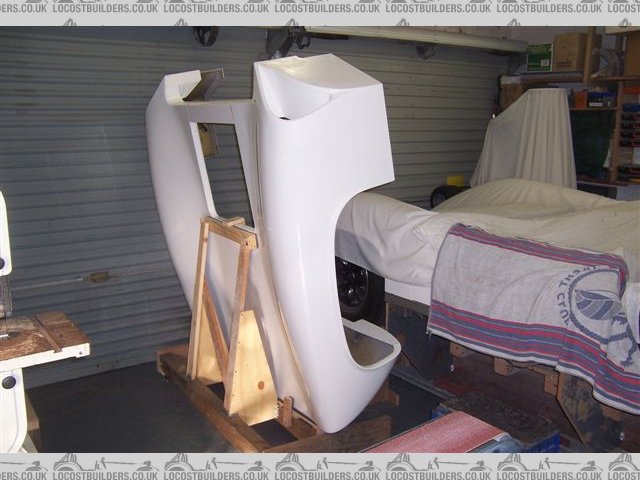
Fred W B - 31/8/14 at 06:08 PM
quote:
Fred, Can I have your garage please.
Thanks! If you are interested, once I had finished the big clean up I documented it
HERE
Fred W B - 31/8/14 at 06:11 PM
quote:
when you start the new thread please can you put a link at the end of this one.
I've started one HERE


