neilp1
|
| posted on 25/11/14 at 12:55 PM |

|
|
Repairing Fibreglass
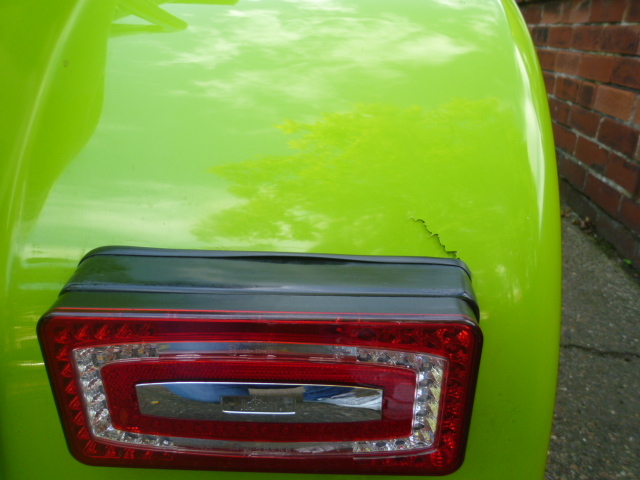
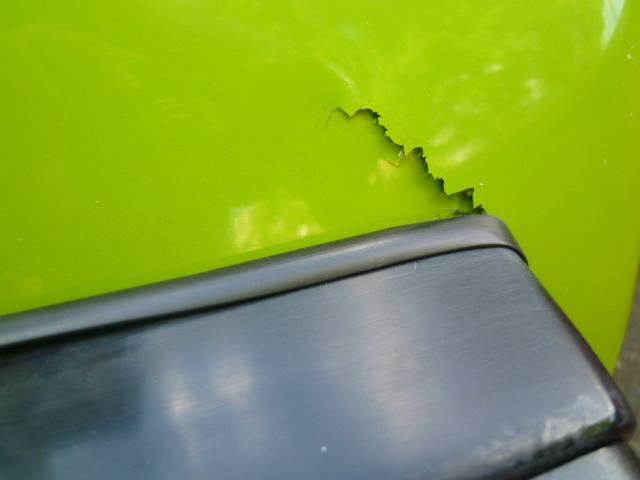
I'm going to have a bash at repairing some damage to my rear arch as shown in the photos. This was caused by some cock reversing into me whilst
I was away from the car. Unfortunately for me the cock decided not to hang around!!
The crack does run behind the light.
Can anyone give me any good pointer/advice for this repair as I have limited experience on this.
[img]
 
Description
[/img]
 
Description
|
|
|
|
|
AndyW
|
| posted on 25/11/14 at 03:14 PM |

|
|
Im sure someone will be along soon with a better answer from mine, but for now I would drill a small hole at the end of the crack, this will stop it
spreading further
|
|
|
garyo
|
| posted on 25/11/14 at 04:17 PM |

|
|
In my experience, stabilising the damage with good use of hole drilling, and strengthening the wound by laying up some GRP on the underside is fairly
easy.
The difficult part is getting a pigment match, and then getting one that stays the same colour over time as the resin fully cures. I presume it gel
coat and not sprayed? Can you get a pot of the gel from your manufacturer rather than mixing your own pigment in to while gel then that'll help
enormously.
Gary
|
|
|
twybrow
|
| posted on 25/11/14 at 09:31 PM |

|
|
Is it a painted surface, or is it gelcoat? Knowing this would help direct you to the right course of action.
|
|
|
spiderman
|
| posted on 25/11/14 at 11:45 PM |

|
|
Gaffa tape. 
I'll get my coat. 
Spider
|
|
|
neilp1
|
| posted on 26/11/14 at 05:43 AM |

|
|
Its gelcoat.
|
|
|
Mikef
|
| posted on 26/11/14 at 08:28 AM |

|
|
You really need to get the manufacturer name, code and batch number if poss. Still not easy to get a good match and blend in. Lot easier to do if its
painted.Personally if you want a really good job, I think I would go the professional route.
|
|
|
twybrow
|
| posted on 1/12/14 at 11:11 PM |

|
|
quote:
Originally posted by neilp1
Its gelcoat.
So if it is gelcoat - have you managed to obtain some of the gelcoat? A lot of suppliers will keep samples for exactly this reason. Otherwise, ask the
bodywork supplier to give you the name of the resin company who made the gelocat so that you can get some more of the right colour match (unless it is
the same batch, it wont be 100%).
Firstly, stabliise what you have. I would start by drilling out the root of any cracks, and using a small burr grinder, form a V along any cracked
edges (feather the edge) so that you have a clear path from back to front - you will work from the back side of the laminate. If needed, you can cut
out whole areas and add back in new material as long as you can reference the shape from the surrounding surfaces.
Next, take something shiny and flexible enough to conform to the shape you want to repair - e.g. a thin sheet of alu, GFRP or similar. Apply mould
release to the flexible plate, and then fix it to the gelcoat side of your laminate - bolt it, stick it - your choice (just make sure it wont come off
until you want it to come off). Next, apply your gelcoat from the back side - you are aiming to apply a coat in 2 passes, so dont go on too thick.
Then, when that is beginning to cure, layup your glass on the back of the gelcoat, starting inside the gaps/cracks and working outwards with
increasingly large pieces, until your hole is filled.
Let it cure and then remove the panel, and fill/repair the holes you fixed th eplate with, and any dodgy edges where new material meets old. Once it
is all filled and level, polish it with Farecla type products and stand back and admire your handy work....
|
|
|


