ChrisS
|
| posted on 1/11/07 at 07:19 PM |

|
|
R1 Temp Sender Wiring
Just wondered if anyone can shed any light on the wiring for the temp sender on a 99 R1, as in the wiringdiagram ive got a green/red wire and a
black/blue wire, yet the temp sender is a single post connection. So what are the two wires for?
Cheers
|
|
|
|
|
amalyos
|
| posted on 1/11/07 at 07:28 PM |
|
|
Don't bother, the gauges will only tell you the temp is high or low. I fitted a new sender in the hoses and a standard temp gauge.

http://stevembuild.blogspot.com
|
|
|
ChrisS
|
| posted on 1/11/07 at 07:46 PM |
|
|
Im not sure thats quite right because if i disconnect the green red and then reconnect it, i get a 2 or 3 digit temp reading, an then it switches to
hi or lo.
|
|
|
Snap-off
|
| posted on 2/11/07 at 06:34 AM |
|
|
Hi, i am sure the green/red goes to the sender connection and the black/blue goes to the earth under the sender on the radiator. I also put a link
from the radiator earth direct to the chassis earth as I was getting weird readings. I also had issue with Hi temp showing early until I changed the
R1 clocks from Deg F to Deg C for some reason.
Steven.
|
|
|
ChrisS
|
| posted on 2/11/07 at 09:21 AM |
|
|
quote:
Originally posted by Snap-off
Hi, i am sure the green/red goes to the sender connection and the black/blue goes to the earth under the sender on the radiator. I also put a link
from the radiator earth direct to the chassis earth as I was getting weird readings. I also had issue with Hi temp showing early until I changed the
R1 clocks from Deg F to Deg C for some reason.
Steven.
Hi
Could you tell us how to change from deg f to deg c, i cant find that in the manual anywhere.
Cheers.
|
|
|
Snap-off
|
| posted on 2/11/07 at 10:21 AM |
|
|
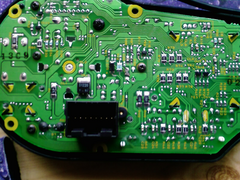
Hi, if you open the clocks and on the circuit board there will be 2 pads bridged. If you de-solder them and bridge the one next to it, it changes the
clock spec. The options are:
J12 open J13 close : UK spec MPH/KMH speedo, Miles ODO & trip, Deg C temp
J12 close J13 open : USA Spec MPH/KMH speedo, Miles ODO & trip, Deg F temp
J12 open J13 open: Europe spec KMH speedo, KM ODO & trip Deg C temp
Hope this helps,
Steven.
This temp info is also handy:
 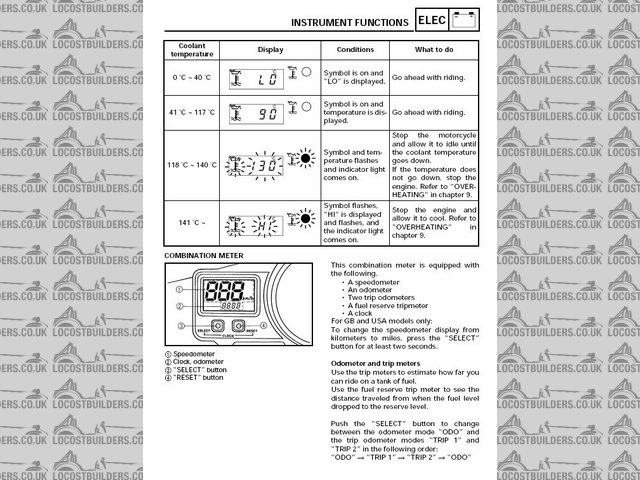
Rescued attachment R1ClockH20Temp.jpg
|
|
|
smart51
|
| posted on 2/11/07 at 11:20 AM |
|
|
The temp sensor has a single post on it but the screw thread is an earth. You need a solder ring earth connection to go between the sensor and the
radiator to make the earth.
|
|
|
mad-butcher
|
| posted on 2/11/07 at 06:19 PM |
|
|
any ideas were i can get a sender from
tony
|
|
|
ChrisS
|
| posted on 19/12/07 at 11:43 AM |
|
|
quote:
Originally posted by Snap-off
Hi, if you open the clocks and on the circuit board there will be 2 pads bridged. If you de-solder them and bridge the one next to it, it changes the
clock spec. The options are:
J12 open J13 close : UK spec MPH/KMH speedo, Miles ODO & trip, Deg C temp
J12 close J13 open : USA Spec MPH/KMH speedo, Miles ODO & trip, Deg F temp
J12 open J13 open: Europe spec KMH speedo, KM ODO & trip Deg C temp
Hope this helps,
Steven.
This temp info is also handy:
SnapOff
I cant seem to find what your refering to. Cold you point it out on the pic below.
Thanks
Description
|
|
|