vinny1275
|
| posted on 23/3/08 at 05:15 PM |

|
|
MNR Vortx main panel fitment
Well, there's a large amount of pink dust on my garage floor now - the bodywork's started to be fitted.
This involved filing out quite a few bits around various bits of chassis and roll bar to make it fit over in the first place, but there's a bit
I'm not quite sure about.
The main tub is one piece back and sides, and where the chassis angles inwards at the rear end of the scuttle, the body seems to be under too much
tension. If the bottom lip of the body is underneath the chassis, where it's supposed to go, the front is lifted off the mounts where it's
supposed to go by about an inch. Pushing it down at the front causes it to pop out at the bottom. Holding it down at the front and pushing it in at
the bottom causes it to start making nasty crackly noises on the top, and it is starting to crack there. I've taken a bit out to go round a
rivet head that it was pushing against, and this made it a bit better, but there still seems to be too much tension in it. Taking the cuts out for the
rear bones hasn't changed it either.
Any ideas how I can take the stress out of this area?
TIA,
Vince
PS - Happy Easter! Hope you've all been good with the Easter eggs 
|
|
|
|
|
coozer
|
| posted on 23/3/08 at 05:47 PM |

|
|
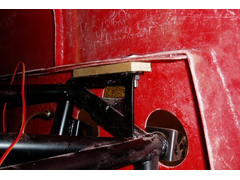
Well there we go, I had exactly the same problem and here is my solution, not very aesthetic but works and is out of sight.
Steve
 
Rescued attachment Body5.JPG
1972 V8 Jago
1980 Z750
|
|
|
vinny1275
|
| posted on 23/3/08 at 05:52 PM |

|
|
Thanks Steve - I forgot to mention that this is only on one side - was yours the same on both?
Cheers
Vince
|
|
|
coozer
|
| posted on 23/3/08 at 06:04 PM |

|
|
I spaced both sides up to keep the wishbone holes even. I seem to remember it did only pop off on one side though when I pushed it down onto the front
plates.
Also what I found is after cutting the V's for the back the nearside is miles away from the chassis tube, like its too high and bulges out and
the offside is pulled tight.
I had to trim the body work back into the radius to get it around the roll bar and made a right pigs ear of it   and its cracked
now and its cracked
now       . It's going need a fancy cover to hide it.... . It's going need a fancy cover to hide it....
1972 V8 Jago
1980 Z750
|
|
|
TimC
|
| posted on 23/3/08 at 06:24 PM |

|
|
Same issue with the nearside bulge around the rear arch area here. My bodywork also needed a bit more than 6 inches of wood to support it. Aluminium
angle is your friend..jpg)
|
|
|
Johneturbo
|
| posted on 23/3/08 at 06:55 PM |

|
|
I've found mine is ok, maybe thats the new style chassis!?
only thing i'm finding is the new style chassis is wider/maybe? longer at the front.
the old style nose i've gone for doesn't fit around it as nice as the new style. shame as i prefure the old style nose.
so i'm contemplating buying the new style nose for a better fit.
|
|
|
worX
|
| posted on 23/3/08 at 07:16 PM |

|
|
As Tim's pasted the photo in you know how it was done on his.
But this was done both sides and I had no Ali Angle big enough to cope with the incorrect sized bodywork so I had to fold some Ali myself to make the
"angle".
Also the panel was approx. 27mm to tall on the pax side and approx. 22mm to tall on the drivers side, so don't worry too much if you think
it's just one side of yours that's not fitting...
ATB
Steve

|
|
|
stuart_g
|
| posted on 23/3/08 at 08:01 PM |

|
|
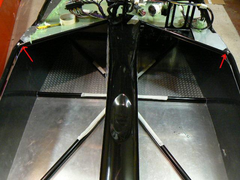
My body work fitted ok. It was only tight on the passenger side where the front half of the floor overlaps the rear half. I had to drill out the rivet
and fit a countersunk one in it's place also sand the lip of the ali so it was smoother. You may find you have to remove a bit of the top
bulkhead at the point where the chassis changes direction as per the pic to get the body to sit down a bit more.
I also found that the bodywork also popped out at the rear and at the point where it changes direction when I pushed it in at the front but don't
worry it all fits perfect when you start to fix it permanantly.
Go around the inside of the body removing any lumps and bumps of fiberglass. I found a few of these in that area and they can make a big difference on
the fitting. The thickness of the fiberglass can be quite thick in places especially in the corners top and bottom.
The body sits on top of the front upper wishbone chassis mounts both sides. There is no need for mods to be done to the chassis as stated above.
[Edited on 23/3/08 by stuart_g]
 
Rescued attachment Interior panels 4.JPG
|
|
|
coozer
|
| posted on 23/3/08 at 09:10 PM |

|
|
Sorry Stuart, your wrong, just because yours fits OK doesn't mean we are wrong.
I cut the holes for the front wishbones out that were scribed and then pushing it down they were out of line. This made the body pop out at the bend
and put loads of stress in it, it looked twisted from the side.
Packing the body up made the wishbone holes line up, the body unstressed along the towards the scuttle and meant the body lined up with the bottom
chassis rail. It also gives me a straight line for mounting the nose and bonnet.
Steve
1972 V8 Jago
1980 Z750
|
|
|
smart51
|
| posted on 23/3/08 at 09:46 PM |

|
|
quote:
Originally posted by vinny1275
Well, there's a large amount of pink dust on my garage floor now - the bodywork's started to be fitted.
You're making a pink car?
|
|
|
bassett
|
| posted on 23/3/08 at 10:27 PM |

|
|
Hi,
guys with tubs that had to be modified, when was your car bought? Reason being im wondering if mines going need these alterations .
Cheers
Adam
My MNR Blog Updated Jan 2010 - Track Day Prep Begins!
|
|
|
marc n
|
| posted on 23/3/08 at 10:32 PM |

|
|
on the earler cars the body does need spacing at the front edge, we had to have it like this to clear the rear panel lower member when the body slides
over and drops down during fitting, otherwise it was near impossible to fit the body, on the newer cars we raised the rear lower member allowing us to
achieve no spacing at the front
also applicable to both cars
sometimes some of the material on the side and rear panel where the front and rear flooor pans overlap can be too thick, ( as stuart mentioned )
when we fit the side and rear panel we fit the body loosely on the chassis and let it rest for a day in the warmth, as sometimes when the fibreglass
is stored and not held in shape it can sag and twist,
the bonnet is another prone to this it is best stored vertical on one end rather than layed on the floor
cheers
marc
please email rather than u2u
direct workshop email ( manned 8am till 6pm )
www.mnrltd.co.uk enquireys to :-
chrismnrltd@btinternet.com
|
NOTE:This user is registered as a LocostBuilders trader and may offer commercial services to other users
|
stuart_g
|
| posted on 23/3/08 at 10:50 PM |

|
|
quote:
Originally posted by coozer
Sorry Stuart, your wrong, just because yours fits OK doesn't mean we are wrong.
I cut the holes for the front wishbones out that were scribed and then pushing it down they were out of line. This made the body pop out at the bend
and put loads of stress in it, it looked twisted from the side.
Packing the body up made the wishbone holes line up, the body unstressed along the towards the scuttle and meant the body lined up with the bottom
chassis rail. It also gives me a straight line for mounting the nose and bonnet.
Steve
I should have put that if you have a newer chassis then you don't need to pack the body. I wasn't implying you had done it wrong.
|
|
|
vinny1275
|
| posted on 24/3/08 at 06:53 AM |

|
|
quote:
Originally posted by smart51
quote:
Originally posted by vinny1275
Well, there's a large amount of pink dust on my garage floor now - the bodywork's started to be fitted.
You're making a pink car?
It's ruby red - when you sand it, you get the coloured bit and the white glass as well - the dust looks pink on the garage floor!
That's my excuse anyway, and I'm sticking to it.

Thanks for all the replies guys, we'll go out and have another look today...
|
|
|
vinny1275
|
| posted on 24/3/08 at 06:39 PM |

|
|
Thanks for all the advice guys, some Ali angle from B & Q took a lot of the hassle out of this. It'll now be nicely supported all along the
front length, and not under too much strain.
Thanks again, hopefully the main tub isn't too far away from done now! 
|
|
|


