scoobyis2cool
|
| posted on 10/1/04 at 01:11 AM |

|
|
How does a rivnut tool work?
I wasn't really sure what forum to post this in but here goes...
I'm going to use rivnuts to attach my headlamp bar to the chassis. I've got a rivnut tool supplied by mk but haven't got a clue how
it works! Can anyone help?
Thanks
Pete
It's not that I'm lazy, it's that I just don't care...
|
|
|
|
|
Mix
|
| posted on 10/1/04 at 09:18 AM |

|
|
Without actually seeing the tool this will have to be pretty general but here goes.
Opening the legs / handles should cause a threaded mandrel to protrude from the nose of the tool, the rivnut is screwed onto this and then inserted
into the appropriate hole in the chassis. Using gentle pressure to keep the flange of the rivnut in contact with the chassis the handles are squeezed
together to 'set' the rivnut and then the tool is unscrewed from it.
It is a good idea to practise setting rivnuts somewhere where you can observe what is going on inside the tube as unlike pop rivets you have to gauge
the correct amount of pressure to apply, ((too much and you strip the thread, too little and the rivnut will rotate, (this will always happen when you
are trying to undo it and is a fine example of Sod's Law  )). )).
In my experience rivnuts are fine for applications where they will be undisturbed for most of the time, however if you feel they will be repeatedly
dis / re-assembled I would suggest you use another method of fixing such as through bolts with spacing tubes as rivnuts tend to work loose under these
conditions.
Hope this makes sense
Mick
|
|
|
alister667
|
| posted on 10/1/04 at 10:18 AM |

|
|
The MK rivnut tool caused me much headscratching too I have to admit. I was expecting something with handles, but it actually looks more like 2 bolts
getting it on! I'm gonna head out get mine and take some pictures to try to explain, I'll be back in a bit.
|
|
|
alister667
|
| posted on 10/1/04 at 10:39 AM |

|
|
Rivnut1
Apologies for the quality of the pics. Just showing the pic of the tool and the rivnut itself. There should be 2 pretty beefy washers on the tool -
one at each end, and a nut on the non-rivnut side.

|
|
|
alister667
|
| posted on 10/1/04 at 10:40 AM |

|
|
Rivnut 2
Just with your fingers screw the rivnut onto the tool so the end of it just pokes out through the rivnut itself.

|
|
|
alister667
|
| posted on 10/1/04 at 10:41 AM |

|
|
Rivnut 3
Tighten up the nut on the right (the one with the small spanner on it) with you fingers. When it's finger tight insert the rivnut into the hole
you wanna rivnut.

|
|
|
type 907
|
| posted on 10/1/04 at 10:42 AM |

|
|
Hi
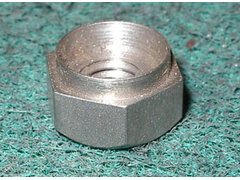
I needed to use stainless rivnuts / thread serts / captive nuts, so I used these. (see pickie) They will take a lot more strain than a
rivnut.
I do have reservations about their use in structural parts of the chassis as they require a large hole which must weaken the box section.
There is no substitute in these areas for the welding in of a threaded boss, IMHO.
Paul G
 
Rescued attachment captive nut.jpg
Too much is just enough
|
|
|
alister667
|
| posted on 10/1/04 at 10:43 AM |

|
|
Rivnut 4
OK you have to imagine on this one the rivnut is stuck in a hole and not on the dinner table! Holding the big hexagonal in place, and making sure the
rivnut stays squarely in the hole tighten the nut (on the right) with the small spanner. This will cause the rivnut to deform in the hole (like a
rivet) and hold firm. The trick is to stop before it wrings. My advice is to fit a few into some box section first and get a feel for it.

Hope that helps you a bit.
Good Luck.
|
|
|
JohnN
|
| posted on 10/1/04 at 02:15 PM |

|
|
Hi Type 907, what is that nut you pictured.
I am also stainless chassis and will soon be thinking about removable transmission tunnel panels. I wondered if there was such a thing as a stainless
rivnut?
BTW, have you completely welded in the floor panel yet? (in stainless) did it shrink/warp much?
John
|
|
|
type 907
|
| posted on 10/1/04 at 06:24 PM |

|
|
Hi John
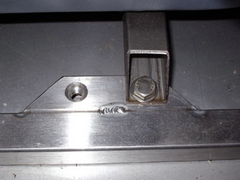
The nut in the pickie is a s/s M8 captive nut. I used them to mount my seat rails. (see other pickie) To fit, you drill a 1/2" hole
& c/s lightly. Pop them in from the back & support. Place the ball end of a hammer on the top & tap it with another hammer. This flairs it
over into the counter sink.
As for panels, I'm using M4 dome head s/s allen screws. They are time consuming to fit but look so much more "trick" than rivets.
(slow reversible drill a must)
Paul G
Woops !! Yes, floors in. 16g full width, 2" drain holes in tranny tunnel. About 5mm of sag, stitch welded.
[Edited on 10/1/04 by type 907]
 
Rescued attachment lotus seat mounts 006s.jpg
Too much is just enough
|
|
|
scoobyis2cool
|
| posted on 11/1/04 at 02:03 PM |

|
|
That's great alister, thanks a lot for that, it makes sense now but i couldnt work it out at all to start with!
Pete
It's not that I'm lazy, it's that I just don't care...
|
|
|
Jonte
|
| posted on 21/1/04 at 02:07 PM |

|
|
I can´t understand what the rivnut is for, even though I read your posts several times.
I just have to figure it out when I get the kit from MK
Click it

|
|
|
Jonte
|
| posted on 21/1/04 at 02:29 PM |

|
|
No worries..... a workmate explained it for me....
Click it

|
|
|


