
More progress, again. Play spot the SVA failure....
flak monkey - 13/6/07 at 06:50 PM
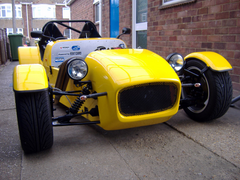
Been busy again, and had Matt around to play spot the SVA failure. Covered a couple more edges around the back which has tidied it up some more.
Got the VIN stamped and welded on as well as riveted on a plate...
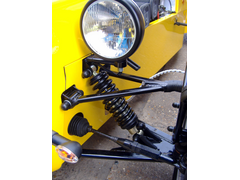
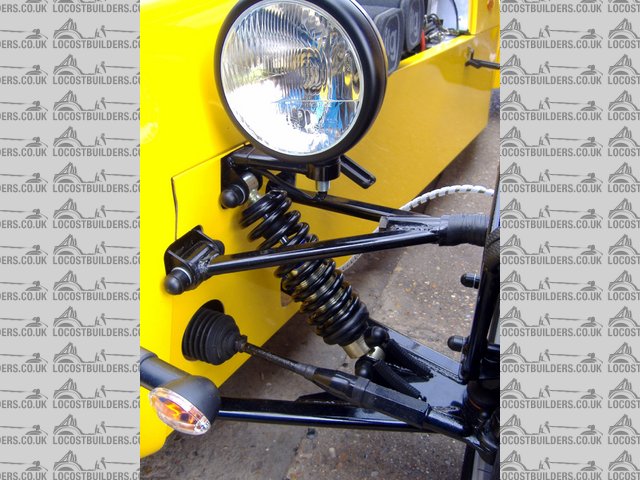
Heres some pics, if you can see anything which could be a potential SVA issue please let me know. Also looking for ideas for how to cover the
headlight threads.
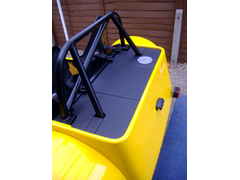
Also the plate under the roll hoop has a corner facing the rear above the back panel which could be a problem? Not a forward facing edge though...


andylancaster3000 - 13/6/07 at 06:57 PM
Steering wheel maybe?
StevieB - 13/6/07 at 06:59 PM
For the headlight threads try a bit of heat shrink - it'll cover the threads and look ok too.
Maybe the steering links too - some self amalgamating tape around those extentions to put a better radius on them might be worthwhile (it'll look
daft, but at least you won't fail for something so simple and daft to miss)
[Edited on 13/6/07 by StevieB]
Humbug - 13/6/07 at 07:03 PM
bolt holes in the gear knob? Could fill them with a dab of silicone if necessary
locoR1 - 13/6/07 at 07:08 PM
That is looking very nice David a real credit to you! Excellent choice of colour as well
I can only see a couple of things the first im sure you know the mountney wheel. most use the sierra wheel for sva.
The next one is your gear knob it look like its got groves round it, have they got a radius on them if not I would just stretch some large o rings
over it (They picked this up on my brothers mk at Norwich)
Cheers Dave����
Confused but excited. - 13/6/07 at 07:09 PM
Very tidy job.
Glad to you you fitted those foam thingies ,that stop small children clogging up your carbs.
nludkin - 13/6/07 at 07:15 PM
As said above, more tape around the steering extensions wouldn't hurt. I think you need a padded section on the steering wheel to be SVA
friendly. And you will need some tape around the camber adjusters as they will get contacted upon by the damn EU sized knee thingie.
Apart from that it's a very tidy car indeed! It should sail through the SVA fairly easily!
JohnN - 13/6/07 at 07:24 PM
Have you got reflectors in your front indicators? My tester said as bike indicators, they were too dim, and probably had no reflectors. I chopped up
the plasic reflector from an old torch, it made quite a difference.
Very tidy car by the way !
[Edited on 13/6/07 by JohnN]
CAD Monkey - 13/6/07 at 07:25 PM
Sod the SVA...Where do all your Avatars come from!?!?!?!?
mookaloid - 13/6/07 at 07:31 PM
That looks really good David 
Only things I can see are the headlamp threads and steering wheel as above - also the centre mirror base where the two mounting screws go is a
potential fail as it is a 'sharp' edge. stick some foam on it or something.
Cheers
Mark
Marlon - 13/6/07 at 07:43 PM
That is looking like a really nice motor!
For the threads on my lights I used track rod covers cabletied on at the top, the second item
down on the tifosi site.
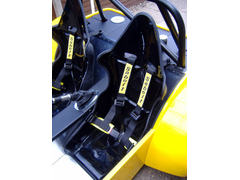
As for potential fails, What are the harness hole like in the seats? do they need any edge trim?
Are your toggle swithces uinside the "zone" of the steering wheel?
hth
john.
Avoneer - 13/6/07 at 08:12 PM
Yep - holes in seats need U trim.
Wheel will fail unless it's padded.
So will knob - fill the holes with silicone until after SVA.
Pat..
graememk - 13/6/07 at 08:42 PM
steering wheel mate.............
you can have the sva pad as soon as i get one back, i have two lend out and niether have come back.
i know one is maybe still in use though.
Catpuss - 13/6/07 at 08:43 PM
As the meet on Tuesday there was a rather good solution to the wires from the head lights - Stainless steel shower head pipes, nice and flexible, you
can poke the wires down the center and they are designed to get wet without rusting.
matt.c - 13/6/07 at 09:10 PM
Image deleted by owner
These edges "circled" are a problem that we found tonight. Not sure what to do there? Headlight threads will be covered up after
adjustment. Steering wheel and gear knob will be changed to SVA ones.
your car is a very nice example flak
worX - 13/6/07 at 09:14 PM
People have already mentioned Steering wheel and gear knob, which I am sure with your SVA knowledge you already knew.
I would add to the remarks about the bottom of the headlight thread, but instead of covering it, why don't you just cut them off in line with the
brackets themselves? It seems an easier fix to me.
Also to add though, I know others may have had problems with harness holes, but I was told by my examiner that they did not have to be covered.
Steve
Avoneer - 13/6/07 at 09:21 PM
Yeah, but for the sake of it, cover them with that magic u trim that falls off on the way heom from the test centre.
Very neat car by the way.
Pat...
Bob C - 13/6/07 at 09:29 PM
Hi Flak - don't cover the headlight threads - saw 'em off! you know you should!
The triangular clips on the back of the seat belts was a radius fail for me - temporary Utrim got me through the retest.
Bob
flak monkey - 14/6/07 at 06:21 AM
Thanks for the comments guys, some good suggestions.
The harness slots have edge trim in already (you cant see it on the pics) and the harness mounting plates are also edge trimmed.
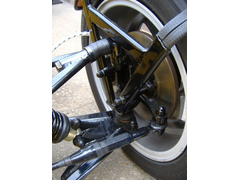
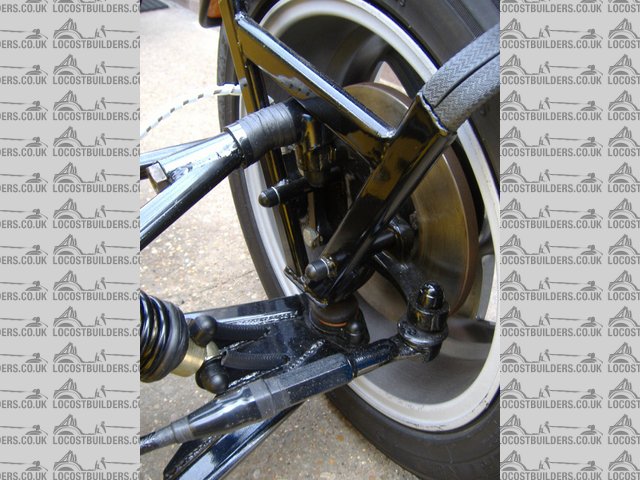
I am guessing that the front upper forward mount for the wishbone will need something on it. Will cover that with a bit of siliconed onU-trim if i can
get some on there.
Shall dig some foam out to cover the camber adjuster and will wrap some more self amalgamating tape around the TR extensions.
I was aware of the wheel being an issue. Its also not on a collapsable boss, but hopefully I will be able to borrow the bits from Graeme.  I am also
going to put a sierra gear knob on for SVA. Anyone got one knocking about?
I am also
going to put a sierra gear knob on for SVA. Anyone got one knocking about?
I'll take a hacksaw to the headlight threads later or tomorrow then. However the nut does protrude from the bottom of the bracket by about 5mm
too...
Cheers,
David
speedyxjs - 14/6/07 at 07:01 AM
Looks good david!
Have you booked SVA yet?
Hammerhead - 14/6/07 at 09:26 AM
Hi David,
Did you use the foam profile that I sent you on the underside of your dash?
Car looks great. After you cut the thread on the headlight can you put a plastic nut cover over the nut that protrudes by 5mm?
Steve.
02GF74 - 14/6/07 at 01:37 PM
those toggle switches are in the exempt zone swept by the steering wheel right?
oily85 - 14/6/07 at 05:25 PM
I've got a sierra gear knob you could borrow, it doesn't look that great but it should do the job
spw1970 - 14/6/07 at 09:00 PM
Well I am not qualified in any way, shape or form to advise on SVA but must say that your car looks stunning. Attention to detail is everything on
kit cars in my opinion and yours is superb.
Stuart
Macbeast - 14/6/07 at 09:07 PM
Will probably fail for being excessively yellow 
Good work David, look forward to seeing it in the flesh someday (or one of the avatars would do )
Simon - 14/6/07 at 11:40 PM
David,
Was gonna mention the top wishbone mounting brackets. Do front and back - they were one of my failure points, and for the sake of 5 mins, I
wouldn't recommend chancing it
Re the headlight mountings, I cut mine so I could run the wires inside the mounting tube, then put grommet in hole underneath.
Nice job too!
ATB
Simon
[Edited on 14/6/07 by Simon]
flak monkey - 15/6/07 at 06:08 AM
SVA is booked, but I am awaiting confirmation of my date. Hopefully early July, was offered the 28th June, but can make it due to uni commitments.
The toggle switches are well within the exempt area, they are actually all behind the steering wheel.
The foam profile did just the job on the bottom of the dash, thanks Steve. The rest was re-padded with 8mm camping mat.
I have now covered the front wishbone brackets, the rear ones dont really stick out much at all, and I can get any trim on them.
Have covered the headlight threads with self amalgamating tape for now. I find it unlikely that the tester will get his ball in under where the
headlights are to even touch the thread. Exposed front suspension should only be tested for projections from the front anyway according to the manual,
though many testers dont seem to pay attention to that....
David
I plan on taking a boot full of trim and bits to cover anything that might be found...
DarrenW - 15/6/07 at 08:58 AM
I hate doing this as its such a tidy job. Any comments will be from Gosforth perspective Im not saying they are a fail but something to consider.
1. Headlight threads.
2. Stg rack extensions - hex visible.
3. Adhesive tape holding the covers before 2. - i wasnt allowed to use sticky tape.
4. Couldnt see how the steering intermediate shaft was connected to steering column - i had to fit longer pinch bolt and lock nut.
5. Gear knob.
6. Steering wheel - check spokes rad and fixing bolts. May need a crash pad over or Sierra wheel fitting. I got away with aftermarket wheel but had to
fit collapsible boss behind it.
7. Couldnt see the screw hole bosses for rear lights - i had to fill with clear silicon. I also had to increase the rad around the fog light
housing.
It is a very very nice car. Cant wait to see it for real.
matt.c - 15/6/07 at 09:03 PM
quote:
Originally posted by flak monkey
SVA is booked, but I am awaiting confirmation of my date. Hopefully early July, was offered the 28th June, but can make it due to uni commitments.
The toggle switches are well within the exempt area, they are actually all behind the steering wheel.
The foam profile did just the job on the bottom of the dash, thanks Steve. The rest was re-padded with 8mm camping mat.
I have now covered the front wishbone brackets, the rear ones dont really stick out much at all, and I can get any trim on them.
Have covered the headlight threads with self amalgamating tape for now. I find it unlikely that the tester will get his ball in under where the
headlights are to even touch the thread. Exposed front suspension should only be tested for projections from the front anyway according to the manual,
though many testers dont seem to pay attention to that....
David
I plan on taking a boot full of trim and bits to cover anything that might be found...
Dont you mean matt will be taking a boot full of trim, kitchen sink, plunger!!!
flak monkey - 16/6/07 at 06:28 AM
quote:
Originally posted by DarrenW
3. Adhesive tape holding the covers before 2. - i wasnt allowed to use sticky tape.
4. Couldnt see how the steering intermediate shaft was connected to steering column - i had to fit longer pinch bolt and lock nut.
It is a very very nice car. Cant wait to see it for real.
The tape is self amalgamting tape, not insulating tape and should, in theory, be OK as you need a tool to remove it i.e. a knife, you cant just peel
it off like normal tape. I have wrapped the extensions in that too.
I have put a lock nut on the column pinch bolt already


