me!
|
| posted on 8/6/12 at 08:50 PM |

|
|
Welding- first attempt!
Evening all.
I've had my first bash at MIG today. A lot of you on here seem pretty handy with a welder, so could you have a glance at some of my practise
bits and let me know how I can improve them please?
The welder is a Clarke 150TE, welding with 0.8 mild steel wire, CO2 shield onto 3mm thick steel box section. 3mm is a bit thicker than I would have
liked to practice on but it was the thinnest stuff in the fabricators scrap bin! All of this is at max power with the feed rate between 5-8 as I was
playing around.
First off beads on to the 3mm box. The ones at the top are the earlier ones. I turned the gas up after the first few which seemed to help. I was
trying to weld in a kind of 'swirly' pattern, I'm not really sure why, but it seemed like the right thing to do at the time! (Most
of the spatter on the plate is from me practising on other bits on top of the plate- the welds on this didn't spit too much)
 
Welding 1
Second is a close up of one of the welds on the above box before I took the wire brush to it. It looks like a line of snot to me- advice welcome! And
what are the shiny bits about?!
 
Welding 2
Third is a piece of angle (3mm) welded on to the other side of the box section. Not sure what I think of this one, it doesn't look very pretty
but it wasn't going anywhere!
 
Welding 3
Wish I'd got a welder sooner, quite enjoyed myself this afternoon!
Sorry for the essay.
Craig
|
|
|
|
|
bobthebuilder
|
| posted on 8/6/12 at 09:11 PM |

|
|
hi chap, some of it doesnt look too bad.
how are you holding the torch? you should have it pointing away from what you are weilding just incase you didnt know.
with mig you just need to play around with the amps and wire feed till it feels about right.
too much wire and it will stab as you weild and not burn into the metal.
too little wire and it will burn out tips and melt the metal.
also you can change your weld by the speed you travel and puting a slight arc movement on the torch as you weld.
best thing is practice.
keep it up
|
|
|
mark chandler
|
| posted on 8/6/12 at 09:13 PM |

|
|
Try figure of 8 pattern or gentle weave side to side 
Make sure you cover your arms, and legs, most of us must have tried welding in shorts at some point when the weather is good... you realise it's
a big mistake.
Also if right handed support you right hand wrist with the left hand, it allows a lot more control rather than free hand.
Apart from the few snotty ones at the top they look pretty strong to me, the ugly splatter is CO2, not a slight argon mix which makes things much
nicer.
Welding is all about practice, by the time you have made a car you will have mastered it, good start.
|
|
|
RichieW
|
| posted on 8/6/12 at 10:05 PM |

|
|
Turn the gas up. Those aero chocolate welds at the top of your first pic are due to a lack of shielding gas. Are you using disposable bottles by any
chance? If so turn the regulator up to the max.
|
|
|
ashg
|
| posted on 8/6/12 at 10:11 PM |

|
|
dump the co2 and use a co2 argon mix. it will produce much better welds with less splatter and make it easier for you to learn. looking at the welds
it looks like you either need to up the wire speed or drop the power and move a bit slower, aim for an inch of weld in about 10 seconds
Anything With Tits or Wheels Will cost you MONEY!!
Haynes Roadster (Finished)
Exocet (Finished & Sold)
New Project (Started)
|
|
|
blakep82
|
| posted on 8/6/12 at 10:36 PM |

|
|
quote:
Originally posted by RichieW
Turn the gas up. Those aero chocolate welds at the top of your first pic are due to a lack of shielding gas. Are you using disposable bottles by any
chance? If so turn the regulator up to the max.
don't turn it to the max! mine's set to 4, bottles last for years ( i don't do a huge amout of welding these days though...), turn
it to the max and they'll last for a few minutes.
________________________
IVA manual link http://www.businesslink.gov.uk/bdotg/action/detail?type=RESOURCES&itemId=1081997083
don't write OT on a new thread title, you're creating the topic, everything you write is very much ON topic!
|
|
|
richiegallon
|
| posted on 8/6/12 at 11:03 PM |

|
|
The best thing you can do is get yourself onto www.mig-welding.co.uk loads of information on there and a very friendly forum too
|
|
|
me!
|
| posted on 9/6/12 at 09:43 AM |

|
|
Cheers chaps. I'm just about to go and do some more practising so I'll bear what you've said in mind. Richie- yep disposable
bottles! The first welds were on 2/3ish as advised in the instructions that came with it, was quickly turned up to 4ish when they were
'aero-like'. I'll try giving it a bit more. I'm using CO2 to start with, I've got a bottle of CO2/Argon mix for when I
start welding proper things on the car. I will practise with it a bit first though! I'll let you know how I get on.
P.s.- covered head to toe!
|
|
|
slingshot2000
|
| posted on 9/6/12 at 10:02 AM |

|
|
quote:
Originally posted by richiegallon
The best thing you can do is get yourself onto www.mig-welding.co.uk loads of information on there and a very friendly forum too
^^^^what he said, very knowledgable and very friendly bunch who will help you !
|
|
|
me!
|
| posted on 9/6/12 at 11:44 AM |

|
|
Ran out of CO2 so changed to my argon/CO2 mix bottle (£15!) to find it empty! It's barely worth driving to machine mart to complain either with
the cost of fuel. Maybe disposables wasn't the right way to go? What do other people use? I don't expect to be doing tons of welding so I
didn't think it was worth the rental costs of larger bottles.
|
|
|
iank
|
| posted on 9/6/12 at 11:57 AM |

|
|
Next step above disposables:
Either Adams Gas http://www.adamsgas.co.uk/index.php?option=com_virtuemart&Itemid=54
or BOC low rental
http://www.boconline.co.uk/products/products_by_type/industrial_gases/shielding_gases/argoshield/2_litre_argoshield_light_filled_cylinder.asp
[Edited on 9/6/12 by iank]
--
Never argue with an idiot. They drag you down to their level, then beat you with experience.
Anonymous
|
|
|
RichieW
|
| posted on 9/6/12 at 12:02 PM |

|
|
Disposables are a false economy and the valves on the bottles are often suspect as you have found out. Have a look on the mig-welding website for the
"volkszone" offer from BOC. It's supposed to be quite a good deal for hobby welders. Other options are documented there too. There
are more and companies out there who will sell you a medium sized bottle without rental charges and just charge you for a refill although you should
still do your sums to see what is cheapest for you.
|
|
|
RichieW
|
| posted on 9/6/12 at 02:52 PM |

|
|
I have a very similar welder to yours. This is some welding of mine from last week. 3mm 50mm x50mm box section for a work bench I am currently trying
to make when it's not raining. The edges were bevelled to ensure decent penetration. 3mm is great to practice on as it you wont blow holes
through the metal as easy as you can with thinner steel.
Welder: Clarke 151 te
Wire: 0.8mm
Gas: Argon CO2 mix.
Power setting: 3 Min
wire speed: about 6.2 out of 10 on the dial.
Gas flow: High enough to make a Scotsman wince 
Admittedly, this is the best weld of the bunch that I took pictures of. I am still trying to improve myself and need to practice more. Argon mix
gives a much smoother, nicer weld.
 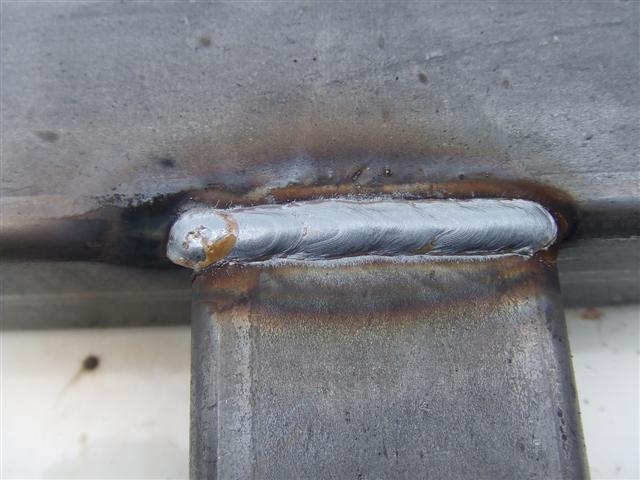
weld
 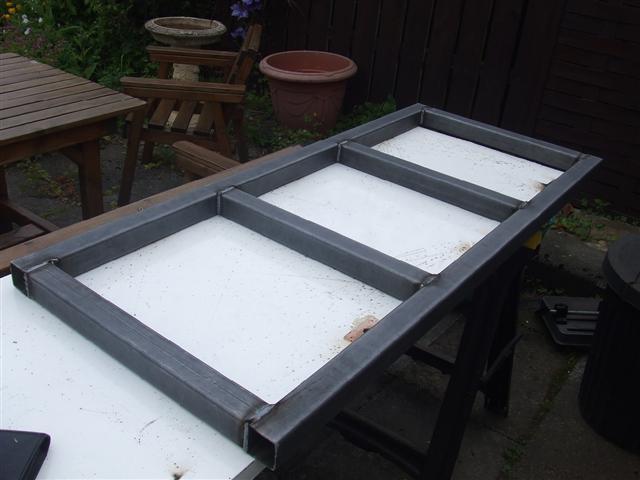
top
|
|
|
me!
|
| posted on 9/6/12 at 06:44 PM |

|
|
quote:
Originally posted by RichieW
I have a very similar welder to yours.
But yours is the shiny red one!
I would have liked to have used an argon mix if the bottle wasn't empty! That weld looks a lot better than mine. The best line of weld I laid
down was this, until I tried to see how slow I could go.
 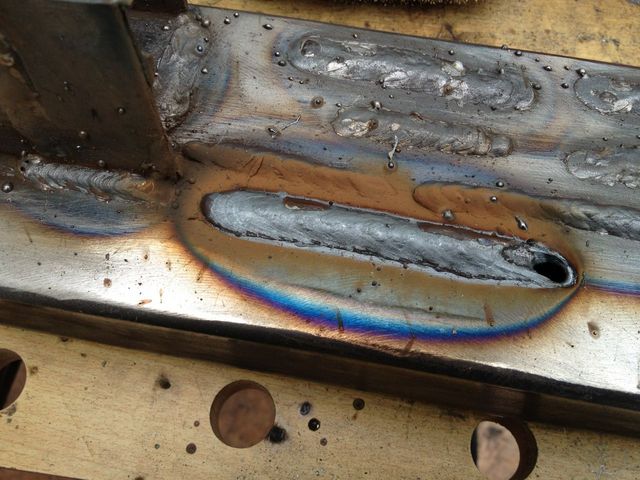
welding 4
Then tried to weld some exhaust, which is the first real job I need to do. It's 1mm thick mild steel, I found it quite tricky not to blow holes.
Eventually I went from this
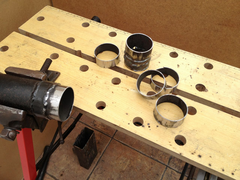 
welding 5
to this
 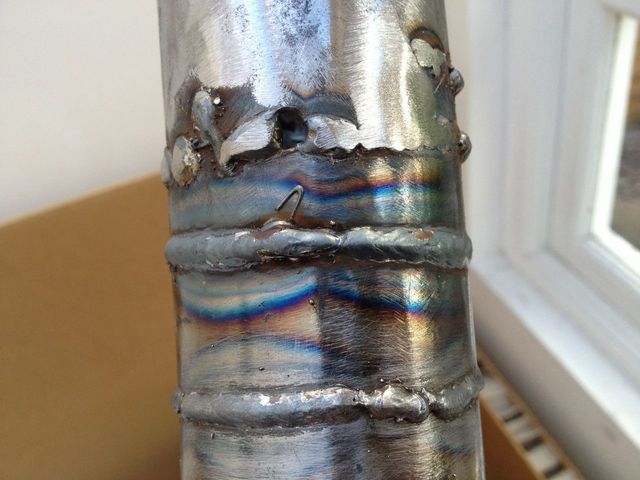
welding 6
I was pretty pleased with it, but I could only weld about a quarter of the way around in one run, and it's not very pretty where the joins are.
I had to change to 0.6mm wire, I found it a lot more forgiving of my lack of skills!
I found I had to go pretty quick when welding the thin stuff. I tried turning it down and going slow but then it just built up on the surface. Am I
missing a trick?
|
|
|
RichieW
|
| posted on 9/6/12 at 07:34 PM |

|
|
For the exhaust welding have a look at the "Thin Metal Techinque" on the mig welding forum. You cant continuously weld really thin metal
as it blows holes. The idea is to create a continuous seam of individual spot like welds. There is a video on the mig welding forum showing how it is
done.
That weld of yours on the top photo of your latest looks really good. You are improving. That fillet weld to the left of the main weld looks good too.
|
|
|
Mr Whippy
|
| posted on 9/6/12 at 08:09 PM |

|
|
mind you can get 8mm gasless wire too, very handy for welding outside, most off my welding is with this
|
|
|
RichieW
|
| posted on 9/6/12 at 09:02 PM |

|
|
 
welding 4
Something to bear in mind. If you are right handed it is considered good practice to weld from right to left. This is called pushing the weld. The
main weld on this picture looks like you are welding left to right and dragging the torch until you blew through at the end due to heat build up.
There is a bit of argument about this in welding circles. Some people don't think this matters and others think dragging is a big no no. You
might want to read up on a bit of welding techinique to make sure you dont pick up too many bad habits early on.
|
|
|
MakeEverything
|
| posted on 9/6/12 at 10:12 PM |

|
|
Gasless wire is very good, but my machine with normal wire and CO2 works well.
I converted mine to run on a cylinder rather than disposables (they lasted about 15 minutes for me) and my CO2 extinguisher has just run out after
about 18m of welding jobs (probably averaged 2-3 hours per month). The CO2 has nackered the argon gauges though, but i know by ear roughly what is
right and once set, it stays there. With CO2 on argon gauges, it freezes the regulator too after long usage.
Next step is to get some argon gas from Weldair in Luton, and make something that i promised for someone. Hoping to do that next week.
Kindest Regards,
Richard.
...You can make it foolProof, but youll never make it Idiot Proof!...
|
|
|
me!
|
| posted on 19/6/12 at 05:45 PM |

|
|
Thanks to IanK I have now ended up with this, for the princely sum of £34 + VAT
 
Argoshield
2 litre bottle of Argoshield light, £18 rental, £16 top up, should be enough for me. I'll be interested to see how much nicer it is to weld
with, the proper regulator should help as well. The place I got it from wasn't listed as a stockist of these bottles, but they were happy to get
it in for me- Gas and Gear in Coventry.
[Edited on 19/6/12 by me!]
|
|
|
DIY Si
|
| posted on 19/6/12 at 06:34 PM |

|
|
I was about to tell you about the place I use in Leicester, called Fosse Gas. I get a medium size bottle (2ft high jobbie) that's filled to 2000
psi/9L for £36. There's no annual fee, just a one off deposit of £55. The guy runs it from his house, so I've just turned up and picked up
a new one before.
“Let your plans be dark and as impenetratable as night, and when you move, fall like a thunderbolt.”
Sun Tzu, The Art of War
My new blog: http://spritecave.blogspot.co.uk/
|
|
|
vanepico
|
| posted on 19/6/12 at 07:37 PM |

|
|
Just finished my first part! The bottom part of this is by far my best weld so far  So I can now operate the clutch, when I get it xD So I can now operate the clutch, when I get it xD
 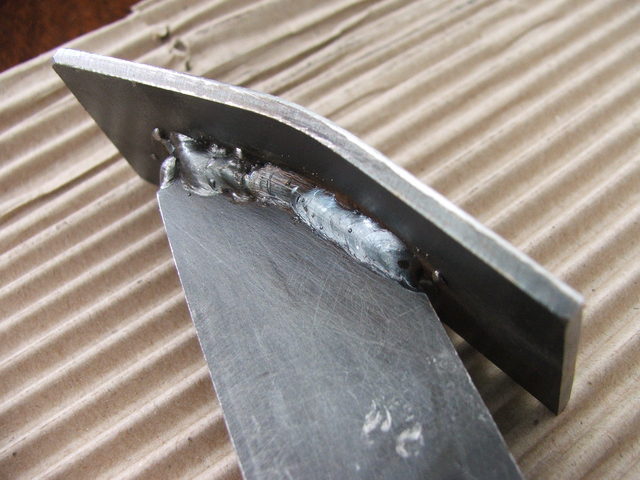
One of my best welds so far!
|
|
|
me!
|
| posted on 19/6/12 at 08:03 PM |

|
|
Good work!
I haven't actually welded anything properly go to on my car yet (exhaust has been tacked to check fit but that doesn't count!). When I do
I'll post it on here, so you can all laugh at my swiss-cheese style 'zorst!
|
|
|
DIY Si
|
| posted on 20/6/12 at 10:41 AM |

|
|
I would definitely practice the thin metal technique that was mentioned earlier. It's how I do a great deal of my welding now as I prefer to
turn the power up a notch and do shorter runs, almost large tacks, rather than doing full runs as they distort too much. I find it a fairly simple
technique but it helps so much. This was last go at it, sticking a coil over tower to the inner wing and chassis rail in my Sprite:

“Let your plans be dark and as impenetratable as night, and when you move, fall like a thunderbolt.”
Sun Tzu, The Art of War
My new blog: http://spritecave.blogspot.co.uk/
|
|
|
me!
|
| posted on 20/6/12 at 11:26 AM |

|
|
Yeah I will have a go at that, it looks like its much better suited to 1mm thick exhaust. I need to chop up the exhaust off cut and practise again, as
now I'm on argon the settings will be different. I'll try both ways and see what gives better results. Would doing it as lots of little
'tack' type welds leave me open to small exhaust leaks? I suppose if I get some decent heat into the previous weld I should be fine.
Is it literally tacks or a couple of cm at a time kind of thing?
|
|
|
DIY Si
|
| posted on 21/6/12 at 01:32 PM |

|
|
I tend to aim for 1cm or 1/2" or so long welds at a time. You do the first weld, then start the second on the leading edge of the first to
ensure a continuous line of welding. The idea is that the back should then look something like this:

Also, just found a pic that makes the technique a little more obvious. The horizontal line shows how one weld starts on the previous one. The idea is
to just pause between welds so the welds solidifies, rather than stopping to let it fully cool.

[Edited on 21/6/12 by DIY Si]
“Let your plans be dark and as impenetratable as night, and when you move, fall like a thunderbolt.”
Sun Tzu, The Art of War
My new blog: http://spritecave.blogspot.co.uk/
|
|
|


