
Cleaning Carbs
Miks15 - 3/4/09 at 12:58 PM
Ive got the next 2 weeks off, so aswell as making more progress with the car, im going to give my bike a good once over.
Its running a bit rough at the minute so my first thing to do is give the carbs a good clean out.
Has anyone got any walkthrough of what to do and what not to do? Last thing i want to do it make it worse!
Thanks
Mikkel
Paul TigerB6 - 3/4/09 at 01:16 PM
I cleaned a set of bike carbs a couple of weeks ago following the Pinto bike carb conversion i was doing not running right.
Very basically, I pulled the vacuum chamber cover off and removed the needles from the piston valve. I then removed the float chamber and slid the pin
out to remove the float. Remove the needle valve, main jet / holder and pilot jet and soak them all, along with the needles in Wynns Carb Cleaner. The
main body of the carbs got a good squirt of carb cleaner also and then a blast with an air line. Reassembe all the bits and they should run much
better.
idl1975 - 3/4/09 at 01:23 PM
Easiest way apparently is to use an ultrasonic cleaner found at your local garden center and used to get s**** out of lawn mower carbs.
IIRC you have to disassemble first and remove all the rubber bits - all the o-rings too, not just gaskets.
This is apparently "the" 100% sure-fire guaranteed way to get rid of varnish.
If you want to do it the hard way (like me), simply take them apart and soak in lots of carb cleaner. Scrubbing may well be necessary to get crap out
of the float bowl. You will want to remove all the jets (incl. needle jet) and clean them very carefully so you don't scratch them.
I'm assuming these carbs haven't been apart in a while, and the bike is fairly broken in (given we're talking a machine with multiple
carbs and multis are all injection these days), so if you are sensible you will replace ALL the rubber bits in the carbs, but definitely the float
bowl and vacuum chamber gaskets/vacuum seals at the very least. If you don't b***** them taking the carbs apart, they won't seal properly
anyway going back together. You can use a tiny bit of light oil smeared on the gasket channels and gaskets to help them seal nicely. If the bike is
more than 5 or 6 years old, I would suggest replacing the fuel hoses while you have the carbs out. Just buy hose and cut to fit rather than paying
stealership rates.
Float bowl and vacuum cover/slide cover bolts (I assume we're talking about CVs not old roundslides) are famously phillips and made of s****metal
(probably to stop you cracking the ally carb bodies), so replace with some good quality ally allen head bolts. Be v. careful removing them - lots of
WD and get some pressure on the back of the wrench/screwdriver or they will strip themselves.
If you have the carbs off, it's also a good time to clean out the tank and check tap operation, and depending on your bike, to get some new plugs
in it, as you're going to have to go through the hell of getting those throttle cables on and off without breaking stuff.
Edit: I assumed above you have the Haynes and/or a diagram from Keihin/Mikuni/bike workshop manual/some dude on the internet so you remember where
all the bits go! 
Also, if it's running rough, once you've cleaned carbs, replaced plugs and checked fuel and spark, buy or borrow a set of vacuum gauges and
balance the carbs while you have the tank off. If your tank doesn't prop up, you can just run a longer temporary fuel hose from the tank on a
bench (etc).
And final thing to do/potential cause - check and if possible replace all the rubber boots - i.e. airbox to carb, carb to intake, having checked the
condition of the clamp screws before you retighten them.
quote:
Originally posted by Miks15
Ive got the next 2 weeks off, so aswell as making more progress with the car, im going to give my bike a good once over.
Its running a bit rough at the minute so my first thing to do is give the carbs a good clean out.
Has anyone got any walkthrough of what to do and what not to do? Last thing i want to do it make it worse!
Thanks
Mikkel
[Edited on 3/4/09 by idl1975]
[Edited on 3/4/09 by idl1975]
[Edited on 3/4/09 by idl1975]
Roman - 3/4/09 at 02:45 PM
Take a look at this thread, the first post in particular gives you a good guide to
stripping and cleaning a set of carbs. 
thunderace - 3/4/09 at 02:54 PM
Cleaning and rebuilding your carbs can be difficult these days. The really good cleaners of yester-year are no longer available now that they have
been deemed "bad for the environment" and outlawed. The cleaners we could always count on are now effectively rendered almost useless. Awe
yes, I remember being able to buy a gallon can of carb-dip at the local parts store and it would strip decades of grime away over night with one 12
hour soaking. Now the same brand barely loosens varnish let alone cleans it away with days of soak time. . . You still need to get carbs clean, but
chemicals today just can't do it alone and you don't want to spend an afternoon scrubbing all the nooks and crannies of your carb housings.
What's a guy (or gal) to do??
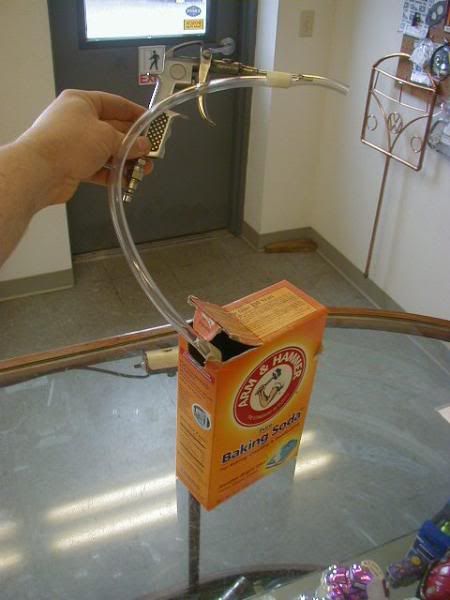
Blast them!! "But wait", you say, "Blasting my carbs will fill them with grit that I'll never get out and my expensive carbs will
be ruined." The solution is to use baking soda as the media. Yes, common, household baking soda!! "But don't I have to own a blasting
cabinet or pressure blaster in order to blast my carbs??" The answer is NO. Below is a list of the items you need in addition to an air source
like an air compressor (and you don't need a large compressor either):
-1 - air gun attachment
1 - two foot length of 7/16" clear vinyl hose
1 - one foot piece of wood dowel, metal rod or thick wire
1 - box of baking soda
1 - small roll of tape (masking or duct)
1 - sharp knife (or razor blade)
You start by cutting your length of vinyl hose approximately 2-2.5 feet long. Vinyl hose is available at home stores like Home Depot, Lowes, etc. for
around $2.00 for a 10 foot roll. Then measure from one end in about 2" and mark it with a Sharpie.

Take your knife or razor blade and make a small cut across the hose ONLY through one side. The cut needs to be just large enough so that the tip of
the air wand attachment will stick into the hose. Stick the tip of the air wand into the hose and let it stick in about 1/4" - 1/2".
Positioning your wand tip like this will create a ventricle effect in the hose causing the soda to be pulled up from the box and mixed with the high
pressure air from the wand. Use one length of tape to wrap around the end of the air wand and hose. This will keep the hose in the proper position on
the wand tip during blasting.
I cut the other end of the vinyl hose at a 45 degree angle to allow better flow of the soda into the hose. Then I tape the piece of dowel, metal rod
or wire to the other end of the hose. This will help keep it from curling up in the box of soda and help you keep good flow into the hose.
Now you have your ultra low-tech & cheap soda blaster ready for blasting!!
WARNING: Blasting should ONLY be done outside in a well ventilated area such as a patio or concrete driveway. Of course proper eye protection and a
face mask should always be worn. Baking soda is not poisonous but it feels like your breathing a soft drink if you inhale it and it's irritating,
so protect those lungs!!
Baking soda will get all over you and the surrounding area, but don't worry, it won't harm anything. Just wear some cloths you don't
need to wear for a hot date later because they will be coated white when you're done. Adjust your air pressure to about 80 - 90 psi on your
compressor. You only need to hold the blaster tip about 6" or so from your carb parts and begin the blasting.
Soda is a soft media and will not harm the factory finish of your carbs. It removes all organic matter from the carb bodies as well as heavy corrosion
scale in aluminum. It will not remove rust or corrosion from steel hardware; it only removes the scale build-up. You can freely blast into passages
and the carb bowls since soda dissolves with water!!
Once you are finished blasting, simply place all your parts into a pot of warm tap water. The soda will dissolve into the water and leave NO RESIDUE
behind. Then blow out the passages with air just as you normally would and your carbs are ready for re-assembly.
The mess on the concrete cleans up just as easy. Simply spray it down with the garden hose to dissolve the soda. NO caustic chemicals to seep into the
ground water for future generations to deal with; this is a real "green" solution to carb cleaning and it's inexpensive too.
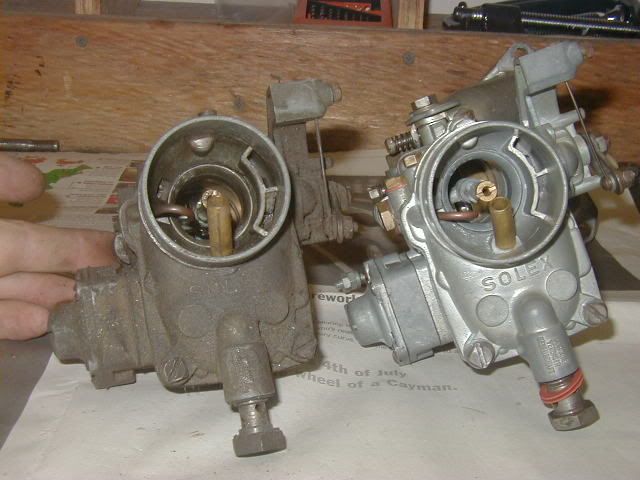
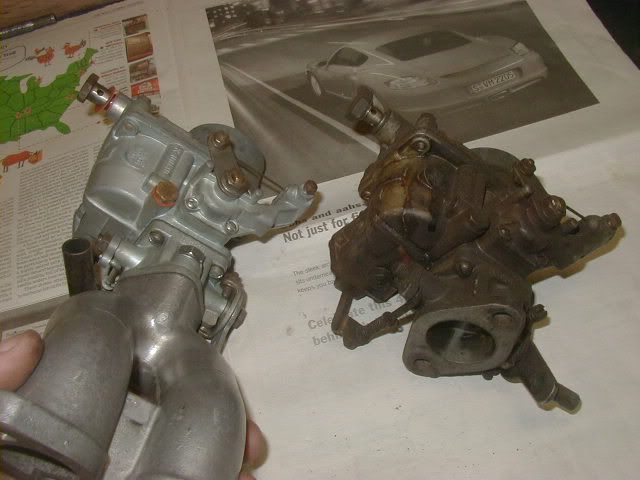
Below are a few before and after photos of some rare Porsche 356 carbs that I cleaned with this exact low-tech blaster. The results speak for
themselves. Total cost for this blaster is about $5 including the box of soda!! So the next time you need your carbs cleaned, give this AircooledTech;
Tools-on-the-cheap soda blaster a try and see what you think. I'll bet you never go back to chemical carb cleaners again!!
fond this info on a vw site.
[Edited on 3/4/09 by thunderace]
David Jenkins - 3/4/09 at 03:12 PM
Right - that's one very useful bit of info for my bookmark list!