Barkalarr
|
| posted on 27/4/15 at 04:14 PM |

|
|
Camera Settings For Awesome Photo's At Stoneleigh
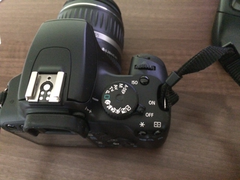
For my birthday a few years ago SWMBO bought me a Cannon EOS 1000D. I've never bothered to read the manual, and not really used it.
With Stoneleigh coming up, I figure it's going to be a good idea to take the camera and attempt to get some half decent shots.
My question is.... how do you drive this thing ?
There are loads of settings, so assuming it's a decent bright (ish) day, what settings do I need so that I can blur the background and the focus
is on the foreground image ?
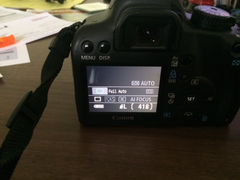 
Description
Description
I know nothing about camera settings or how to use it but would like to understand what the main settings mean.
ISO
W/B
AWB
AL FOCUS
etc, etc.
|
|
|
|
|
AntonUK
|
| posted on 27/4/15 at 04:24 PM |
|
|
It will really depend on the amount of available light, lens choice etc.
Unless you want to learn the exposure triangle before now and then, I would put it in P mode, set your ISO to auto, and rotate the wheel under the
shutter button to get the smallest f number (aperture) that it lets you do.
Concentrate on composition before worrying about settings etc.
Build Photos Here
|
|
|
AntonUK
|
| posted on 27/4/15 at 04:26 PM |
|
|
If you do want to learn the settings and what they all mean, YouTube has loads of great videos
Build Photos Here
|
|
|
theduck
|
| posted on 27/4/15 at 04:48 PM |
|
|
What anton said, but you want it in Av not P.
For basic composition ideas look at this link -
http://www.nikonusa.com/en/Learn-And-Explore/Art
icle/h7dfrceh/5-easy-composition-guidelines.html
Also, when grouping (taking pictures of multiple cars for example) try and keep groups in odd numbers.
[Edited on 27/4/15 by theduck]
|
|
|
Barkalarr
|
| posted on 27/4/15 at 05:09 PM |
|
|
quote:
Originally posted by AntonUK
If you do want to learn the settings and what they all mean, YouTube has loads of great videos
I'm such an idiot - I didn't even think of that ... doh !
|
|
|
HowardB
|
| posted on 27/4/15 at 08:11 PM |
|
|
There's a great lifehack thing too
linky
Hth
Howard
Fisher Fury was 2000 Zetec - now a 1600 (it Lives again  and goes zoom) and goes zoom)
|
|
|
rusty nuts
|
| posted on 27/4/15 at 08:30 PM |
|
|
RTFM?? I know blokes don't normally but it sometimes helps
|
|
|
Barkalarr
|
| posted on 27/4/15 at 09:30 PM |
|
|
quote:
Originally posted by rusty nuts
RTFM?? I know blokes don't normally but it sometimes helps
Can't do that.... It's in my DNA !! lol
|
|
|
austin man
|
| posted on 27/4/15 at 10:05 PM |
|
|
use the rear screen set it in aperture priority mode probably the AV on yours, the lower the number the more light it allows in when indoors (not well
lit) changing the ISO setting to a higher number increases the light as well the bigger the number the lighter the picture. Have a play around in the
house in different lights you will get the hang of it
Life is like a bowl of fruit, funny how all the weird looking ones are left alone
|
|
|
dubzter
|
| posted on 28/4/15 at 07:22 AM |
|
|
Agree with all of the comments above, set it in AV mode, auto iso, set it to the largest aperture (which is the smallest F number) this will let in
the most light and help you to blur the background. Then practice, practice, practice.
I'm guessing you probably have the kit lens (18-55mm) that came with your 1000d so the smallest aperture will be f3.5 at 18mm (wide angle) and
f5.6 at 55mm (zoom)
_______________________
Blog
Facebook Build Thread
Haynes Forum Build Thread
Locost Builders Build Thread
|
|
|
Ugg10
|
| posted on 28/4/15 at 08:35 AM |
|
|
I would also make sure you show in RAW format so that you can use the free Canon DPP software to change exposure after the fact, not possible with
JPGs. These are quite large files but can get you out of quite a mess if you forget to use the right settings.
The AVForums Digital Photography group is quite a friendly place (as photo forums go) to ask questions as well.
https://www.avforums.com/forums/digital-photography.80/
Worth investing some time understanding the "exposure triangle" (loads of explanations on the net/youtube) i.e. the relationship between
shutter speed, aperture and sensitivity (ISO). Once this has been mastered then look into depth of field.
I would just go outside with your car on the drive or just in your back garden) and blast off a couple of hundred photos (they are free on digital
cameras) and see what you find out. Do this methodically and you will soon pick it up - Set it to M (manual), fix the ISO (say 400) and then change
the aperture for a fixed shutter (say 1/200) and see what happens and then do the opposite, fix the aperture (say f8) and change the shutter, finally
fix the shutter/aperture (1/200, f8) and change the ISO. These settings should work on an overcast day.
Note - the aperture figure (f number) defines the size of the hole in the front of the camera (low F number equals big hole therefore loads of light
reaching the sensor), the shutter speed is in 1/x of a second (large numbers equals short amount of time the shutter is open therefore little light
reaching the sensor), ISO is the sensitivity of the sensor (gain), large ISO number equals more sensitive (for dark situation) but this comes with the
penalty of electronic noise on the photos. Therefore you can see that you can trade off aperture for shutter (fixed ISO) depending on the situation
e.g. for sports photography you may want to stop action so need a quick shutter speed (1/1000 say) and therefore will need to use a large aperture
(small f stop f2.8 say) and maybe up the ISO (1600).
One final pointer - depending on the lens (whether it has Image Stabilisation) then your shutter should be no slower than 1/(lens focal length) - so
if you are using the 18-55 kit lens then for hand holding the shutter should be no slower than 1/25 to 1/50s typically.
---------------------------------------------------------------
1968 Ford Anglia 105e, 1.7 Zetec SE, Mk2 Escort Workd Cup front end, 5 link rear
Build Blog - http://Anglia1968.weebly.com
|
|
|
alex1991
|
| posted on 28/4/15 at 10:08 AM |
|
|
You can get cheap (<£100) prime lenses for the Cannon that have a low aperture (1.8).
they work really well for the price and are good for car pictures.
|
|
|
theduck
|
| posted on 28/4/15 at 02:25 PM |
|
|
Couple of basic tutorials
Aperture - http://img07.deviantart.net/798b/i/2015/102/4/3/apertures_by_stumac1985-dv7fl3.jpg
ISO - http://img00.deviantart.net/333f/i/2015/102/0/1/iso_tutorial_by_stumac1985-dyerdx.jpg
All taken on an olympus E1
|
|
|
AntonUK
|
| posted on 28/4/15 at 03:55 PM |
|
|
I still think beginners should start with P mode until they learn what the camera is doing for them. It takes care of the less obvious stuff such as
metering, and focus modes, with Av the OP would need to set these manually.
Shoot JPEG fine + RAW, then you have the opportunity to do some post processing should you wish to get into it at a later date.
As said, forget the settings (even auto is fine) and concentrate on compositional rules such as rule of thirds and leading lines. Composition is much
harder to learn than the technical aspects.
Good luck.

[Edited on 28/4/15 by AntonUK]
Build Photos Here
|
|
|
dubzter
|
| posted on 28/4/15 at 08:28 PM |
|
|
haha I like that.
_______________________
Blog
Facebook Build Thread
Haynes Forum Build Thread
Locost Builders Build Thread
|
|
|


.jpg)
.jpg)


