
Wide body panels
phil_far - 17/4/05 at 02:44 PM
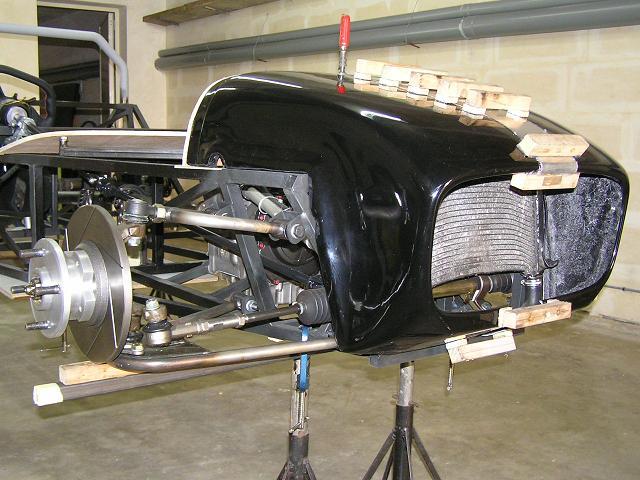
Gents,
A couple of months ago I have asked for advice on the above subject. Most of the builders suggested cutting the body and attaching a pice of aluminium
by riveting it to the body. Well after a chat with a friend of mine and another guy who repairs boats for a living, they suggested that there is no
need to drill the body through. They use 'hot glue gun' which stcks to fibre very quickly and with a little side force could be
'snapped' off and the rest 'peeled' away. They suggested that a 'U' shaped wood formers are used so that the middle
section would not sag and then insert the aluminium strip in between and again glued. I am attaching the photo of my nosecone prepared for the fiber
layers from beneath. Hope it will be of some help
Regards


Rescued attachment P1.JPG
longwayoff - 17/4/05 at 03:29 PM
That’s roughly how I did mine but I used Aluminium strips with holes drilled in them stuck in place on the underside with fibreglass paste. When I had
finished the topside I layered up the underside with glass mat.
The only thing I would say extra is to chamfer and feather the edges of the cut section well back by at least ˝ an inch with a grinder to avoid cracks
appearing later in the top surface where it joints meets the bit you have just put in.
I cut my nose and scuttle over three years ago and no crack yet but my mate who did not bother is now sporting parallel cracks running up his nose
cone and scuttle
phil_far - 17/4/05 at 04:35 PM
Yes, I forgot to mention the chamfer on the edges and they also advised to cover the aluminium strip with packing tape (the brown one) ensuring that
the fiber does not stick to the plate.

Volvorsport - 18/4/05 at 07:42 PM
grp doesnt stick to ally
Simon - 18/4/05 at 07:52 PM
Phil,
Again, same method, except materials wise, I used three of pieces of wood - one at rear and two at the front - just to keep the two halves apart.
For the "mould" I used 1/32" or 1/64" (can't remember which I'm afraid) ply taped in place with brown tape.
Covered the visible ply (from the inside) with tape and laid up.
ATB
Simon
Triton - 18/4/05 at 09:49 PM
There is an easier way to make it wider but if you cut it first you are stuck with bodging it back together..........but it's a secret
robinbastd - 18/4/05 at 10:17 PM
Out of sheer cussidness I'm going to jump in with a suggestion. Sorry to Mark if I'm right!
Why not make a mould of the top and front of the existing nose cone first. Then cut the thing in half,lay up a new piece from the mould and join it
between the two halves.
Ian
Triton - 19/4/05 at 06:25 AM
almost but not quite
timf - 21/4/05 at 08:28 PM
whats the secret then mark ?
robinbastd - 21/4/05 at 08:43 PM
Lay up a mould taking in all of one side and go 2" past the centre line,do the same on the other side. Join the 2 halves together and lay up a
+4" nosecone.
Alternatively,and far easier, buy a wider nosecone from Mark.
Ian
Triton - 25/4/05 at 05:06 PM
Pornselling cornish bloke,
You were closer with first idea....this is the craponit factor puzzle.
