

Well I've gone and done it again.
I've bought back my old locost project after finding out the current owner hadn't touched it since i sold it to him nearly ten years ago.
Am getting it picked up tomorrow and brought to a garage near me where i'll have to strip it back down and replace lots of the kit.
Having driven a Caterham for a few days recently i expect i'll be trying to squeeze in a few upgrades along the way, but my initial thoughts are
to get it back to a driving stage and then deciding on either the IVA route or track day machine.
Jason
Please for you, but wish mine could come back 
Cheers Steve, I guess some of the WLM crew may get asked a few questions while i put it back together and decide on final route !! 
Here's a pic of the progress so far.

Jason
quote:
Originally posted by Deckman001
Here's a pic of the progress so far.

Jason
 )
) 
Sadly I couldn't re-size the pic, will try harder next time once I've worked out how to 
Jason
Great news mate!
I'm not sure I ever saw it finished actually! 
Cheers,
J
Sadly I never managed to get a pic of it just before I sold it about 10 years ago, it did have mainly blue bodywork but with black front arches and a
yellow nose cone.
It drove perfectly from Croydon to Reigate using trade plates as all electrics apart from the speedo worked and was virtually ready for SVA at the
time apart from the soft bits.
When bought back, I found the brakes seized and bodywork wrecked, so they were my first steps getting it back to how it was. Next will be mirrors and
ignition system to be replaced, then with any luck, and i hope i get some, it won't be long till i have to get it to Kent to get it tested,
that'll be a nice first drive out in it for me, no pressure !!
Jason
Hi Jason nice to see you back,shame that's ten years wasted.
Hope you are keeping well mate, if you need anything give me a shout as i still have few bits left over in the garage.
Decent autojumble Sunday 29th February at Ardingly if you are interested, i'm planning to go and catch up with couple of old members.
Hi ya Bob,
Long time no see !!
At the moment I am building up the soft bits for IVA and i still need to make sure what front indicators i need if they can help cover up as much as
possible at the front chassis/top front wish bone area ?
Any advice from anyone is very much appreciated ! ! 
Am thinking about some front indicator pods like Caterhams use, or maybe just stalks that stick out each side like Andy's blue car Indy had?
Jason
Jason
I used the same indicators on the nosecone as Andy and extended them by 5" using black plastic 15mm conduit,this extension actually worked well
for me at the test.
The indicators were rear motorcycle and i'm pretty sure a picture should be still available in my photo archive.
[img]http://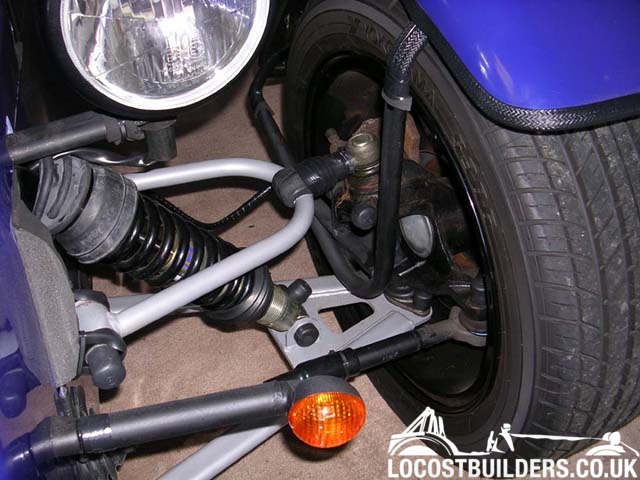 [/img]
[Edited on 9/2/20 by bob]
 Wow Fab pic Bob,
That's a great pic just like what i needed to know !!
Jason
Just a thought, how do i get pics uploaded? I've tried JPG and JPEG's but only the first pic of the new bodywork was accepted ? 
Jason
It seems to have changed a little since i was posting pics on here, much easier to sort the avatar from the photo archive now.
Have you tried loading pics to your archive first ?
Hi Bob,
Yeah I took pics on my phone, emailed them to my desk top comp, then saved them, jpg, but apart from the first time i managed to upload the new pic, i
can't seam to get any others uploaded using the same method 
Jason
Jason sadly i can not make the Ardingly Autojumble on Sunday 23rd Feb, but i am still going to the classic bike jumble and show on Sunday 29th March at the same venue.
Hi Bob,
That's a shame, I was hoping to catch up with you all, I'm hoping soon that all I'll need is soft bits for IVA
Jason
Awesome!
I often wonder what happened to mine....
quote:
Originally posted by flak monkey
Awesome!
I often wonder what happened to mine....
So far so good i think, I've refurbished the front calipers so working great now along with changing the brake fluid and bleeding all round,
changed the bodywork and refitted the lights. Engine has had an oil change along with a new ignition system and a carb drain down and clean out.
Fitted the now required reversing light as I had already pre wired it. When i took the centre console off i found that I had done a proper job with
the hand brake that i hadn't remembered, i had also fitted the speed sensor required which i also hadn't remembered !! They were a great
result !!
So engine now runs, timing set and drives forward and backward in the garage, what a feeling again !! 
So as far as my limited knowledge can see, I only have a few bits left to do before it goes for a shake down, sort out and mimic mot from an MOT
centre boss i know well.
The missing bits are,
1. Front indicators extendable by about 90mm to get them to less than 400mm from outside edge. ( anyone got any they used for IVA and now replaced
?)
2. Interior mirror that lets me see the line behind the car during the IVA, will need to check the car when out of the garage to see what I can see
with the near side and off side mirrors in case they possibly make the interior unnecessary ?
3. Rear boot cover, I like the softbits for 7's version, so am hoping they are still making them to order.
Then it's just IVA soft bits that cover bolts edges and possibly the shock base area.
With the above in mind, would anyone with IVA experience possibly be able to pop along one evening or at a weekend to look it over with a critical eye
to give me some advice as to what I've missed and should do before I book the IVA test ?
I am based in South Croydon, Surrey.
Thanks
Jason
When I use an electrical connecter on a cable like that I first cut the black plastic insulator off, makes it look a bit neater
Regards
Fred W B
Hi Fred,
Thanks for that, I've now ordered a new end of cable thing which will get fitted this weekend and hopefully can then test run the motor once
again to put a smile back on my face 
Jason
Hi Bob,
I've sent you a U2U,
Just wondering what bits left in the garage are ?
I've almost finished the main car build, just a few bits of tidying up ready for IVA, I think I've found some rubber trim to cover the side
of the cockpit internal edge to hide that, I need to sort an IVA proof cover for the cockpit side radius by the side of the seat, was thinking of
getting some alu to bend to shape and turn down the sides to cover the whole top radius and then cover it with the same soft material that I've
covered the tunnel top?
Indicators are getting there, have got some, just need to extend them about 90mm and make it look professional !! eek.
Jason
quote:
Originally posted by bob
Hi Jason nice to see you back,shame that's ten years wasted.
Hope you are keeping well mate, if you need anything give me a shout as i still have few bits left over in the garage.
Decent autojumble Sunday 29th February at Ardingly if you are interested, i'm planning to go and catch up with couple of old members.
It's getting there

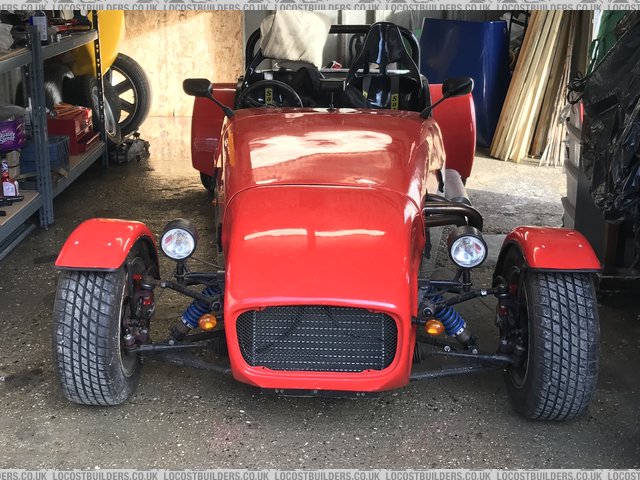
New Look
Yes I know the front indicators are a fail, I'm getting them sorted this weekend I hope 
Jason
[Edited on 10/3/20 by Deckman001]
Revised throttle linkage, thanks to Sera 

Description
Jason
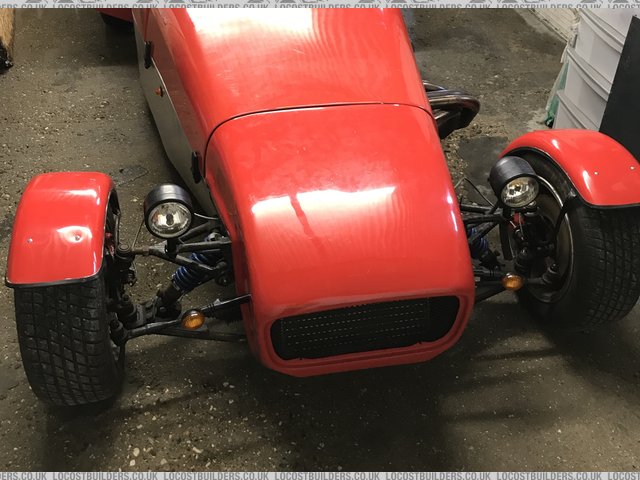
Well, I'ts mostly finished so went off to this afternoon to have the suspension and geometry set up ready for the IVA.
Here's a pic before it was driven off by the set up guy on trade plates.

Description
Jason
Sadly have just a txt from the driver saying the diff sounded very loud, looks like i might have to get that replaced or repaired before the IVA test

[Edited on 18/3/20 by Deckman001]
Just a quick update as the car is now at the garage being set up properly, The Diff on the drive there was so noisy, the guy needed earphones to
concentrate, so I've asked him to drop it out seeing as he said it's an easier job at his garage with ramps and all off his tools. He's
going to asses it once it's out and give me a call about it, he has a guy he sends axles and gearboxes to, so will get a price when he knows a
bit more 
At least while it's there he can sort the VIN plate and chassis number though 
Jason
Well, Just had an update on the Diff, It's a 3.54, he showed me the tag bolted on and just needs a full bearing kit so all ordered and it might
start going back together next week.
So am just wondering, with a tuned 1600 x/flow fitted with a type 9 g/box attached to a 3.54 diff driving 13" wheels with normal Locost racing
tyres type fitted, will i get decent acceleration with a limited top speed?
Jason
quote:
Originally posted by Deckman001
So am just wondering, with a tuned 1600 x/flow fitted with a type 9 g/box attached to a 3.54 diff driving 13" wheels with normal Locost racing tyres type fitted, will i get decent acceleration with a limited top speed?
Jason
Ha Ha, although I know i love speed, I wasn't intending to build a rocket, I just love the feel of my car and the open air driving it gives, I
would though like it to be a good drive with some sporty acceleration as Iv'e got friends who want me to take it to track days with them in their
modified road cars and heavy race cars 
Jason
Hi all,
Just to give an update, I should get it back by Wednesday next week as the space is needed in the MOT shop !!
It's been set up as a Cat Supersport so should be good for the road or track depending on IVA.
Have fitted the new side repeaters to the front cycle wings, and fitted a new suitable relay to reduce the flashing rate due to some led bulbs
used.
Axle and diff have been out and overhauled, new bearings all round should cure the whining 
Ignition timing has been checked and the advance reduced as i had temp set it up way to advanced, oops.
Tappets have also been checked and adjusted, thought id done that, but apparently the exhaust clearances were all over the place, but always too big,
so hopefully it'll be quieter too now.
My friendly MOT man knows the IVA guy who used to work at the local but now closed centre so is going to ask him to look my car over for obvious
things that can be sorted before i go to IVA.
I await a reply from K and R DVLA for my chassis number so will just keep tidying things up as best as possible during the wait and also learn to sew
myself a rear boot cover, eek.
Jason
I received a great comment from the guy who drove my locost back to me from the garage it was being set up in. He is the owner and the guy who did the
set up for me.
He said " F*** it's quick !!" 
Jason
So, a few more jobs crossed off the list.
top side rail covered as well as the curve by the exterior arm curve
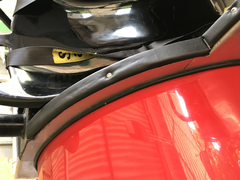

Description
I have also drilled and put a split pin through the bias pedal box adjuster bar. No pic available as it was a nightmare just to complete that !!
Replacement passenger seat installed so no cracked fibre glass sides to repair before IVA, drivers seat re-positioned to give a little bit better gear
stick access for shorter people.
Steering wheel spokes covered with vinyl so that no holes exposed.
All in all a few good hours done to the car 
Jason
Good to see the progress mate- well done!
Cheers, I'm hoping to get it on the road by the end of summer, but am still waiting for a chassis number before I can book an IVA test.
James, How did you cover your steering column ? did you use a std shroud or do something else ?
Jason
Another recent pic of my car, Sadly my daughter was playing with her phone options, and slightly changed the colour !!
Description
Jason
Another pic, the newly fitted rear springs, it now bounces at the rear too 
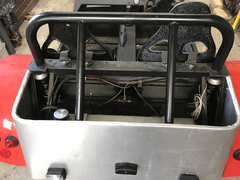

New springs fitted
Here's my first attempt at a rear boot cover, not too bad me thinks,

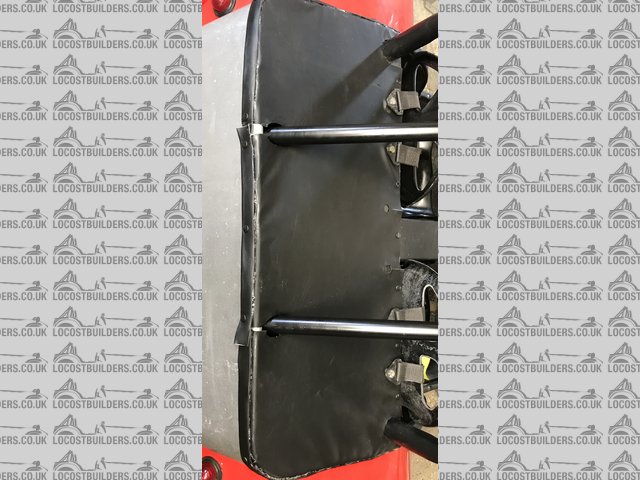
New rear cover
Jason
Another quick update,
Chassis number received, have stamped it on the top rail near side ali cover from the sides, this was to test what i could do and it looks pants so
good job it's not where it's meant to be, so have ordered a blank vin plate and will stamp that and attach it where it should be on the off
side top rail.
Have tidied up loose wiring under the dash, so no loose cables are clear to see of hanging below the dash.
Have sealed up all gaps in the foot well and tunnel areas.
Steering column is now covered where the cables were exposed.
Jobs still to do.
Will get some satin black paint and clean up the cockpit floor and sides where needed to make it look fresher.
Try to retrieve my engine number that was skimmed off during a decking job by the original owner, if that fails, I'll need to get another
one
Try to get the GSXR 600 srad bike carbs looked at the get an even better balance from them.
Fill in IVA forms and sign my life away !! 
Jason
[Edited on 19/7/20 by Deckman001]
I think you will find the VIN should be stamped on the chassis, VIN plates are normally alloy and you need one of those as well.
I bought some strip steel and practiced with it until I was happy with the punching and then welded it to the top rail. You could always get an
engraving shop to engrave the number on a strip and weld that.
quote:
Originally posted by Schrodinger
I think you will find the VIN should be stamped on the chassis, VIN plates are normally alloy and you need one of those as well.
I bought some strip steel and practiced with it until I was happy with the punching and then welded it to the top rail. You could always get an engraving shop to engrave the number on a strip and weld that.
I can't remember the exact positions but the manufacturer's plate should be on the bulkhead drivers side and the chassis number should also be stamped/engraved on the chassis on the drivers side.
When I did mine I had vin number in one obvious place (under bonnet) and repeated it elsewhere so, i guess if some scummy little toe-rag nicked it and ground away the obvious number, you could prove ID by showing the hidden one.
Ok guys, many thanks, I'll fix the ali plate one to the bulkhead drivers side, get a steel plate stamped welded to the top rail drivers side to
hide the chassis rail where i tried to do it myself and failed !!.
That and use a smaller hammer to get a bit more control over it aiming at the stamps. I only just have all my digits after smacking a finger half way
through doing the first steel VIN stamping 
Many many thanks guys.
Jason
quote:
Originally posted by Deckman001
Cheers, I'm hoping to get it on the road by the end of summer, but am still waiting for a chassis number before I can book an IVA test.
James, How did you cover your steering column ? did you use a std shroud or do something else ?
Jason
quote:
Originally posted by James
quote:
Originally posted by Deckman001
Cheers, I'm hoping to get it on the road by the end of summer, but am still waiting for a chassis number before I can book an IVA test.
James, How did you cover your steering column ? did you use a std shroud or do something else ?
Jason
Sorry- only just spotted this by luck!
I used the boring old Sierra column shroud as by luck it fitted perfectly.

Hi all, well just an update. I took the car for a fill up with fuel and drove it to my local mot guy to get the chassis plate welded in. when i got to
him i found out that i had a petrol tank leak so had to drain out what was left so that the welding could carry on. Got it back home and tried to
strip out the tank, but it wouldn't come out so just managed to get to the offending cover plate and strip that off too, cleaned it all up and
resealed it and all seams good now. So that was refitted, and moved onto the lack of caster angle.
Found about 3mm of movement on the top wish bones which when rebuilt and test driven it felt so much better i couldn't stop smiling. It still
isn't enough for the IVA test, so I'll be doing the same on the lower wishbones and moving them forward by hopefully the same 3mm.
The trials of building a kit car eh !!!
Jason
Jason.
You get my stamp of approval 
From memory, the castor angle in the book was 5.3 % but never got a good result from that, and in the end had 7%
I have a proper gunsons guage to do castor/camber, you can borrow, if you are down my way
One of these
https://www.ebay.co.uk/itm/Gunson-77066-Trakrite-Magnetic-Camber-Castor-Gauge-Aligning-Tool/172500502021?epid=15017008822&_trkparms=ispr%3D1&h
ash=item2829d4c605:g:QHYAAOSw5cNYiMqQ&enc=AQAFAAACYBaobrjLl8XobRIiIML1V4Imu%2Fn%2BzU5L90Z278x5ickkSG%2BOFgrj2Yvbvmrj2TAdM8QxZfzsRYKfSC7djaIHwf4wzF
QEPENgO5YSzZiKyINDgAmwl7JenT%2FBRpRVARAynv5Ml4e5OaoSLlv9yDyU6Qoi3%2Fi6zuIJPmNZvT7B0zMmL2msIULEGqTo21K7FjWhu2mU2sbx64JlKVIAiY1gKJVyn5WaccU9PstHND49arap
iIE9zCsPVGNOUAVB8i3UkxeiIjk0J0Mqn3s1OHTOiE2A9G69LziAiZGsG2UhDWYntWdUqk7xhDCzWkbh%2FML0b3f295iJwssPOBzbXc02BuE%2Bk77bWy44HB%2BOnNqugdbOlEk0cqX7wM9SIDxT
E0HYz%2FNFLUzWIsNhb2nhvk9jv2mKIcG31Y7iP1PwP%2FezcFYX7B6AHcDYLhNGwT8mSmB%2F3wuircKiQf5%2BMMK%2Fa3NOKzpbw2jhPxKOiIJFLY2CfLUVK%2FVYeo%2FAcuqsSJXWnphUJ5Sq
kiurCxkkRzMyFwd9C0NE5%2FtvT%2BDc7DOhHgytjZp8nmo%2FubJ9swKbyaxqYNa5RP%2B9iUnsPfdgptT9Cz73IkO9qr3KPZZnmKtcBQQoD4%2BbxAhBjluXStRdHjHVQUymc%2BW34mzaJT6%2F
ilTD5wuP9cU%2FPuBpvHHwDx3Dieja0RTUcLO3U5P16Pn3H4HoWWZWf80192%2BWwYSvgLoUdHoZdhJV9YV2cHpSVZAHLXH4NQajtLFtLX%2FXgimaspNhbx%2F7spy2ju%2FLnnZk1Zfe5W3vK%2B
TJRBicOorCZiFlL5UNNrMr&checksum=1725005020213c8b32e5c5fb440a96598e60987c9ef7
steve
[Edited on 3/8/20 by steve m]
Hi Steve,
Many thanks for that. Am going to do the lower bones first and see if i can borrow his trade plates again for a trip up the road to see if it's
worked.
If feels so much better already, I'm now confident to take my hands off the wheel knowing it won't try and kill me straight away by pulling
to one side or the other !! So i hope im going in the right direction enough to just get a pass on it with self center'ing just starting when he
tests it.
Oh, and the fuel sender unit turned out to be rusted up, so that had to come out and get cleaned up, it now works 
Speedo is reading a little high, but it is the right side of accurate, does anyone know how accurate it needs to be ?
Jason
Jason
What tyre pressures are you running, as I found, that 17psi was spot on, and anything over 28 was like driving on ball bearings
although for IVA a lot of cars went through with 30 plus in the fronts to aid the self centering
steve
Hi Steve, to be honest I've no idea. They don't look very high pressurised, possibly a little low. So putting upto a full load 30psi might
make it better then just for the IVA ?
Jason
Just an update.
I gave up with the fuel sender as it was very dodgy so a direct replacement is now fitted and i now have a fully working dash once again and seeing i
have half a tank is a nice feeling.
Speedo is definitely too high, so have found instructions online to calibrate my unit so I just need to get out in it and drive a set mile and it
should then be perfect.
Ball joint cover has been replaced with a correctly sized unit and that's the last bit to do before the test as far as I can see.
So i bit the bullet and applied on line for the test  so just waiting for then to reply asking for the money and setting a date or setting up the
remote test preferred by me if they can.
I keep going out to the garage and can't think of anything else that is needed, maybe a need a few more fresh eyes looking over it before I get
it tested ?
Chuck a bunch of photos up to get some help on projections etc.
How is it for decibels/emissions etc- things a little difficult to help with via photo! ;-)
Well, this is how the front looks


Description
and this the sides


Description
and from across the road

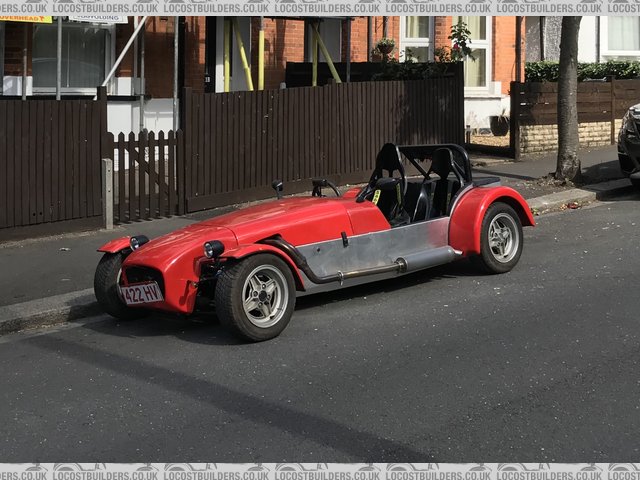
Description
and the back end doesn't have any great detail pics yet 
But it is now covered and the chassis and wishbones have been repainted so looks a lot tidier
Jason
[Edited on 24/8/20 by Deckman001]
Bit hard to see the detail mate.
Might be worth starting a fresh thread when you've got a bunch of detailed photos (assuming you want the collective to give it the once over).
Not seeing a side indicator though? Or is it the black circle a little behind the front wheel?
Sorry about the small pics, Side repeaters are front cycle wing mounted as pre SVA ones were fitted where the black blind grommets are now fitted.
IVA application has just been rejected stating no accompanying documents received !! Bloomin online form didn't let me include them when i
applied !!
At least they haven't charged me for that attempt though so will try again when i get a bit of time.
Although I might try and sort the lack of engine number issue before i try again.
Jason
Well another update, Just been out to the garage and had another look around to make sure it's ready, hoovered it out and cleaned it up a bit.
Checked the lights, all work correctly 
Engine started first turn of the key 
Ran it up to temp and waiting for fan to kick in, which it did perfectly 
Cleaned up the potentially leaking sump, and checked it with a clean rag after getting up to temp and after a few fan kick ins, no new oil on the sump

Gave it a go to drive it out of the garage, fail yet again 
Will need a few more scaffold boards for easy access to get it down the ramp, at least it's not steal-able at the moment !! 
Jason
So, my application failed again, this time though they gave a reason.
1. Please can you provide the vehicles gross weight. D'oh what an over sight by me 500kgs ?
2. Please can you provide a completed amateur build declaration (IVA 4). I bought a part rolling chassis over 14 years ago and built it up from there,
no records are available now, how can i get round what they want ?
3. Please can you provide copies of receipts for major parts in your name. again, no major receipts apart from ebay and such sites, will they do ?, am
trying to get the car sale receipt to me from who i sold it to over ten years ago but it's proving difficult. 
Jason
Im sure i sold you the engine gear box, back axle, all the whishbones, seatbelts, etc etc
You must of lost the reciept
steve
quote:
Originally posted by steve m
Im sure i sold you the engine gear box, back axle, all the whishbones, seatbelts, etc etc
You must of lost the reciept
steve

Hi all, some receipts added along with the story of the build and sale and buy back so fingers crossed, another ten day wait will get me a test to
fail at :-)
Jason
Well, The last application has passed so I have a test date now booked !!
Although they just cancelled that date 
But then gave me another date, 28hrs earlier then the first date !!!!!
Wish me luck, am hoping for a small list of fail items, as I've not built a car before so I do expect that some bits aren't right.
The last time i was able to put trade plates on it and get a little drive out , it felt so good I couldn't stop smiling and I got lots of smiles
and waves from people i didn't know !!
Jason
Hi all,
Well, the test went better than expected. Even though i knew I'd fail on some points due to not knowing much about what was needed, I passed
quite a few areas I had expected to fail in and failed in some i expected to pass in so over all it was a good day.
I think I have a bout 26 fails, and have completed 15 already. 4 more to be done this next week and I think by the end of a few weeks all I'll
have left to do is sort the headlights and engine emissions, plus the missing self centreing on one side.
Engine is a 1600 x/flow with spark rite Stealth electronic distributor, coil and leads, new plugs BPR6ES and recently timed by an mot man. The carbs
are GSXR600 SRAD on a Bogg Bros manifold.
CO passed with 4.50 max actual V 0.24 PASS
HC ppm 1200 max actual 1388 FAIL
If anyone knows how best to reduce the mixture on these carbs and it only seams to have idle jets that need cleaning when it won't idle and fixed
main jets so am slightly at a loss the resolve this with the carbs ?
Self centreing, should be easy to resolve by getting the car back on to a laser level set up now that i have taken the wishbones of and upset all the
pre set up data.
What is really nice though is the fact that on the fail form, it says I can drive the car to a pre-arranged booked in appointment to fix fail
issues.
Jason
Just another update, I've nearly finished all the fails I could sort, new headlights and brackets being fitted tomorrow along with the
manufacturers plate being fitted, and then its just some welding, steering and suspension set up ready for the self centring and emissions to make the
engine run a bit richer.
Jason
I would start with the basics , check and adjust the valve clearances ( tight valves will cause high HCs and also will give a low CO, cause stalling, lack of power and poor starting) make sure you use the correct settings for the cam in your engine, usually with the engine cold . Leaking valve stem oil seals and worn rings/ pistons/bores will cause high HCs . Worth carrying out a compression test , dry and wet . Timing can and will have an effect on emissions, unless you know for certain the correct setting has been used. Vacuum advance unit should be tested as should centrifugal advance . Only after checking and adjusting all the above check and adjust the carbs , balance and mixture , I have had a weak mixture cause high HCs .
Cheers for that and Iíve passed it onto the guy who may be trying to sort the emissions this week. So I mounted the headlights and wired them up,
allís good there. Mounted the manufacturers plate as well as the brake reservoir and no leaks visible,( will give that one a week to prove itself)
I have also raised the needle on my bike carbs in anticipation of the emissions testing and restarted the engine on second turn of the key. So allís
good as far as I can tell.
At the moment I only get to the car each Saturday morning due to working daft hours each day so incompatible with the garage where the car is now
situated on a ramp for fantastic underneath access.
So all in all, I think I just need to get the welding done, headlights set up, tracking sorted for self centering and the emissions for c/o and h/c.
so not a massive list to get done and he says he'll try and get those last bits done this next week.
[Edited on 22/11/20 by Deckman001]
[Edited on 23/11/20 by Deckman001]
Hi all, Well I have found out why my emissions were so bad, it was running on only 3.25 cylinders ! as well as needing the carbs to be re-jetted.
So carbs sorted, and fired it up and c/o was ok but hcc was way over the limit. So we checked the sparks thinking one was bad and the back cylinder
was running a lot cooler. checked the plug, very wet so did a non firing pressure test and was fantastic readings , then confused, we did a firing
pressure test and low and behold a dodgy cylinder showed itself. So head is going to come off over the next day or so to get a look at the valves and
seats, and depending on results, I might bite the bullet and get new hardened valve seats fitted so that I can then fill up with unleaded, but this
will all depend on the head removal results.
Rusty, you were spot on, well done matey !!
Jason
At least you have found the cause of the problem , it might be worth checking the valves and seats then lapping the valves in if you intend modifying the engine at a later date rather than fitting unleaded seats now?
Just a thought, have you checked how far each valve is actually opening? Iíve known camshaft lobes to wear causing problems
Yeah at least i'm heading in the right direction now, We didn't check the opening measurement, I just accepted the issue and i stripped the
head off, it looks like each of the exhaust valves had made contact with the pistons, and number 4 was sat level with the head while all the other
three were about 1-2mm high so there was definitely a problem waiting to happen there.
Jason
Even with 1300 pistons for high compression and a performance cam I donít have any problems with valve/piston clearances . Has your engine been modified and not had the valve to piston clearances checked? It is possible to machine valve pockets in the pistons . Another possible problem could be valve timing, or extremely tight valve clearances.When I rebuilt my engine I set the cam timing very carefully to the manufacturers settings before refitting the head , then I used some thick solder wire through each plug hole under each valve in turn while rotating the crank to test for clearance . Some people use plasticine but I was being lazy not wanting to remove the head if I didnít need to . .
The internals look std to me and the other mechanic looking at them so the only part not checked now is the cam. I'll try and get a lift
measurement from it to see if that is std too.
Jason
I popped into the garage this afternoon to paint the newly welded headlight brackets, only to get the news I feared. The engine is in serious trouble.
The head needs serious work, the bearings look very tired so the crank may need a regrind and the can is shot so I'll need a new one of them
along with new followers, and while the pistons are out I might as well get new rings for them too.
so trying to look on the bright side, I did struggle to find one, At least the engine should be nice and strong, fairly std, but with new internals
and bearings and seals, also I'll be able to put unleaded straight in without more issues.
Jason
Now might be the ideal time to uprate the engine ? If the bores and pistons are worn maybe a rebore with 1300 pistons to increase compression , a performance cam kit correctly timed if you need a new cam and a modified head etc
Yeah, but I was trying to keep the costs down, but now the engine refurbishment will cost upto £1k.
For head repairs, refurbishment £500
New cam, £200 at least
Pistons need skimming to prevent the exhaust valve hitting them again.
Then it's bearings, rings and seals.
I'll be keeping the costs as low as possible to rebuilding it myself with guidance from the garage boss.
I had seen an upgraded head at £680, but thats just more money just before xmas that I can't avoid costs, so I can't get the upgrades at the
moment.
Jason
quote:
Originally posted by rusty nuts
Now might be the ideal time to uprate the engine ? If the bores and pistons are worn maybe a rebore with 1300 pistons to increase compression , a performance cam kit correctly timed if you need a new cam and a modified head etc
Iíve not had any experience modifying a x flow engine with small combustion chambers so I canít help with that one.,
No worries,
The engine is now stripped down, head off and the pistons and con rods are out and separated. The cam is the next one to be removed ready for the new
to me cam and for the new main and big end bearings also ready for when the pistons return from the machine shop skimming 25thou off the top off each
to ensure the exhaust valves don't make more contacts with the pistons. I've bought a refurbished head so should be delivered by Tuesday
15th so with any luck I might have all the bits back by that weekend so a rebuild could start.
Jason ( looking forward to a winter drive to the retest in Gillingham )
quote:
Originally posted by Deckman001
No worries,
The engine is now stripped down, head off and the pistons and con rods are out and separated. The cam is the next one to be removed ready for the new to me cam and for the new main and big end bearings also ready for when the pistons return from the machine shop skimming 25thou off the top off each to ensure the exhaust valves don't make more contacts with the pistons. I've bought a refurbished head so should be delivered by Tuesday 15th so with any luck I might have all the bits back by that weekend so a rebuild could start.
Jason ( looking forward to a winter drive to the retest in Gillingham )
quote:
Originally posted by rusty nuts
quote:
Originally posted by Deckman001
No worries,
The engine is now stripped down, head off and the pistons and con rods are out and separated. The cam is the next one to be removed ready for the new to me cam and for the new main and big end bearings also ready for when the pistons return from the machine shop skimming 25thou off the top off each to ensure the exhaust valves don't make more contacts with the pistons. I've bought a refurbished head so should be delivered by Tuesday 15th so with any luck I might have all the bits back by that weekend so a rebuild could start.
Jason ( looking forward to a winter drive to the retest in Gillingham )
Check the bearings are the correct size on the outer diameter, Fords apparently salvaged some blocks by line boring the main bearings oversize , so you can have undersized for the crank and oversize caps etc . The old bearings might be marked with the size? Iíve never come across it myself but an old workmate did in the early 70s
So, just a little engine rebuild update. The new cam is in along with new cam followers. The skimmed pistons have had the new rings installed
correctly and put onto the con rods, new big end bearings fitted and all installed.The cam has been timed up and set, it all turns over very nicely so
seals and covers will be next along with the oil pump and dizzy. Then it'll be oil pick up and sump, ready for the new head turning up next
week.
So all coming along nicely all be it slowly with limited time at the garage due to the time of year and work.
No pics as I can't upload them on here.
Jason
Yep the photo hosting fault on here is a real shame.
What cam did you go for in the end? Did you just line the dots up on the timing gears when timing?
Hi Ya, I went for a BCF2 with new followers. and yes I timed the cam with the dots lining up, we turned the engine over by hand a few times and
rechecked it, and it was still perfectly set up 
Jason
You may have been better off ignoring the timing marks and setting the timing using a dial gauge and degree wheel
FITTING
Hope the link works , if not have a look at Burtonpower for camshaft fitting and timing to get the best from the cam , ignore the timing marks on the
crank pulley unless you check it is accurate. I used a duplex vernier gear on mine but if you check it and find it is out offset cam keys are
available but I have in the past filed the slot in the sprocket and used shims to adjust the timing ( shim stock or old feeler gauge will work )
Jason,
Dialling the cam in using the dots is fine, you will be pretty close, but i do have a dial guage and 360 wheel, etc, if you want to do it properly,
You will be within a couple of degrees, with the dots,
You can still use the guage to verify, even with the head on, if you want to add some more of my garage tools to your collection !
steve
quote:
Originally posted by rusty nuts
You may have been better off ignoring the timing marks and setting the timing using a dial gauge and degree wheel
FITTING
Hope the link works , if not have a look at Burtonpower for camshaft fitting and timing to get the best from the cam , ignore the timing marks on the crank pulley unless you check it is accurate. I used a duplex vernier gear on mine but if you check it and find it is out offset cam keys are available but I have in the past filed the slot in the sprocket and used shims to adjust the timing ( shim stock or old feeler gauge will work )
Hmmm, interesting thoughts, I've been checking what I have done by asking each thing checked by my garage friend who is letting me keep my car
there on a ramp so I can lift the car up and work on the engine underneath it. He is my engine rebuild expert as he has already built lots of engines
and loves x/flows as they are so easy for him. I'll pass on the views when i pop back tomorrow to fit the sump and maybe the flywheel and clutch
, if so I'll get the engine back in just waiting for the new head and take it from there.
Thanks for your replies , all input is gratefully received.
Jason
I would recommend a competition sump gasket, the normal item is cork and tend to leak , my gasket has been used 3 times and is still oil tight
I would say the same, the cork sump and rocker gaskets are a bit one time only
How about an engine from something closer to this century? 
Lets get him through the process first, and then upograde
To a Pinto
hhahahahahahaha
Cheers guys,
Iv'e also just realised that I got my retest dates slightly out, I have to be retested by 14th April, so I may have a bit of time running in my
rebuilt engine as long as I can get it rebuilt and installed correctly and then it's just the emissions and self centring to sort before the
retest.
Then a few hundred miles on trade plates running it in I guess.

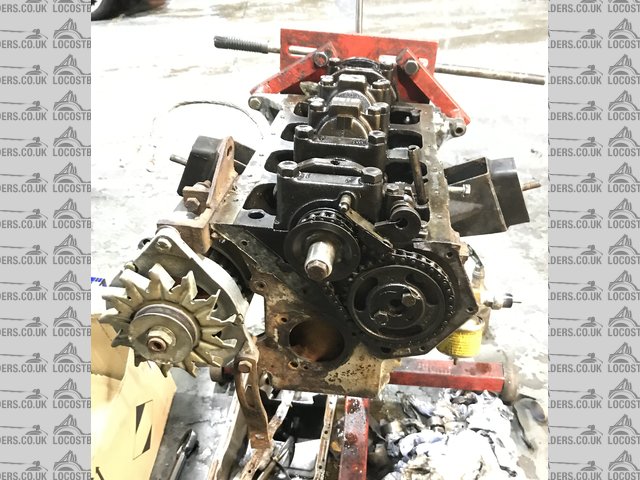
Description
Jason
[Edited on 3/1/21 by Deckman001]
Engine was out before Xmas

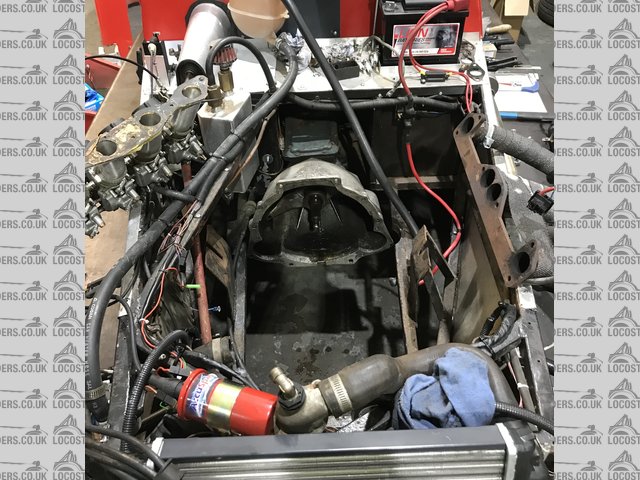
Description
But is now mostly back in apart from the head which should be delivered by mid week
Engine rebuilt and lifted back in apart from the head.

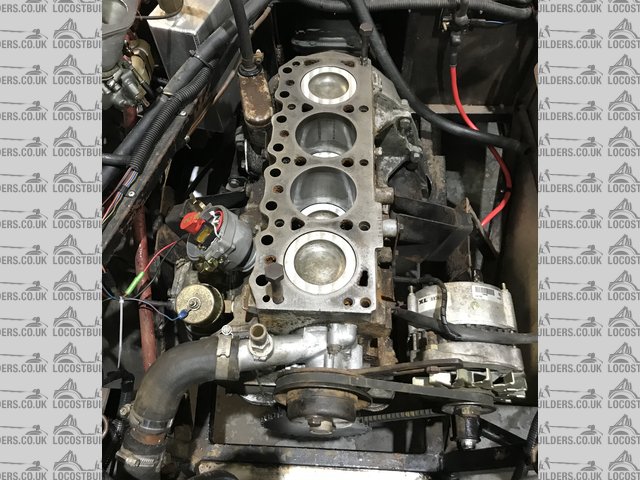
Description
quote:
Originally posted by steve m
Lets get him through the process first, and then upograde
To a Pinto
hhahahahahahaha

This engine rebuild will cost about £1k so I think I'll be keeping it for quite a while as it should live well.
Jason
Well, it's back together and is now running. slightly noisier than i expected, but my engine guy seams very happy with it running. Water pump was
leaking so that was taken off again and re-sealed, it's back on now with water and no more leaks showing. Am so happy to see no oil from around
the sump gaskets or seals 
It has also been 'timed' correctly at 10 degrees, it coughs and spits a bit on choke, but soon runs without it and is lovely and smooth now,
and picks up so quickly i couldn't stop smiling. It also now Barks from the exhaust!! (good job I've already passed the noise level checks
as IVA)
Jason
A new update after this weeks work on it.
The engine is now back together and water tight, a slight weep from around the rocker cover, but I can live with that at the moment.
I set up the head lights and then tried the emissions, sadly a thermostat wire had come loose and at the time of testing, it blew its nose and emptied
its water all over the mot station !! 
next visit let me sort the stat issue and re fill of the water works, then a pressure test showed where the water had exploded from, thankfully just a
re seating of a pipe needed on the thermostat housing and tightening of the jubilee clip once more cured the problem. So i fired it up again and found
that no.4 was running colder than the others by quite a lot and removing the plug lead didn't change the engine note. I borrowed an infared
thermostat and it showed the same on that exhaust manifold part. So engine water drained again and carbs off to inspect. Cleaned out no 4 and then
bathed each carbs jets in cleaner for an hour and then reassembled them but with no 4's jets in no 1. It started on the button and ran really
well until I twisted the throttle a few times seriously and then it started to burble again, so i checked the temps again of the manifold and low and
behold, no 1 was now playing up showing the same temp as no 4 was previously.
This time I couldn't be bothered to take the manifold off again so i took off the bowl of no.1 carbs and removed the idle jet. Took a while to
find anything small enough to get down the jet to try and clear it out, but with alternate poking and blasting with compressed air, it started to blow
through better. I repeated this a few time for good measure but couldn't get any more air through it so put it back in and reconnected the fuel
line and it fired up even better this time. I pulled over the emissions testing machine and the h/c were almost non existent !! but the c/o was three
times the limit, then over three or four adjustments, I have finally gotten a passable result with 283 h/c (1200 the limit) and 1.8 c/o (4.5 the
limit).


So next thing on the list is tracking and steering, although I have proven that the steering is light enough for a 7 so it looks like the geometry is
the issue and next week I'll be looking to get it set up on a laser set up as before, otherwise it'll mean either a new top wish bone on the
right, or cutting off the brackets and welding then back on a bit further back. Next week will be the tell tale last issues I hope before I can call
the test centre to see the testing situation.
Jason
A little tip for clearing jets without stripping the carbs , open the throttle so the engine revs then place the palm your hand over the carb inlet for a couple of seconds, the engine revs will drop, quickly remove your hand while holding the throttle open . Repeat if needed. The vacuum created often clears any blockage. Poking anything through a jet is likely to enlarge it.
quote:
Originally posted by rusty nuts
A little tip for clearing jets without stripping the carbs , open the throttle so the engine revs then place the palm your hand over the carb inlet for a couple of seconds, the engine revs will drop, quickly remove your hand while holding the throttle open . Repeat if needed. The vacuum created often clears any blockage. Poking anything through a jet is likely to enlarge it.
quote:
Originally posted by Deckman001
quote:
Originally posted by rusty nuts
A little tip for clearing jets without stripping the carbs , open the throttle so the engine revs then place the palm your hand over the carb inlet for a couple of seconds, the engine revs will drop, quickly remove your hand while holding the throttle open . Repeat if needed. The vacuum created often clears any blockage. Poking anything through a jet is likely to enlarge it.
Ahh, so that's why my engine guy was doing that, I thought he was just seeing if closing of any carb changed the engine tone. re poking something down the jet, I used very thin solder, so soft that it would deform, but it may be what dislodged the blockage, I still couldn't get any thing solid through the jet, just compressed air mainly so hopefully whatever I did to get it sorted is a permanent solution.
Jason
Cheers 
Just a thought, does anyone have a heater fitted for the cooler months? Seeing as I am now almost ready to do my retest, should i fit a heater for the
drive there and back during the winter, or should i just man up and accept the challenge of frozen fingers and face as a sacrifice ? 
Jason
I have a heater because I have a windscreen but as a heater you can hardly feel any heat while driving unless you put your hand to the vent. Ideally if I was building again I would look for a heated Caterham screen and just connect a hose from the inlet manifold to the water pump
Ah, fair enough, that's the second recommendation of no heater without a screen and side deflectors/doors :-(
I do have a motorbike helmet or racing fire proof helmet insert balaclava along with gloves and a motocross face shield that could help with cold
weather driving. I was thinking of a second reason for the heater to help warm up my speedo as when cold or damp, it stops showing the mileage
although it does keep the mileage recording to show again once warmed up/dried up.
It's using am M8 sensor from ETB connected through two spade connectors, but it appears that it shouldn't be in an open 7 type car
though.
Does anyone know if this is a stepper type speedo, so I could change the it to a more suitable type?
Jason
If the guage is an ETB guage then you can use a gearbox type sensor from Burton
https://www.burtonpower.com/ford-electronic-speedo-sensor-revfss.html
It works well with my t9 box and speedo.
quote:
Originally posted by Schrodinger
If the guage is an ETB guage then you can use a gearbox type sensor from Burton https://www.burtonpower.com/ford-electronic-speedo-sensor-revfss.html
It works well with my t9 box and speedo.
quote:
Originally posted by Schrodinger
If the guage is an ETB guage then you can use a gearbox type sensor from Burton https://www.burtonpower.com/ford-electronic-speedo-sensor-revfss.html
It works well with my t9 box and speedo.
Jason,
I had a heater in my 7 for the first year or so, but it was never that successful, so all ripped out,
what improved all round comfort was a good couple of layers on, and a wooley hat!
Also, with the split toneau and a small side cover for your right arm, it can get quite cosy from the waist down
But driving a 7 in the winter, the rain, cold, etc, is quite a miserable hobby, and these cars are so light, that even with excellent tyres, traction
can be tricky
steve
Cheers Steve, my main problem is just the timing of a re test at some point soon so a very wintertime drive down to Gillingham Kent hopefully
Jason
Just a thought Steve, do you have a copy of the front suspension geometry I could have as I want to check the front right for correctness and I donít
have a copy of the book anymore.
Jason
[Edited on 17/1/21 by Deckman001]
Ive just emailed what i think you needed
Cheers Steve,
Itís very much appreciated 😊
Jason
Hi all,
I have finished all the jobs I can and am very pleased with it so far. The two jobs left are being done by the MOT center owner, the geometry set up
to check the self centering, and a little bit of welding to tidy up some pre-welded brackets please the IVA tester. then it's another quick check
of the emissions along with a head light alignment check. Sadly though, he has been instructed to self isolate so fingers crossed he'll be fine
in a week or so.
Jason
Just thought I'd set myself up, I failed the original test and the general list is far above. I then did the retest and failed again, this time
my speedo stopped working, and the steering was too stiff resulting in the car not self centreing again. Turns out the bottom ball joins were seized,
the rack was a bit too dry, the steering column was also dry and the angle between the steering column and the rack was extreme. So I have replaced
the lower ball joints, pumped grease back into the rack, made sure the steering column is greased up nicely so smooth, and i have reduced the angle
between it and the rack.
I have made sure that the steering is now a lot easier to turn and even quite smooth, I have now put the car on a laser level set up and all settings
are green apart from an amber on one of them so am very very happy to test it again.
The speedo, was another issue, I had fitted the sender too near the front of the prop shaft and there is a slight oscillation of it resulting in bad
readings, I have moved it further back and along with rewiring the speedo removing some excess cable and joints near the connection and it now is very
smooth and seams to work exactly as it should. Happy days, I can now start to relax about the retest for a few days anyway.
Jason
Which steering column are you using? If it is a Sierra item it is possible to change the plastic column bush where it goes through the bulk head witha self aligning bearing which makes the steering even easier and helps with the self centering. Av ailable from Simply Bearings , just use the center part of the bush reducing the outer diameter to fit through the bearing . Think its been covered on here ?
Yeah it's a sierra one, I've put grease around the top bearing, the spring area below that as well as around that plastic bush through the
rubber grommet, I can now turn the threaded section by hand so hopefully it's now a low free'r 
The rack was a bit dry so I also re-greased that too, and with the new lower ball joint, with the wheels off the ground I can turn the steering wheel
by a finger instead of two hands needed 
It has now been set up on a digital laser set up as a 94-2011 cat supersport so hopefully it's the same age as my car so hopefully it's very
similar set ups 
Just a thought, anyone know which Caterham is of similar design and sizes as a locost ? Am thinking about windscreen and door sizes?
Jason
[Edited on 11/4/21 by Deckman001]
https://nw.rhocar.org/supporting_the_steering_shaft.htm
Have a look at the link. Made a huge difference to my steering effort and self centering
T'is a shame I didn't see this before, I've sadly not got enough time to change what i have so am going to keep my fingers crossed for
the final test attempt I can do.
Jason
Happy days, It Passed today at the retest !!!


So next job is to register it, so a few more hoops to get through based on the donor vehicle being a '77 plate, but the engine turned out to be a
'79 so it won't be a straight forward exercise.
Many thanks for everyone's help with getting my kit car to this stage, hopefully we will all get out soon in 7's and other kitcars for a
breakfast run somewhere.
Jason

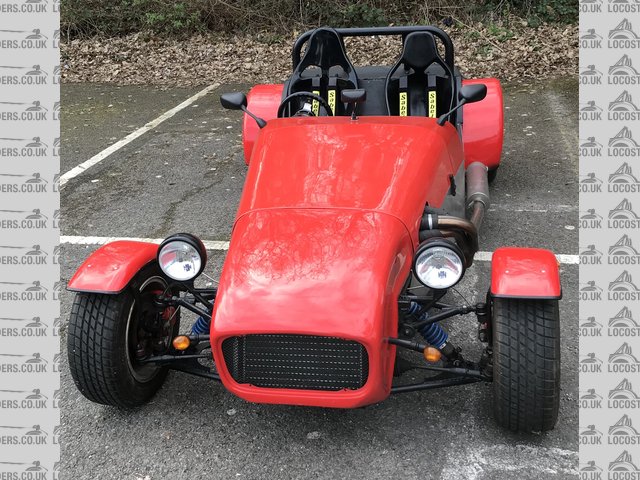
Description
My car, sat at the IVA waiting area 
quote:
Originally posted by rusty nuts
Even with 1300 pistons for high compression and a performance cam I donít have any problems with valve/piston clearances . Has your engine been modified and not had the valve to piston clearances checked? It is possible to machine valve pockets in the pistons . Another possible problem could be valve timing, or extremely tight valve clearances.When I rebuilt my engine I set the cam timing very carefully to the manufacturers settings before refitting the head , then I used some thick solder wire through each plug hole under each valve in turn while rotating the crank to test for clearance . Some people use plasticine but I was being lazy not wanting to remove the head if I didnít need to . .
Good question, I am waiting to get the pistons back as well as the refurbished head at the same time, but I am intending to fit the pistons first and
then check for valve clearances based on the assessed can valve lift declarations so that I can measure the assumed clearance before I re fit the
engine bottom end and then build it up back into operational mode. Hopefully it will also be normally less noisy now too.
Jason