
Hello!
Going to do a build diary here with a wee difference. Its all getting filmed!
The plan is to make a very budget MX5 based classic 7.
First stint of it was breaking up the MX5, episode can be found here:
https://www.youtube.com/watch?v=7zdq-m6xq7k
[youtube]https://www.youtube.com/watch?v=7zdq-m6xq7k[/youtube]
Seems the Youtube embed feature isnt working?
[Edited on 7/9/20 by thetankwad]
you only need the "7zdq-m6xq7k" part of the link
Superb, thanks for the help dude!
Thanks for posting... Good project lookng foward to the vids..
Subscribed also, this could be fun. Good luck with the build. Hope it goes smoother and quicker than mine. 👍
Thanks guys! Powering into Episode 2 now. We did a TVR resto shortly before which we put an episode a week out on. Understandably we may not hit that level of footage with this one but we hope to have some regular stuff on it!
subscribed. Looking forward to it.
Good stuff! Subscribed
Great topic and video, will look forward to updates
Keep up the great work.
Jason
Very entertaining, look forward to the next episodes
One thing I'd say watching that rather heart stopping vid is put a block of soft wood on your axle stand pad between it and the bodywork or
anything your else your lifting.
Metal on metal is very very slippery and there is no way I'd have went under the car as they had it there, worse still it was sitting at quite an
angle too and the front stands right at their full extent, barely touching the car! Not trying to be critical but I've had a few scares over the
years and cars fall faster than you can move out the way (and they don't always fall straight down either).
I know it's all very busy and exciting but just take a moment now and again, stand back and look at what your doing and think to yourself
"is that safe??" So please use wood next time and we might get to the final episode 

[Edited on 10/9/20 by Mr Whippy]
Thanks so much to all for the replies, glad this will be of interest.
Mr Whippy, I would never baulk at a safety comment, as you say often its an unobserved issue that can catch you out. That is a very good point and
something I hadn't considered. Thank you for that, it will be remedied in future!
I used to know a guy who had his hand underneath a brake disc when the car came down so it was trapped between the disc and the concrete... that was
fun! 
quote:
Originally posted by James
I used to know a guy who had his hand underneath a brake disc when the car came down so it was trapped between the disc and the concrete... that was fun!
Quick update, we have the MX5 stripped and put aside, and we are knocking up a bench to start the welding. Steel is on order so its full steam
ahead.
I'd like to think we will have the next episode up in a week or 2.
Well done guys, keep it up as we like the update videos.
Jason
quote:
Originally posted by Mr Whippy
One thing I'd say watching that rather heart stopping vid is put a block of soft wood on your axle stand pad between it and the bodywork or anything your else your lifting.
Metal on metal is very very slippery

Quick update, I have been very very busy between this build and all the other nonsense that comes with running a car channel on youtube. Those who
have subscribed will note that this isn't the only project I have on the go at the moment. FEAR NOT! It has not been forgotten, and this Friday
the next instalment goes live. Link for that can be found here:
In typical project style, most of this is covering the actual prep needed rather than any of the build, so we are getting our house in order and ready
for welding up a chassis. Few useful tips and we knock up the bench for welding here.
[Edited on 5/10/20 by thetankwad]
[Edited on 5/10/20 by thetankwad]
quote:
Originally posted by thetankwad
quote:
Originally posted by James
I used to know a guy who had his hand underneath a brake disc when the car came down so it was trapped between the disc and the concrete... that was fun!
I bet. Sounds horrific!
We have all taken our eyes off the ball. I remember using an airgun to take a long bolt out from underneath a car, running the bolt out and the thread acting against the gun and pinching my knuckles between the gun and the floor. Seems like such an unlikely thing to happen but there we go! Luckily it was easily resolved by just gunning the bolt back in.
One of the first things I was taught as an appretice tractor mechanic in 1960 something was never put any part of yourself under a vehicle without TWO means of support - one of those with cars was to put the wheel you have just taken off under the car - and that would make 3 means of support!
Morning all! Its Sunday so time for an update.
As promised, we start welding in this episodes. We certainly don't finish it though....
I love this series of videos - but I am REALLY struggling with the accent sometimes! Of course, this is my problem, not yours... but you'd think with a brother who lives in Dornock that I'd be better at understanding the accent by now!
quote:
Originally posted by David Jenkins
I love this series of videos - but I am REALLY struggling with the accent sometimes! Of course, this is my problem, not yours... but you'd think with a brother who lives in Dornock that I'd be better at understanding the accent by now!
quote:
Originally posted by thetankwad
Sorry dude. Believe it or not we do slow down the chat and try to speak clearer. Its usually worse than that!!
quote:
Originally posted by David Jenkins
quote:
Originally posted by thetankwad
Sorry dude. Believe it or not we do slow down the chat and try to speak clearer. Its usually worse than that!!
One year we drove up to visit my brother when he lived near Inverness. First time I'd driven up. I pulled into a BP garage on the outskirts of
Glasgow to top up before the next leg. Filled up and went to pay - guy behind the counter said "Hurra hur eh hur a hur" and pointed at the
card machine. So I put my card in and put in the numbers. Then he said "Heh hurra hur a hurhur" so I took my card out and walked away. I
still have no idea what he said, but at least he pointed to the appropriate device...
But don't take it personally, as I love accents of all descriptions. Last time we were up there we went into Glasgow itself, and had nae bother!
quote:
Originally posted by David Jenkins
One year we drove up to visit my brother when he lived near Inverness. First time I'd driven up. I pulled into a BP garage on the outskirts of Glasgow to top up before the next leg. Filled up and went to pay - guy behind the counter said "Hurra hur eh hur a hur" and pointed at the card machine. So I put my card in and put in the numbers. Then he said "Heh hurra hur a hurhur" so I took my card out and walked away. I still have no idea what he said, but at least he pointed to the appropriate device...
But don't take it personally, as I love accents of all descriptions. Last time we were up there we went into Glasgow itself, and had nae bother!
I'm loving these videos!
I remember going through the same sort of pain and frustration when I made my chassis - although I didn't have a squeaky toy to cover up the
swearing... 
Though I'm jealous of all the build space you've got - this is where I built mine:
Brilliant! You've really shown the reality of making your own chassis, it should be obligatory viewing for anyone who hasn't done one before
who thinks a) its easy and b) that they are going to make one
I know it's not the 7-up project - but their latest MR2 project video made me laugh... I must get a squeaky toy...
Another weekend, another update!
Wee festive update for you guys.
Don't worry, no mention of Christmas in here at all.
Enjoy.
Coming along nicely!
All books and plans seem to have some anomalies that you won't notice until it's too late!
Hopefully that rear bar being lower won't get in the way of the propshaft and/or diff?
quote:
Originally posted by christim
Coming along nicely!
All books and plans seem to have some anomalies that you won't notice until it's too late!
Hopefully that rear bar being lower won't get in the way of the propshaft and/or diff?
Another weekend, another update!
Another wee update for you guys. Episode 12 already!
Still making me giggle...
Glad to hear it!!
Hi, just a very quick heads up, when you fit your seat on top of the bottom rails you'll need to move up the upper seat belt mounts by the same
amount to pass an IVA test.
I used f/glass seats bolted straight to the steel sheet floor panel, I then fitted the seat belt mount eyes straight to the rail behind the seats and
the tester said they were at a perfect height, and any lower would have been a fail, so just be careful to asses the mounting points based on the IVA
test.
It's a fantastic watch on youtube, many thanks for the very enjoyable videos
Jason
quote:
Originally posted by Deckman001
Hi, just a very quick heads up, when you fit your seat on top of the bottom rails you'll need to move up the upper seat belt mounts by the same amount to pass an IVA test.
I used f/glass seats bolted straight to the steel sheet floor panel, I then fitted the seat belt mount eyes straight to the rail behind the seats and the tester said they were at a perfect height, and any lower would have been a fail, so just be careful to asses the mounting points based on the IVA test.
It's a fantastic watch on youtube, many thanks for the very enjoyable videos
Jason
Had a few things to do in life so apologies for the delay!
Getting into some proper fab work now...
Hi ya, great watch once again, As usual I'm late again but you can use a dual master cylinder pedal box as I have just passed IVA with one. It
would allow you to get the exact brake balance you want, and then you just need to lock the nuts on the bias bar with split pins and put a disclaimer
sticker in the engine bay stating not to alter the balance
Keep up the great work though guys, it'll be the new ' go to ' media for anyone building a similar car
Jason
quote:
Originally posted by Deckman001
Hi ya, great watch once again, As usual I'm late again but you can use a dual master cylinder pedal box as I have just passed IVA with one. It would allow you to get the exact brake balance you want, and then you just need to lock the nuts on the bias bar with split pins and put a disclaimer sticker in the engine bay stating not to alter the balance
Keep up the great work though guys, it'll be the new ' go to ' media for anyone building a similar car
Jason
Yeah very true, I got the bias system to make sure the brake system could be modified to make sure the braking bias was perfect and then locked. For
anyone else doing the same, remember to lock off the lock nuts as well as put a sticker near the brake fill up point saying do not alter the brake
balance.
Jason
Here's our latest update guys. The Locost is currently packed up due to a unit move. Hoping to be in properly for the end of this month, and we
have some new bits bought that should push the project on nicely!
Hi guys,
I noticed on a very recent video of yours doing the exhaust that it was cut to length when fitted, but your rear arches aren't fitted, so it may
be worth a trial fit again to make sure it all clears ok.
I posted on one of your videos but just wanted to say again, this video series you are doing has rekindled my desire to build a car. I first started about 20 years but then other interests of the female variety took over. 😂 I�m sure many here can relate. I�ve found I have some spare time now and have been looking for a decent long term project. Last week I made a start by buying a scrap MX5 which I�ve just got in the garage today. This evening / tomorrow I�ll start to strip the body off it. Can�t wait for the next instalment. Keep up the good work!
Shamefully, and hopefully not to the detriment of this thread too far, I have taken my eye off the ball on updates here. So much so, we are around
episode 90 of this. For the purposes of the story and keeping the thread coherent as a full timeline, I might just keep the links going and update
here unless any mods object?
In the meantime, here's where we got to as of today...

Car looks excellent - although the roll bar looks a little tall.
Do you have any pictures of your headlight mounting?
I can do better... I have many many videos!
The roll bar is high to clear me and a helmet. It will look better once the rest goes in and the front tapers down..
Watched the first random video, and straight onto the second. Love the videos / format / presentation.
I'll get back into updating this thread then, hopefully one a day wont overload you guys too much. Something that will become VERY clear over the
course of the build but starts to creep in around this points is...
DIVERSIONS. I absolutely love a diversion. I am a diversion tart.
I am also a "for sale page", "auction site" and basically any other method for wasting money I do not have tart. So the positive
thing about building a project on this scale is, when boredom browsing for parts begins, you can still make sure you are funnelling spurious
unnecessary parts in for a common goal, rather than just buying bumf for projects you will never start. That being said, the decision to buy an entire
bodyshell for this when there wasn't a single aluminium panel or paint droplet on the chassis was a bold one.
My argument, as most will agree with, was that it was too cheap to refuse. Well, stay tuned folks, because this purchase bites me in the Arsen Wenger
for many more episodes in ways you wouldn't believe....
[Edited on 2/4/25 by thetankwad]
[Edited on 2/4/25 by thetankwad]
[Edited on 2/4/25 by thetankwad]
Lets get this out the way. Sometimes when you do Youtube, you sell yourself into things for the sake of success. In this instance it was leggings.
Skinny men do this un-ironically. I should not. Lets leave it there.
Anyway, suspension brackets were more or less the order of the day here, along with some catch up. You probably noticed an entire garage change an
episode or 2 ago. That knocked the flow quite a bit on the car, and sapped a LOT of time getting back up to speed....
So with a more or less completed frame, sheeting sections in aluminium is the next order of the day. Ultimately, I had none of the required materials
to do so, but a motivation to kick this phase of the project off and provide some form of update. Enter the road sign, an airbag discharge, and
general nonsense that was informative but did little to move things forward:
...that's unfair. It covered a lot of the theory we will skip by when blitzing the floor. I'm sure that a few of you have tried something
that you haven't worked with before so kick off a trial run that you KNOW will end up in the bin anyway!
[Edited on 4/4/25 by thetankwad]
Settling into the new gaff, with more or less all the kit available to fabricate that I had before, I could jump back into the wishbones.
As you will know when building a project like this you need to target "small wins". For example, even stripping an MX5 for its donor bits is
a challenge, so targeting that for completion was step one. Then, having a fully fabricated chassis. Step two. Every time you hit that win it
motivates you to move to the next, and before you know it, 4 years later the car still isn't finished! (rofl).
My motivation at this point was to lose the axle stands. The chassis on wheels was the target, if only to hit it and move onto the next one. Anyway,
the rear arms were a bit of a missing thing, so uppers were started first!
So another milestone reached, this actually came before the chassis standing on its own feet. I had been using 2 sources for the build, obviously the
Ron Champion / Haynes book "How to build a sportscar..." and "Vodou" for scratch building a chassis.
Now the logic with the Vodou plan was it came with a whole raft of drawings, guides for cuts / angles / lengths, and also arms. All of this suited an
MX5 too, so was a perfect basis. It failed, however, at providing anything beyond a rolling chassis. I figured using the teachings within the Haynes
for the wider areas should bridge the gap nicely. Naturally, this was a load of mis founded nonsense and bit me swiftly in the arse down the line.
So the milestone? I had completed the Vodou plans as soon as the lower rear arms were completed, and thus my "Big Bible of Bollocks" was
required no longer!
With all 4 corners not fabricated, the test fit had to happen!
Arms on, and fully understanding the challenges that would be presented for the next step. Mostly fitting new parts (reusing joints etc was never on
the agenda, despite how cheap the target was. I wasn't skimping on my safety) and refurbing the tougher elements such as uprights.
For your reference, I obviously filmed these a LONG time ago and simply haven't updated the thread, and this is mostly an exercise in thread
tidying! That being said, short of the thumbnail there is almost no context for ME by this point either on what happened in each episode, so I have
had to re-watch each episode for each post as we go. The interesting thing I have noticed is the complete disparity in quality between what I THOUGHT
was a well polished production by Episode 24 and where I am now. The audio is not great, and I had acknowledged that at the time (Budget just
didn't allow better mics), but it is interesting to have that magnifying glass to look back in time and go "ahhh, you weren't as slick
as you thought"... Something I imagine would apply to many facets in life, not just video production!
I had more hair too.
I guess the big annoyance for me is, the start of the series wont match the end. Then again, its now over 80 episodes long so I doubt anything matches
over that timeframe. Even The Simpsons ran out of humour given long enough seasons.
So getting the wheels on was no small feat. There were a couple of significant hurdles to resolve, 2 of which were worth particular note:
1. The front rack being of Smart Car origin needed a significant amount of fudgery to extend its reach whilst negating bumpsteer. This required the
fabrication of extenders, which get covered in this episode.
2. Also covered here was the rear mounting of uprights, namely that the lower bolt for an MX5 was not in fact the diameter that the bushes were, and
as such that the arms were designed for. Out of all the options available, I took what seemed to be the engineering meatiest.
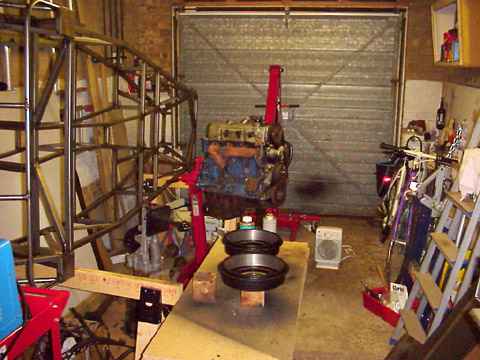
Excuse the misleading clickbait thumbnail. The engine was "placed" in, but the problem with thumbnails is they demand a snapshot that
summarises an episode and entices people in to watch a video (more often than not on a false premise) and rarely does the video you have made justice.
I still struggle with the concept today, and I suspect it is one of the biggest nooses around the Toolsntrack neck. Anyway....
The engine does get fitted, if only to prove it will physically occupy the space. This time was a strange little ghostland between completing a
chassis and realising you still need to do everything else... a bit like trudging up a mountain, reaching what you feel is a summit and cresting it,
only to discover you have 5/6ths of a mountain to go as you get over the crest...
Also, the weight of content production was starting to show. You see, much like the thumbnail chat, you really need to pick a subject and complete it
start to finish in one episode. That is nigh on impossible when building a car at the same time as trying to put an episode out every week. In the end
I gave myself breathing space by working on other cars, filming that too and taking more time to polish this content. Then everyone moaned that I was
not focusing on the Locost enough. Ho Hum.
So in this segment we explore suspension options at the same time as trial fitting an engine. 2 tasks that always go hand in hand!
Test post
I remember, around 15 years ago, I was reading build threads and thinking "these are brilliant, pictured records of your whole build! They are so
much neater than those scabby polaroid books you see crusty old MG drivers dish out at car shows to prove their resto was documented" and
promptly joined up on here 25 years ago to fail in that challenge completely. Years later, I continued the exploration onto video and again, I though
having a documented video diary of every single thing you do to a car?? How unbelievably useful!. Well, almost...
The key to both of those things having tangible use is an index. With no way of quickly finding the referenced information you need, you will have a
very VERY long slog hunting your evidence for that little bit of info.
Now, dear reader, we come to the truth behind the sudden updating of this thread. You see, as of today I am rendering the guts of episode 93, so
without giving much away there has been significant progress. But I have also uncovered issues, and as you can imagine, some form of documented
evidence of what the bloody hell I did wrong would save a lot of time, wouldn't it?
I have finally stumbled on the snippet I was hunting through all these poorly indexed (pish thumbnails, wishy washy titles) video archives for. Its
the suspension pick up points...
You see, I do not trust that I have correctly installed them. Well, I spent a staggering amount of time explaining my measurements for installing
them, didn't I? Yes, but that was the lateral location, wasn't it? The side to side. The location that almost makes zero difference if its
correct or not. The critical measurement would be the "inside to outside" one, the measurement that would HEAVILY dictate the ride height of
the car. That would be a useful one to discuss. Did I go into that?
Did I 'eck
[Edited on 23/4/25 by thetankwad]
Measure twice... cut once.
Remember when I went and bought Westfield bodywork? That was because its for a 7 platform and all those wee cars are basically the same, right? No
need to ask anyone on here if this would bolt straight on with no drama, right?
Nope.
In what would become the most staggering diversion for the sake of blind perseverance ever known to a project build, this is the start of the bodywork
saga. At least the prop got more or less addressed here, and we started on sorting the driveshafts (which now I have rewatched, I have forgotten about
and since done again.... I did wonder why they seemed so fresh).
Having lamented the bodywork, I should caveat that the nosecone actually works just fine. Sized up, it aligned with the chassis OK, and the wee Honda
Civic rad I elected to use sat snug within its boundaries. Also, in a rare feat for me, we started and finished ONE TASK in one episode... mounting
the radiator:
That's a lie, we still had to tie in the top mount for the rad and gusset the lower mounts, but the thinking was there! Also, whilst not part of
mounting a radiator, the nosecone mounts were established at this point too.
[Edited on 28/4/25 by thetankwad]
How pertinent, the Christmas episode! After all, it is May. Also incorrect is the bit in this where I hit episode 30 and think we are halfway (as I
write I am working on episode 93).
So what made it Christmassy? Well much like tonight when I go to the same place in the same weather to continue work on the same car, it was cold.
DAMN cold. To this day we still have not sorted a proper heating strategy.
I would be writing the exact words I speak in the first 3 minutes of the video, namely a project recap and overview of where we have got to. If you
skim read this, then THIS episode if a good jumping point to start following the build on and get up to speed quickly. Also, I started to sit up and
take notice of the sound issues that had been plaguing the videos prior to now. At this point it was manually adjusting EVERY scene to optimise the
quality based off of what I had recorded with the mic on the phone, but it IS better. The mics that followed naturally solved this completely.
Given the overview nature of the episode, it seemed a good time to dive into the Westy bodywork I had bought, and why it was more or less a binfire.
Fear not, I had many gallons of petrol to use to put said fire out.
Time for a new target. With an engine in a car (Can you call it a car at this stage? Still feels like a glorified pile of steel ) it seemed sensible
to aim towards firing it up, and addressing all the issues preventing that from happening.
One huge glaring issue was the alternator. Due to the route taken by the steering column, this would directly intrude on the location the alternator
had on the engine. Now, sensible head may suggest amending the route for the shaft or investigating the reason for this. I know, with little doubt,
that the intrusion is due to the particularly narrow rack I have selected. Because of the stumpy nature, the steering shaft input is very close to the
centre of the car, taking the column fairly close to the engine. I *had* tried to dial that out by aiming the shaft lower, almost to the floor of the
car then canting back up to intercept the rack, but to no avail.
There would also be the possible solution of adding a second UJ and rerouting it, however I wasn't keen on that for a wide variety of reasons,
mostly that the more UJs a rack has, the more slop and indirect feeling it can introduce. Not to mention, for amateur-face here, it is another
opportunity for a mistake.
So the better option was to shift the alternator. With the power steering now gone, we have a lot of space where a pump once lived, so with little
more justification than that, plans were afoot.
Whilst not specifically needed for a first start, installing the handbrake was a nice, bite-sized task. I suppose if the engine was running the car
should be secured, so this was kinda needed. In all honestly, I was sick of tripping over the lever and worried I'd end up forgetting to
accommodate the lever on the car and end up with some unpleasant and "kit car" looking solution.
Fresh out of a TVR and remembering the titan levels of forearm and wrist strength needed to get that afterthought of a handbrake to bite, I wanted to
pre-engineer in some improvements. The lever is canted on its axis towards the driver to allow for more ergonomic action. Did that sound convincing?
Its actually canted to make sure the cable will clear the propshaft with zero chance of a slack assembly falling down and rubbing it. Looking back on
what I filmed, it reminds me of the wildly over-engineered solution I made. I think you could lift the car with the handbrake if required.
Also included, radiator top bracket. Again, wildly overcomplicated for a simple task but having sacrificed many overpriced alloy radiatorss to the
gods of poor mounting and excess flex causing the tanks to rupture, I wanted a robust lock for it.
In another seldom found moment, the fuel tank was a single episode resolution. Whilst I do like to challenge myself a bit from time to time, the
scratch fabrication of a tank carried too much risk for little reward, plus owning no TIG welder meant that I would be hampered considerably by
material choice. As luck would have it, most "universal" tank designs seem to be based on seven style fuel tanks anyway, or perhaps seven
tanks are always so simple a universal design works. Either way, further savings were found by grabbing a used one.
Naturally, this developed into a drama as the used one was for a carb car and mine was injection, but it wasn't a show stopper. What did
frequently stop shows was the continued shin-denting on those strap locking tabs.....
And now we move onto one of the most over-done, poorly thought out and embarrassingly incorrect components I have made for the car.
In my defence, I made this way to soon as I needed to shut the bloody thing up for a test run. That said, I had a mounted engine and a pretty good
idea of the shape it needed to be, given that I had the profile the car would be and the manifold that I retained.
I wont give away spoilers as to what caused ALL the exhaust issues, but I'll let you guess. All the same, I think revision 1 came out looking OK
for a test mock up!
With enough built in the car to make it run without putting the fear into me, it was time to make that happen. One key point to note on my skillset.
Engineery fabricatey mechanical stuff is my forte. Electrical guff, not so much. So to circumvent the high likelihood of a project stall or even
abandonment with the electrical part of it, I opted to rip the ENTIRE mx5 loom out with the donor, and ensure that what I had taken still made the
lump of donor parts start. See episode 1-3.
The logic there was that I could chuck all of that at the chassis, tidy as I went and thin it out as the car got built, but at a minimum be able to
start and engine once it was in a car. Obviously, this didn't happen.
What now follows is a squad of Scotsmen try to get and engine to crank, which even by my standards should be a fairly simple task.
I decided to keep this episode focused on the thinking (or lack of) that goes into solving this issue when the above function doesn't happen. In
my mind this would have been vaguely educational, but what happened instead was frankly nonsense, hilarity and general tomfoolery. Its worth a look
for the comedy alone.
What made me giggle was that the YouTube video came up with subtitles on...
(Only joking - I love to hear accents from all over the UK and if I can't understand them it's my problem, not theirs.)
quote:
Originally posted by David Jenkins
What made me giggle was that the YouTube video came up with subtitles on...
(Only joking - I love to hear accents from all over the UK and if I can't understand them it's my problem, not theirs.)
Having trimmed and bodged the loom to a place where I can actually understand what's doing what, it became easier to jerry rig up a test fire.
This is a handy wee run through on how to make such a thing happen now I think about it.
Every time I manage to hit one of these milestones, such as this "first start" one, I always taint it by discovering so many things that
need done as a consequence, or rather a chance of discovery following the event. Its took me a while to get over being disheartened by that. As you
can see, even here I have a whole host of reasons why the engine wont run right. I remember not long after filming it I was ready to buy another
project car (this is my go to solution to any problem... buy a different one) but the handy thing about doing the YouTube stuff is the accountability
it provides. I cant just walk away because then its just another failed build very publicly displayed to the world. Well, I think even today this vid
has had 3 to 4k views so whilst 4000 people would seem a lot, its barely a drop in the YT oven so "public" is a stretch, but still...

I've started so I'll finish it.
The key to finishing a car is a damn good list. Conscious that the obvious stuff was ... obvious, I decided to focus on the unknown unknowns and
started to delve into the annoying issues that "off book" 7 building presented. The clutch was a belter, as the MX5 slave cylinder design
has not really been accounted for in any kit adaptation, as the throw puts it right into a chassis member. The long and short of this is substantial
mods will follow.
Side note, around halfway through this video my facial hair changes. That was not a fashion choice. I messed up trimming my beard and basically
"balded" one cheek. Around 5 years from now that look will be the in thing. You heard it here first.
So with an engine check fit out the way, the big elephant of multiple occupancy was the clutch. I'm sure going inboard slave or some other high
cost solution would have resolved this issue with ease, but I have an ace up my sleeve.. the fact the car is half built.
The solution with the least wallet impact was to simply notch a space in the chassis to allow the slave to throw with no obstruction. Simple in
principle, but the removal area would be a huge structural member so that strength would need to be re-added, and in my "clydebuilt" over
engineer-y head, that meant adding with twice the strength to be very sure it wouldn't cause an issue.
So onto the floors. As the flooring and general "unseen" panelling of the car was fairly basic in its flat nature, I took the opportunity to
go a bit off piste.
Normally a thick grade of steel or thicker aluminium is favoured by fellow 7 builders, with basic riveting to complete. I opted for something a bit
spicier, and went with 6082 aluminium. Now, I call this "aircraft grade" a lot in the video and didn't really want to bog down in the
technicality of it too much lest the vast majority of viewers got bored and fell asleep, but the principle was this...
6061 is the common grade used in automotive applications, (Audi use it for the A8 and such) and its good. 6082 has a higher tensile strength at the
compromise of formability. 4mm thick flooring in the above, properly riveted and bonded would be as light as 1.6mm steel sheeting, but actually going
beyond the usual steel levels in improving rigidity, whilst also resisting corrosion. The only downside to 6082 was the lack of bend, but as the panel
sections were all flat this was of little concern.
I actually found myself looking forward to the simplicity of flooring and panelling the chassis, as it was all flat sections and would be simple to
do.... right?
Wrong.
So first up, overlaps. I was quite impressed I considered this well before making the mistake (not like me to manage that!). The potential for
riveting (AND bonding) one panel in and that closing a route to access another panel for the same treatment was high in a number of cases, so a
considered approach was needed.
Second, have you ever riveted more than 10 rivets on the go? By hand? With the CHEAP rivet tools? Take my sage advice, at least get the scissor action
one, or do as so many comments on the video suggest: Get an air powered one.
So with the lions share of the aloominum panelling sorted, it was time to revisit the contentious "other bodywork", namely that damned
Westfield body set. Remember that from the previous page? Lets get into why this was a mistake...
Having had a stab at the relatively simple task of widening the scuttle, it was time to stretch the bonnet (hood, for the yanks) to meet it. To this
day, I have my doubts over that bonnet....
Behind the scenes insight: I really reeeeeally struggled to believe that the bodywork stuff would be interesting. I don't find it interesting,
plus I do NOT really know what I am doing with glass fibre. Therefor, it stands to reason that filming it for presentation to the masses would be a
risky process. As a result, I often drop in segments of smaller jobs to break that up, such as in this episode sorting the handbrake cable mounts.
I have, however, learned a lot from this fibreglass crash course. And by learn a lot, I know a bit more than the inevitable "don't work with
fibreglass" you'd expect me to say. Whether that means we try a round 2 on the body remains to be seen.
Continuing on the body fun, and with the biggest headscratcher (the rear clamshell) still to be butchered, the chopping devices come out.
A big slice down the middle was my hope to resolve. HOWEVER, obviously not. The differences between Westy and Locost is massive. Sides, width, you
name it. This quickly becomes a plan for major surgery.
Has this really been a simpler plan over just scratch building the rear panelling? Still undecided, but its a close one. I guess I was lucky that the
last of the chassis metalwork could be fabricated to match the clamshell rather than the other way around, as this would have surely scrapped its use.